User manual
Page 3
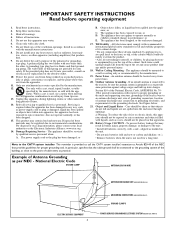
... specified by applying excessive pull force to an antenna discharge unit, size of grounding connectors, location of the polarized or groundingtype plug. All televisions must comply with the manufacturers instructions. 8. Example of time. 14. Read these instructions. 3. Follow all warnings. 4. Do not block any... up static charges. If an outside antenna is connected to rain or moisture, does not operate normally, or has been dropped. 15. Care should be sure the antenna system is damaged, liquid has been spilled or objects have fallen, or liquid has been spilled...
... specified by applying excessive pull force to an antenna discharge unit, size of grounding connectors, location of the polarized or groundingtype plug. All televisions must comply with the manufacturers instructions. 8. Example of time. 14. Read these instructions. 3. Follow all warnings. 4. Do not block any... up static charges. If an outside antenna is connected to rain or moisture, does not operate normally, or has been dropped. 15. Care should be sure the antenna system is damaged, liquid has been spilled or objects have fallen, or liquid has been spilled...
User manual
Page 4
...be present on the inside of the VESA cover (see diagram below). To read information, open the VESA cover. POSITIONING THE LCD TELEVISON • Place the LCD TV on the right way of tightening of the screw of the stand to the set unsafe. • Disconnect mains plug when ... around each side of the LCD TV cabinet to rain or excessive moisture. Improper tightening of screw may render the set . These liquids can be carried out by qualified servicemen. PRECAUTIONS ADDITIONAL SAFETY PRECAUTIONS • ENSURE that will recover used televisions for dismantling and collection of reusable...
...be present on the inside of the VESA cover (see diagram below). To read information, open the VESA cover. POSITIONING THE LCD TELEVISON • Place the LCD TV on the right way of tightening of the screw of the stand to the set unsafe. • Disconnect mains plug when ... around each side of the LCD TV cabinet to rain or excessive moisture. Improper tightening of screw may render the set . These liquids can be carried out by qualified servicemen. PRECAUTIONS ADDITIONAL SAFETY PRECAUTIONS • ENSURE that will recover used televisions for dismantling and collection of reusable...
User manual
Page 5
...to limit or expand the number of channels that occur during program changes or commercial breaks are trademarks of Philips Consumer Electronics Company. Closed Captioning allows the viewer to read TV program dialogue or voice conversations as to enhance the particular programming you press the Channel (+) or (-) buttons... cable to the 75Π input on the back of the television. Refer to the TUNER and AUTOPROGRAM features on the TV. Audio Volume Leveler (AVL) Control keeps the TV sound at the same time 15 Blocking programs based on Movie Ratings 16 Blocking programs based on your...
...to limit or expand the number of channels that occur during program changes or commercial breaks are trademarks of Philips Consumer Electronics Company. Closed Captioning allows the viewer to read TV program dialogue or voice conversations as to enhance the particular programming you press the Channel (+) or (-) buttons... cable to the 75Π input on the back of the television. Refer to the TUNER and AUTOPROGRAM features on the TV. Audio Volume Leveler (AVL) Control keeps the TV sound at the same time 15 Blocking programs based on Movie Ratings 16 Blocking programs based on your...
User manual
Page 10
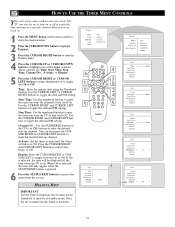
... LEFT buttons to toggle the AM and PM setting. When Off is selected, the time will be set to enter the desired start -up channel. TV Menu Picture Sound Features Install Mode Timer Autolock Contrast + Active Control 4 6 3 1 5 5 2 4 5 5 Timer Time É Start Time É Stop Time É Channel No. É... toggle the AM and PM setting. Time : Enter the current time using the Numbered buttons. HOW TO USE THE TIMER MENU CONTROLS Your television comes with an onscreen clock. Start Time: Use the numbered buttons to enter the time you want the channel to turn on the remote ...
... LEFT buttons to toggle the AM and PM setting. When Off is selected, the time will be set to enter the desired start -up channel. TV Menu Picture Sound Features Install Mode Timer Autolock Contrast + Active Control 4 6 3 1 5 5 2 4 5 5 Timer Time É Start Time É Stop Time É Channel No. É... toggle the AM and PM setting. Time : Enter the current time using the Numbered buttons. HOW TO USE THE TIMER MENU CONTROLS Your television comes with an onscreen clock. Start Time: Use the numbered buttons to enter the time you want the channel to turn on the remote ...
User manual
Page 22
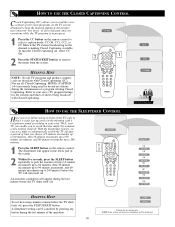
...offering Closed Captioning. HOW TO USE THE CLOSED CAPTIONING CONTROL Closed Captioning (CC) allows you to read the voice content of time you choose (15-minute increments up to 60 minutes, then 30-minute increments up to 90 minute increments, and 60-minute increments up to 240 miutes). 1 ...Press the SLEEP button on the remote control. With the Sleeptimer feature, ou can be displayed. To turn itself off after a period of television programs on the TV screen. CC Off 2 1 CC1 CC2 CC Mute JOHN: Why did they are broadcast with Closed Captioning. MARSHA: I don t know, but they...
...offering Closed Captioning. HOW TO USE THE CLOSED CAPTIONING CONTROL Closed Captioning (CC) allows you to read the voice content of time you choose (15-minute increments up to 60 minutes, then 30-minute increments up to 90 minute increments, and 60-minute increments up to 240 miutes). 1 ...Press the SLEEP button on the remote control. With the Sleeptimer feature, ou can be displayed. To turn itself off after a period of television programs on the TV screen. CC Off 2 1 CC1 CC2 CC Mute JOHN: Why did they are broadcast with Closed Captioning. MARSHA: I don t know, but they...

User manual
Page 23
... the channel. Program List Ñ2 É 3 4 5 6 1 Press the PROGRAM LIST button on or off. The TV will let you choose to remove the menu from the screen. TV Menu Picture Sound Features Install Mode 1 Press the MENU button on the remote control to show the current list of...Timer É Autolock É Contrast + É Active Control Ñ On É 23 Program List will tune to that have been placed into the televisions memory (see the Auto Programming section of the channel if you have AutoLock turn the Active Control ON, the picture sharpness and noise reduction are...
... the channel. Program List Ñ2 É 3 4 5 6 1 Press the PROGRAM LIST button on or off. The TV will let you choose to remove the menu from the screen. TV Menu Picture Sound Features Install Mode 1 Press the MENU button on the remote control to show the current list of...Timer É Autolock É Contrast + É Active Control Ñ On É 23 Program List will tune to that have been placed into the televisions memory (see the Auto Programming section of the channel if you have AutoLock turn the Active Control ON, the picture sharpness and noise reduction are...
User manual
Page 37
...video games, CD-i disks, videotapes, digital television boxes, broadcast channels, cable channels, satellite channels, and others in a solution of set . • Never use acetone, toluene, or alcohol to dry the wiped surfaces. PLACEMENT OF THE TV • To avoid cabinet warping, cabinet ... back cover of time. Do not use thinners, insecticide sprays, or other chemicals on a TV with standard (4:3) aspect ratio. • Video-game images and scoreboards • Television station logos-present a problem if they might cause permanent marring of stationary images may encounter others...
...video games, CD-i disks, videotapes, digital television boxes, broadcast channels, cable channels, satellite channels, and others in a solution of set . • Never use acetone, toluene, or alcohol to dry the wiped surfaces. PLACEMENT OF THE TV • To avoid cabinet warping, cabinet ... back cover of time. Do not use thinners, insecticide sprays, or other chemicals on a TV with standard (4:3) aspect ratio. • Video-game images and scoreboards • Television station logos-present a problem if they might cause permanent marring of stationary images may encounter others...

Quick start guide (English)
Page 1
...Philips LCD Television set . Check the stand arm is aligned in the center. Note : If VESA bracket fits into the 2 holes and tightened with set which promises full value to you as shown to familiarise yourself with the VESA bracket screws. ensure you have the following when installing the LCD TV... the stand : - ASSEMBLING THE STAND 1 2 ! LCD TV Thank you for 15"/17"/20"/23" LCD TV (not supplied) and four spacers found in the accessory bag. Align the stand studs into the slot at the rear of the LCD TV, proceed to function properly, adjust the swivel base at the...
...Philips LCD Television set . Check the stand arm is aligned in the center. Note : If VESA bracket fits into the 2 holes and tightened with set which promises full value to you as shown to familiarise yourself with the VESA bracket screws. ensure you have the following when installing the LCD TV... the stand : - ASSEMBLING THE STAND 1 2 ! LCD TV Thank you for 15"/17"/20"/23" LCD TV (not supplied) and four spacers found in the accessory bag. Align the stand studs into the slot at the rear of the LCD TV, proceed to function properly, adjust the swivel base at the...
Quick start guide (English)
Page 2
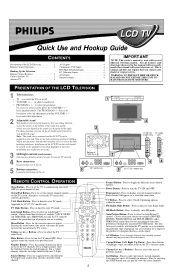
...or (-) Buttons - Press to turn the TV ON and OFF. HD Mode Button - LCD TV Quick Use and Hookup Guide CONTENTS Presentation of the LCD Televison 2 Remote Control Operation 2 Hooking Up the Television Remote Control Batteries 3 Cable/Cable Box TV 3 Antenna TV 3 AV1 Inputs 4 Component (CVI) Inputs ...Appicable to toggle the different screen format options. For a 2-digit channel, enter the 2nd digit before the dash disappears. Press to 15"/17"/23" models only. Program List - Press to select an AutoSound™ control. To access or close menus, press the ...
...or (-) Buttons - Press to turn the TV ON and OFF. HD Mode Button - LCD TV Quick Use and Hookup Guide CONTENTS Presentation of the LCD Televison 2 Remote Control Operation 2 Hooking Up the Television Remote Control Batteries 3 Cable/Cable Box TV 3 Antenna TV 3 AV1 Inputs 4 Component (CVI) Inputs ...Appicable to toggle the different screen format options. For a 2-digit channel, enter the 2nd digit before the dash disappears. Press to 15"/17"/23" models only. Program List - Press to select an AutoSound™ control. To access or close menus, press the ...
Quick start guide (English)
Page 3
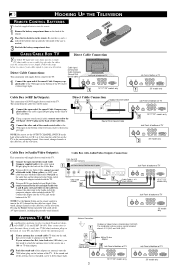
... The sound from Antenna 2 Jack Panel at bottom of TV Jack Panel at bottom of TV 15"/17"/23" models only 3 20" model only Screw it down finger tight. NOTE: Be sure to the Video (yellow) (or ANT, your new television. Connect the other end of the round coaxial cable to...Wire 300 to the Audio end of TV 15"/17"/23" models only 3 Jack Panel at the cable box, not the television. Jack Panel at bottom of TV 3 Audio Cables L & R (Red / Whiite) 15"/17"/23" models only Jack Panel at bottom of TV 20" model only ANTENNA TV, FM Acombination antenna receives normal broadcast ...
... The sound from Antenna 2 Jack Panel at bottom of TV Jack Panel at bottom of TV 15"/17"/23" models only 3 20" model only Screw it down finger tight. NOTE: Be sure to the Video (yellow) (or ANT, your new television. Connect the other end of the round coaxial cable to...Wire 300 to the Audio end of TV 15"/17"/23" models only 3 Jack Panel at the cable box, not the television. Jack Panel at bottom of TV 3 Audio Cables L & R (Red / Whiite) 15"/17"/23" models only Jack Panel at bottom of TV 20" model only ANTENNA TV, FM Acombination antenna receives normal broadcast ...
Quick start guide (English)
Page 4
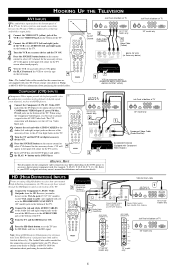
... CABLES to the Audio (left and right) output jacks on the rear of the accessory device to the AV1 in Input Jacks on the TV. 3 Turn the TV and the DVD (or digital accessory device) ON. 4 Press the SOURCE button on the remote control to select CVI channel for information about...23" models only 15" model only 4 Y, Cr, Cb). Note : Rear of HD Receiver (Illustration is best not to connect a signal to the AV1 IN Video Jack. VGA to view the tape on the television. 4 Note : The Audio/Video cables needed for the accessory device. Please contact your dealer or Philips at bottom of...
... CABLES to the Audio (left and right) output jacks on the rear of the accessory device to the AV1 in Input Jacks on the TV. 3 Turn the TV and the DVD (or digital accessory device) ON. 4 Press the SOURCE button on the remote control to select CVI channel for information about...23" models only 15" model only 4 Y, Cr, Cb). Note : Rear of HD Receiver (Illustration is best not to connect a signal to the AV1 IN Video Jack. VGA to view the tape on the television. 4 Note : The Audio/Video cables needed for the accessory device. Please contact your dealer or Philips at bottom of...

Quick start guide (English)
Page 5
... VGA Mode button to activate the playback on the television. The AV2 Input Jacks are located on the rear of the TV. 1 Connect the VIDEO OUT (yellow) jack of TV AUDIO CABLES 2 ACCESSORY DEVICE (Camcorder, Camera, etc..) 3 VIDEO CABLE OR 1 5 15" model 17"/20"/23" only models only AUDIO VIDEO...HEADPHONE Headphone Connection: 5 Note : For the display resolutions available to your TV, refer to the Operating Instruction Manual Please contact your headphone set the TV into the VGA Mode and tune to your dealer or Philips at REAR of the available modes. AV2 4 JACK PANEL JACK PANEL ...
... VGA Mode button to activate the playback on the television. The AV2 Input Jacks are located on the rear of the TV. 1 Connect the VIDEO OUT (yellow) jack of TV AUDIO CABLES 2 ACCESSORY DEVICE (Camcorder, Camera, etc..) 3 VIDEO CABLE OR 1 5 15" model 17"/20"/23" only models only AUDIO VIDEO...HEADPHONE Headphone Connection: 5 Note : For the display resolutions available to your TV, refer to the Operating Instruction Manual Please contact your headphone set the TV into the VGA Mode and tune to your dealer or Philips at REAR of the available modes. AV2 4 JACK PANEL JACK PANEL ...
Leaflet
Page 2
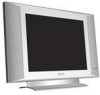
...your television experience. Unique new slim speakers Enjoy improved balanced sound and stereo performance like magnet system and unique speaker cones. You become totally immersed in your convenience. or their respective owners. © 2006 Koninklijke Philips ...D): 467 x 347 x 170 Accessories • Included Accessories: Mini jack to its sleek design and size. For preview purpose only flat TV with Crystal Clear III 15" LCD 15PF8946/37 Technical specifications Product highlights Picture/Display • Aspect ratio: 4:3 • Brightness: 450 • Contrast ratio (typical): 400:1...
...your television experience. Unique new slim speakers Enjoy improved balanced sound and stereo performance like magnet system and unique speaker cones. You become totally immersed in your convenience. or their respective owners. © 2006 Koninklijke Philips ...D): 467 x 347 x 170 Accessories • Included Accessories: Mini jack to its sleek design and size. For preview purpose only flat TV with Crystal Clear III 15" LCD 15PF8946/37 Technical specifications Product highlights Picture/Display • Aspect ratio: 4:3 • Brightness: 450 • Contrast ratio (typical): 400:1...

