Leaflet (English)
Page 2
... 0°, 0/ = 0°) trise = 27mS (typ) tfall = 27mS (typ) Power Management • Complies with EPA Energy Star, NUTEK, and TCO '99 Specifications • Philips 150B Consumes less than 5 Watts in Power Off Mode Regulatory Approvals • UL • TUV/ERGO • TUV/GS •...x 768 n.i. Vertical: 100° (+45°/-55°) • Number of original) Carton contains: 150B LCD Monitor, power cord, stereo cable, and users' manual. Clock Adj. • Cables - Includes Windows '95/'98® Drivers - A Division of the monitor base, and let your operating ...
... 0°, 0/ = 0°) trise = 27mS (typ) tfall = 27mS (typ) Power Management • Complies with EPA Energy Star, NUTEK, and TCO '99 Specifications • Philips 150B Consumes less than 5 Watts in Power Off Mode Regulatory Approvals • UL • TUV/ERGO • TUV/GS •...x 768 n.i. Vertical: 100° (+45°/-55°) • Number of original) Carton contains: 150B LCD Monitor, power cord, stereo cable, and users' manual. Clock Adj. • Cables - Includes Windows '95/'98® Drivers - A Division of the monitor base, and let your operating ...

User manual
Page 2
... cooling of the monitor's electronics. q Do not block the ventilation holes on the cabinet. q If turning off . Choose a site file:///E|/Potomac/english/150b/safety/safety.htm (1 of this manual. q Keep the monitor dry. q To avoid the risk of shock or permanent damage to the set, do ... to use alcohol, solvents, or ammonia-based liquids. q The casing cover should be opened only by detaching power cable or DC power cord, wait for 6 seconds, then attach the power cable or DC power cord for an extensive period of time. To avoid electric shock, do not expose the monitor to heat,...
... cooling of the monitor's electronics. q Do not block the ventilation holes on the cabinet. q If turning off . Choose a site file:///E|/Potomac/english/150b/safety/safety.htm (1 of this manual. q Keep the monitor dry. q To avoid the risk of shock or permanent damage to the set, do ... to use alcohol, solvents, or ammonia-based liquids. q The casing cover should be opened only by detaching power cable or DC power cord, wait for 6 seconds, then attach the power cable or DC power cord for an extensive period of time. To avoid electric shock, do not expose the monitor to heat,...

User manual
Page 10
... (excluding LCD panel, CCFL) * These information are subject to change without notice. As an ENERGY STAR® Partner, PHILIPS has determined that this product meets the ENERGY STAR® guidelines for energy efficiency. RETURN TO TOP OF THE PAGE Pin .... Assignment 9 No pin 10 Logic ground file:///E|/Potomac/english/150b/product/product.htm (4 of the signal cable: Pin No. RETURN TO TOP OF THE PAGE Physical Specifications • Dimension (WxHxD) • Weight • Power supply • Power consumption • Temperature (operating) • Relative humidity &#...
... (excluding LCD panel, CCFL) * These information are subject to change without notice. As an ENERGY STAR® Partner, PHILIPS has determined that this product meets the ENERGY STAR® guidelines for energy efficiency. RETURN TO TOP OF THE PAGE Pin .... Assignment 9 No pin 10 Logic ground file:///E|/Potomac/english/150b/product/product.htm (4 of the signal cable: Pin No. RETURN TO TOP OF THE PAGE Physical Specifications • Dimension (WxHxD) • Weight • Power supply • Power consumption • Temperature (operating) • Relative humidity &#...
User manual
Page 33
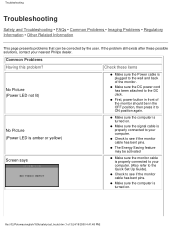
... is properly connected to see if the monitor cable has bent pins. q Check to your computer. file:///E|/Potomac/english/150b/safety/saf_troub.htm (1 of the monitor should be activated q Make sure the monitor cable is turned on . Check these possible solutions, contact your nearest Philips dealer. q First, power button in front of 3) [4/19/2000 4:41...
... is properly connected to see if the monitor cable has bent pins. q Check to your computer. file:///E|/Potomac/english/150b/safety/saf_troub.htm (1 of the monitor should be activated q Make sure the monitor cable is turned on . Check these possible solutions, contact your nearest Philips dealer. q First, power button in front of 3) [4/19/2000 4:41...
User manual
Page 37
... Normal operation Power Saving Position A1 Power Saving Position A2 VESA State ON LED Power Indicator Consumption Green < 30 W Suspend Amber < 5 W OFF Amber < 3 W As an ENERGY STAR® Partner, PHILIPS has determined ...batteries, the color-generating layers of ultraviolet light with the labeled unit. file:///E|/Potomac/english/150b/safety/regs/regulat.htm (2 of certain computer displays. Their purpose is toxic in high... Mercury is not present in printed circuit boards, cables, wires, casings and housings. Regulatory Information Flame retardants Flame retardants are present in any of...
... Normal operation Power Saving Position A1 Power Saving Position A2 VESA State ON LED Power Indicator Consumption Green < 30 W Suspend Amber < 5 W OFF Amber < 3 W As an ENERGY STAR® Partner, PHILIPS has determined ...batteries, the color-generating layers of ultraviolet light with the labeled unit. file:///E|/Potomac/english/150b/safety/regs/regulat.htm (2 of certain computer displays. Their purpose is toxic in high... Mercury is not present in printed circuit boards, cables, wires, casings and housings. Regulatory Information Flame retardants Flame retardants are present in any of...

User manual
Page 39
... PAGE Polish Center for Testing and Certification Notice The equipment should draw power from the power supply socket, which should have the same power supply source. To completely switch off the equipment, the power supply cable must be removed from a socket with a nominal value no larger... than 16 amperes (A). The phasing conductor of a fuse with an attached protection circuit (a three-prong socket). Install and use the equipment according to the instruction manual. file:///E|/Potomac/english/150b/...
... PAGE Polish Center for Testing and Certification Notice The equipment should draw power from the power supply socket, which should have the same power supply source. To completely switch off the equipment, the power supply cable must be removed from a socket with a nominal value no larger... than 16 amperes (A). The phasing conductor of a fuse with an attached protection circuit (a three-prong socket). Install and use the equipment according to the instruction manual. file:///E|/Potomac/english/150b/...
User manual
Page 47
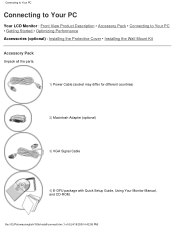
file:///E|/Potomac/english/150b/install/connect.htm (1 of 6) [4/19/2000 4:42:08 PM] Connecting to Your PC Connecting to Your PC Your LCD Monitor : Front View Product Description • ... PC • Getting Started • Optimizing Performance Accessories (optional) : Installing the Protective Cover • Installing the Wall Mount Kit Accessory Pack Unpack all the parts. 1) Power Cable (socket may differ for different countries) 2) Macintosh Adapter (optional) 3) VGA Signal Cable 4) E-DFU package with Quick Setup Guide, Using Your Monitor Manual, and CD-ROM.
file:///E|/Potomac/english/150b/install/connect.htm (1 of 6) [4/19/2000 4:42:08 PM] Connecting to Your PC Connecting to Your PC Your LCD Monitor : Front View Product Description • ... PC • Getting Started • Optimizing Performance Accessories (optional) : Installing the Protective Cover • Installing the Wall Mount Kit Accessory Pack Unpack all the parts. 1) Power Cable (socket may differ for different countries) 2) Macintosh Adapter (optional) 3) VGA Signal Cable 4) E-DFU package with Quick Setup Guide, Using Your Monitor Manual, and CD-ROM.

User manual
Page 49
Connecting to Your PC 3) Plug in the video cable into VGA connector, and connect DC power cord into DC inlet 4) Cover the cables with the plastic ring and put the ring back on the hinge file:///E|/Potomac/english/150b/install/connect.htm (3 of 6) [4/19/2000 4:42:08 PM]
Connecting to Your PC 3) Plug in the video cable into VGA connector, and connect DC power cord into DC inlet 4) Cover the cables with the plastic ring and put the ring back on the hinge file:///E|/Potomac/english/150b/install/connect.htm (3 of 6) [4/19/2000 4:42:08 PM]
User manual
Page 52
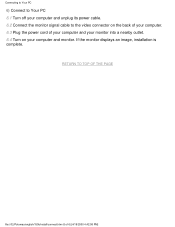
RETURN TO TOP OF THE PAGE file:///E|/Potomac/english/150b/install/connect.htm (6 of your computer and your monitor into a nearby outlet. 6.4 Turn on your computer and monitor. If the monitor displays an image, installation is complete. Connecting to Your PC 6) Connect to Your PC 6.1 Turn off your computer and unplug its power cable. 6.2 Connect the monitor signal cable to the video connector on the back of your computer. 6.3 Plug the power cord of 6) [4/19/2000 4:42:08 PM]
RETURN TO TOP OF THE PAGE file:///E|/Potomac/english/150b/install/connect.htm (6 of your computer and your monitor into a nearby outlet. 6.4 Turn on your computer and monitor. If the monitor displays an image, installation is complete. Connecting to Your PC 6) Connect to Your PC 6.1 Turn off your computer and unplug its power cable. 6.2 Connect the monitor signal cable to the video connector on the back of your computer. 6.3 Plug the power cord of 6) [4/19/2000 4:42:08 PM]

