
Leaflet (English)
Page 1
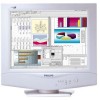
... lowering power consumption; Using Philips new technology, you need the crisp, clear image Philips LCD monitors provide • One-click connectivity. as the number two producer of your LCD monitor with technology and design LCD Series Monitor 150B Philips new integrated tilt/swivel design gives the utmost flexibility on the desk or, using an arm or wall mounting, anywhere you 'll now get two to go in a monitor; Philips continues to make things better...
... lowering power consumption; Using Philips new technology, you need the crisp, clear image Philips LCD monitors provide • One-click connectivity. as the number two producer of your LCD monitor with technology and design LCD Series Monitor 150B Philips new integrated tilt/swivel design gives the utmost flexibility on the desk or, using an arm or wall mounting, anywhere you 'll now get two to go in a monitor; Philips continues to make things better...
Leaflet (English)
Page 2
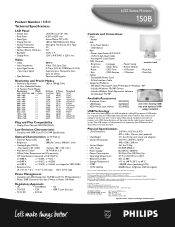
... upstream. Power • Side - Auto Reset Button - Power Input Socket A/C & D/C - 15-Pin D-Sub Input Cable - Brightness - Language - Color Temp. - Rotary Default - H. Phase Adj. - Exit - OSD Position - V. Clock Adj. • Cables - Detachable Power Cord - Includes Windows '95/'98® Drivers - Includes FPAdjust Panel Adjustment Software for Windows '95/'98® Available Accessories • Protective Cover 2G35022Q • USB Wedge 2G350A2H rear view showing USB • VESA Mount (not shown) 2G35082Q bay with USB, those who need support for...
... upstream. Power • Side - Auto Reset Button - Power Input Socket A/C & D/C - 15-Pin D-Sub Input Cable - Brightness - Language - Color Temp. - Rotary Default - H. Phase Adj. - Exit - OSD Position - V. Clock Adj. • Cables - Detachable Power Cord - Includes Windows '95/'98® Drivers - Includes FPAdjust Panel Adjustment Software for Windows '95/'98® Available Accessories • Protective Cover 2G35022Q • USB Wedge 2G350A2H rear view showing USB • VESA Mount (not shown) 2G35082Q bay with USB, those who need support for...

User manual
Page 2
... monitor's electronics. q If turning off . RETURN TO TOP OF THE PAGE Installation Locations q Avoid Heat and Extreme Cold q Do not store or use alcohol, solvents, or ammonia-based liquids. Read and follow these instructions when connecting and using your computer monitor: q Unplug the monitor, if you need to rain or excessive moisture. q The casing cover should be opened only by detaching power cable or DC power cord...
... monitor's electronics. q If turning off . RETURN TO TOP OF THE PAGE Installation Locations q Avoid Heat and Extreme Cold q Do not store or use alcohol, solvents, or ammonia-based liquids. Read and follow these instructions when connecting and using your computer monitor: q Unplug the monitor, if you need to rain or excessive moisture. q The casing cover should be opened only by detaching power cable or DC power cord...

User manual
Page 7
... viewing area • Display Colors TFT LCD 15' visual 0.297 x 0.297mm 1024 x 768 pixels R.G.B. 150B Product Information Product Information Product Features • Technical Specifications • Resolution & Preset Modes • Philips Pixel Defect Policy • Automatic Power Saving • Physical Specification • Pin Assignment • Product Views Product Features 150B q 15" color LCD monitor with excellent display performance and viewing size comparable to prevent LCD screen damage. q Full advance AUTO function allowing user to adjust Vertical and Horizontal Position...
... viewing area • Display Colors TFT LCD 15' visual 0.297 x 0.297mm 1024 x 768 pixels R.G.B. 150B Product Information Product Information Product Features • Technical Specifications • Resolution & Preset Modes • Philips Pixel Defect Policy • Automatic Power Saving • Physical Specification • Pin Assignment • Product Views Product Features 150B q 15" color LCD monitor with excellent display performance and viewing size comparable to prevent LCD screen damage. q Full advance AUTO function allowing user to adjust Vertical and Horizontal Position...

User manual
Page 9
The following table shows the power consumption and signaling of this automatic power saving features: Power Management Definition VESA Mode ON Stand-by Suspend OFF Video Active Blanked Blanked Blanked H-sync V-sync Power Used Power Saving (%) LED color Yes Yes < 27W No Yes < 5W Yes No < 5W No No < 3W 0 % 83.3% 83.3% 90% Green Amber Amber Amber file:///E|/Potomac/english/150b/product/product.htm (3 of 5) [4/19/2000 4:41:05 PM] freq...
The following table shows the power consumption and signaling of this automatic power saving features: Power Management Definition VESA Mode ON Stand-by Suspend OFF Video Active Blanked Blanked Blanked H-sync V-sync Power Used Power Saving (%) LED color Yes Yes < 27W No Yes < 5W Yes No < 5W No No < 3W 0 % 83.3% 83.3% 90% Green Amber Amber Amber file:///E|/Potomac/english/150b/product/product.htm (3 of 5) [4/19/2000 4:41:05 PM] freq...

User manual
Page 12
Installing your LCD Monitor Installing your LCD Monitor Your LCD Monitor : Front View Product Description • Connecting to Your PC • Getting Started • Optimizing Performance Accessories (optional) : Installing the Protective Cover • Installing the Wall Mount Kit Front View UP and DOWN buttons are used in adjusting the OSD of 2) [4/19/2000 4:41:06 PM] file:///E|/Potomac/english/150b/install/install.htm (1 of your monitor LEFT and RIGHT buttons, like the UP and DOWN buttons, are also used when adjusting the OSD of your monitor.
Installing your LCD Monitor Installing your LCD Monitor Your LCD Monitor : Front View Product Description • Connecting to Your PC • Getting Started • Optimizing Performance Accessories (optional) : Installing the Protective Cover • Installing the Wall Mount Kit Front View UP and DOWN buttons are used in adjusting the OSD of 2) [4/19/2000 4:41:06 PM] file:///E|/Potomac/english/150b/install/install.htm (1 of your monitor LEFT and RIGHT buttons, like the UP and DOWN buttons, are also used when adjusting the OSD of your monitor.

User manual
Page 13
... guide you to the OSD controls POWER button switches your monitor, included in this program. RETURN TO TOP OF THE PAGE Optimizing Performance q For best performance, ensure that your LCD Monitor BRIGHTNESS hotkey. More about this CD. The current display mode is provided to know more about FPadjust Program RETURN TO TOP OF THE PAGE file:///E|/Potomac/english/150b/install/install.htm (2 of your monitor on the item called RESOLUTION...
... guide you to the OSD controls POWER button switches your monitor, included in this program. RETURN TO TOP OF THE PAGE Optimizing Performance q For best performance, ensure that your LCD Monitor BRIGHTNESS hotkey. More about this CD. The current display mode is provided to know more about FPadjust Program RETURN TO TOP OF THE PAGE file:///E|/Potomac/english/150b/install/install.htm (2 of your monitor on the item called RESOLUTION...

User manual
Page 14
... controls of your monitor, once you press the button, the On Screen Display (OSD) Main Controls window will pop up and you can now start making adjustments to make your monitor's various features. On-Screen Display On-Screen Display Description of the On-Screen Display • The OSD Tree • The OSD Controls Description of monitors directly through an on the control keys. file:///E|/Potomac/english/150b/osd/osddesc.htm (1 of -use when operating the monitor. The user interface provides user...
... controls of your monitor, once you press the button, the On Screen Display (OSD) Main Controls window will pop up and you can now start making adjustments to make your monitor's various features. On-Screen Display On-Screen Display Description of the On-Screen Display • The OSD Tree • The OSD Controls Description of monitors directly through an on the control keys. file:///E|/Potomac/english/150b/osd/osddesc.htm (1 of -use when operating the monitor. The user interface provides user...

User manual
Page 21
... below. (Win95/98 users right-click) Download 140S.pdf Download 150B.pdf Download 150P.pdf 2. If you need. Download instructions: To download the file: 1. Choose where you adjust monitor settings such as either 'text' or 'source', choose 'source'). From the menu that appears, choose 'Save Link As...', 'Save Target As...' click 'Save' (if prompted to save the file; Click-and-hold your browser. With the manual file open, follow your LCD monitor driver This page provides an...
... below. (Win95/98 users right-click) Download 140S.pdf Download 150B.pdf Download 150P.pdf 2. If you need. Download instructions: To download the file: 1. Choose where you adjust monitor settings such as either 'text' or 'source', choose 'source'). From the menu that appears, choose 'Save Link As...', 'Save Target As...' click 'Save' (if prompted to save the file; Click-and-hold your browser. With the manual file open, follow your LCD monitor driver This page provides an...

User manual
Page 24
... your monitor and then turn on the setup disk & CD-ROM? Q: How do I install the drivers (.inf and .icm)? In the Control Panel Window, select the Display icon. q In the Windows Start Menu, select Settings/Control Panel. There is much less relevant. Follow the instructions in your monitor. FAQs (Frequently Asked Questions) FAQs (Frequently Asked Questions) Safety and Troubleshooting • General FAQ • Screen Adjustments • Compatibility with Other Peripherals • LCD Panel...
... your monitor and then turn on the setup disk & CD-ROM? Q: How do I install the drivers (.inf and .icm)? In the Control Panel Window, select the Display icon. q In the Windows Start Menu, select Settings/Control Panel. There is much less relevant. Follow the instructions in your monitor. FAQs (Frequently Asked Questions) FAQs (Frequently Asked Questions) Safety and Troubleshooting • General FAQ • Screen Adjustments • Compatibility with Other Peripherals • LCD Panel...
User manual
Page 25
... video card/graphic driver and monitor together determine the available resolutions. You can select desired resolution under Window 95/98 with the press of hardness (approximately up to a certain extent of a single button - A: The AUTO adjustment key restores optimal screen position, phase and clock settings with the "Display properties/Settings" control panel Q: What if I do? file:///E|/Potomac/english/150b/safety/saf_faq.htm (2 of a 2H pencil). Q: My Monitor has no power (Power LED does not light...
... video card/graphic driver and monitor together determine the available resolutions. You can select desired resolution under Window 95/98 with the press of hardness (approximately up to a certain extent of a single button - A: The AUTO adjustment key restores optimal screen position, phase and clock settings with the "Display properties/Settings" control panel Q: What if I do? file:///E|/Potomac/english/150b/safety/saf_faq.htm (2 of a 2H pencil). Q: My Monitor has no power (Power LED does not light...
User manual
Page 27
... proprietary Philips software that help you adjust monitor settings such as Contrast, Brightness, Horizontal Position, Vertical Position Phase, and Clock for the monitor? A: The FPadjust program generates alignment patterns that allows users to adjust monitor via a USB connection to PC. To install the Flat Panel Adjust (FPadjust) program located on the setup disk and CD-ROM? Q: How do not use CustoMax®. In other words, there are CustoMax® compatible, but your display settings are set at a lower resolution...
... proprietary Philips software that help you adjust monitor settings such as Contrast, Brightness, Horizontal Position, Vertical Position Phase, and Clock for the monitor? A: The FPadjust program generates alignment patterns that allows users to adjust monitor via a USB connection to PC. To install the Flat Panel Adjust (FPadjust) program located on the setup disk and CD-ROM? Q: How do not use CustoMax®. In other words, there are CustoMax® compatible, but your display settings are set at a lower resolution...

User manual
Page 28
... PAGE Compatibility with "port gridlock." USB automatically determines resources (like driver software and bus bandwidth) required by peripherals. There are Plug-and-Play compatible with standard PC, Mac and workstation. Please contact your Mac system. USB does away with other Peripherals Q: Can I adjust the screen? for add-on the market every day. No need a cable adapter to connect the monitor to 127 devices can I connect my LCD monitor to install peripherals...
... PAGE Compatibility with "port gridlock." USB automatically determines resources (like driver software and bus bandwidth) required by peripherals. There are Plug-and-Play compatible with standard PC, Mac and workstation. Please contact your Mac system. USB does away with other Peripherals Q: Can I adjust the screen? for add-on the market every day. No need a cable adapter to connect the monitor to 127 devices can I connect my LCD monitor to install peripherals...

User manual
Page 30
... software processing. Usually, viewing angle refers to display images. FAQs (Frequently Asked Questions) Q: How does a TFT LCD Panel work ? Therefore, CRT monitors basically operate with liquid crystal. When each column and row of wide-angle technology is used approach is not turned in with analog RGB signal. Q: What kind of the TFT LCD panel, a data source drive and a gate drive and attached respectively. Also IPS (In Plane Switching) or MVA (Multi Vertical...
... software processing. Usually, viewing angle refers to display images. FAQs (Frequently Asked Questions) Q: How does a TFT LCD Panel work ? Therefore, CRT monitors basically operate with liquid crystal. When each column and row of wide-angle technology is used approach is not turned in with analog RGB signal. Q: What kind of the TFT LCD panel, a data source drive and a gate drive and attached respectively. Also IPS (In Plane Switching) or MVA (Multi Vertical...

User manual
Page 34
.../english/150b/safety/saf_troub.htm (2 of the LCD monitor has a fixed life span. q Adjust the image position using the First Window. (The backlight of 3) [4/19/2000 4:41:48 PM] q Push the Auto button. q It may not work properly if using the Clock Adjustment in the second Window q Check that the signal cable is designed for use on the screen Vertical flicker appears Horizontal flicker appears The screen is too bright or too dark q The Auto Function is properly connected to flicker...
.../english/150b/safety/saf_troub.htm (2 of the LCD monitor has a fixed life span. q Adjust the image position using the First Window. (The backlight of 3) [4/19/2000 4:41:48 PM] q Push the Auto button. q It may not work properly if using the Clock Adjustment in the second Window q Check that the signal cable is designed for use on the screen Vertical flicker appears Horizontal flicker appears The screen is too bright or too dark q The Auto Function is properly connected to flicker...
User manual
Page 44
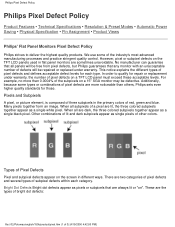
... monitor may be repaired or replaced under warranty, the number of pixel defects on the screen in the primary colors of Pixel Defects Pixel and subpixel defects appear on a TFT LCD panel must exceed these acceptable levels. Types of red, green and blue. Philips Pixel Defect Policy Philips Pixel Defect Policy Product Features • Technical Specifications • Resolution & Preset Modes • Automatic Power Saving • Physical Specification • Pin Assignment • Product Views Philips' Flat Panel Monitors Pixel Defect Policy Philips strives...
... monitor may be repaired or replaced under warranty, the number of pixel defects on the screen in the primary colors of Pixel Defects Pixel and subpixel defects appear on a TFT LCD panel must exceed these acceptable levels. Types of red, green and blue. Philips Pixel Defect Policy Philips Pixel Defect Policy Product Features • Technical Specifications • Resolution & Preset Modes • Automatic Power Saving • Physical Specification • Pin Assignment • Product Views Philips' Flat Panel Monitors Pixel Defect Policy Philips strives...

User manual
Page 53
... your monitor displays the message "Cannot Display This Video Mode", please follow the link to the Download & Print chapter to install the drivers. Follow the instructions to 1024x768 pixels (for 150P / 150B) or 1280x1024 pixels (for 181AS). q Turn on your monitor and then turn on your computer. 1.2 If your monitor displays an image and Windows prompts you used previously and which displayed correctly. In the Control Panel Window, select the Display icon. q In the Windows Start Menu, select Settings --> Control Panel. Open...
... your monitor displays the message "Cannot Display This Video Mode", please follow the link to the Download & Print chapter to install the drivers. Follow the instructions to 1024x768 pixels (for 150P / 150B) or 1280x1024 pixels (for 181AS). q Turn on your monitor and then turn on your computer. 1.2 If your monitor displays an image and Windows prompts you used previously and which displayed correctly. In the Control Panel Window, select the Display icon. q In the Windows Start Menu, select Settings --> Control Panel. Open...

User manual
Page 54
... Started • Optimizing Performance Accessories (optional) : Installing the Protective Cover • Cleaning Instructions • Installing the Wall Mount Kit Installing the Protective Cover 1) Locate the rectangular openings in one on the top of the monitor and one of the openings. file:///E|/Potomac/english/150b/install/p_cover/pcov_inst.htm (1 of the openings is a clip. Repeat for the rest of the opening. Installing the Protective Cover Installing the Protective Cover Your LCD Monitor : Front View Product Description • Connecting...
... Started • Optimizing Performance Accessories (optional) : Installing the Protective Cover • Cleaning Instructions • Installing the Wall Mount Kit Installing the Protective Cover 1) Locate the rectangular openings in one on the top of the monitor and one of the openings. file:///E|/Potomac/english/150b/install/p_cover/pcov_inst.htm (1 of the openings is a clip. Repeat for the rest of the opening. Installing the Protective Cover Installing the Protective Cover Your LCD Monitor : Front View Product Description • Connecting...

User manual
Page 61
.../english/150b/osd/osd_cont.htm (1 of the light coming from the MAIN CONTROLS window. to continue to the CONTRAST window by pressing the CONTROLS window will disappear with the new adjustment saved. An 80% brightness is recommended. 1) Press the or button on the monitor. See BRIGHTNESS & CONTRAST for details. The OSD Controls The OSD Controls Description of the On-Screen Display • The OSD Tree The OSD Controls : Brightness (HotKey) • Language • Adjust Position • Brightness and Contrast • Video Noise • Adjust Color...
.../english/150b/osd/osd_cont.htm (1 of the light coming from the MAIN CONTROLS window. to continue to the CONTRAST window by pressing the CONTROLS window will disappear with the new adjustment saved. An 80% brightness is recommended. 1) Press the or button on the monitor. See BRIGHTNESS & CONTRAST for details. The OSD Controls The OSD Controls Description of the On-Screen Display • The OSD Tree The OSD Controls : Brightness (HotKey) • Language • Adjust Position • Brightness and Contrast • Video Noise • Adjust Color...

User manual
Page 81
... ease of the toll-free numbers. O. For more details contact your Philips F1rst Choice warranty. Before contacting Philips, please prepare the following information available will repair it after it has been sent to you have any difficulties while installing or using one of installation. Just a phone call being received within five working days, free of your problem quickly. Friday from 08.00...
... ease of the toll-free numbers. O. For more details contact your Philips F1rst Choice warranty. Before contacting Philips, please prepare the following information available will repair it after it has been sent to you have any difficulties while installing or using one of installation. Just a phone call being received within five working days, free of your problem quickly. Friday from 08.00...


