
Owner's Manual
Page 2
.... 3. Close attention is necessary when this sewing machine. Use only the attachments recommended by the manufacturer as threading the needle, changing the needle, threading the bobbin, changing the presser foot or changing the light. 10.Always unplug sewing machine from the electrical outlet when removing covers, lubricating, or when making any...
.... 3. Close attention is necessary when this sewing machine. Use only the attachments recommended by the manufacturer as threading the needle, changing the needle, threading the bobbin, changing the presser foot or changing the light. 10.Always unplug sewing machine from the electrical outlet when removing covers, lubricating, or when making any...
Owner's Manual
Page 4
... Stitch width adjustment button ...12 Stitch length adjustment button 13 Tension adjustment buttons ...13 FUNC selection button ...14 Key lock button...14 Bobbin winding button ...14 Elongation button ...15 Mirror image button ...15 Twin needle button ...15 SELECTION BUTTONS ...16-17 Direct stitch selection and...18 TURN MACHINE ON / OFF ...19 UNDERSTANDING THE LCD SCREEN 20-21 LCD SCREEN BRIGHTNESS CONTROL 21 WINDING THE BOBBIN ...22 Bobbin winding...22-24 INSERTING THE BOBBIN ...25-26 UPPER THREADING...27-32 Threading the upper thread...27-29 Using the needle threader ...30 Using the thread...
... Stitch width adjustment button ...12 Stitch length adjustment button 13 Tension adjustment buttons ...13 FUNC selection button ...14 Key lock button...14 Bobbin winding button ...14 Elongation button ...15 Mirror image button ...15 Twin needle button ...15 SELECTION BUTTONS ...16-17 Direct stitch selection and...18 TURN MACHINE ON / OFF ...19 UNDERSTANDING THE LCD SCREEN 20-21 LCD SCREEN BRIGHTNESS CONTROL 21 WINDING THE BOBBIN ...22 Bobbin winding...22-24 INSERTING THE BOBBIN ...25-26 UPPER THREADING...27-32 Threading the upper thread...27-29 Using the needle threader ...30 Using the thread...
Owner's Manual
Page 7
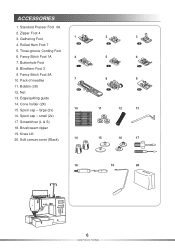
ACCESSORIES 1. Zipper Foot 4 3. Fancy Stitch Foot 1A 7. Pack of needles 11. Cone holder (2X) 15. Screwdriver (L & S) 18. Soft canvas cover (Black) 6 INSTRUCTIONS Standard Presser Foot 0A 2. Rolled Hem Foot 7 5. Blindhem Foot 3 9. Edge/quilting guide 14. Spool cap – small (2x) 17. Buttonhole Foot 8. Gathering Foot 4. Net 13. Three-groove Cording Foot 6. Knee Lift 20. Fancy Stitch Foot 2A 10. Bobbin (3X) 12. Spool cap – large (2x) 16. Brush/seam ripper 19.
ACCESSORIES 1. Zipper Foot 4 3. Fancy Stitch Foot 1A 7. Pack of needles 11. Cone holder (2X) 15. Screwdriver (L & S) 18. Soft canvas cover (Black) 6 INSTRUCTIONS Standard Presser Foot 0A 2. Rolled Hem Foot 7 5. Blindhem Foot 3 9. Edge/quilting guide 14. Spool cap – small (2x) 17. Buttonhole Foot 8. Gathering Foot 4. Net 13. Three-groove Cording Foot 6. Knee Lift 20. Fancy Stitch Foot 2A 10. Bobbin (3X) 12. Spool cap – large (2x) 16. Brush/seam ripper 19.
Owner's Manual
Page 8
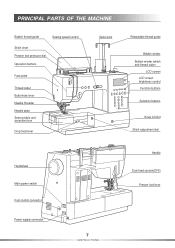
PRINCIPAL PARTS OF THE MACHINE Bobbin thread guide Sewing speed control Stitch chart Presser foot pressure dial Operation buttons Face plate Thread cutter Buttonhole lever Needle threader Needle plate Sewing table and accessory box Drop feed lever Spool pins Retractable thread guide Bobbin winder Bobbin winder switch and thread cutter LCD screen LCD screen brightness control Function buttons Selection buttons Knee Lift slot Stitch adjustment dial Handwheel Main power switch Foot control connector Power supply connector 7 INSTRUCTIONS Handle Dual feed system(DFS) Presser foot lever
PRINCIPAL PARTS OF THE MACHINE Bobbin thread guide Sewing speed control Stitch chart Presser foot pressure dial Operation buttons Face plate Thread cutter Buttonhole lever Needle threader Needle plate Sewing table and accessory box Drop feed lever Spool pins Retractable thread guide Bobbin winder Bobbin winder switch and thread cutter LCD screen LCD screen brightness control Function buttons Selection buttons Knee Lift slot Stitch adjustment dial Handwheel Main power switch Foot control connector Power supply connector 7 INSTRUCTIONS Handle Dual feed system(DFS) Presser foot lever

Owner's Manual
Page 13
... stitch width adjustment buttons. FUNCTION BUTTONS Stitch width adjustment buttons Stitch length adjustment buttons Tension adjustment buttons Twin needle button Mirror image button Elongation button Bobbin winding button Key lock button FUNC selection button Stitch width adjustment buttons When you select a stitch, the machine will automatically set center needle position will...
... stitch width adjustment buttons. FUNCTION BUTTONS Stitch width adjustment buttons Stitch length adjustment buttons Tension adjustment buttons Twin needle button Mirror image button Elongation button Bobbin winding button Key lock button FUNC selection button Stitch width adjustment buttons When you select a stitch, the machine will automatically set center needle position will...

Owner's Manual
Page 15
... 2, and then stitch number by using the numbered buttons. Press " ", then 4, and then stitch number by using the numbered buttons. Push the bobbin winder switch to unlock. Quilt stitch mode (Group 3-C)- Press " ", then 6, and then stitch number by using the numbered buttons. Press the "... be operated. Press the numbered button corresponding to reenter direct selection. Then press the 2 digit stitch number from group B on the bobbin winder shaft. Direct mode stitch selection (Group 1-A)Select stitch from accidentally being changed. Press " ", then 3, and then stitch number ...
... 2, and then stitch number by using the numbered buttons. Press " ", then 4, and then stitch number by using the numbered buttons. Push the bobbin winder switch to unlock. Quilt stitch mode (Group 3-C)- Press " ", then 6, and then stitch number by using the numbered buttons. Press the "... be operated. Press the numbered button corresponding to reenter direct selection. Then press the 2 digit stitch number from group B on the bobbin winder shaft. Direct mode stitch selection (Group 1-A)Select stitch from accidentally being changed. Press " ", then 3, and then stitch number ...
Owner's Manual
Page 21
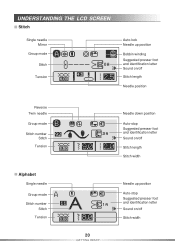
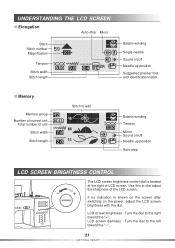
UNDERSTANDING THE LCD SCREEN Stitch Single needle Mirror Group mode Stitch Tension Auto-lock Needle up position Bobbin winding Suggested presser foot and identification letter Sound on/off Stitch length Needle position Reverse Twin needle Group mode Stitch number Stitch Tension Alphabet Single needle Group mode Stitch number Stitch Tension Needle down position Auto-stop Suggested presser foot and identification letter Sound on/off Stitch length Stitch width 20 GETTING READY Needle up position Auto-stop Suggested presser foot and identification letter Sound on/off Stitch width
UNDERSTANDING THE LCD SCREEN Stitch Single needle Mirror Group mode Stitch Tension Auto-lock Needle up position Bobbin winding Suggested presser foot and identification letter Sound on/off Stitch length Needle position Reverse Twin needle Group mode Stitch number Stitch Tension Alphabet Single needle Group mode Stitch number Stitch Tension Needle down position Auto-stop Suggested presser foot and identification letter Sound on/off Stitch length Stitch width 20 GETTING READY Needle up position Auto-stop Suggested presser foot and identification letter Sound on/off Stitch width
Owner's Manual
Page 22
...stop LCD SCREEN BRIGHTNESS CONTROL The LCD screen brightness control dial is located at the right of the LCD screen. Use this to edit Bobbin winding Tension Mirror Sound on the power, adjust the LCD screen brightness with the dial. If no indication is shown on the screen ...after switching on /off Needle up position Auto-stop Mirror Stitch Stitch number Magnification Tension Stitch width Stitch length Bobbin winding Single needle Sound on/off Needle up position Suggested presser foot and identification letter Memory Memory group Number of current unit Total number...
...stop LCD SCREEN BRIGHTNESS CONTROL The LCD screen brightness control dial is located at the right of the LCD screen. Use this to edit Bobbin winding Tension Mirror Sound on the power, adjust the LCD screen brightness with the dial. If no indication is shown on the screen ...after switching on /off Needle up position Auto-stop Mirror Stitch Stitch number Magnification Tension Stitch width Stitch length Bobbin winding Single needle Sound on/off Needle up position Suggested presser foot and identification letter Memory Memory group Number of current unit Total number...
Owner's Manual
Page 23
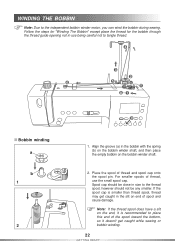
... thread. 4 3 2 6 5 1 11 87 Bobbin winding a b 1 2 9 1. Follow the steps for "Winding The Bobbin" except place the thread for the bobbin through the thread guide opening not in the bobbin with the spring (b) on the bobbin winder shaft, and then place the empty bobbin on the bobbin winder shaft. 2. For smaller spools of spool and ... the spool of the spool toward the bottom, so it is smaller than thread spool, thread may get caught while sewing or bobbin winding. 22 GETTING READY Note: If the thread spool does have a slit on end of thread, use being careful not to the independent...
... thread. 4 3 2 6 5 1 11 87 Bobbin winding a b 1 2 9 1. Follow the steps for "Winding The Bobbin" except place the thread for the bobbin through the thread guide opening not in the bobbin with the spring (b) on the bobbin winder shaft, and then place the empty bobbin on the bobbin winder shaft. 2. For smaller spools of spool and ... the spool of the spool toward the bottom, so it is smaller than thread spool, thread may get caught while sewing or bobbin winding. 22 GETTING READY Note: If the thread spool does have a slit on end of thread, use being careful not to the independent...
Owner's Manual
Page 24
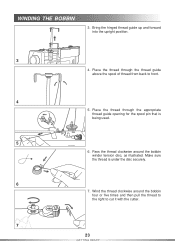
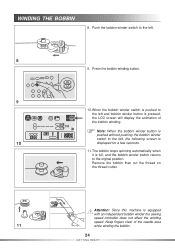
... of thread from back to cut it with the cutter. 7 23 GETTING READY Make sure the thread is being used. 5 6. WINDING THE BOBBIN 3. Pass the thread clockwise around the bobbin four or five times and then pull the thread to the right to front. 4 5. Place the thread through the appropriate thread guide...
... of thread from back to cut it with the cutter. 7 23 GETTING READY Make sure the thread is being used. 5 6. WINDING THE BOBBIN 3. Pass the thread clockwise around the bobbin four or five times and then pull the thread to the right to front. 4 5. Place the thread through the appropriate thread guide...
Owner's Manual
Page 25
... LCD screen will display the animation of the needle area 11 while winding the bobbin. 24 GETTING READY Press the bobbin winding button. 9 10.When the bobbin winder switch is pushed to the left . 8 9. Remove the bobbin then cut the thread on the thread cutter. Note: When the... bobbin winder button is pushed without pushing the bobbin winder switch to the left and bobbin winder button is full, and the bobbin winder switch returns to the orginal position. Attention:...
... LCD screen will display the animation of the needle area 11 while winding the bobbin. 24 GETTING READY Press the bobbin winding button. 9 10.When the bobbin winder switch is pushed to the left . 8 9. Remove the bobbin then cut the thread on the thread cutter. Note: When the... bobbin winder button is pushed without pushing the bobbin winder switch to the left and bobbin winder button is full, and the bobbin winder switch returns to the orginal position. Attention:...
Owner's Manual
Page 26
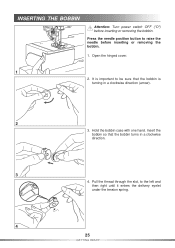
Hold the bobbin case with one hand. Pull the thread through the slot, to be sure that the bobbin turns in a clockwise direction (arrow). 2 3. Open the hinged cover. 1 2. Insert the bobbin so that the bobbin is important to the left and then right until it enters the delivery eyelet under the tension spring. 4 25 GETTING READY INSERTING THE BOBBIN Attention: Turn power switch OFF ("O") before inserting or removing the bobbin. 1. Press the needle position button to raise the needle before inserting or removing the bobbin. It is turning in a clockwise direction. 3 4.
Hold the bobbin case with one hand. Pull the thread through the slot, to be sure that the bobbin turns in a clockwise direction (arrow). 2 3. Open the hinged cover. 1 2. Insert the bobbin so that the bobbin is important to the left and then right until it enters the delivery eyelet under the tension spring. 4 25 GETTING READY INSERTING THE BOBBIN Attention: Turn power switch OFF ("O") before inserting or removing the bobbin. 1. Press the needle position button to raise the needle before inserting or removing the bobbin. It is turning in a clockwise direction. 3 4.
Owner's Manual
Page 27
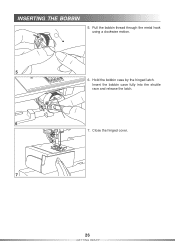
Insert the bobbin case fully into the shuttle race and release the latch. 6 7. Pull the bobbin thread through the metal hook using a clockwise motion. 5 6. Hold the bobbin case by the hinged latch. Close the hinged cover. 7 26 GETTING READY INSERTING THE BOBBIN 5.
Insert the bobbin case fully into the shuttle race and release the latch. 6 7. Pull the bobbin thread through the metal hook using a clockwise motion. 5 6. Hold the bobbin case by the hinged latch. Close the hinged cover. 7 26 GETTING READY INSERTING THE BOBBIN 5.
Owner's Manual
Page 33
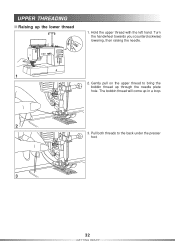
UPPER THREADING Raising up in a loop. 2 3. Hold the upper thread with the left hand. The bobbin thread will come up the lower thread 1. Turn the handwheel towards you (counterclockwise) lowering, then raising the needle. 1 2. Pull both threads to bring the bobbin thread up through the needle plate hole. Gently pull on the upper thread to the back under the presser foot. 3 32 GETTING READY
UPPER THREADING Raising up in a loop. 2 3. Hold the upper thread with the left hand. The bobbin thread will come up the lower thread 1. Turn the handwheel towards you (counterclockwise) lowering, then raising the needle. 1 2. Pull both threads to bring the bobbin thread up through the needle plate hole. Gently pull on the upper thread to the back under the presser foot. 3 32 GETTING READY
Owner's Manual
Page 42
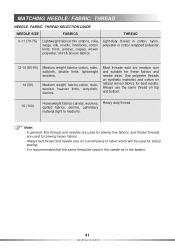
... and cotton on top and bottom. 16 (100) Heavyweight fabrics-canvas, woolens, quilted fabrics, denims, upholstery material (light to medium). Light-duty thread in the bobbin. 41 SEWING BASICS MATCHING NEEDLE/ FABRIC/ THREAD NEEDLE, FABRIC, THREAD SELECTION GUIDE NEEDLE SIZE FABRICS THREAD 9-11 (70-75) Lightweight fabrics-thin cottons, voile, serge...
... and cotton on top and bottom. 16 (100) Heavyweight fabrics-canvas, woolens, quilted fabrics, denims, upholstery material (light to medium). Light-duty thread in the bobbin. 41 SEWING BASICS MATCHING NEEDLE/ FABRIC/ THREAD NEEDLE, FABRIC, THREAD SELECTION GUIDE NEEDLE SIZE FABRICS THREAD 9-11 (70-75) Lightweight fabrics-thin cottons, voile, serge...
Owner's Manual
Page 43
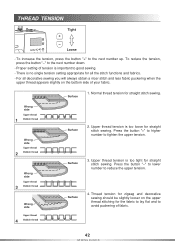
... of your fabric. To reduce the tension, press the button "" to tighten the upper tension. Surface 1. Wrong side Upper thread 1 Bobbin thread Wrong side Upper thread 2 Bobbin thread Wrong side Upper thread 3 Bobbin thread Wrong side Upper thread 4 Bobbin thread Surface 2. Press the button "+" to higher number to the next number down. - Surface 3.
... of your fabric. To reduce the tension, press the button "" to tighten the upper tension. Surface 1. Wrong side Upper thread 1 Bobbin thread Wrong side Upper thread 2 Bobbin thread Wrong side Upper thread 3 Bobbin thread Wrong side Upper thread 4 Bobbin thread Surface 2. Press the button "+" to higher number to the next number down. - Surface 3.
Owner's Manual
Page 57
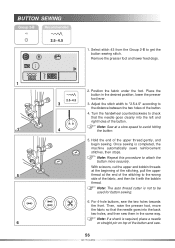
Once sewing is not to avoid hitting 4 the button. 5. With scissors, cut the upper and bobbin threads at the beginning of the stitching, pull the upper 5 thread at a slow speed to be used for button sewing. 6. Then, raise the presser foot, ... button. 2 Note: Sew at the end of the stitching to the distance between the two holes of the fabric, and then tie it with the bobbin thread. BUTTON SEWING 2.5~4.5 1.
Once sewing is not to avoid hitting 4 the button. 5. With scissors, cut the upper and bobbin threads at the beginning of the stitching, pull the upper 5 thread at a slow speed to be used for button sewing. 6. Then, raise the presser foot, ... button. 2 Note: Sew at the end of the stitching to the distance between the two holes of the fabric, and then tie it with the bobbin thread. BUTTON SEWING 2.5~4.5 1.
Owner's Manual
Page 68
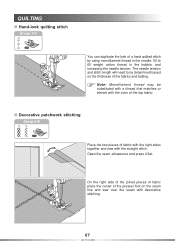
... You can duplicate the look of the fabrics and batting. The needle tension and stitch length will need to 60 weight cotton thread in the bobbin, and increasing the needle tension. Decorative patchwork stitching Place the two pieces of the presser foot on the thickness of a hand quilted stitch by using...
... You can duplicate the look of the fabrics and batting. The needle tension and stitch length will need to 60 weight cotton thread in the bobbin, and increasing the needle tension. Decorative patchwork stitching Place the two pieces of the presser foot on the thickness of a hand quilted stitch by using...
Owner's Manual
Page 72
... foot. 2. Combine an increased stitch length with the stitch length, begin by tightening needle tension. First lower the tension setting to below 2 and pull the bobbin thread to medium weight fabrics.
... foot. 2. Combine an increased stitch length with the stitch length, begin by tightening needle tension. First lower the tension setting to below 2 and pull the bobbin thread to medium weight fabrics.
Owner's Manual
Page 76
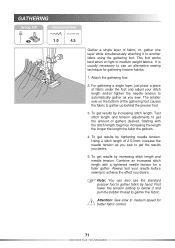
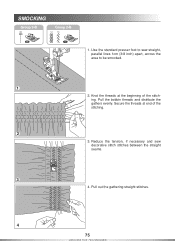
Knot the threads at end of the stitching. SMOCKING 1 2 3 1. Secure the threads at the beginning of the stitching. 3. Pull the bobbin threads and distribute the gathers evenly. Reduce the tension, if necessary and sew decorative stitch stitches between the straight seams. 4. Use the standard presser foot to sew straight, parallel lines 1cm (3/8 inch) apart, across the area to be smocked. 2. Pull out the gathering straight stitches. 4 75 DECORATIVE TECHNIQUES
Knot the threads at end of the stitching. SMOCKING 1 2 3 1. Secure the threads at the beginning of the stitching. 3. Pull the bobbin threads and distribute the gathers evenly. Reduce the tension, if necessary and sew decorative stitch stitches between the straight seams. 4. Use the standard presser foot to sew straight, parallel lines 1cm (3/8 inch) apart, across the area to be smocked. 2. Pull out the gathering straight stitches. 4 75 DECORATIVE TECHNIQUES


