
Pfaff C1100 Pro Support Question
Pfaff C1100 Pro Support Question
Find answers below for this question about Pfaff C1100 Pro.Need a Pfaff C1100 Pro manual? We have 1 online manual for this item!
Question posted by weaver1940 on September 16th, 2014
Bobbin Case Backlash Spring
The bobbin case has the back lash spring which keeps falling out. I set it back in the right position and it snaps in place but then it lets the thread loop outside of the bobbin and hang down to the point it gets caught up. Other times it works for a longer time period. since it also has the pig tail and 9mm stitch it is imposibble to find a new one..Where can I get one? My dealer didn't any extra to buy, just the bobbins.
Current Answers
Related Pfaff C1100 Pro Manual Pages
Owner's Manual - Page 2
....
1
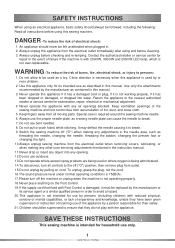
INSTRUCTIONS Never place anything on cord. SAVE THESE INSTRUCTIONS
This sewing machine is required around the sewing machine needle. 6. Always unplug this sewing machine. Always unplug before ...machine or unplug when the machine is used as
threading the needle, changing the needle, threading the bobbin, changing the presser foot or changing the light. 10.Always unplug sewing machine...
Owner's Manual - Page 6
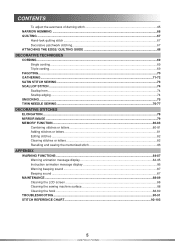
...cording...69
FAGOTING...70 GATHERING ...71-72 SATIN STITCH SEWING ...73 SCALLOP STITCH ...74
Scallop hem...74 Scallop edging...74 SMOCKING ...75 TWIN NEEDLE SEWING ...76-77
DECORATIVE STITCHES
ELONGATION...78 MIRROR IMAGE ...79...-89 Cleaning the LCD screen ...88 Cleaning the sewing machine surface 88 Cleaning the hook ...88-89
TROUBLESHOOTING ...90-91 STITCH REFERENCE CHART...92-103
5
INSTRUCTIONS
Owner's Manual - Page 9
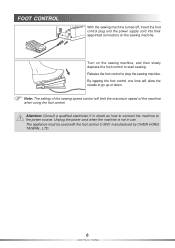
Release the foot control to stop the sewing machine. Note: The setting of the machine when using the foot control. Attention: Consult a qualified electrician if in use. Turn on the sewing machine.
Unplug the power cord when the machine is not in doubt as how to connect the machine to the power source. By tapping the foot control one...
Owner's Manual - Page 13

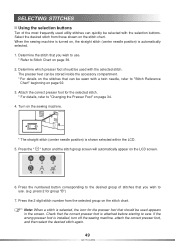
... right. Certain stitches have a limited stitch width. FUNCTION BUTTONS
Stitch width adjustment buttons
Stitch length adjustment buttons
Tension adjustment buttons
Twin needle button Mirror image button Elongation button Bobbin winding button Key lock button FUNC selection button
Stitch width adjustment buttons
When you select a stitch, the machine will automatically set center needle position...
Owner's Manual - Page 20

... jack. The lamp comes on when the machine is not sewing.
2. In addition, before transporting the machine to another location, be sure to correctly operate the machine.
19
GETTING READY
TURN MACHINE ON/ OFF
Turn on the machine
Press the right side of the main power switch on the right side of the machine, the power switch is turned off...
Owner's Manual - Page 23
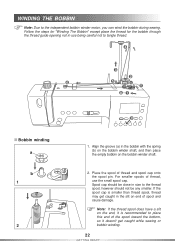
... The Bobbin" except place the thread for the bobbin through the thread guide opening not in the bobbin with the spring (b) on the bobbin winder shaft, and then place the empty bobbin on end of spool and cause damage. Note: If the thread spool does have a slit on the end, it is smaller than thread spool, thread may get caught while sewing or bobbin winding.
22
GETTING...
Owner's Manual - Page 24
....
7 23
GETTING READY Make sure the thread is being used.
5
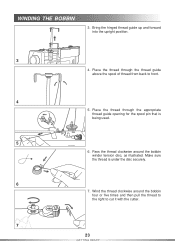
6. Place the thread through the appropriate thread guide opening for the spool pin that is under the disc securely.
6
7. Wind the thread clockwise around the bobbin winder tension disc, as illustrated. Pass the thread clockwise around the bobbin four or five times and then pull the thread to the right to...
Owner's Manual - Page 29
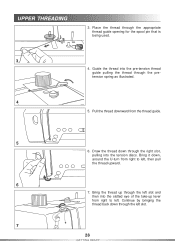
Place the thread through the pretension spring as illustrated.
4
5. Bring it down through the right slot, pulling into the tension discs. Guide the thread into the slotted eye of the take-up lever from the thread guide.
5
6. UPPER THREADING
3. Draw the thread down through the left slot.
7 28
GETTING READY Pull the thread downward from right to left . Continue by bringing the...
Owner's Manual - Page 30
... the end of the machine.
10
29
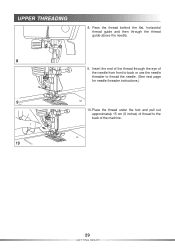
GETTING READY Pass the thread behind the flat, horizontal thread guide and then through the eye of the needle from front to back or use the needle threader to thread the needle. (See next page for needle threader instructions.)
9
10.Place the thread under the foot and pull out approximately...
Owner's Manual - Page 49
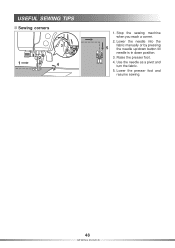
Use the needle as a pivot and turn the fabric.
5. Lower the presser foot and resume sewing.
48
SEWING BASICS Raise the presser foot.
4. Lower the needle into the
5
fabric manually or by pressing the needle up/down button till
needle is in down position.
3. USEFUL SEWING TIPS
Sewing corners
3
1. Stop the sewing machine when you reach a corner.
2.
Owner's Manual - Page 50
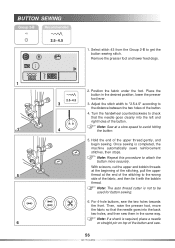
... the presser foot that should be selected with the selected stitch. If the wrong presser foot is automatically selected. 1. When the sewing machine is turned on the sewing machine.
* The straight stitch (center needle position) is attached before starting to "Changing the Presser Foot" on page 34. 4.
press 2 for the selected stitch.
* For details, refer...
Owner's Manual - Page 57
... it with the bobbin
thread. Hold the end of the stitching to get the button sewing stitch.
With scissors, cut the upper and bobbin threads
at the beginning of the stitching, pull the upper
5
thread at a slow speed to the distance between the two holes of the button and sew.
56
STITCHES
Once sewing is required, place a needle
6
or straight...
Owner's Manual - Page 76
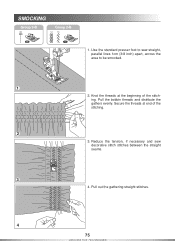
... lines 1cm (3/8 inch) apart, across the area to be smocked.
2. Knot the threads at end of the stitching. Secure the threads at the beginning of the stitching.
3. Pull the bobbin threads and distribute the gathers evenly. Reduce the tension, if necessary and sew decorative stitch stitches between the straight seams.
4. Pull out the gathering straight...
Owner's Manual - Page 81
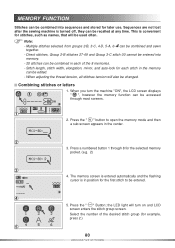
.... - Press the " " Button; When adjusting the thread tension, all stitches tension will be changed. Sequences are not lost after the sewing machine is turned off, they can be combined into
memory. ... convenient for the first stitch to open the memory mode and then a sub-screen appears in position for stitches, such as names, that will also be used often.
Press a numbered button 1...
Owner's Manual - Page 84
... screen will start the sewing machine.
4
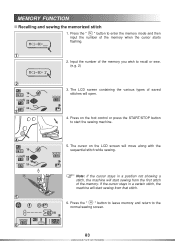
5. Note: If the cursor stays in a certain stitch, the machine will open.
3
4. The LCD screen containing the various types of the memory when the cursor starts flashing.
1
2.
MEMORY FUNCTION
Recalling and sewing the memorized stitch
1. If the cursor stays in a position not showing a stitch, the machine will move along with...
Owner's Manual - Page 85
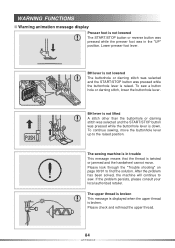
... twisted or jammed and the handwheel cannot move the buttonhole lever up to the raised position.
The sewing machine is in the "UP" position.
To sew a button hole or darning stitch, lower the buttonhole lever.
Please check and rethread the upper thread.
84
APPENDIX Lower presser foot lever. BH lever is not lifted A stitch other than...
Owner's Manual - Page 88
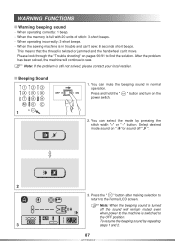
... power to the machine is twisted or jammed and the handwheel can mute the beeping sound in trouble and can select the mode by repeating
3
steps 1 and 2.
87
APPENDIX Press the " " button after making selection to return to find the solution. This means that the thread is switched to sew. You can 't move...
Owner's Manual - Page 89
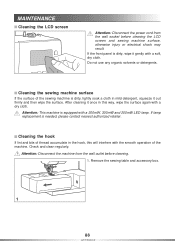
... wipe the surface. Check and clean regularly.
Cleaning the hook
If lint and bits of thread accumulate in this will interfere with a 200mW, 300mW and 200mW LED lamp. Cleaning the sewing machine surface
If the surface of the machine.
MAINTENANCE
Cleaning the LCD screen
Attention: Disconnect the power cord from the wall outlet before...
Owner's Manual - Page 90
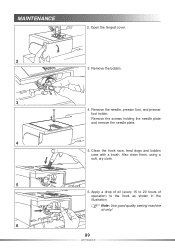
... the hook race, feed dogs and bobbin case with a brush. Apply a drop of oil (every 15 to 20 hours of operation) to the hook as shown in the illustration. Remove the needle, presser foot, and presser foot holder. Open the hinged cover.
2
3. Note: Use good quality sewing machine oil only!
6 89
APPENDIX MAINTENANCE
2. Remove...
Owner's Manual - Page 92
...
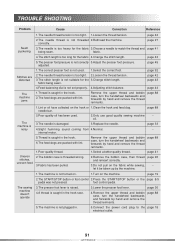
1.The correct presser foot is caught in the hook race.
4.Remove the upper thread and bobbin case, turn the handwheel backwards and forwards by hand and remove the thread remnants.
needle bar. page 44
1.Thread is not used .
2.Only use good quality sewing machine
--
page 33
4.Slight humming sound coming from 4.Normal.
--
Stitches are packed with lint...
Similar Questions

Edge Guide - Pfaff Select 1540 Sewing Machine
How does the Edge Guide work for the Pfaff Select 1540 sewing machine?
How does the Edge Guide work for the Pfaff Select 1540 sewing machine?
(Posted by jesjames 1 year ago)
My Bobbin Case Has Gone Into 2. The Spring Steel Got Off.
I have a Smarter c1100 pro, by pfaff. have anyone got that problem????
I have a Smarter c1100 pro, by pfaff. have anyone got that problem????
(Posted by dklisette 10 years ago)

Sewing Machines
i own a pfaff 362-261 automatic sewing machine made in germony in 1966. I still have its origanal ca...
i own a pfaff 362-261 automatic sewing machine made in germony in 1966. I still have its origanal ca...
(Posted by boancomputers 10 years ago)

Pfaff C1100 Pro Sewing Machine Instruction
Can you please direct me to "easy" to understand instruction on how to "thread" my Pfaff C1100 Pro s...
Can you please direct me to "easy" to understand instruction on how to "thread" my Pfaff C1100 Pro s...
(Posted by magicfeathers55 10 years ago)

Sewing Machine Is Blinking Away And Not Able To Operate
Sewing machine was sewing constantly even after I removed my foot from the pedal. I had to switch it...
Sewing machine was sewing constantly even after I removed my foot from the pedal. I had to switch it...
(Posted by kasperflindt 11 years ago)