
Owner's Manual
Page 4
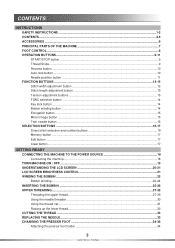
CONTENTS INSTRUCTIONS SAFETY INSTRUCTIONS ...1-2 CONTENTS...3-5 ACCESSORIES ...6 PRINCIPAL PARTS OF THE MACHINE 7 FOOT CONTROL ...8 OPERATION BUTTONS...9-11 START/STOP button...9 Thread Snips ...9 Reverse button ...10 Auto-lock button ...10 Needle position button ......
CONTENTS INSTRUCTIONS SAFETY INSTRUCTIONS ...1-2 CONTENTS...3-5 ACCESSORIES ...6 PRINCIPAL PARTS OF THE MACHINE 7 FOOT CONTROL ...8 OPERATION BUTTONS...9-11 START/STOP button...9 Thread Snips ...9 Reverse button ...10 Auto-lock button ...10 Needle position button ......
Owner's Manual
Page 7
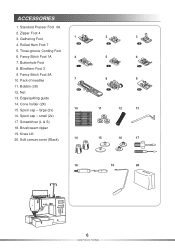
Rolled Hem Foot 7 5. Buttonhole Foot 8. Fancy Stitch Foot 2A 10. Pack of needles 11. Spool cap – large (2x) 16. Zipper Foot 4 3. Bobbin (3X) 12. Brush/seam ripper 19. Knee Lift 20. Edge/quilting guide 14. Blindhem Foot 3 9. Net 13. Cone holder (2X) 15. Soft canvas cover (Black) 6 INSTRUCTIONS Gathering Foot 4. Spool cap – small (2x) 17. Standard Presser Foot 0A 2. Fancy Stitch Foot 1A 7. Screwdriver (L & S) 18. ACCESSORIES 1. Three-groove Cording Foot 6.
Rolled Hem Foot 7 5. Buttonhole Foot 8. Fancy Stitch Foot 2A 10. Pack of needles 11. Spool cap – large (2x) 16. Zipper Foot 4 3. Bobbin (3X) 12. Brush/seam ripper 19. Knee Lift 20. Edge/quilting guide 14. Blindhem Foot 3 9. Net 13. Cone holder (2X) 15. Soft canvas cover (Black) 6 INSTRUCTIONS Gathering Foot 4. Spool cap – small (2x) 17. Standard Presser Foot 0A 2. Fancy Stitch Foot 1A 7. Screwdriver (L & S) 18. ACCESSORIES 1. Three-groove Cording Foot 6.
Owner's Manual
Page 8
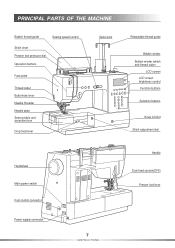
PRINCIPAL PARTS OF THE MACHINE Bobbin thread guide Sewing speed control Stitch chart Presser foot pressure dial Operation buttons Face plate Thread cutter Buttonhole lever Needle threader Needle plate Sewing table and accessory box Drop feed lever Spool pins Retractable thread guide Bobbin winder Bobbin winder switch and thread cutter LCD screen LCD screen brightness control Function buttons Selection buttons Knee Lift slot Stitch adjustment dial Handwheel Main power switch Foot control connector Power supply connector 7 INSTRUCTIONS Handle Dual feed system(DFS) Presser foot lever
PRINCIPAL PARTS OF THE MACHINE Bobbin thread guide Sewing speed control Stitch chart Presser foot pressure dial Operation buttons Face plate Thread cutter Buttonhole lever Needle threader Needle plate Sewing table and accessory box Drop feed lever Spool pins Retractable thread guide Bobbin winder Bobbin winder switch and thread cutter LCD screen LCD screen brightness control Function buttons Selection buttons Knee Lift slot Stitch adjustment dial Handwheel Main power switch Foot control connector Power supply connector 7 INSTRUCTIONS Handle Dual feed system(DFS) Presser foot lever
Owner's Manual
Page 50
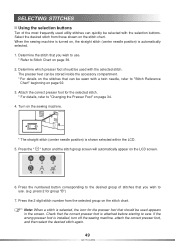
.... 5. When the sewing machine is turned on the LCD screen. 6. Attach the correct presser foot for group "B") 7. Check that can quickly be stored inside the accessory compartment. * For details on the stitches that the correct presser foot is attached before starting to "Changing the Presser Foot" on the sewing machine. * The...
.... 5. When the sewing machine is turned on the LCD screen. 6. Attach the correct presser foot for group "B") 7. Check that can quickly be stored inside the accessory compartment. * For details on the stitches that the correct presser foot is attached before starting to "Changing the Presser Foot" on the sewing machine. * The...
Owner's Manual
Page 89
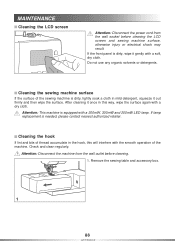
Do not use any organic solvents or detergents. If lamp replacement is equipped with a soft, dry cloth. Remove the sewing table and accessory box. 1 88 APPENDIX Cleaning the sewing machine surface If the surface of the machine. After cleaning it once in mild detergent, squeeze it gently with a ...
Do not use any organic solvents or detergents. If lamp replacement is equipped with a soft, dry cloth. Remove the sewing table and accessory box. 1 88 APPENDIX Cleaning the sewing machine surface If the surface of the machine. After cleaning it once in mild detergent, squeeze it gently with a ...


