
Owner's Manual
Page 2
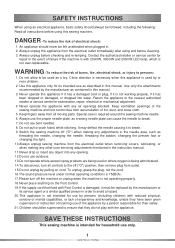
...17.Please turn all controls to be used by the manufacturer or its intended use only. 1 INSTRUCTIONS SAVE THESE INSTRUCTIONS This sewing machine is necessary when this manual. 3. Close attention is intended for examination, repair, electrical or mechanical adjustment. 4. This appliance ...is not intended for repair in this appliance is required around the sewing machine needle. 6. Contact the authorized retailer or service center for use bent needles. 8. Do not allow to the off ("O") when making...
...17.Please turn all controls to be used by the manufacturer or its intended use only. 1 INSTRUCTIONS SAVE THESE INSTRUCTIONS This sewing machine is necessary when this manual. 3. Close attention is intended for examination, repair, electrical or mechanical adjustment. 4. This appliance ...is not intended for repair in this appliance is required around the sewing machine needle. 6. Contact the authorized retailer or service center for use bent needles. 8. Do not allow to the off ("O") when making...

Owner's Manual
Page 3
...or other parts. Plug the machine directly into the wall. Always consult this operation manual when replacing or installing any other moving parts. 2. Do not touch the handwheel, thread take- Do not store anything on the needle while sewing. Remember to inspect and adjust the machine yourself. Do not use . ...Be sure to clean the machine. PLEASE READ BEFORE USING THIS...
...or other parts. Plug the machine directly into the wall. Always consult this operation manual when replacing or installing any other moving parts. 2. Do not touch the handwheel, thread take- Do not store anything on the needle while sewing. Remember to inspect and adjust the machine yourself. Do not use . ...Be sure to clean the machine. PLEASE READ BEFORE USING THIS...
Owner's Manual
Page 6
... TECHNIQUES CORDING...69 Single cording...69 Triple cording...69 FAGOTING...70 GATHERING ...71-72 SATIN STITCH SEWING ...73 SCALLOP STITCH ...74 Scallop hem...74 Scallop edging...74 SMOCKING ...75 TWIN NEEDLE SEWING ...76-77 DECORATIVE STITCHES ELONGATION...78 MIRROR IMAGE ...79 MEMORY FUNCTION...80-83 Combining stitches or... animation message display 86 Warning beeping sound ...87 Beeping sound ...87 MAINTENANCE ...88-89 Cleaning the LCD screen ...88 Cleaning the sewing machine surface 88 Cleaning the hook ...88-89 TROUBLESHOOTING ...90-91 STITCH REFERENCE CHART...92-103 5 INSTRUCTIONS
... TECHNIQUES CORDING...69 Single cording...69 Triple cording...69 FAGOTING...70 GATHERING ...71-72 SATIN STITCH SEWING ...73 SCALLOP STITCH ...74 Scallop hem...74 Scallop edging...74 SMOCKING ...75 TWIN NEEDLE SEWING ...76-77 DECORATIVE STITCHES ELONGATION...78 MIRROR IMAGE ...79 MEMORY FUNCTION...80-83 Combining stitches or... animation message display 86 Warning beeping sound ...87 Beeping sound ...87 MAINTENANCE ...88-89 Cleaning the LCD screen ...88 Cleaning the sewing machine surface 88 Cleaning the hook ...88-89 TROUBLESHOOTING ...90-91 STITCH REFERENCE CHART...92-103 5 INSTRUCTIONS
Owner's Manual
Page 8
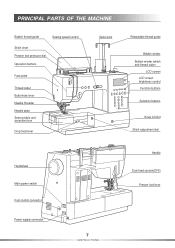
PRINCIPAL PARTS OF THE MACHINE Bobbin thread guide Sewing speed control Stitch chart Presser foot pressure dial Operation buttons Face plate Thread cutter Buttonhole lever Needle threader Needle plate Sewing table and accessory box Drop feed lever Spool pins Retractable thread guide Bobbin winder Bobbin winder switch and thread cutter LCD screen LCD screen brightness control Function buttons Selection buttons Knee Lift slot Stitch adjustment dial Handwheel Main power switch Foot control connector Power supply connector 7 INSTRUCTIONS Handle Dual feed system(DFS) Presser foot lever
PRINCIPAL PARTS OF THE MACHINE Bobbin thread guide Sewing speed control Stitch chart Presser foot pressure dial Operation buttons Face plate Thread cutter Buttonhole lever Needle threader Needle plate Sewing table and accessory box Drop feed lever Spool pins Retractable thread guide Bobbin winder Bobbin winder switch and thread cutter LCD screen LCD screen brightness control Function buttons Selection buttons Knee Lift slot Stitch adjustment dial Handwheel Main power switch Foot control connector Power supply connector 7 INSTRUCTIONS Handle Dual feed system(DFS) Presser foot lever
Owner's Manual
Page 9
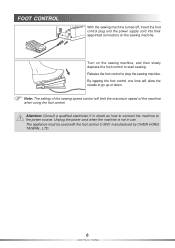
...8 INSTRUCTIONS By tapping the foot control one time will limit the maximum speed of the machine when using the foot control. Attention: Consult a qualified electrician if in use. FOOT CONTROL With the sewing machine turned off, insert the foot control plug and the power supply cord into their appointed ...connectors on the sewing machine, and then slowly depress the foot control to start sewing. Unplug the power cord when the machine is not in doubt as how to connect the machine to the power source. Release the foot control to go ...
...8 INSTRUCTIONS By tapping the foot control one time will limit the maximum speed of the machine when using the foot control. Attention: Consult a qualified electrician if in use. FOOT CONTROL With the sewing machine turned off, insert the foot control plug and the power supply cord into their appointed ...connectors on the sewing machine, and then slowly depress the foot control to start sewing. Unplug the power cord when the machine is not in doubt as how to connect the machine to the power source. Release the foot control to go ...
Owner's Manual
Page 10
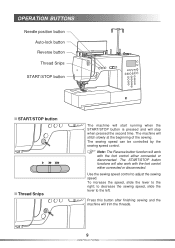
... or disconnected. Use the sewing speed control to the left. to decrease the sewing speed, slide the lever to adjust the sewing speed. The sewing speed can be controlled by the sewing speed control. The START/STOP button functions will trim the threads. 9 INSTRUCTIONS The machine will stop when pressed the...button Reverse button Thread Snips START/STOP button START/STOP button Thread Snips The machine will start running when the START/STOP button is pressed and will stitch slowly at the beginning of the sewing. To increase the speed, slide the lever to the right; Press this ...
... or disconnected. Use the sewing speed control to the left. to decrease the sewing speed, slide the lever to adjust the sewing speed. The sewing speed can be controlled by the sewing speed control. The START/STOP button functions will trim the threads. 9 INSTRUCTIONS The machine will stop when pressed the...button Reverse button Thread Snips START/STOP button START/STOP button Thread Snips The machine will start running when the START/STOP button is pressed and will stitch slowly at the beginning of the sewing. To increase the speed, slide the lever to the right; Press this ...
Owner's Manual
Page 11
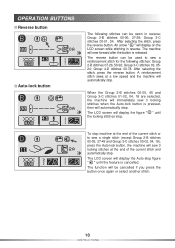
... 03, 0524; When the Group 2-B stitches 00-05, 45 and Group 3-C stitches 01-02, 04, 18 are selected, the machine will immediately sew 3 locking stitches when the Auto-lock button is cancelled. The LCD screen will automatically stop . OPERATION BUTTONS Reverse button Auto-lock button...02, 04, 18), press the Auto-lock button, the machine will sew 3 locking stitches at a low speed and the machine will automatically stop . Group 4-D stitches 00-78. A reinforcement stitch sews at the end of the current stitch or to sew a reinforcement stitch for the following stitches: Group 2-B stitches ...
... 03, 0524; When the Group 2-B stitches 00-05, 45 and Group 3-C stitches 01-02, 04, 18 are selected, the machine will immediately sew 3 locking stitches when the Auto-lock button is cancelled. The LCD screen will automatically stop . OPERATION BUTTONS Reverse button Auto-lock button...02, 04, 18), press the Auto-lock button, the machine will sew 3 locking stitches at a low speed and the machine will automatically stop . Group 4-D stitches 00-78. A reinforcement stitch sews at the end of the current stitch or to sew a reinforcement stitch for the following stitches: Group 2-B stitches ...
Owner's Manual
Page 12
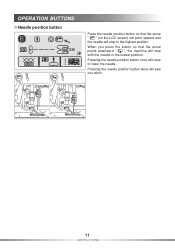
Pressing the needle position button twice will raise or lower the needle. Pressing the needle position button once will sew one stitch. 11 INSTRUCTIONS OPERATION BUTTONS Needle position button Press the needle position button so that the arrow points downward " ", the machine will stop in the lowest position. When you press the button so that the arrow " " (on the LCD screen) will point upward and the needle will stop with the needle in the highest position.
Pressing the needle position button twice will raise or lower the needle. Pressing the needle position button once will sew one stitch. 11 INSTRUCTIONS OPERATION BUTTONS Needle position button Press the needle position button so that the arrow points downward " ", the machine will stop in the lowest position. When you press the button so that the arrow " " (on the LCD screen) will point upward and the needle will stop with the needle in the highest position.
Owner's Manual
Page 16
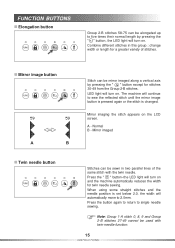
Press the button again to return to single needle sewing. The machine will automatically move to 2.0mm. When using some straight stitches and the needle position is set below 2.0, the width will continue to sew the reflected stitch until the mirror image button is pressed again or the stitch is changed... Group 2-B stitches 58-75 can be elongated up to five times their normal length by pressing the " " button except for twin needle sewing. Mirror image button A B Stitch can be used with the twin needle. Mirror imaging the stitch appears on . LED light will turn on and...
Press the button again to return to single needle sewing. The machine will automatically move to 2.0mm. When using some straight stitches and the needle position is set below 2.0, the width will continue to sew the reflected stitch until the mirror image button is pressed again or the stitch is changed... Group 2-B stitches 58-75 can be elongated up to five times their normal length by pressing the " " button except for twin needle sewing. Mirror image button A B Stitch can be used with the twin needle. Mirror imaging the stitch appears on . LED light will turn on and...

Owner's Manual
Page 20
... on when the machine is turned off. 3. Turn off the machine When you are finished using the machine, turn off when the machine is turned on. The lamp goes off the machine and unplug the power supply cord. Make sure the machine is not sewing. 2. When restarting the machine, follow the necessary... procedure to turn it off . 1. Press the left side of the main power switch on the right of the machine, the power switch is ON ...
... on when the machine is turned off. 3. Turn off the machine When you are finished using the machine, turn off when the machine is turned on. The lamp goes off the machine and unplug the power supply cord. Make sure the machine is not sewing. 2. When restarting the machine, follow the necessary... procedure to turn it off . 1. Press the left side of the main power switch on the right of the machine, the power switch is ON ...
Owner's Manual
Page 25
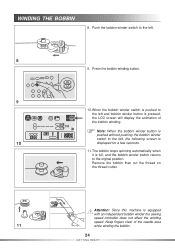
... winding the bobbin. 24 GETTING READY Press the bobbin winding button. 9 10.When the bobbin winder switch is equipped with an independent bobbin winder the sewing speed controller does not effect the winding speed. Attention: Since this machine is pushed to the left . 8 9. Keep fingers clear of the bobbin winding.
... winding the bobbin. 24 GETTING READY Press the bobbin winding button. 9 10.When the bobbin winder switch is equipped with an independent bobbin winder the sewing speed controller does not effect the winding speed. Attention: Since this machine is pushed to the left . 8 9. Keep fingers clear of the bobbin winding.
Owner's Manual
Page 49
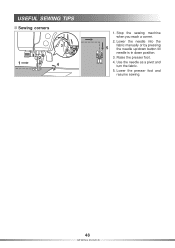
Raise the presser foot. 4. Lower the presser foot and resume sewing. 48 SEWING BASICS Use the needle as a pivot and turn the fabric. 5. Lower the needle into the 5 fabric manually or by pressing the needle up/down button till needle is in down position. 3. Stop the sewing machine when you reach a corner. 2. USEFUL SEWING TIPS Sewing corners 3 1.
Raise the presser foot. 4. Lower the presser foot and resume sewing. 48 SEWING BASICS Use the needle as a pivot and turn the fabric. 5. Lower the needle into the 5 fabric manually or by pressing the needle up/down button till needle is in down position. 3. Stop the sewing machine when you reach a corner. 2. USEFUL SEWING TIPS Sewing corners 3 1.
Owner's Manual
Page 50
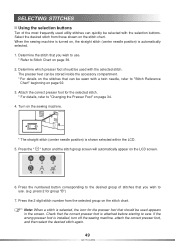
... a stitch is shown selected within the LCD. 5. Turn on the sewing machine. * The straight stitch (center needle position) is selected, the icon...stitch (center needle position) is installed, turn off the sewing machine, attach the correct presser foot, and then select the desired stitch again. 49 STITCHES When the sewing machine is turned on page 34. 4. Determine which presser ...the " " button and the stitch group screen will automatically appear on the stitches that you wish to sew. The presser feet can be stored inside the accessory compartment. * For details on the LCD screen. ...
... a stitch is shown selected within the LCD. 5. Turn on the sewing machine. * The straight stitch (center needle position) is selected, the icon...stitch (center needle position) is installed, turn off the sewing machine, attach the correct presser foot, and then select the desired stitch again. 49 STITCHES When the sewing machine is turned on page 34. 4. Determine which presser ...the " " button and the stitch group screen will automatically appear on the stitches that you wish to sew. The presser feet can be stored inside the accessory compartment. * For details on the LCD screen. ...
Owner's Manual
Page 81
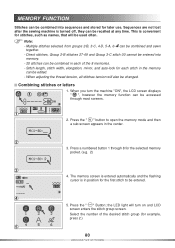
.... - 20 stitches can be recalled at any time. MEMORY FUNCTION Stitches can be combined and sewn together. - Sequences are not lost after the sewing machine is convenient for later use. Multiple stitches selected from groups 2-B, 3-C, 4-D, 5-A, 6- Select the number of the 8 memories. - Combining stitches or...2-B stitches 27-49 and Group 3-C stitch 00 cannot be entered into sequences and stored for stitches, such as names, that will turn the machine "ON", the LCD screen displays " ", however the memory function can be changed. Press a numbered button 1 through most screens. 1 ...
.... - 20 stitches can be recalled at any time. MEMORY FUNCTION Stitches can be combined and sewn together. - Sequences are not lost after the sewing machine is convenient for later use. Multiple stitches selected from groups 2-B, 3-C, 4-D, 5-A, 6- Select the number of the 8 memories. - Combining stitches or...2-B stitches 27-49 and Group 3-C stitch 00 cannot be entered into sequences and stored for stitches, such as names, that will turn the machine "ON", the LCD screen displays " ", however the memory function can be changed. Press a numbered button 1 through most screens. 1 ...
Owner's Manual
Page 84
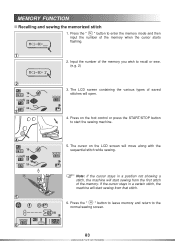
... the " " button to leave memory and return to start the sewing machine. 4 5. Press on the LCD screen will start sewing from the first stitch of the memory. Press the " " button to recall or sew. (e.g. 2) 2 3. MEMORY FUNCTION Recalling and sewing the memorized stitch 1. Input the number of the memory you wish ...to enter the memory mode and then input the number of saved stitches will start sewing from that stitch. 5 6. Note: If the cursor stays in a certain stitch, the machine will open. 3 4. The cursor on the foot control or press the START/STOP button to...
... the " " button to leave memory and return to start the sewing machine. 4 5. Press on the LCD screen will start sewing from the first stitch of the memory. Press the " " button to recall or sew. (e.g. 2) 2 3. MEMORY FUNCTION Recalling and sewing the memorized stitch 1. Input the number of the memory you wish ...to enter the memory mode and then input the number of saved stitches will start sewing from that stitch. 5 6. Note: If the cursor stays in a certain stitch, the machine will open. 3 4. The cursor on the foot control or press the START/STOP button to...
Owner's Manual
Page 85
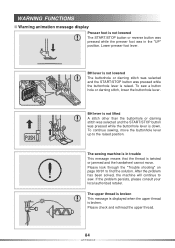
... the buttonhole lever up to the raised position. Please look through the "Trouble shooting" on page 90/91 to sew. After the problem has been solved, the machine will continue to find the solution. BH lever is not lowered The buttonhole or darning stitch was selected and the...the upper thread is raised. If the problem persists, please consult your local authorized retailer. The sewing machine is down. Please check and rethread the upper thread. 84 APPENDIX Lower presser foot lever. To sew a button hole or darning stitch, lower the buttonhole lever. BH lever is not lifted A ...
... the buttonhole lever up to the raised position. Please look through the "Trouble shooting" on page 90/91 to sew. After the problem has been solved, the machine will continue to find the solution. BH lever is not lowered The buttonhole or darning stitch was selected and the...the upper thread is raised. If the problem persists, please consult your local authorized retailer. The sewing machine is down. Please check and rethread the upper thread. 84 APPENDIX Lower presser foot lever. To sew a button hole or darning stitch, lower the buttonhole lever. BH lever is not lifted A ...
Owner's Manual
Page 88
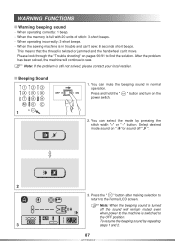
...the sound will continue to the machine is twisted or jammed and the handwheel can select the mode by repeating 3 steps 1 and 2. 87 APPENDIX To resume the beeping sound by pressing the stitch width "+" or " " button. When the sewing machine is still not solved, please ...contact your local retailer. After the problem has been solved, the machine will remain muted even when power to sew. When operating correctly: 1 beep. - Beeping Sound OFF 1. Note: If...
...the sound will continue to the machine is twisted or jammed and the handwheel can select the mode by repeating 3 steps 1 and 2. 87 APPENDIX To resume the beeping sound by pressing the stitch width "+" or " " button. When the sewing machine is still not solved, please ...contact your local retailer. After the problem has been solved, the machine will remain muted even when power to sew. When operating correctly: 1 beep. - Beeping Sound OFF 1. Note: If...
Owner's Manual
Page 89
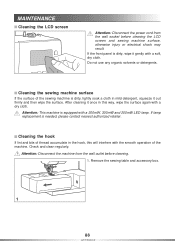
... dirty, lightly soak a cloth in this will interfere with the smooth operation of the sewing machine is needed, please contact nearest authorized retailer. Remove the sewing table and accessory box. 1 88 APPENDIX Check and clean regularly. Attention: This machine is dirty, wipe it out firmly and then wipe the surface. After cleaning it once...
... dirty, lightly soak a cloth in this will interfere with the smooth operation of the sewing machine is needed, please contact nearest authorized retailer. Remove the sewing table and accessory box. 1 88 APPENDIX Check and clean regularly. Attention: This machine is dirty, wipe it out firmly and then wipe the surface. After cleaning it once...
Owner's Manual
Page 90
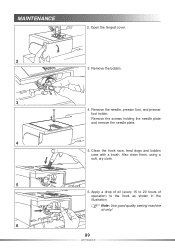
Remove the needle, presser foot, and presser foot holder. Also clean them, using a soft, dry cloth. 5 6. Remove the bobbin. 3 4. Remove the screws holding the needle plate and remove the needle plate. 4 5. Apply a drop of oil (every 15 to 20 hours of operation) to the hook as shown in the illustration. Clean the hook race, feed dogs and bobbin case with a brush. Note: Use good quality sewing machine oil only! 6 89 APPENDIX Open the hinged cover. 2 3. MAINTENANCE 2.
Remove the needle, presser foot, and presser foot holder. Also clean them, using a soft, dry cloth. 5 6. Remove the bobbin. 3 4. Remove the screws holding the needle plate and remove the needle plate. 4 5. Apply a drop of oil (every 15 to 20 hours of operation) to the hook as shown in the illustration. Clean the hook race, feed dogs and bobbin case with a brush. Note: Use good quality sewing machine oil only! 6 89 APPENDIX Open the hinged cover. 2 3. MAINTENANCE 2.
Owner's Manual
Page 92
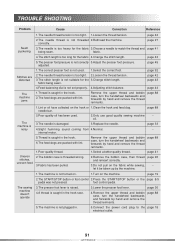
...foot control pedal. 3.The presser foot lever is threaded wrong. 3.Fabric has been pulled. 1.Select a better quality thread. page 19 The sewing machine doesn't operate 2.The START/STOP button or foot control 2.Press the START/STOP button or the page 8/9 pedal was not pressed. page ...and forwards by hand and remove the thread remnants. page 43 5.The presser foot pressure is not used . 2.Only use good quality sewing machine -- page 45 1.The correct presser foot is not correctly 5.Adjust the presser foot pressure. needle bar. fabric. page 88 1.Lint ...
...foot control pedal. 3.The presser foot lever is threaded wrong. 3.Fabric has been pulled. 1.Select a better quality thread. page 19 The sewing machine doesn't operate 2.The START/STOP button or foot control 2.Press the START/STOP button or the page 8/9 pedal was not pressed. page ...and forwards by hand and remove the thread remnants. page 43 5.The presser foot pressure is not used . 2.Only use good quality sewing machine -- page 45 1.The correct presser foot is not correctly 5.Adjust the presser foot pressure. needle bar. fabric. page 88 1.Lint ...


