Operation Manual
Page 12
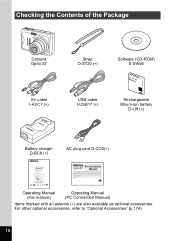
Checking the Contents of the Package Camera Optio S7 Strap O-ST20 (∗) Software (CD-ROM) S-SW56 AV cable I-AVC7 (∗) USB cable I-USB17 (∗) Rechargeable lithium-ion battery D-LI8 (∗) Battery charger D-BC8 (∗) AC plug cord D-CO2(∗) Operating Manual (this manual) Operating Manual (PC Connection Manual) Items marked with an asterisk (∗) are also available as optional accessories. For other optional accessories, refer to "Optional Accessories" (p.174). 10
Checking the Contents of the Package Camera Optio S7 Strap O-ST20 (∗) Software (CD-ROM) S-SW56 AV cable I-AVC7 (∗) USB cable I-USB17 (∗) Rechargeable lithium-ion battery D-LI8 (∗) Battery charger D-BC8 (∗) AC plug cord D-CO2(∗) Operating Manual (this manual) Operating Manual (PC Connection Manual) Items marked with an asterisk (∗) are also available as optional accessories. For other optional accessories, refer to "Optional Accessories" (p.174). 10

Operation Manual
Page 26
.... Write-protect switch Setting the switch to [LOCK] protects the existing data by your nearest PENTAX service center. • If you are taking movies even when there is connected to a PC with the USB cable as this may damage the card and render it cannot be exposed to rapid changes in direct... Memory Card will not necessarily delete the data so that will completely delete the data. Be sure to discard, give away or sell your camera. Inquiries on the card, images or sound are off while data is being recorded on the card compatibility can also be answered by prohibiting ...
.... Write-protect switch Setting the switch to [LOCK] protects the existing data by your nearest PENTAX service center. • If you are taking movies even when there is connected to a PC with the USB cable as this may damage the card and render it cannot be exposed to rapid changes in direct... Memory Card will not necessarily delete the data so that will completely delete the data. Be sure to discard, give away or sell your camera. Inquiries on the card, images or sound are off while data is being recorded on the card compatibility can also be answered by prohibiting ...
Operation Manual
Page 130
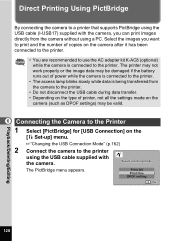
... 128 Select printing mode The PictBridge menu appears. Select the images you can print images directly from the camera to the printer. • Do not disconnect the USB cable during data transfer. • Depending on the type of printer, not all the settings made on the...copies on the [B Set-up] menu. 1"Changing the USB Connection Mode" (p.162) 2 Connect the camera to the printer. Direct Printing Using PictBridge By connecting the camera to a printer that supports PictBridge using the USB cable (I-USB17) supplied with the camera, you want to print and the number of power while...
... 128 Select printing mode The PictBridge menu appears. Select the images you can print images directly from the camera to the printer. • Do not disconnect the USB cable during data transfer. • Depending on the type of printer, not all the settings made on the...copies on the [B Set-up] menu. 1"Changing the USB Connection Mode" (p.162) 2 Connect the camera to the printer. Direct Printing Using PictBridge By connecting the camera to a printer that supports PictBridge using the USB cable (I-USB17) supplied with the camera, you want to print and the number of power while...

Operation Manual
Page 133
... appears. When you disconnect the USB cable from the camera before you turn the camera off . 6 2 Disconnect the USB cable from the camera. 3 Disconnect the USB cable from the printer when you have finished printing. 1 Turn the camera off , the camera returns to select [DPOF setting]. 2 Press the OK button. Disconnecting the Camera from the Printer Disconnect the camera from the printer. To...
... appears. When you disconnect the USB cable from the camera before you turn the camera off . 6 2 Disconnect the USB cable from the camera. 3 Disconnect the USB cable from the printer when you have finished printing. 1 Turn the camera off , the camera returns to select [DPOF setting]. 2 Press the OK button. Disconnecting the Camera from the Printer Disconnect the camera from the printer. To...

Operation Manual
Page 164
The camera is ready to select [NTSC] or [PAL]. Settings Changing the Video Output Format You can change the USB Connection mode depending on whether the USB cable is set . The pull-down menu appears. 3 Use the four-way controller (23) to play back images. 7 Do not connect the printer while "...controller MENU MENU button Rec. Choose the video output format to match the output format of the TV. 4 Press the Q Playback button. 162 The camera is set . The pull-down menu appears. 3 Use the four-way controller (23) to play back images. Mode Recorded Pixels Quality Level White ...
The camera is ready to select [NTSC] or [PAL]. Settings Changing the Video Output Format You can change the USB Connection mode depending on whether the USB cable is set . The pull-down menu appears. 3 Use the four-way controller (23) to play back images. 7 Do not connect the printer while "...controller MENU MENU button Rec. Choose the video output format to match the output format of the TV. 4 Press the Q Playback button. 162 The camera is set . The pull-down menu appears. 3 Use the four-way controller (23) to play back images. Mode Recorded Pixels Quality Level White ...

Operation Manual
Page 165
...Press the four-way controller (5). The Power Saving function will not work in the following conditions. • In Playback mode • When the USB cable is ready to play back images. Moving the slider leftwards makes the LCD monitor darker and moving rightwards makes it brighter. 3 Press the Q Playback...button. When Power Saving takes effect and the LCD monitor dims, press any button to return to dim automatically when you leave the 7 camera without performing any operations for a certain period, you can adjust the brightness of the LCD Monitor You can lessen battery drain. Set-...
...Press the four-way controller (5). The Power Saving function will not work in the following conditions. • In Playback mode • When the USB cable is ready to play back images. Moving the slider leftwards makes the LCD monitor darker and moving rightwards makes it brighter. 3 Press the Q Playback...button. When Power Saving takes effect and the LCD monitor dims, press any button to return to dim automatically when you leave the 7 camera without performing any operations for a certain period, you can adjust the brightness of the LCD Monitor You can lessen battery drain. Set-...
Operation Manual
Page 166
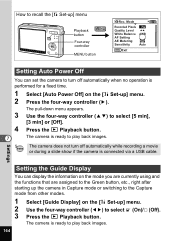
...way controller (45) to select O (On)/P (Off). 3 Press the Q Playback button. The camera is connected via a USB cable. The camera does not turn off automatically while recording a movie or during a slide show if the camera is ready to select [5 min], [3 min] or [Off]. 4 Press the Q Playback button.... 7 The camera is performed for a fixed time. 1 Select [Auto Power Off] on ...
...way controller (45) to select O (On)/P (Off). 3 Press the Q Playback button. The camera is connected via a USB cable. The camera does not turn off automatically while recording a movie or during a slide show if the camera is ready to select [5 min], [3 min] or [Off]. 4 Press the Q Playback button.... 7 The camera is performed for a fixed time. 1 Select [Auto Power Off] on ...

Operation Manual
Page 176
USB cable I-USB17 (∗) AV cable I-AVC7 (∗) Camera case O-CC56 Strap O-ST8 Strap O-ST20 (∗) Leather Strap O-ST24 Sports Strap O-ST30 Remote control unit E (zoom function) Remote control unit F Rechargeable lithium-ion battery D-... (∗). Optional Accessories A number of the AC plug cord name differs depending on the country. 8 Products marked with an asterisk (∗) are available for this camera. The ending of dedicated accessories are the same as those supplied with the...
USB cable I-USB17 (∗) AV cable I-AVC7 (∗) Camera case O-CC56 Strap O-ST8 Strap O-ST20 (∗) Leather Strap O-ST24 Sports Strap O-ST30 Remote control unit E (zoom function) Remote control unit F Rechargeable lithium-ion battery D-... (∗). Optional Accessories A number of the AC plug cord name differs depending on the country. 8 Products marked with an asterisk (∗) are available for this camera. The ending of dedicated accessories are the same as those supplied with the...

Operation Manual
Page 183
Flash Type Auto flash with the conditions under which the camera is used. Time Function World Time setting for 50% of Auto) Tele: Approx. 0.4 m - Approx. 5.1 m (at the standard output sensitivity of Auto) Drive Modes Single-frame,... SD Memory Card) Weight When Shooting 120 g (including battery and SD Memory Card) Accessories Rechargeable lithium-ion battery, battery charger, AC plug cord, USB cable, software (CD-ROM), AV cable, strap, operating manual Power Supply Battery Charger D-BC8 AC Adapter D-AC8 (optional) Rated input AC100-240V (50Hz/60Hz) AC100-240V (50Hz/60Hz) ...
Flash Type Auto flash with the conditions under which the camera is used. Time Function World Time setting for 50% of Auto) Tele: Approx. 0.4 m - Approx. 5.1 m (at the standard output sensitivity of Auto) Drive Modes Single-frame,... SD Memory Card) Weight When Shooting 120 g (including battery and SD Memory Card) Accessories Rechargeable lithium-ion battery, battery charger, AC plug cord, USB cable, software (CD-ROM), AV cable, strap, operating manual Power Supply Battery Charger D-BC8 AC Adapter D-AC8 (optional) Rated input AC100-240V (50Hz/60Hz) AC100-240V (50Hz/60Hz) ...
Connection Guide
Page 1
...ensure full operation of ACDSee for Internet Product Registration is available on the Apple website. The PENTAX Software Installer screen appears. Windows, Macintosh Step 3 Setting Up Your Digital Camera Setting the USB Connection Mode to [PC] 1 Press the 3 button. 2 Press the four-way controller ... to register your computer with the USB cable. PC Connection Manual You can transfer images and movies captured with a digital camera to your computer and then organize, display, edit, print, and share them by Optio S7 on Windows 98/NT. USB connection • OS : Mac ...
...ensure full operation of ACDSee for Internet Product Registration is available on the Apple website. The PENTAX Software Installer screen appears. Windows, Macintosh Step 3 Setting Up Your Digital Camera Setting the USB Connection Mode to [PC] 1 Press the 3 button. 2 Press the four-way controller ... to register your computer with the USB cable. PC Connection Manual You can transfer images and movies captured with a digital camera to your computer and then organize, display, edit, print, and share them by Optio S7 on Windows 98/NT. USB connection • OS : Mac ...

Connection Guide
Page 2
... preview of folders in the [Components missing] dialog box. It is the only pane that [Acquire images from the digital camera, it to your camera on . Disconnecting the Camera from a camera connected to the Macintosh. • To edit images, first transfer them as [NO_NAME] ([untitled] in folder [xxxPENTX],...to the Playback Only mode when the USB cable is disconnected. H Status bar Displays information and properties for PENTAX] icon. For details on how to use each function. 1 Select [ACDSee™ Help] from [Help] on . 2 With your camera turned off , connect it is not...
... preview of folders in the [Components missing] dialog box. It is the only pane that [Acquire images from the digital camera, it to your camera on . Disconnecting the Camera from a camera connected to the Macintosh. • To edit images, first transfer them as [NO_NAME] ([untitled] in folder [xxxPENTX],...to the Playback Only mode when the USB cable is disconnected. H Status bar Displays information and properties for PENTAX] icon. For details on how to use each function. 1 Select [ACDSee™ Help] from [Help] on . 2 With your camera turned off , connect it is not...

