Operation Manual
Page 8
... of Operating Parts 12 Getting Started 13 Attaching the Strap 13 Powering the Camera 14 Installing the Battery 14 Removing the Battery 14 Charging the Battery 16 Charging the Battery Abroad 19 Using the AC Adapter (optional 21 Installing the SD Memory Card 23 Image Size and Quality of Still ... Playing Back an Image 34 Playing Back the Previous or Next Image 34 Common Operations 36 Turning the Camera On and Off 36 Using the My Album Function 36 Turning the Camera On in Playback Mode 37 Using the Button Functions 38 Capture Mode 38 Playback Mode 39 Voice Recording...
... of Operating Parts 12 Getting Started 13 Attaching the Strap 13 Powering the Camera 14 Installing the Battery 14 Removing the Battery 14 Charging the Battery 16 Charging the Battery Abroad 19 Using the AC Adapter (optional 21 Installing the SD Memory Card 23 Image Size and Quality of Still ... Playing Back an Image 34 Playing Back the Previous or Next Image 34 Common Operations 36 Turning the Camera On and Off 36 Using the My Album Function 36 Turning the Camera On in Playback Mode 37 Using the Button Functions 38 Capture Mode 38 Playback Mode 39 Voice Recording...
Operation Manual
Page 9
...According to the Shooting Scene (Picture Mode 57 Taking Pictures of Dark Scenes (Night Scene Mode 61 Taking Movies (Movie Mode 62 Reducing Camera Shake and Blurring in Photos (Blur reduction Mode 64 Taking Pictures in Frame Composite mode 65 Using the Self-timer 67 Continuous Shooting (Continuous... Shooting Mode 69 Using the Remote Control Unit (optional 71 Using the Zoom to Change the Subject Size 73 Setting the Shooting Functions 75 Selecting the Focus Mode 75 Selecting the Flash ...
...According to the Shooting Scene (Picture Mode 57 Taking Pictures of Dark Scenes (Night Scene Mode 61 Taking Movies (Movie Mode 62 Reducing Camera Shake and Blurring in Photos (Blur reduction Mode 64 Taking Pictures in Frame Composite mode 65 Using the Self-timer 67 Continuous Shooting (Continuous... Shooting Mode 69 Using the Remote Control Unit (optional 71 Using the Zoom to Change the Subject Size 73 Setting the Shooting Functions 75 Selecting the Focus Mode 75 Selecting the Flash ...
Operation Manual
Page 10
...Images 134 Rotating the Displayed Image 135 Editing Pictures with Color Filters 136 Editing Pictures with the Digital Filter 138 Editing Pictures with Brightness Filter 140 Editing Movies 142 Red-eye Compensation 145 Adding a ...Frame (Frame Composite 147 Copying Files 149 Settings 151 Camera Settings 151 Setting Up the Start-up Screen 151 Formatting an SD Memory Card or the Built... List of City 166 Default Settings 167 Optional Accessories 174 Messages 175 Troubleshooting 177 Main Specifications 179 WARRANTY POLICY 182 Index...187 8
...Images 134 Rotating the Displayed Image 135 Editing Pictures with Color Filters 136 Editing Pictures with the Digital Filter 138 Editing Pictures with Brightness Filter 140 Editing Movies 142 Red-eye Compensation 145 Adding a ...Frame (Frame Composite 147 Copying Files 149 Settings 151 Camera Settings 151 Setting Up the Start-up Screen 151 Formatting an SD Memory Card or the Built... List of City 166 Default Settings 167 Optional Accessories 174 Messages 175 Troubleshooting 177 Main Specifications 179 WARRANTY POLICY 182 Index...187 8
Operation Manual
Page 12
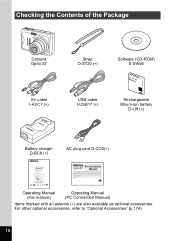
Checking the Contents of the Package Camera Optio S7 Strap O-ST20 (∗) Software (CD-ROM) S-SW56 AV cable I-AVC7 (∗) USB cable I-USB17 (∗) Rechargeable lithium-ion battery D-LI8 (∗) Battery charger D-BC8 (∗) AC plug cord D-CO2(∗) Operating Manual (this manual) Operating Manual (PC Connection Manual) Items marked with an asterisk (∗) are also available as optional accessories. For other optional accessories, refer to "Optional Accessories" (p.174). 10
Checking the Contents of the Package Camera Optio S7 Strap O-ST20 (∗) Software (CD-ROM) S-SW56 AV cable I-AVC7 (∗) USB cable I-USB17 (∗) Rechargeable lithium-ion battery D-LI8 (∗) Battery charger D-BC8 (∗) AC plug cord D-CO2(∗) Operating Manual (this manual) Operating Manual (PC Connection Manual) Items marked with an asterisk (∗) are also available as optional accessories. For other optional accessories, refer to "Optional Accessories" (p.174). 10
Operation Manual
Page 17
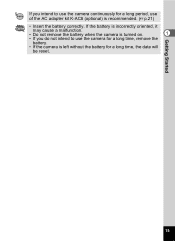
If you do not intend to use of the AC adapter kit K-AC8 (optional) is left without the battery for a long period, use the camera continuously for a long time, the date will be reset. Getting Started 15 If the battery is incorrectly oriented, it may cause a malfunction. • Do not remove the battery when the camera is turned on. 1 • If you intend to use the camera for a long time, remove the battery. • If the camera is recommended. (1p.21) • Insert the battery correctly.
If you do not intend to use of the AC adapter kit K-AC8 (optional) is left without the battery for a long period, use the camera continuously for a long time, the date will be reset. Getting Started 15 If the battery is incorrectly oriented, it may cause a malfunction. • Do not remove the battery when the camera is turned on. 1 • If you intend to use the camera for a long time, remove the battery. • If the camera is recommended. (1p.21) • Insert the battery correctly.
Operation Manual
Page 23
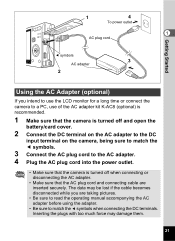
... LCD monitor for a long time or connect the camera to a PC, use of the AC adapter kit K-AC8 (optional) is recommended. 1 Make sure that the camera is turned off and open the battery/card cover.... 2 Connect the DC terminal on the AC adapter to the DC input terminal on the camera, being sure to... AC adapter. 4 Plug the AC plug cord into the power outlet. • Make sure that the camera is turned off when connecting or disconnecting the AC adapter. • Make sure that the AC plug cord...
... LCD monitor for a long time or connect the camera to a PC, use of the AC adapter kit K-AC8 (optional) is recommended. 1 Make sure that the camera is turned off and open the battery/card cover.... 2 Connect the DC terminal on the AC adapter to the DC input terminal on the camera, being sure to... AC adapter. 4 Plug the AC plug cord into the power outlet. • Make sure that the camera is turned off when connecting or disconnecting the AC adapter. • Make sure that the AC plug cord...

Operation Manual
Page 73
...select i or h. 3 Press the OK button. h The picture is taken immediately. • Focusing may be compromised if you move the camera while the self-timer lamp is taken after approximately three seconds. i The self-timer lamp blinks quickly and the picture is blinking. • ... the remote control unit in Capture mode. 2 Use the four-way controller (45) to take pictures using the remote control unit E or F (optional). 4 Taking Pictures Using the Remote Control 1 Press the four-way controller (2) in Movie mode. 71 Taking Pictures Four-way controller OK button Shutter release...
...select i or h. 3 Press the OK button. h The picture is taken immediately. • Focusing may be compromised if you move the camera while the self-timer lamp is taken after approximately three seconds. i The self-timer lamp blinks quickly and the picture is blinking. • ... the remote control unit in Capture mode. 2 Use the four-way controller (45) to take pictures using the remote control unit E or F (optional). 4 Taking Pictures Using the Remote Control 1 Press the four-way controller (2) in Movie mode. 71 Taking Pictures Four-way controller OK button Shutter release...
Operation Manual
Page 74
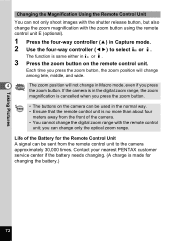
...you press the zoom button. • The buttons on the remote control unit. Life of the camera. • You cannot change the digital zoom range with the zoom button using the remote control unit E (optional). 1 Press the four-way controller (2) in the normal way. • Ensure that the ... zoom position will not change in i or h. 3 Press the zoom button on the camera can be sent from the front of the Battery for changing the battery.) Taking Pictures 72 Contact your nearest PENTAX customer service center if the battery needs changing. (A charge is same either in Macro mode...
...you press the zoom button. • The buttons on the remote control unit. Life of the camera. • You cannot change the digital zoom range with the zoom button using the remote control unit E (optional). 1 Press the four-way controller (2) in the normal way. • Ensure that the ... zoom position will not change in i or h. 3 Press the zoom button on the camera can be sent from the front of the Battery for changing the battery.) Taking Pictures 72 Contact your nearest PENTAX customer service center if the battery needs changing. (A charge is same either in Macro mode...
Operation Manual
Page 126
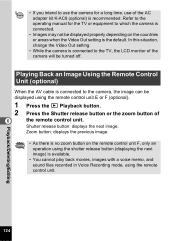
In this situation, change the Video Out setting. • While the camera is connected to the camera, the image can be displayed using the remote control unit E or F (optional). 1 Press the Q Playback button. 2 Press the Shutter release button or the zoom button of 6 the remote control unit. Zoom button: displays the previous image. •...
In this situation, change the Video Out setting. • While the camera is connected to the camera, the image can be displayed using the remote control unit E or F (optional). 1 Press the Q Playback button. 2 Press the Shutter release button or the zoom button of 6 the remote control unit. Zoom button: displays the previous image. •...
Operation Manual
Page 130
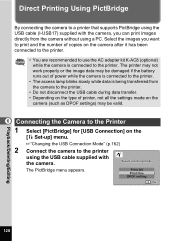
...cable (I-USB17) supplied with the camera, you want to print and the number of copies on the camera after it has been connected to the printer. • You are recommended to use the AC adapter kit K-AC8 (optional) while the camera is being transferred from the camera without using the USB cable ...supplied with the camera. The printer may not work properly or the image data may be damaged if the battery runs ...
...cable (I-USB17) supplied with the camera, you want to print and the number of copies on the camera after it has been connected to the printer. • You are recommended to use the AC adapter kit K-AC8 (optional) while the camera is being transferred from the camera without using the USB cable ...supplied with the camera. The printer may not work properly or the image data may be damaged if the battery runs ...

Operation Manual
Page 176
Optional Accessories A number of the AC plug cord name differs depending on the country. 8 Products marked with the camera. 174 Appendix The ending of dedicated accessories are the same as those supplied with an asterisk (∗) are available for this camera. USB cable I-USB17 (∗) AV cable I-AVC7 (∗) Camera case O-CC56 Strap O-ST8 Strap...
Optional Accessories A number of the AC plug cord name differs depending on the country. 8 Products marked with the camera. 174 Appendix The ending of dedicated accessories are the same as those supplied with an asterisk (∗) are available for this camera. USB cable I-USB17 (∗) AV cable I-AVC7 (∗) Camera case O-CC56 Strap O-ST8 Strap...

Operation Manual
Page 183
..., battery charger, AC plug cord, USB cable, software (CD-ROM), AV cable, strap, operating manual Power Supply Battery Charger D-BC8 AC Adapter D-AC8 (optional) Rated input AC100-240V (50Hz/60Hz) AC100-240V (50Hz/60Hz) Rated output DC 4.2 V / 630 mA DC 4.5 V/2 A External dimensions 88 ×...10 sec., 2 sec. Flash Type Auto flash with the conditions under which the camera is based on , flash fired for 71 cities (28 time zones) Power Supply Rechargeable lithium-ion battery D-LI8, AC adapter (optional) Battery Life Approx. 180 images (at the standard output sensitivity of Auto) ...
..., battery charger, AC plug cord, USB cable, software (CD-ROM), AV cable, strap, operating manual Power Supply Battery Charger D-BC8 AC Adapter D-AC8 (optional) Rated input AC100-240V (50Hz/60Hz) AC100-240V (50Hz/60Hz) Rated output DC 4.2 V / 630 mA DC 4.5 V/2 A External dimensions 88 ×...10 sec., 2 sec. Flash Type Auto flash with the conditions under which the camera is based on , flash fired for 71 cities (28 time zones) Power Supply Rechargeable lithium-ion battery D-LI8, AC adapter (optional) Battery Life Approx. 180 images (at the standard output sensitivity of Auto) ...
Operation Manual
Page 190
Appendix N Night Scene Mode 61 Nine-Image Display 113 Number of recordable images . . . 18 O OK button 12, 38 Operating Time 18 Optional Accessories 174 P Pan Focus mode 75 PictBridge 128 Picture Mode 57 Play back Movies 111 Play back Sound 106 Play back Still Pictures 34 Play ...
Appendix N Night Scene Mode 61 Nine-Image Display 113 Number of recordable images . . . 18 O OK button 12, 38 Operating Time 18 Optional Accessories 174 P Pan Focus mode 75 PictBridge 128 Picture Mode 57 Play back Movies 111 Play back Sound 106 Play back Still Pictures 34 Play ...

