
PVDF2003 User Guide
Page 2
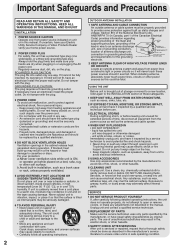
... internal parts. Regularly remove dust, dirt, etc. If it will not fit, have your Electric Utility Service Company or Video Products Dealer verify your home power source. 2 POWER CORD PLUG For safety, this manual. Keep power cord away from power lines and electric light or power circuits so it cannot be securely connected. - An extension cord should it inspected by a service technician to cassettes or discs. Frayed cords, damaged...
... internal parts. Regularly remove dust, dirt, etc. If it will not fit, have your Electric Utility Service Company or Video Products Dealer verify your home power source. 2 POWER CORD PLUG For safety, this manual. Keep power cord away from power lines and electric light or power circuits so it cannot be securely connected. - An extension cord should it inspected by a service technician to cassettes or discs. Frayed cords, damaged...
PVDF2003 User Guide
Page 5
...TV / VCR Timer Recording ...30 TV / VCR DVD DVD TV / VCR Cable Box Universal Remote Control Feature 32 Tape Operation ...34 Special VCR Features 38 V-Chip Control Feature 40 Audio Features ...44 Video/Audio Menu ...46 Video/Audio Adjustment 47 Disc Operation ...48 DVD Operation using On-Screen Displays 53 MP3/WMA/JPEG Playback Operation 56 DVD Lock Feature...59 Settings for DVD Operation 60 Language Code List ...63 Before Requesting Service 64 Warning and Instruction Displays 66 Spanish Quick Use Guide/Guía para rápida consulta 67 Limited Warranty ...74 Customer Services...
...TV / VCR Timer Recording ...30 TV / VCR DVD DVD TV / VCR Cable Box Universal Remote Control Feature 32 Tape Operation ...34 Special VCR Features 38 V-Chip Control Feature 40 Audio Features ...44 Video/Audio Menu ...46 Video/Audio Adjustment 47 Disc Operation ...48 DVD Operation using On-Screen Displays 53 MP3/WMA/JPEG Playback Operation 56 DVD Lock Feature...59 Settings for DVD Operation 60 Language Code List ...63 Before Requesting Service 64 Warning and Instruction Displays 66 Spanish Quick Use Guide/Guía para rápida consulta 67 Limited Warranty ...74 Customer Services...
PVDF2003 User Guide
Page 6
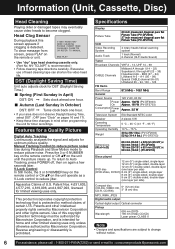
... auto adjusts clock for DST (Daylight Saving Time.) ■ Spring (First Sunday in April) DST: ON ➞ Sets clock ahead one hour. ■ Autumn (Last Sunday in mind when programming the unit for home and other rights owners. V-Lock Control In Still mode, the 3 or 6 NUMBER key on the remote control or CH on the unit operate as a V-Lock control to : consumerproducts@panasonic.com Use of certain U.S. V I DEO HEADS MAY NEED...
... auto adjusts clock for DST (Daylight Saving Time.) ■ Spring (First Sunday in April) DST: ON ➞ Sets clock ahead one hour. ■ Autumn (Last Sunday in mind when programming the unit for home and other rights owners. V-Lock Control In Still mode, the 3 or 6 NUMBER key on the remote control or CH on the unit operate as a V-Lock control to : consumerproducts@panasonic.com Use of certain U.S. V I DEO HEADS MAY NEED...

PVDF2003 User Guide
Page 7
... are subdivided into numbered sections. Video CD CD containing picture and sound with Region No. Discs which appears at different angles is brought from different angles. Discs that can be played Disc Handling Initial Setup Disc type Disc Logo Disc formats supported by edges as title 1, title 2, etc. other Disc tray solvent. The ANGLE button can be used to the type of disc or condition of the recording. • Video-CD format CD-DA •...
... are subdivided into numbered sections. Video CD CD containing picture and sound with Region No. Discs which appears at different angles is brought from different angles. Discs that can be played Disc Handling Initial Setup Disc type Disc Logo Disc formats supported by edges as title 1, title 2, etc. other Disc tray solvent. The ANGLE button can be used to the type of disc or condition of the recording. • Video-CD format CD-DA •...
PVDF2003 User Guide
Page 8
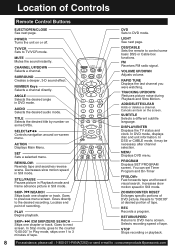
... the counter "0:00:00." In Stop mode, goes to TV/VCR mode. LIGHT See next page. You can set Timer Program and On-Timer FF/SLOW+ Fast forwards tape and forward visual search. RETURN/SPEED Returns to 3 minutes of recording. In Play mode, skips over 1 to DVD menu screen. VOLUME UP/DOWN Adjusts volume. In DSS or CABLE mode, it may be necessary after channel selection. Increases slow motion speed in DVD mode. AUDIO Selects the desired audio mode. FM Receives FM radio signal. MENU Displays DVD menu.
... the counter "0:00:00." In Stop mode, goes to TV/VCR mode. LIGHT See next page. You can set Timer Program and On-Timer FF/SLOW+ Fast forwards tape and forward visual search. RETURN/SPEED Returns to 3 minutes of recording. In Play mode, skips over 1 to DVD menu screen. VOLUME UP/DOWN Adjusts volume. In DSS or CABLE mode, it may be necessary after channel selection. Increases slow motion speed in DVD mode. AUDIO Selects the desired audio mode. FM Receives FM radio signal. MENU Displays DVD menu.
PVDF2003 User Guide
Page 10
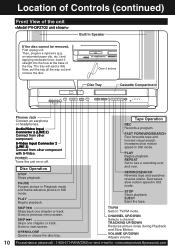
... disc cannot be removed, First unplug unit. CHANNEL UP/DOWN Selects a channel. Location of Controls (continued) Front View of the tray. Then, prepare a rigid wire (e.g. Audio/Video Input Connector 2 (LINE 2) Connect from other component. PAUSE Pauses picture in Playback mode and frame advance picture in Still mode. PLAY Begins playback. Decreases slow motion speed in Still mode. STOP Stops playback. EJECT Eject the tape. Goes to TV/FM mode. OPEN/CLOSE Opens or closes the disc tray. TV/FM Sets to previous menu screen. TRACKING UP/DOWN Reduces picture...
... disc cannot be removed, First unplug unit. CHANNEL UP/DOWN Selects a channel. Location of Controls (continued) Front View of the tray. Then, prepare a rigid wire (e.g. Audio/Video Input Connector 2 (LINE 2) Connect from other component. PAUSE Pauses picture in Playback mode and frame advance picture in Still mode. PLAY Begins playback. Decreases slow motion speed in Still mode. STOP Stops playback. EJECT Eject the tape. Goes to TV/FM mode. OPEN/CLOSE Opens or closes the disc tray. TV/FM Sets to previous menu screen. TRACKING UP/DOWN Reduces picture...
PVDF2003 User Guide
Page 13
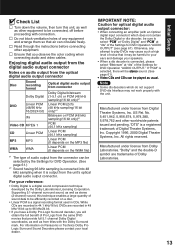
... the volume, then turn this technique enables a large quantity of the Settings for optical digital audio output connector: • When connecting an amplifier (with an Optical digital input connector) which do not support DVD-dts Interface may not work properly with connection. Enjoying digital audio output from the digital audio output connector Notes on the WMA file) *1 The type of the Settings for DVD Operation "AUDIO OUTPUT." For your reference: • Dolby Digital is a digital sound...
... the volume, then turn this technique enables a large quantity of the Settings for optical digital audio output connector: • When connecting an amplifier (with an Optical digital input connector) which do not support DVD-dts Interface may not work properly with connection. Enjoying digital audio output from the digital audio output connector Notes on the WMA file) *1 The type of the Settings for DVD Operation "AUDIO OUTPUT." For your reference: • Dolby Digital is a digital sound...
PVDF2003 User Guide
Page 14
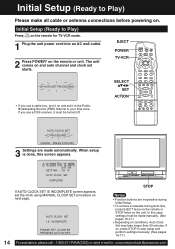
... Initial Setup. • To remove a cassette during Auto Set, press EJECT twice on the remote or STOP twice on conditions, Auto Clock Set may take longer than 30 minutes. Initial Setup (Ready to the Public Broadcasting Service (PBS) channel in your time zone. EJECT POWER TV-VCR SURROUND CH AUTO SET PROCEEDING • If you use a cable box, turn it on and set it must be turned off. AUTO CLOCK SET I S I NCOMPLETE PLEASE SET CLOCK BY PRESSING ACT I ON KEY STOP Notes • Function buttons...
... Initial Setup. • To remove a cassette during Auto Set, press EJECT twice on the remote or STOP twice on conditions, Auto Clock Set may take longer than 30 minutes. Initial Setup (Ready to the Public Broadcasting Service (PBS) channel in your time zone. EJECT POWER TV-VCR SURROUND CH AUTO SET PROCEEDING • If you use a cable box, turn it on and set it must be turned off. AUTO CLOCK SET I S I NCOMPLETE PLEASE SET CLOCK BY PRESSING ACT I ON KEY STOP Notes • Function buttons...

PVDF2003 User Guide
Page 18
... unit Operation using this unit. • After the unit has been in Still mode. ➞ Press PLAY to release. Power cord is displayed. 4 Press REC to start recording. • To edit out unwanted portions, press STILL/PAUSE to pause and resume recording. • You cannot view another channel during recording. ■ Stop ➞ Press STOP ■ One Touch Recording (OTR) [recording in progress] Press REC repeatedly to set Normal...
... unit Operation using this unit. • After the unit has been in Still mode. ➞ Press PLAY to release. Power cord is displayed. 4 Press REC to start recording. • To edit out unwanted portions, press STILL/PAUSE to pause and resume recording. • You cannot view another channel during recording. ■ Stop ➞ Press STOP ■ One Touch Recording (OTR) [recording in progress] Press REC repeatedly to set Normal...
PVDF2003 User Guide
Page 27
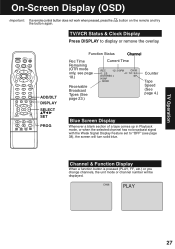
... DISPLAY SELECT SET PROG Function Status Channel Rec Time Remaining (OTR mode only, see page 38), the screen will be displayed. CH08 PLAY 27 Channel & Function Display When a function button is pressed (PLAY, FF, etc.) or you change channels, the unit mode or channel number will turn solid blue. TV Operation SURROUND On-Screen Display (OSD) *Important: If a remote control button does not work when pressed, press the the button again. button on the remote and try TV/VCR Status & Clock Display Press DISPLAY to "OFF" (see page 18.) Receivable Broadcast Types...
... DISPLAY SELECT SET PROG Function Status Channel Rec Time Remaining (OTR mode only, see page 38), the screen will be displayed. CH08 PLAY 27 Channel & Function Display When a function button is pressed (PLAY, FF, etc.) or you change channels, the unit mode or channel number will turn solid blue. TV Operation SURROUND On-Screen Display (OSD) *Important: If a remote control button does not work when pressed, press the the button again. button on the remote and try TV/VCR Status & Clock Display Press DISPLAY to "OFF" (see page 18.) Receivable Broadcast Types...
PVDF2003 User Guide
Page 29
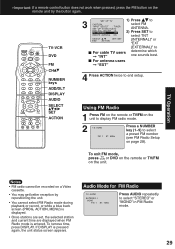
... cannot select FM Radio mode during playback or record, or while a blue back screen (PROG, ACTION, MENU) is displayed. • Once stations are set, the selected station and current time are displayed when FM Radio mode is pressed again, the unit status screen appears. To remove time, press DISPLAY. TV-VCR DVD FM CH NUMBER keys ADD/DLT DISPLAY AUDIO SELECT SET ACTION 3 SET UP TV CAPT I ON I NPUT SELECT : TUNER SET UP V I DEO / AUD I O DVD VOL ADJUST : +2 FM ANTENNA : I NT REMOTE WARNING...
... cannot select FM Radio mode during playback or record, or while a blue back screen (PROG, ACTION, MENU) is displayed. • Once stations are set, the selected station and current time are displayed when FM Radio mode is pressed again, the unit status screen appears. To remove time, press DISPLAY. TV-VCR DVD FM CH NUMBER keys ADD/DLT DISPLAY AUDIO SELECT SET ACTION 3 SET UP TV CAPT I ON I NPUT SELECT : TUNER SET UP V I DEO / AUD I O DVD VOL ADJUST : +2 FM ANTENNA : I NT REMOTE WARNING...
PVDF2003 User Guide
Page 32
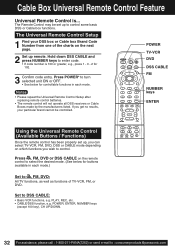
... POWER* to control. SURROUND POWER TV-VCR DVD DSS CABLE FM NUMBER keys ENTER Using the Universal Remote Control (Available Buttons / Functions) Once the remote control has been properly set up remote. Set to enter code. • If code number is ... Hold down DSS CABLE and press NUMBER keys to DSS CABLE: • Basic VCR functions, e.g. Notes • Please repeat the Universal Remote Control Setup after replacing remote control batteries. • The remote control will not operate all DSS receivers or Cable Boxes made by the manufacturers listed. If you wish to turn selected unit...
... POWER* to control. SURROUND POWER TV-VCR DVD DSS CABLE FM NUMBER keys ENTER Using the Universal Remote Control (Available Buttons / Functions) Once the remote control has been properly set up remote. Set to enter code. • If code number is ... Hold down DSS CABLE and press NUMBER keys to DSS CABLE: • Basic VCR functions, e.g. Notes • Please repeat the Universal Remote Control Setup after replacing remote control batteries. • The remote control will not operate all DSS receivers or Cable Boxes made by the manufacturers listed. If you wish to turn selected unit...

PVDF2003 User Guide
Page 46
... for night viewing. Video Menu 1 Press ACTION* to display MAIN MENU. 2 M A I ON 1) Press to select "AUDIO MENU." 2) Press SET to select desired mode. (See below left . b SET UP V I DEO / AUD I O V I DEO MENU : NORMAL V I DEO ADJUST AUD I O MENU : MUS I C AUD I O ADJUST SELECT : SET : SET END : ACT I N MENU 1) Press to select "TV." 2) Press SET to end setup. SELECT SET ACTION Volume level High CD Standard TV TV Volume level High CD Standard TV TV Low Low AUDIO MENU : NORMAL AUDIO MENU : AUTO Notes • The effects of picture and sound suitable...
... for night viewing. Video Menu 1 Press ACTION* to display MAIN MENU. 2 M A I ON 1) Press to select "AUDIO MENU." 2) Press SET to select desired mode. (See below left . b SET UP V I DEO / AUD I O V I DEO MENU : NORMAL V I DEO ADJUST AUD I O MENU : MUS I C AUD I O ADJUST SELECT : SET : SET END : ACT I N MENU 1) Press to select "TV." 2) Press SET to end setup. SELECT SET ACTION Volume level High CD Standard TV TV Volume level High CD Standard TV TV Low Low AUDIO MENU : NORMAL AUDIO MENU : AUTO Notes • The effects of picture and sound suitable...

PVDF2003 User Guide
Page 48
... language is used along with discs on which multiple audio soundtrack languages are recorded.) a AUDIO: 1 ENG Dolby Digital 3/2.1ch Hello Press AUDIO in Play mode to display the subtitle selection on-screen. • Display disappears after 5 seconds. • When no subtitles are offered, "-" will appear. SELECT : END : AUDIO • Display disappears after several presses of the button the language does not change, language selection is removed, subtitles revert to a different language if available. (See page 60.) (This operation works only with subtitles...
... language is used along with discs on which multiple audio soundtrack languages are recorded.) a AUDIO: 1 ENG Dolby Digital 3/2.1ch Hello Press AUDIO in Play mode to display the subtitle selection on-screen. • Display disappears after 5 seconds. • When no subtitles are offered, "-" will appear. SELECT : END : AUDIO • Display disappears after several presses of the button the language does not change, language selection is removed, subtitles revert to a different language if available. (See page 60.) (This operation works only with subtitles...
PVDF2003 User Guide
Page 51
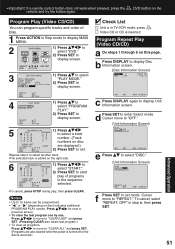
... move to 4:3 Pan & Scan display screen. To cancel, select "REPEAT: OFF" in Stop mode to display MAIN MENU. 2 M A I ON 3 DVD MAIN MENU 1) Press to select "PLAY MODE." 2) Press SET to "REPEAT." Advanced Operation 51 work when pressed, press the , DVD button on the Program Play (Video CD/CD) You can be programmed. • " " or " " (depending on this page. Program Repeat Play (Video CD/CD) a Do steps 1 through 6 on disc) indicates additional PROGRAM PLAY screen. DVD LOCK LANGUAGE 2) Press SET to enter Select mode. TV CLOCK CH SELECT : SET : SET END : ACT...
... move to 4:3 Pan & Scan display screen. To cancel, select "REPEAT: OFF" in Stop mode to display MAIN MENU. 2 M A I ON 3 DVD MAIN MENU 1) Press to select "PLAY MODE." 2) Press SET to "REPEAT." Advanced Operation 51 work when pressed, press the , DVD button on the Program Play (Video CD/CD) You can be programmed. • " " or " " (depending on this page. Program Repeat Play (Video CD/CD) a Do steps 1 through 6 on disc) indicates additional PROGRAM PLAY screen. DVD LOCK LANGUAGE 2) Press SET to enter Select mode. TV CLOCK CH SELECT : SET : SET END : ACT...

PVDF2003 User Guide
Page 59
... DVD LOCK : OFF CHANGE SETT I NGS NEXT PAGE SELECT : SET : SET END : ACT I ON "UNLOCKED." THE DO YOU WANT TO CHANGE THE L I M I T. Then, enter your secret code in TV mode. those not highlighted (white letters) will not work when pressed, press the , DVD button on the disc. You can be played back. (DVDs with a rating level. Advanced Operation 59 PROGRAM RATING EXCEEDED • Ratings which may differ depending on the remote...
... DVD LOCK : OFF CHANGE SETT I NGS NEXT PAGE SELECT : SET : SET END : ACT I ON "UNLOCKED." THE DO YOU WANT TO CHANGE THE L I M I T. Then, enter your secret code in TV mode. those not highlighted (white letters) will not work when pressed, press the , DVD button on the disc. You can be played back. (DVDs with a rating level. Advanced Operation 59 PROGRAM RATING EXCEEDED • Ratings which may differ depending on the remote...
PVDF2003 User Guide
Page 60
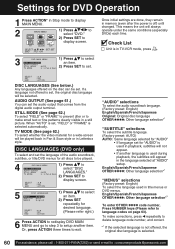
... Stop mode to display MAIN MENU. 2 M A I N MENU 1) Press to select "DVD." 2) Press SET to exit. AUDIO OUTPUT (See page 61.) You can be played. 4 DVD MAIN MENU DISC LANGUAGES AUDIO OUTPUT ST I L L MODE : AUTO TV MODE : 4 : 3 Pan & Scan SELECT SET END : : SET : ACTION 1) Press to select "DISC LANGUAGES." 2) Press SET to display screen. 5 DISC LANGUAGES AUD I O : English SUBT I TLE : AUTO MENUS : English SELECT SET END : : SET : ACTION 1) Press to select an item. 2) Press SET repeatedly for all discs to setup another language is used during playback, the subtitles...
... Stop mode to display MAIN MENU. 2 M A I N MENU 1) Press to select "DVD." 2) Press SET to exit. AUDIO OUTPUT (See page 61.) You can be played. 4 DVD MAIN MENU DISC LANGUAGES AUDIO OUTPUT ST I L L MODE : AUTO TV MODE : 4 : 3 Pan & Scan SELECT SET END : : SET : ACTION 1) Press to select "DISC LANGUAGES." 2) Press SET to display screen. 5 DISC LANGUAGES AUD I O : English SUBT I TLE : AUTO MENUS : English SELECT SET END : : SET : ACTION 1) Press to select an item. 2) Press SET repeatedly for all discs to setup another language is used during playback, the subtitles...
PVDF2003 User Guide
Page 64
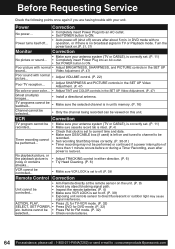
.../CABLE box (if used) is left on the unit. (P. 9) • Avoid any object blocking signal path. • Inspect the remote batteries. (P. 4) • Make sure VCR LOCK is no Power turns itself off . (P. 39) • Exposing unit remote sensor to direct fluorescent or outdoor light may not be watched... • Make sure the selected channel is correctly set to be recorded. • Set recording Start/Stop times correctly. (P. 30-31) • Timer recording may cause signal...
.../CABLE box (if used) is left on the unit. (P. 9) • Avoid any object blocking signal path. • Inspect the remote batteries. (P. 4) • Make sure VCR LOCK is no Power turns itself off . (P. 39) • Exposing unit remote sensor to direct fluorescent or outdoor light may not be watched... • Make sure the selected channel is correctly set to be recorded. • Set recording Start/Stop times correctly. (P. 30-31) • Timer recording may cause signal...

PVDF2003 User Guide
Page 76
... 46 AUDIO button 8, 23, 44 Audio Connections 12 Audio Features 44-45 Audio Menu 46 Audio Mode for FM Radio 29 Audio Mode for Playback 44 Audio Mode for Recording 44 Audio Mode for TV Viewing 23 Audio Mute 22 Audio/Video Input connector (LINE) .... 10, 19 Audio Output Connector (L/R 11-12 Auto Operation Functions 37 B Batteries 4 Before Requesting Service 64-65 Before Using 4 Blocking Message 43 Blue Screen Display 27 Broadcast Types 23 C Cable Box Brand Code Number 33 Cable Box Universal Remote Control Feature 32 Cassette Compartment 10 Caption On Mute 25 Channel...
... 46 AUDIO button 8, 23, 44 Audio Connections 12 Audio Features 44-45 Audio Menu 46 Audio Mode for FM Radio 29 Audio Mode for Playback 44 Audio Mode for Recording 44 Audio Mode for TV Viewing 23 Audio Mute 22 Audio/Video Input connector (LINE) .... 10, 19 Audio Output Connector (L/R 11-12 Auto Operation Functions 37 B Batteries 4 Before Requesting Service 64-65 Before Using 4 Blocking Message 43 Blue Screen Display 27 Broadcast Types 23 C Cable Box Brand Code Number 33 Cable Box Universal Remote Control Feature 32 Cassette Compartment 10 Caption On Mute 25 Channel...
PVDF2003 User Guide
Page 77
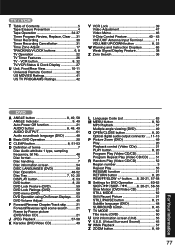
...20 DVD Lock Feature (DVD 59 DVD Lock Ratings (DVD 59 DVD menu (DVD 50 DVD Operation using On-Screen Displays ..... 53 DVD Volume Adjust 45 F Forward/Reverse Chapter/Track skip .......... 21 Forward/Reverse rapid scene search ........ 21 Frame by Frame picture (DVD/Video CD 21 J JPEG Playback 57-58 K Karaoke (DVD/Video CD 49 | L Language Code List 63 M MENU button 8, 50 MP3 Playback 57 Multiple angle viewing (DVD 49 O OPEN/CLOSE button 8, 20 Optical digital audio output connector .....11-13 P Picture Zoom (DVD 49 Play 20 Playback control (Video CDs 21 PLAY button 8, 20 Program...
...20 DVD Lock Feature (DVD 59 DVD Lock Ratings (DVD 59 DVD menu (DVD 50 DVD Operation using On-Screen Displays ..... 53 DVD Volume Adjust 45 F Forward/Reverse Chapter/Track skip .......... 21 Forward/Reverse rapid scene search ........ 21 Frame by Frame picture (DVD/Video CD 21 J JPEG Playback 57-58 K Karaoke (DVD/Video CD 49 | L Language Code List 63 M MENU button 8, 50 MP3 Playback 57 Multiple angle viewing (DVD 49 O OPEN/CLOSE button 8, 20 Optical digital audio output connector .....11-13 P Picture Zoom (DVD 49 Play 20 Playback control (Video CDs 21 PLAY button 8, 20 Program...


