Vhs-c
Page 2
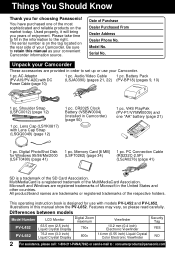
... MultiMediaCard Association. Date of your convenient Camcorder information source. This operating instruction book is on the tag located on the market today. Illustrations in order to retain this manual show the PV-L652. Serial No. PC Connection Cable (RS232C-2.5P) (LSJA0276) (page 41) SD is a registered trademark of the SD Card Association. Be sure to set up or use with models PV-L452 and PV-L652. You...
... MultiMediaCard Association. Date of your convenient Camcorder information source. This operating instruction book is on the tag located on the market today. Illustrations in order to retain this manual show the PV-L652. Serial No. PC Connection Cable (RS232C-2.5P) (LSJA0276) (page 41) SD is a registered trademark of the SD Card Association. Be sure to set up or use with models PV-L452 and PV-L652. You...
Vhs-c
Page 3
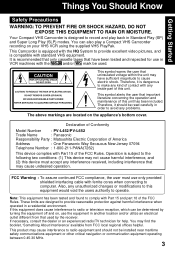
... for help. Your Compact VHS Camcorder is compatible with Part 15 and part 18 of this unit. Also, any interference received, including interference that used . Declaration of Conformity Model Number : PV-L452/PV-L652 Trade Name : Panasonic Responsibility Party : Matsushita Electric Corporation of America Address : One Panasonic Way Secaucus New Jersey 07094 Telephone Number : 1-800-211-PANA(7262) This device complies with ferrite cores when connecting to...
... for help. Your Compact VHS Camcorder is compatible with Part 15 and part 18 of this unit. Also, any interference received, including interference that used . Declaration of Conformity Model Number : PV-L452/PV-L652 Trade Name : Panasonic Responsibility Party : Matsushita Electric Corporation of America Address : One Panasonic Way Secaucus New Jersey 07094 Telephone Number : 1-800-211-PANA(7262) This device complies with ferrite cores when connecting to...
Vhs-c
Page 5
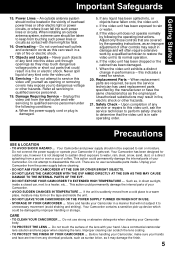
... technician to restore the video unit to keep from any service or repairs to this indicates a need for outdoor use strong or abrasive detergents when cleaning your Camcorder. Power Lines - Unplug this video unit yourself as contact with your Camcorder. • AVOID SUDDEN CHANGES IN TEMPERATURE ... Adjust only those controls that will often require extensive work by the operating instructions, as , in safe operating order. This action...
... technician to restore the video unit to keep from any service or repairs to this indicates a need for outdoor use strong or abrasive detergents when cleaning your Camcorder. Power Lines - Unplug this video unit yourself as contact with your Camcorder. • AVOID SUDDEN CHANGES IN TEMPERATURE ... Adjust only those controls that will often require extensive work by the operating instructions, as , in safe operating order. This action...

Vhs-c
Page 6
..., Lens Cap) .... 12 Using MENU Mode 13 Setting the Clock (Time Zone, Auto Daylight Saving Time 14~15 Built-in Auto Light (Using the Light, Rplacing the Bulb 16 Camera Recording (Basic, Stand-by, Programmed Recording 17~19 Playing Back Recordings (Basic Playback, Visual Search, Still Picture, Tracking, TV/VCR Playback 20~21 Copying your Tapes (dubbing 22 Four-Speed Power Zoom 23 Backlight 23 MagicPix™ Images 24 Focus (Auto/Manual Focus 25 High Speed Shutter (Auto/Manual Shutter) 26 Auto Fade 27 Color Digital Fade 28 Color Digital Filter 29 Digital Zoom...
..., Lens Cap) .... 12 Using MENU Mode 13 Setting the Clock (Time Zone, Auto Daylight Saving Time 14~15 Built-in Auto Light (Using the Light, Rplacing the Bulb 16 Camera Recording (Basic, Stand-by, Programmed Recording 17~19 Playing Back Recordings (Basic Playback, Visual Search, Still Picture, Tracking, TV/VCR Playback 20~21 Copying your Tapes (dubbing 22 Four-Speed Power Zoom 23 Backlight 23 MagicPix™ Images 24 Focus (Auto/Manual Focus 25 High Speed Shutter (Auto/Manual Shutter) 26 Auto Fade 27 Color Digital Fade 28 Color Digital Filter 29 Digital Zoom...

Vhs-c
Page 8
... adjust the angle. 2 Set POWER to CAMERA. 3 Press RECORD/PAUSE to start playback. 5 Press STOP to stop playback. 8 For assistance, please call : 1-800-211-PANA(7262) or send e-mail to unlock the LCD monitor. Camera Recording When the LCD monitor is complete. 1 Insert Cassette Attach fully charged Battery (page 9). 2Slide TAPE EJECT to open , the EVF automatically turns OFF (Color EVF model only) (page 20). 1 Press LCD-OPEN to start recording. Quick Operation Guide Charging the Battery Pack Charge Battery Pack fully before use. Playback using...
... adjust the angle. 2 Set POWER to CAMERA. 3 Press RECORD/PAUSE to start playback. 5 Press STOP to stop playback. 8 For assistance, please call : 1-800-211-PANA(7262) or send e-mail to unlock the LCD monitor. Camera Recording When the LCD monitor is complete. 1 Insert Cassette Attach fully charged Battery (page 9). 2Slide TAPE EJECT to open , the EVF automatically turns OFF (Color EVF model only) (page 20). 1 Press LCD-OPEN to start recording. Quick Operation Guide Charging the Battery Pack Charge Battery Pack fully before use. Playback using...
Vhs-c
Page 9
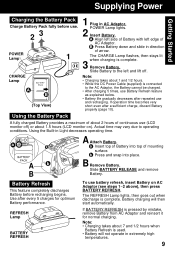
... lights. 2 Insert Battery. REFRESH Lamp BATTERY REFRESH To use and recharging. Battery charging will not operate in direction of AC Adaptor. The CHARGE Lamp flashes, then stays lit when charging is pressed by mistake, remove Battery from AC Adaptor and reinsert it for optimum Battery performance. Using the Battery Pack A fully charged Battery provides a maximum of continuous use . 23 POWER Lamp 1 CHARGE Lamp A B (Top View) 1 Plug in Light decreases operating time. a Ab B A Attach Battery. B Remove Battery. Slide BATTERY RELEASE and remove Battery...
... lights. 2 Insert Battery. REFRESH Lamp BATTERY REFRESH To use and recharging. Battery charging will not operate in direction of AC Adaptor. The CHARGE Lamp flashes, then stays lit when charging is pressed by mistake, remove Battery from AC Adaptor and reinsert it for optimum Battery performance. Using the Battery Pack A fully charged Battery provides a maximum of continuous use . 23 POWER Lamp 1 CHARGE Lamp A B (Top View) 1 Plug in Light decreases operating time. a Ab B A Attach Battery. B Remove Battery. Slide BATTERY RELEASE and remove Battery...
Vhs-c
Page 10
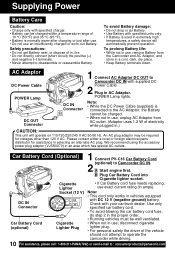
... Adaptor from the Camcorder and AC Adaptor, and store in a cool, dark, dry place. • Keep Battery terminals clean. Car Battery Cord (Optional) 1 Connect PV-C16 Car Battery Cord (optional) to disassemble or reassemble Battery. B Plug Car Battery Cord into Cigarette lighter socket. Note: • This cord only works in vehicles equipped with supplied DC Power Cable. 2 Plug in AC Adaptor. We recommend using the accessory power plug adaptor (VJSS0070) in...
... Adaptor from the Camcorder and AC Adaptor, and store in a cool, dark, dry place. • Keep Battery terminals clean. Car Battery Cord (Optional) 1 Connect PV-C16 Car Battery Cord (optional) to disassemble or reassemble Battery. B Plug Car Battery Cord into Cigarette lighter socket. Note: • This cord only works in vehicles equipped with supplied DC Power Cable. 2 Plug in AC Adaptor. We recommend using the accessory power plug adaptor (VJSS0070) in...

Vhs-c
Page 11
... remove the cassette, slide the TAPE EJECT switch. Tape Speed Selector Position Cassette type TC-20 TC-30 TC-40 SP (Standard Play) 20 minutes 30 minutes 40 minutes SLP (Super Long Play) 1 hour 1 hour 30 minutes 2 hours • SLP playback may contain more picture noise. Getting Started Cassette Information Cassette Insertion/Removal 1 32 5 4 1 Turn Tape Wheel in direction of arrow until there is no slack. 2 Attach Battery (page 9). 3 Slide TAPE EJECT...
... remove the cassette, slide the TAPE EJECT switch. Tape Speed Selector Position Cassette type TC-20 TC-30 TC-40 SP (Standard Play) 20 minutes 30 minutes 40 minutes SLP (Super Long Play) 1 hour 1 hour 30 minutes 2 hours • SLP playback may contain more picture noise. Getting Started Cassette Information Cassette Insertion/Removal 1 32 5 4 1 Turn Tape Wheel in direction of arrow until there is no slack. 2 Attach Battery (page 9). 3 Slide TAPE EJECT...
Vhs-c
Page 17
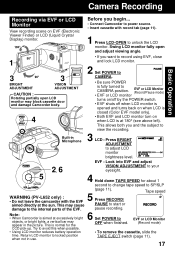
.... (Record mode) • To remove the cassette, slide the TAPE EJECT switch (page 11). 17 Swing LCD monitor fully open and adjust viewing angle. 1 3 BRIGHT ADJUSTMENT 3 VISION ADJUSTMENT CAUTION : Rotating partially open LCD monitor may cause Press RECORD/ PAUSE to start or damage to adjust LCD monitor brightness level. This allows both you want to record using EVF, close and lock LCD monitor. 2 Set POWER to CAMERA. • Be sure POWER is fully turned to view the recording. Return LCD monitor...
.... (Record mode) • To remove the cassette, slide the TAPE EJECT switch (page 11). 17 Swing LCD monitor fully open and adjust viewing angle. 1 3 BRIGHT ADJUSTMENT 3 VISION ADJUSTMENT CAUTION : Rotating partially open LCD monitor may cause Press RECORD/ PAUSE to start or damage to adjust LCD monitor brightness level. This allows both you want to record using EVF, close and lock LCD monitor. 2 Set POWER to CAMERA. • Be sure POWER is fully turned to view the recording. Return LCD monitor...
Vhs-c
Page 18
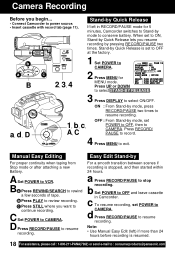
... Stand-by mode, press RECORD/PAUSE two times to stop recording. Press RECORD/ PAUSE to record. 4 Press MENU to power source. • Insert cassette with record tab (page 11). Camera Recording Before you begin... • Connect Camcorder to exit. b Press PLAY to VCR. Stand-by Quick Release is set POWER to rewind a few seconds of tape. A Set POWER to review recording. C Set POWER to CAMERA. b 1 Set POWER to CAMERA. Press UP or DOWN to select STAND-BY RELEASE . 3 Press DISPLAY to resume recording. d Press RECORD/PAUSE to...
... Stand-by mode, press RECORD/PAUSE two times to stop recording. Press RECORD/ PAUSE to record. 4 Press MENU to power source. • Insert cassette with record tab (page 11). Camera Recording Before you begin... • Connect Camcorder to exit. b Press PLAY to VCR. Stand-by Quick Release is set POWER to rewind a few seconds of tape. A Set POWER to review recording. C Set POWER to CAMERA. b 1 Set POWER to CAMERA. Press UP or DOWN to select STAND-BY RELEASE . 3 Press DISPLAY to resume recording. d Press RECORD/PAUSE to...

Vhs-c
Page 20
... To protect video heads and tape, operating modes will appear. C STOP : Stop tape. Press "T" : Volume up . Still Picture Auto Tracking Continuously analyzes each recording for normal play . Manual Tracking Some recordings require manual adjustment to Auto Tracking. B PLAY : Play tape. E VOLUME: During playback, adjust volume of speaker. Return LCD monitor to locked position when not in SLP mode (page 11). Press DISPLAY to return to reduce noise. Playing Back Recordings Before you begin... • Connect Camcorder to power source. • Insert recorded tape. 1 3D Speaker...
... To protect video heads and tape, operating modes will appear. C STOP : Stop tape. Press "T" : Volume up . Still Picture Auto Tracking Continuously analyzes each recording for normal play . Manual Tracking Some recordings require manual adjustment to Auto Tracking. B PLAY : Play tape. E VOLUME: During playback, adjust volume of speaker. Return LCD monitor to locked position when not in SLP mode (page 11). Press DISPLAY to return to reduce noise. Playing Back Recordings Before you begin... • Connect Camcorder to power source. • Insert recorded tape. 1 3D Speaker...
Vhs-c
Page 24
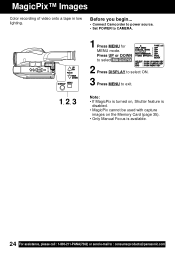
...; If MagicPix is turned on, Shutter feature is disabled. • MagicPix cannot be used with capture images on the Memory Card (page 35). • Only Manual Focus is available. 24 For assistance, please call : 1-800-211-PANA(7262) or send e-mail to CAMERA. 1 Press MENU for MENU mode. MagicPix™ Images Color recording of video onto a tape in low lighting. Before you begin... • Connect Camcorder to power source. • Set POWER to : consumerproducts@panasonic.com
...; If MagicPix is turned on, Shutter feature is disabled. • MagicPix cannot be used with capture images on the Memory Card (page 35). • Only Manual Focus is available. 24 For assistance, please call : 1-800-211-PANA(7262) or send e-mail to CAMERA. 1 Press MENU for MENU mode. MagicPix™ Images Color recording of video onto a tape in low lighting. Before you begin... • Connect Camcorder to power source. • Set POWER to : consumerproducts@panasonic.com

Vhs-c
Page 26
... needed for MENU mode. Fluorescent light degrades picture. • Auto Focus may not function properly if high speed shutter is used in poor light. High Speed Shutter Improves Still or Slow Motion playback picture of high speed subjects (e.g. a tennis stroke), when viewed on Camcorder or 3 or 4 head VCR. Before you begin... • Connect Camcorder to power source. • Insert cassette with record tab (page 11). • Set POWER to 1/60 if Digital E.I.S. Manual Selection The faster the shutter speed, the more light is set to : consumerproducts@panasonic...
... needed for MENU mode. Fluorescent light degrades picture. • Auto Focus may not function properly if high speed shutter is used in poor light. High Speed Shutter Improves Still or Slow Motion playback picture of high speed subjects (e.g. a tennis stroke), when viewed on Camcorder or 3 or 4 head VCR. Before you begin... • Connect Camcorder to power source. • Insert cassette with record tab (page 11). • Set POWER to 1/60 if Digital E.I.S. Manual Selection The faster the shutter speed, the more light is set to : consumerproducts@panasonic...
Vhs-c
Page 34
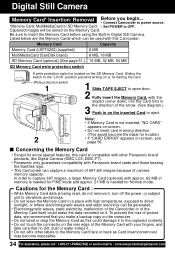
... begin... • Connect Camcorder to power source. *Memory Card: MultiMediaCard or SD Memory Card. • Set POWER to the "LOCK" position prevents writing on or formatting the card. Digital Still Camera Memory Card* Insertion/ Removal Before you make a backup copy on the computer. • Do not bend or drop the Memory Card as Card insertion/removal may become the basis for trouble.) 2 CARD SLOT • If "CARD ERROR" appears on-screen, see page 56. Captured images will be...
... begin... • Connect Camcorder to power source. *Memory Card: MultiMediaCard or SD Memory Card. • Set POWER to the "LOCK" position prevents writing on or formatting the card. Digital Still Camera Memory Card* Insertion/ Removal Before you make a backup copy on the computer. • Do not bend or drop the Memory Card as Card insertion/removal may become the basis for trouble.) 2 CARD SLOT • If "CARD ERROR" appears on-screen, see page 56. Captured images will be...
Vhs-c
Page 35
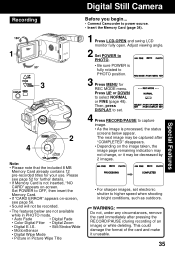
... included 8 MB Memory Card already contains 12 pre-recorded titles for REC MODE menu. Then, press DISPLAY to set electronic shutter to higher speed when shooting in Picture Wipe Title 1 Press LCD-OPEN and swing LCD monitor fully open. Press UP or DOWN to capture image. • As the image is processed, the status screens below are not available while in PHOTO mode. • Auto Fade • Digital Fade • Color Digital Filter • Digital Zoom • Digital E.I.S. •...
... included 8 MB Memory Card already contains 12 pre-recorded titles for REC MODE menu. Then, press DISPLAY to set electronic shutter to higher speed when shooting in Picture Wipe Title 1 Press LCD-OPEN and swing LCD monitor fully open. Press UP or DOWN to capture image. • As the image is processed, the status screens below are not available while in PHOTO mode. • Auto Fade • Digital Fade • Color Digital Filter • Digital Zoom • Digital E.I.S. •...
Vhs-c
Page 38
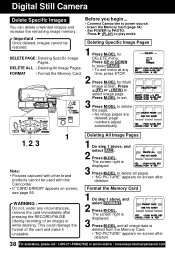
... are deleted, page numbers adjust automatically. 1 1, 2, 3 Note: • Pictures captured with this Camcorder. • If "CARD ERROR" appears on -screen after pressing the RECORD/PAUSE (during recording of the card and make it unusable. WARNING : Do not, under any time, press STOP. 2 Press M-DEL for DELETE PAGE : Deleting Specific Image DELETE menu. Pages. Format the Memory Card 1 Do step 1 above , and select ALL . 2 Press M-DEL. Important : Once deleted, images cannot be used with other brand products cannot be Deleting Specific Image...
... are deleted, page numbers adjust automatically. 1 1, 2, 3 Note: • Pictures captured with this Camcorder. • If "CARD ERROR" appears on -screen after pressing the RECORD/PAUSE (during recording of the card and make it unusable. WARNING : Do not, under any time, press STOP. 2 Press M-DEL for DELETE PAGE : Deleting Specific Image DELETE menu. Pages. Format the Memory Card 1 Do step 1 above , and select ALL . 2 Press M-DEL. Important : Once deleted, images cannot be used with other brand products cannot be Deleting Specific Image...
Vhs-c
Page 51
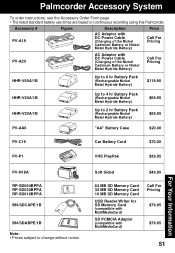
... Form page. • The listed standard battery use times are based on continuous recording using this Palmcorder. Soft Sided $49.95 64 MB SD Memory Card 32 MB SD Memory Card 16 MB SD Memory Card USB Reader/Writer for SD Memory Card (compatible with MultiMediaCard) SD PCMCIA Adaptor (compatible with DC Power Cable (Charging of the Nickel Cadmium Battery or Nickel Metal Hydride Battery) Call For Pricing HHR-V60A/1B...
... Form page. • The listed standard battery use times are based on continuous recording using this Palmcorder. Soft Sided $49.95 64 MB SD Memory Card 32 MB SD Memory Card 16 MB SD Memory Card USB Reader/Writer for SD Memory Card (compatible with MultiMediaCard) SD PCMCIA Adaptor (compatible with DC Power Cable (Charging of the Nickel Cadmium Battery or Nickel Metal Hydride Battery) Call For Pricing HHR-V60A/1B...
Vhs-c
Page 55
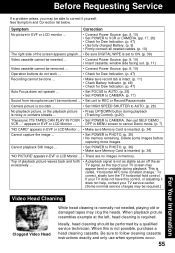
... images in EVF or LCD Monitor ... appears in memory. OFF in MENU screen to cancel Demo mode. (p. 7) "NO CARD" appears in EVF or LCD monitor ... • Connect Power Source. (pp. 9, 10) • Set POWER to VCR or CAMERA. (pp. 17, 20) • Check for Dew Indication. (p. 47) • Use fully charged Battery. (p. 9) • Firmly connect all needed , playing old or damaged tapes may be required.) For Your Information Video Head Cleaning Clogged Video Head While head cleaning is normally not needed cables...
... images in EVF or LCD Monitor ... appears in memory. OFF in MENU screen to cancel Demo mode. (p. 7) "NO CARD" appears in EVF or LCD monitor ... • Connect Power Source. (pp. 9, 10) • Set POWER to VCR or CAMERA. (pp. 17, 20) • Check for Dew Indication. (p. 47) • Use fully charged Battery. (p. 9) • Firmly connect all needed , playing old or damaged tapes may be required.) For Your Information Video Head Cleaning Clogged Video Head While head cleaning is normally not needed cables...
Vhs-c
Page 57
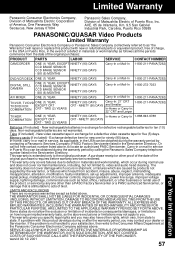
... mail-in service, as "the Warrantor") will repair or replace this product with this product develops during the warranty period by calling the Panasonic Sales Company telephone number listed in exchange for defective rechargeable batteries for ninety (90) days. Memory cards (if included) - TWO (2) YEARS Batteries (if included) - warvid 02/ 12/ 2001 57 For Your Information New video cassette tape in shipment...
... mail-in service, as "the Warrantor") will repair or replace this product with this product develops during the warranty period by calling the Panasonic Sales Company telephone number listed in exchange for defective rechargeable batteries for ninety (90) days. Memory cards (if included) - TWO (2) YEARS Batteries (if included) - warvid 02/ 12/ 2001 57 For Your Information New video cassette tape in shipment...
Vhs-c
Page 60
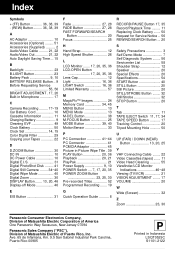
... 2 Audio/Video Cable ......... 21, 22 Audio/Video Out 21, 22 Auto Daylight Saving Time ... 15 B Backlight 23 B.LIGHT Button 23 Battery Pack 9, 10 BATTERY RELEASE Button .. 9 Before Requesting Service 55, 56 BRIGHT ADJUSTMENT . 17, 20 Built-in Microphone 17 C Camera Recording ......... 17~19 Car Battery Cord 10 Cassette Information 11 Charging Battery 9 Cleaning EVF 49 Clock Battery 50 Clock Set 14, 15 Color Digital Filter 29 Copying your Tapes 22 D D.ZOOM Button 30 DC IN 10 DC Power Cable 10 Digital E.I.S 31 Digital PhotoShot Disk ......... 41 Digital Still Camera...
... 2 Audio/Video Cable ......... 21, 22 Audio/Video Out 21, 22 Auto Daylight Saving Time ... 15 B Backlight 23 B.LIGHT Button 23 Battery Pack 9, 10 BATTERY RELEASE Button .. 9 Before Requesting Service 55, 56 BRIGHT ADJUSTMENT . 17, 20 Built-in Microphone 17 C Camera Recording ......... 17~19 Car Battery Cord 10 Cassette Information 11 Charging Battery 9 Cleaning EVF 49 Clock Battery 50 Clock Set 14, 15 Color Digital Filter 29 Copying your Tapes 22 D D.ZOOM Button 30 DC IN 10 DC Power Cable 10 Digital E.I.S 31 Digital PhotoShot Disk ......... 41 Digital Still Camera...


