
Digital Video Camcorder
Page 8
... Lens Cap 18 Attaching the Shoulder Strap 18 Inserting a Cassette 18 Using a Memory Card 19 Turning on the Camcorder 19 Selecting Modes 20 Using the Viewfinder/LCD Monitor 20 Using the Menu Screen 21 List of Menus 22 Setting Date and Time 26 Internal Lithium Battery Recharge 26 LP Mode 26 Audio Recording Mode 26 Recording Mode About Recording 27 Recording on a Tape 27 Recording a Still Picture on a Card (Photoshot 29 Quick Start 31 Self-timer Recording 31 Zoom In/Out Functions 31 Digital Zoom Function 32 Image...
... Lens Cap 18 Attaching the Shoulder Strap 18 Inserting a Cassette 18 Using a Memory Card 19 Turning on the Camcorder 19 Selecting Modes 20 Using the Viewfinder/LCD Monitor 20 Using the Menu Screen 21 List of Menus 22 Setting Date and Time 26 Internal Lithium Battery Recharge 26 LP Mode 26 Audio Recording Mode 26 Recording Mode About Recording 27 Recording on a Tape 27 Recording a Still Picture on a Card (Photoshot 29 Quick Start 31 Self-timer Recording 31 Zoom In/Out Functions 31 Digital Zoom Function 32 Image...

Digital Video Camcorder
Page 13
... MACRO] -32(16) Menu Button [MENU] -21(17) Pause Button [;] -47- Power LCD Lamp -21(31) Mode Selector Switch [AUTO/MANUAL/AE LOCK] -27-, -35-, -38(32) Grip Belt Release Button -17(33) White Balance Sensor -37(34) Recording Lamp -27(35) Auto Pop-up Flash -40(36) Remote Control Sensor -16- (37) REMOTE/MIC (PLUG IN POWER) (38) AV IN/OUT PHONES (39) (40)(41)(42)(43) (37) USB Jack [ ] -59- (38) Jack...
... MACRO] -32(16) Menu Button [MENU] -21(17) Pause Button [;] -47- Power LCD Lamp -21(31) Mode Selector Switch [AUTO/MANUAL/AE LOCK] -27-, -35-, -38(32) Grip Belt Release Button -17(33) White Balance Sensor -37(34) Recording Lamp -27(35) Auto Pop-up Flash -40(36) Remote Control Sensor -16- (37) REMOTE/MIC (PLUG IN POWER) (38) AV IN/OUT PHONES (39) (40)(41)(42)(43) (37) USB Jack [ ] -59- (38) Jack...
Digital Video Camcorder
Page 17
... the Power Source Set the [OFF/ON] Switch (48) to [OFF] and, while pressing the [PUSH BATT] Button (55), slide the Battery or DC Cable upward to disconnect it easier to handle and carry a Camcorder. Before Use 2 Attach the charged Battery to the Camcorder. ≥When you use the Camcorder while brightening the LCD Monitor up by pressing the [POWER LCD] Button. ≥When you set [EVF ON/AUTO...
... the Power Source Set the [OFF/ON] Switch (48) to [OFF] and, while pressing the [PUSH BATT] Button (55), slide the Battery or DC Cable upward to disconnect it easier to handle and carry a Camcorder. Before Use 2 Attach the charged Battery to the Camcorder. ≥When you use the Camcorder while brightening the LCD Monitor up by pressing the [POWER LCD] Button. ≥When you set [EVF ON/AUTO...
Digital Video Camcorder
Page 20
... angle of 120o. Also, you turn the Camcorder off, this mode when playing back the recorded still picture on a tape. D PC To Use the Viewfinder at the Same Time as the LCD Monitor Set [LCD/EVF] >> [EVF ON/AUTO] >> [ON]. ≥The Viewfinder does not turn off even if the LCD Monitor is opened. ≥When you can be adjusted in the direction of the arrow. ≥The...
... angle of 120o. Also, you turn the Camcorder off, this mode when playing back the recorded still picture on a tape. D PC To Use the Viewfinder at the Same Time as the LCD Monitor Set [LCD/EVF] >> [EVF ON/AUTO] >> [ON]. ≥The Viewfinder does not turn off even if the LCD Monitor is opened. ≥When you can be adjusted in the direction of the arrow. ≥The...
Digital Video Camcorder
Page 22
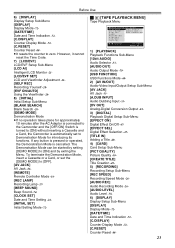
...Picture Playback Mode A File Selection Operation may be repeated in the following instructions.) List of Menus The figures of [EFFECT2] (-42-) are different from the actual Menus. ª [TAPE RECORDING MENU] Tape Recording Menu TAPE RECORDING MENU CAMERA !PROG.AE ADVANCED EIS DIGITAL D.ZOOM CARD SELF TIMER RECORDING USB FUNCTION DISPLAY REC MODE LCD/EVF RED EYE INITIAL FLASH LEVEL ;/∫:SELECT %:NEXT MENU:EXIT 1) [CAMERA] Camera Setup Sub-Menu [PROG.AE] Auto Exposure Mode -35[EIS] Image Stabilizer -32[D.ZOOM] Digital Zoom -32[SELF TIMER] Self-timer Recording -31[USB...
...Picture Playback Mode A File Selection Operation may be repeated in the following instructions.) List of Menus The figures of [EFFECT2] (-42-) are different from the actual Menus. ª [TAPE RECORDING MENU] Tape Recording Menu TAPE RECORDING MENU CAMERA !PROG.AE ADVANCED EIS DIGITAL D.ZOOM CARD SELF TIMER RECORDING USB FUNCTION DISPLAY REC MODE LCD/EVF RED EYE INITIAL FLASH LEVEL ;/∫:SELECT %:NEXT MENU:EXIT 1) [CAMERA] Camera Setup Sub-Menu [PROG.AE] Auto Exposure Mode -35[EIS] Image Stabilizer -32[D.ZOOM] Digital Zoom -32[SELF TIMER] Self-timer Recording -31[USB...
Digital Video Camcorder
Page 23
...86- [REMOTE] Remote Controller Mode -16- [REC LAMP] Recording Lamp -27- [BEEP SOUND] Beep Sound -74- [CLOCK SET] Date and Time Setting -26- [INITIAL SET] Initial Setting Mode -72- ª [TAPE PLAYBACK MENU] Tape Playback Menu TAPE PLAYBACK MENU PLAYBACK !12bit AUDIO AV IN/OUT AUDIO OUT DIGITAL USB FUNCTION CARD RECORDING DISPLAY LCD/EVF INITIAL ;/∫:SELECT %:NEXT MENU:EXIT 1) [PLAYBACK] Playback Functions Sub-Menu [12bit AUDIO] Audio Selector -53[AUDIO OUT] Audio Output Mode -79[USB FUNCTION] USB Functions Mode -602) [AV IN/OUT] Audio-Video Input/Output Setup Sub-Menu [AV...
...86- [REMOTE] Remote Controller Mode -16- [REC LAMP] Recording Lamp -27- [BEEP SOUND] Beep Sound -74- [CLOCK SET] Date and Time Setting -26- [INITIAL SET] Initial Setting Mode -72- ª [TAPE PLAYBACK MENU] Tape Playback Menu TAPE PLAYBACK MENU PLAYBACK !12bit AUDIO AV IN/OUT AUDIO OUT DIGITAL USB FUNCTION CARD RECORDING DISPLAY LCD/EVF INITIAL ;/∫:SELECT %:NEXT MENU:EXIT 1) [PLAYBACK] Playback Functions Sub-Menu [12bit AUDIO] Audio Selector -53[AUDIO OUT] Audio Output Mode -79[USB FUNCTION] USB Functions Mode -602) [AV IN/OUT] Audio-Video Input/Output Setup Sub-Menu [AV...

Digital Video Camcorder
Page 24
.../EVF] LCD/EVF Setup Sub-Menu [LCD AI] Intelligent LCD Monitor -21[LCD/EVF SET] LCD and Viewfinder Adjustment -21[EVF ON/AUTO] Using the Viewfinder -208) [INITIAL] Initial Setup Sub-Menu [BLANK SEARCH] Blank Search -28[REMOTE] Remote Controller Mode -16[BEEP SOUND] Beep Sound -74- ª [CARD RECORDING MENU] Card Recording Menu CARD RECORDING MENU CAMERA !PROG.AE ADVANCED EIS DIGITAL SHTR EFFECT CARD SELF TIMER RECORDING RED EYE DISPLAY FLASH LEVEL LCD/EVF INITIAL ;/∫:SELECT %:NEXT MENU:EXIT 1) [CAMERA] Camera Setup Sub-Menu [PROG.AE] Auto Exposure Mode -35[EIS] Image...
.../EVF] LCD/EVF Setup Sub-Menu [LCD AI] Intelligent LCD Monitor -21[LCD/EVF SET] LCD and Viewfinder Adjustment -21[EVF ON/AUTO] Using the Viewfinder -208) [INITIAL] Initial Setup Sub-Menu [BLANK SEARCH] Blank Search -28[REMOTE] Remote Controller Mode -16[BEEP SOUND] Beep Sound -74- ª [CARD RECORDING MENU] Card Recording Menu CARD RECORDING MENU CAMERA !PROG.AE ADVANCED EIS DIGITAL SHTR EFFECT CARD SELF TIMER RECORDING RED EYE DISPLAY FLASH LEVEL LCD/EVF INITIAL ;/∫:SELECT %:NEXT MENU:EXIT 1) [CAMERA] Camera Setup Sub-Menu [PROG.AE] Auto Exposure Mode -35[EIS] Image...
Digital Video Camcorder
Page 28
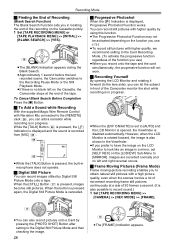
... displayed, Progressive Photoshot Function works. However, when the LCD Monitor is rotated forward, the image is pressed, the built-in progress. ≥When the [EVF ON/AUTO] is set [SELF REC] on the Cassette, the Camcorder stops at a rate of the Camcorder monitor the shot while recording is in microphone does not operate. ª Digital Still Picture You can also record pictures onto a Card by Digital Still Picture Mode onto a tape. You can record still pictures...
... displayed, Progressive Photoshot Function works. However, when the LCD Monitor is rotated forward, the image is pressed, the built-in progress. ≥When the [EVF ON/AUTO] is set [SELF REC] on the Cassette, the Camcorder stops at a rate of the Camcorder monitor the shot while recording is in microphone does not operate. ª Digital Still Picture You can also record pictures onto a Card by Digital Still Picture Mode onto a tape. You can record still pictures...
Digital Video Camcorder
Page 31
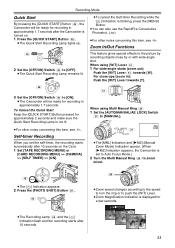
... Camcorder is turned on the Card. 1 Set [TAPE RECORDING MENU] or [CARD RECORDING MENU] >> [CAMERA] >> [SELF TIMER] >> [ON]. ≥To cancel the Self-timer Recording while the [ ] Indication is blinking, press the [MENU] Button. ≥You can also use the RapidFire Consecutive Photoshot. (-30-) ≥For other notes concerning this item, see -75-. Self-timer Recording When you set to Auto Focus Mode.) 2 Turn the Multi Manual Ring (24) to zoom in approximately 1.7 seconds. AUTO MANUAL...
... Camcorder is turned on the Card. 1 Set [TAPE RECORDING MENU] or [CARD RECORDING MENU] >> [CAMERA] >> [SELF TIMER] >> [ON]. ≥To cancel the Self-timer Recording while the [ ] Indication is blinking, press the [MENU] Button. ≥You can also use the RapidFire Consecutive Photoshot. (-30-) ≥For other notes concerning this item, see -75-. Self-timer Recording When you set to Auto Focus Mode.) 2 Turn the Multi Manual Ring (24) to zoom in approximately 1.7 seconds. AUTO MANUAL...
Digital Video Camcorder
Page 39
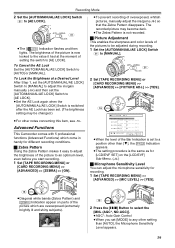
... the [AUTO/MANUAL/AE LOCK] Switch is the same as for [LCD/EVF SET] on parts of the picture which come in handy for recording. 1 Set [TAPE RECORDING MENU] >> [ADVANCED] >> [MIC LEVEL] >> [YES]. (16) MENU STILL ENTER FADE 2 Press the [;/∫] Button to any other notes concerning this item, see -78-. The brightness of the picture is not recorded. ª Picture Adjustment This enables the sharpness and color levels of overexposed, whitish pictures, manually adjust the...
... the [AUTO/MANUAL/AE LOCK] Switch is the same as for [LCD/EVF SET] on parts of the picture which come in handy for recording. 1 Set [TAPE RECORDING MENU] >> [ADVANCED] >> [MIC LEVEL] >> [YES]. (16) MENU STILL ENTER FADE 2 Press the [;/∫] Button to any other notes concerning this item, see -78-. The brightness of the picture is not recorded. ª Picture Adjustment This enables the sharpness and color levels of overexposed, whitish pictures, manually adjust the...
Digital Video Camcorder
Page 58
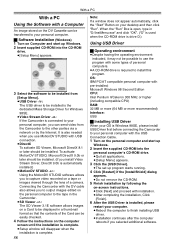
...;[Setup Menu] appears. 3 Click the [USB Driver]. ≥The set up Windows. 2 Insert the supplied CD-ROM into the CD-ROM drive. ≥[Setup Menu] appears. 3 Select the software to be installed from [Setup Menu]. ≥USB Driver -58-: The USB driver to be installed is the dedicated Mass Storage Driver for Windows 98SE. ≥Video Stream Driver -60-: If the Camcorder is connected to your personal computer, you can be transferred to your personal computer. ª Software Installation (Windows) 1 Turn...
...;[Setup Menu] appears. 3 Click the [USB Driver]. ≥The set up Windows. 2 Insert the supplied CD-ROM into the CD-ROM drive. ≥[Setup Menu] appears. 3 Select the software to be installed from [Setup Menu]. ≥USB Driver -58-: The USB driver to be installed is the dedicated Mass Storage Driver for Windows 98SE. ≥Video Stream Driver -60-: If the Camcorder is connected to your personal computer, you can be transferred to your personal computer. ª Software Installation (Windows) 1 Turn...
Digital Video Camcorder
Page 60
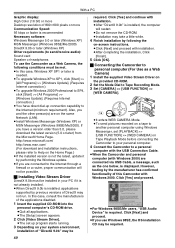
...USB FUNCTION] >> [WEB CAMERA] on Tape Playback Mode before connecting the Camcorder to your personal computer. 4 Connect the Camcorder to a personal computer with the USB Connection Cable. ≥When the Camcorder and personal computer (with installation. ≥After completing the installation, Click [Finish]. 5 Click [OK]. ª Connecting the Camcorder to personal computer (For Use as a Web Camera) 1 Install the supplied Video Stream Driver on -screen instructions. ≥Click [Next] and proceed with Windows 2000) are connected to Tape Recording Mode. 3 Set [CAMERA] >> [USB FUNCTION...
...USB FUNCTION] >> [WEB CAMERA] on Tape Playback Mode before connecting the Camcorder to your personal computer. 4 Connect the Camcorder to a personal computer with the USB Connection Cable. ≥When the Camcorder and personal computer (with installation. ≥After completing the installation, Click [Finish]. 5 Click [OK]. ª Connecting the Camcorder to personal computer (For Use as a Web Camera) 1 Install the supplied Video Stream Driver on -screen instructions. ≥Click [Next] and proceed with Windows 2000) are connected to Tape Recording Mode. 3 Set [CAMERA] >> [USB FUNCTION...
Digital Video Camcorder
Page 61
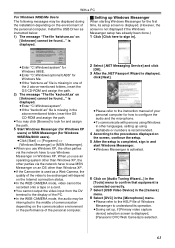
... personal computer. 2 Select [.NET Messaging Service] and click [OK]. 3 After the .NET Passport Wizard is displayed, click [Next]. ≥Please refer to the instruction manual of your personal computer for how to configure the audio and the microphone. ≥To communicate with persons using Windows in other languages, setting up , if [Primary video capture device] selection screen is displayed, [Panasonic DVC Web Camera] is missing in one of...
... personal computer. 2 Select [.NET Messaging Service] and click [OK]. 3 After the .NET Passport Wizard is displayed, click [Next]. ≥Please refer to the instruction manual of your personal computer for how to configure the audio and the microphone. ≥To communicate with persons using Windows in other languages, setting up , if [Primary video capture device] selection screen is displayed, [Panasonic DVC Web Camera] is missing in one of...
Digital Video Camcorder
Page 68
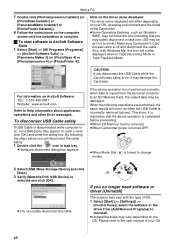
... driver name displayed will occur as Windows 98SE, may not show .) Make sure Camcorder's Card Access Lamp is copied from [Add/Remove Programs] to an SD Memory Card, the copied data may damage the Card data. O If the above ). In such a case click [OK] and close the dialog box. ON FF ≥When Mode Dial (44) is turned to Help information about application operations and other Error messages. To disconnect USB Cable...
... driver name displayed will occur as Windows 98SE, may not show .) Make sure Camcorder's Card Access Lamp is copied from [Add/Remove Programs] to an SD Memory Card, the copied data may damage the Card data. O If the above ). In such a case click [OK] and close the dialog box. ON FF ≥When Mode Dial (44) is turned to Help information about application operations and other Error messages. To disconnect USB Cable...

Digital Video Camcorder
Page 69
..., delete the USB Driver from [Device Manager] as the power source for the Camcorder when using may simply ignore it to a user name having equivalent authority. ≥If you use Windows 98SE, the message, "File is not found" may stop midway through. Switch the operation mode of the Camcorder and reconnect the Cable. ≥If the Camcorder is connected in the PC Mode, the [Removable Disk] icon representing the Memory Card drive is displayed in these instructions are...
..., delete the USB Driver from [Device Manager] as the power source for the Camcorder when using may simply ignore it to a user name having equivalent authority. ≥If you use Windows 98SE, the message, "File is not found" may stop midway through. Switch the operation mode of the Camcorder and reconnect the Cable. ≥If the Camcorder is connected in the PC Mode, the [Removable Disk] icon representing the Memory Card drive is displayed in these instructions are...

Digital Video Camcorder
Page 71
...- Z.MIC : Zoom Microphone -32- Others Others Indicators Various functions and Camcorder status are shown on the screen. r: Remaining Battery Power ≥When the battery power becomes low, the Indicator changes. When the battery is discharged completely, the u (v) Indicator flashes. MIC, AV IN: Audio Dubbing Input Display -5312 bit, 16 bit: Audio Recording Mode -26- LOW CUT: External microphone supported by the Smart Accessory Shoe -12- ZEBRA : P·ADJ : æ: Zebra Pattern -39Picture Adjustment -39Progressive...
...- Z.MIC : Zoom Microphone -32- Others Others Indicators Various functions and Camcorder status are shown on the screen. r: Remaining Battery Power ≥When the battery power becomes low, the Indicator changes. When the battery is discharged completely, the u (v) Indicator flashes. MIC, AV IN: Audio Dubbing Input Display -5312 bit, 16 bit: Audio Recording Mode -26- LOW CUT: External microphone supported by the Smart Accessory Shoe -12- ZEBRA : P·ADJ : æ: Zebra Pattern -39Picture Adjustment -39Progressive...

Digital Video Camcorder
Page 76
... place, the recorded picture is presented in a time-lapse-like manner. ≥Adjust the Focus manually. ≥The Progressive Photoshot Function is automatically turned off. ≥In the Card Recording Mode, using the MagicPix Functions is not possible. ≥When the [PICTURE SIZE] is set to [1280k960] in the Tape Recording Mode, the Photoshot recording is disabled. ≥When using the MagicPix Functions, you cannot use the Built-in Flash. ≥The shutter speed cannot be adjusted. ≥...
... place, the recorded picture is presented in a time-lapse-like manner. ≥Adjust the Focus manually. ≥The Progressive Photoshot Function is automatically turned off. ≥In the Card Recording Mode, using the MagicPix Functions is not possible. ≥When the [PICTURE SIZE] is set to [1280k960] in the Tape Recording Mode, the Photoshot recording is disabled. ≥When using the MagicPix Functions, you cannot use the Built-in Flash. ≥The shutter speed cannot be adjusted. ≥...

Digital Video Camcorder
Page 80
... cannot adjust the sound volume with the Remote Controller in Playback Zoom Mode. ≥If you turn off the Camcorder power or if you operate the Mode Dial, Playback Zoom Mode is automatically cancelled. ≥Even if Playback Zoom Functions are being used once the title is inserted. ≥A full-colored title made on other equipment cannot be played back or added to the picture with this Camcorder. ≥The SD Memory Card has a write protection switch...
... cannot adjust the sound volume with the Remote Controller in Playback Zoom Mode. ≥If you turn off the Camcorder power or if you operate the Mode Dial, Playback Zoom Mode is automatically cancelled. ≥Even if Playback Zoom Functions are being used once the title is inserted. ≥A full-colored title made on other equipment cannot be played back or added to the picture with this Camcorder. ≥The SD Memory Card has a write protection switch...

Digital Video Camcorder
Page 86
... Camcorder and the Cassette is open ? Normal Recording 1: Recording does not start although power is supplied to [SAVE]), recording cannot be performed. (-19-) • Are you using the Battery in an extremely cold place? LP Mode does not allow audio dubbing to operate. (-26-) Indications 1: The Time Code becomes inaccurate. 0 The Time Code Indication counter may not be constant in the reverse direction in Slow Motion Playback Mode, but this case, use the Manual Focus Mode...
... Camcorder and the Cassette is open ? Normal Recording 1: Recording does not start although power is supplied to [SAVE]), recording cannot be performed. (-19-) • Are you using the Battery in an extremely cold place? LP Mode does not allow audio dubbing to operate. (-26-) Indications 1: The Time Code becomes inaccurate. 0 The Time Code Indication counter may not be constant in the reverse direction in Slow Motion Playback Mode, but this case, use the Manual Focus Mode...

Digital Video Camcorder
Page 87
.... • Turn the Camcorder off after operating the [OFF/ON] switch, press the [RESET] Button (-13-) first. Playback (Sound) 1: Sound is not played back from the AV signal output jack is [12bit AUDIO] on the [PLAYBACK] Sub-Menu of the [TAPE PLAYBACK MENU] set to [NORMAL] or [ECONOMY]? Press the [1] Button to cancel the Variable Speed Search Function. (-45-) Card 1: Recorded pictures are converted into digital signals and recorded on PC. • To disconnect the USB Cable safely...
.... • Turn the Camcorder off after operating the [OFF/ON] switch, press the [RESET] Button (-13-) first. Playback (Sound) 1: Sound is not played back from the AV signal output jack is [12bit AUDIO] on the [PLAYBACK] Sub-Menu of the [TAPE PLAYBACK MENU] set to [NORMAL] or [ECONOMY]? Press the [1] Button to cancel the Variable Speed Search Function. (-45-) Card 1: Recorded pictures are converted into digital signals and recorded on PC. • To disconnect the USB Cable safely...


