Digital Video Camera
Page 8
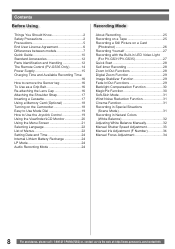
... the Lens Cap 16 Attaching the Shoulder Strap 17 Inserting a Cassette 17 Using a Memory Card (Optional 18 Turning on the Camcorder 18 Easy to Use Mode Dial 19 How to Use the Joystick Control 19 Using the Viewfinder/LCD Monitor 20 Using the Menu Screen 21 Selecting Language 22 List of Menus 22 Setting Date and Time 24 Internal Lithium Battery Recharge 24 LP Mode 24 Audio Recording Mode 24 Recording Mode About Recording 25 Recording on a Tape 25 Recording a Still Picture on a Card...
... the Lens Cap 16 Attaching the Shoulder Strap 17 Inserting a Cassette 17 Using a Memory Card (Optional 18 Turning on the Camcorder 18 Easy to Use Mode Dial 19 How to Use the Joystick Control 19 Using the Viewfinder/LCD Monitor 20 Using the Menu Screen 21 Selecting Language 22 List of Menus 22 Setting Date and Time 24 Internal Lithium Battery Recharge 24 LP Mode 24 Audio Recording Mode 24 Recording Mode About Recording 25 Recording on a Tape 25 Recording a Still Picture on a Card...
Digital Video Camera
Page 13
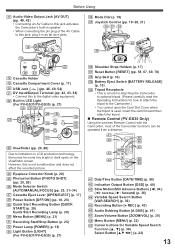
... Mode Selector Switch [AUTO/MANUAL/FOCUS] (pp. 25, 31~34) 27 Cassette Eject Lever [OPEN/EJECT] (p. 17) 28 Power Switch [OFF/ON] (pp. 18, 25) 29 Quick Start Recording Button [QUICK START] (p. 28) Quick Start Recording Lamp (p. 28) 30 Menu Button [MENU] (p. 21) 31 Recording Start/Stop Button (p. 25) 32 Power Lamp [POWER] (p. 18) 33 Light Button [LIGHT] (For PV-GS31/PV-GS35) (p. 27) 36 Shoulder Strap Holders (p. 17) 37 Reset Button [RESET] (pp. 58, 67, 69, 70) 38 Grip Belt (p. 16) 39 Battery Eject Switch [BATTERY...
... Mode Selector Switch [AUTO/MANUAL/FOCUS] (pp. 25, 31~34) 27 Cassette Eject Lever [OPEN/EJECT] (p. 17) 28 Power Switch [OFF/ON] (pp. 18, 25) 29 Quick Start Recording Button [QUICK START] (p. 28) Quick Start Recording Lamp (p. 28) 30 Menu Button [MENU] (p. 21) 31 Recording Start/Stop Button (p. 25) 32 Power Lamp [POWER] (p. 18) 33 Light Button [LIGHT] (For PV-GS31/PV-GS35) (p. 27) 36 Shoulder Strap Holders (p. 17) 37 Reset Button [RESET] (pp. 58, 67, 69, 70) 38 Grip Belt (p. 16) 39 Battery Eject Switch [BATTERY...
Digital Video Camera
Page 19
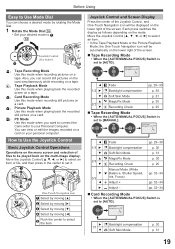
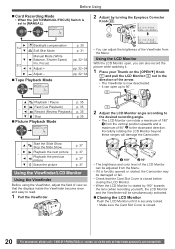
... playing back the recorded scene on a tape. : Card Recording Mode Use this mode when recording still pictures on a card. : Picture Playback Mode Use this mode when playing back the recorded still picture on a card. : PC Mode Use this mode when recording pictures on the lower right of files to [AUTO]. How to Use the Joystick Control Basic Joystick Control Operations Operations on your Personal Computer. You can view or edit the images recorded on a card on the menu screen and selection of the screen. „ Tape Recording Mode • When the [AUTO/MANUAL/FOCUS] Switch is set...
... playing back the recorded scene on a tape. : Card Recording Mode Use this mode when recording still pictures on a card. : Picture Playback Mode Use this mode when playing back the recorded still picture on a card. : PC Mode Use this mode when recording pictures on the lower right of files to [AUTO]. How to Use the Joystick Control Basic Joystick Control Operations Operations on your Personal Computer. You can view or edit the images recorded on a card on the menu screen and selection of the screen. „ Tape Recording Mode • When the [AUTO/MANUAL/FOCUS] Switch is set...
Digital Video Camera
Page 20
... Viewfinder. 1 180° 2 90° • The brightness and color level of 90° 2 to [MANUAL]. Before Using „ Card Recording Mode • When the [AUTO/MANUAL/FOCUS] Switch is set to the downward direction. Using the LCD Monitor With the LCD Monitor open up to 90°. 2 ▲ Playback / Pause ► - ◄ Fast (Cue Playback) Rewind (Review Playback) ▼ Stop „ Picture Playback Mode One-Touch Navigation icon OFF p. 35 p. 35 p. 35 p. 35 1 2 Adjust the LCD...
... Viewfinder. 1 180° 2 90° • The brightness and color level of 90° 2 to [MANUAL]. Before Using „ Card Recording Mode • When the [AUTO/MANUAL/FOCUS] Switch is set to the downward direction. Using the LCD Monitor With the LCD Monitor open up to 90°. 2 ▲ Playback / Pause ► - ◄ Fast (Cue Playback) Rewind (Review Playback) ▼ Stop „ Picture Playback Mode One-Touch Navigation icon OFF p. 35 p. 35 p. 35 p. 35 1 2 Adjust the LCD...

Digital Video Camera
Page 22
...] Digital Zoom (p. 29) [ ZOOM MIC] Zoom Microphone (p. 28) [ DATE/TIME] Date and Time Indication (p. 58) [ INITIAL SET] Initial Setting Mode (p. 58) [ SETUP] Setup Sub-Menu [ FADE COLOR] Fade color (p. 29) [ AUDIO REC] Audio Recording Mode (p. 24) [ DISPLAY] Display Mode (p. 58) [ REMOTE] (PV-GS35 Only) Remote Control Mode (p. 15) [ BEEP SOUND] Beep Sound (p. 59) [ LCD SET] LCD Adjustment (p. 21) [ EVF SET] Viewfinder Adjustment (p. 21) [ DEMO MODE] Demonstration Mode • If you set to [ DEMO MODE] >> [ON] without inserting a cassette or a card, the Camcorder is canceled. If no operations...
...] Digital Zoom (p. 29) [ ZOOM MIC] Zoom Microphone (p. 28) [ DATE/TIME] Date and Time Indication (p. 58) [ INITIAL SET] Initial Setting Mode (p. 58) [ SETUP] Setup Sub-Menu [ FADE COLOR] Fade color (p. 29) [ AUDIO REC] Audio Recording Mode (p. 24) [ DISPLAY] Display Mode (p. 58) [ REMOTE] (PV-GS35 Only) Remote Control Mode (p. 15) [ BEEP SOUND] Beep Sound (p. 59) [ LCD SET] LCD Adjustment (p. 21) [ EVF SET] Viewfinder Adjustment (p. 21) [ DEMO MODE] Demonstration Mode • If you set to [ DEMO MODE] >> [ON] without inserting a cassette or a card, the Camcorder is canceled. If no operations...
Digital Video Camera
Page 24
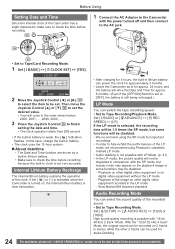
... check the time before recording. 30 1 Connect the AC Adaptor to the Camcorder with "16 bit 48 kHz 2 track" Mode. Before Using Setting Date and Time Since the internal clock of the Camcorder has a slight imprecision make sure to check the time before recording because the built-in the LP mode - If the [ ] or [--] is indicated when the Camcorder is turned on digital video equipment without the LP mode - Slow Motion/Still Advance playback Audio Recording Mode...
... check the time before recording. 30 1 Connect the AC Adaptor to the Camcorder with "16 bit 48 kHz 2 track" Mode. Before Using Setting Date and Time Since the internal clock of the Camcorder has a slight imprecision make sure to check the time before recording because the built-in the LP mode - If the [ ] or [--] is indicated when the Camcorder is turned on digital video equipment without the LP mode - Slow Motion/Still Advance playback Audio Recording Mode...
Digital Video Camera
Page 25
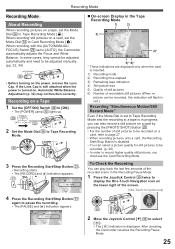
... use the Card Recording Mode. In some cases, they cannot be adjusted manually. (pp. 32, 34) 26 • Before turning on the power, remove the Lens Cap. After checking, the Camcorder resumes the Recording Pause Mode. 25 SP 3h59m59s29f R2:00 PAUSE 2/2 35 2 Move the Joystick Control [▼] 35 to Tape Recording Mode [ ]. Recording Mode Recording Mode About Recording When recording pictures on a tape, set the Mode Dial 34 to select [ ]. • The [ ] indication is displayed. When recording with the [AUTO/MANUAL/ FOCUS] Switch 26 set to [AUTO...
... use the Card Recording Mode. In some cases, they cannot be adjusted manually. (pp. 32, 34) 26 • Before turning on the power, remove the Lens Cap. After checking, the Camcorder resumes the Recording Pause Mode. 25 SP 3h59m59s29f R2:00 PAUSE 2/2 35 2 Move the Joystick Control [▼] 35 to Tape Recording Mode [ ]. Recording Mode Recording Mode About Recording When recording pictures on a tape, set the Mode Dial 34 to select [ ]. • The [ ] indication is displayed. When recording with the [AUTO/MANUAL/ FOCUS] Switch 26 set to [AUTO...
Digital Video Camera
Page 41
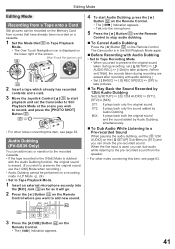
... recorded Cassette. • If the tape recorded in the [16bit] Mode is dubbed with audio dubbing.) • Set [ BASIC] >> [ REC SPEED] >> [SP] to [ST2] and you can check the pre-recorded sound. Editing Mode Editing Mode Recording from a Tape onto a Card Still pictures can be performed on a recording made in LP Mode. (p. 24) • Set to Tape Playback Mode. 1 Insert an external microphone securely into the [MIC] Jack 16 as far as it will go. 2 Press the [ ] Button...
... recorded Cassette. • If the tape recorded in the [16bit] Mode is dubbed with audio dubbing.) • Set [ BASIC] >> [ REC SPEED] >> [SP] to [ST2] and you can check the pre-recorded sound. Editing Mode Editing Mode Recording from a Tape onto a Card Still pictures can be performed on a recording made in LP Mode. (p. 24) • Set to Tape Playback Mode. 1 Insert an external microphone securely into the [MIC] Jack 16 as far as it will go. 2 Press the [ ] Button...
Digital Video Camera
Page 42
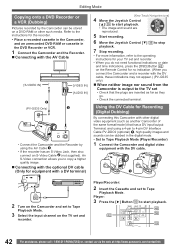
... image. „ Connecting with the optional DV cable (Only for the recorder. • Place a recorded cassette in the Camcorder, and an unrecorded DVD-RAM or cassette in the digital mode. • Set to Tape Playback Mode (Player/Recorder) 1 Connect the Camcorder and digital video equipment with the DV cable. 1 2 Turn on the Camcorder and set to Tape Playback Mode. 3 Select the input channel on the Remote Control for Recording (Digital Dubbing) By connecting this Camcorder with other digital video equipment (such as another Camcorder of the same format/model...
... image. „ Connecting with the optional DV cable (Only for the recorder. • Place a recorded cassette in the Camcorder, and an unrecorded DVD-RAM or cassette in the digital mode. • Set to Tape Playback Mode (Player/Recorder) 1 Connect the Camcorder and digital video equipment with the DV cable. 1 2 Turn on the Camcorder and set to Tape Playback Mode. 3 Select the input channel on the Remote Control for Recording (Digital Dubbing) By connecting this Camcorder with other digital video equipment (such as another Camcorder of the same format/model...
Digital Video Camera
Page 44
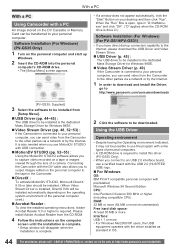
... the Internet. Please install Adobe Acrobat Reader from the Camcorder to be downloaded. It is also needed when you use the program with some types of a camera. Using the USB Driver Operating environment • Despite having the Operating environment indicated, it may not be possible to capture video recorded on a tape or images viewed through the lens of personal computers. • A CD-ROM drive is required. Microsoft Windows 98 Second Edition CPU...
... the Internet. Please install Adobe Acrobat Reader from the Camcorder to be downloaded. It is also needed when you use the program with some types of a camera. Using the USB Driver Operating environment • Despite having the Operating environment indicated, it may not be possible to capture video recorded on a tape or images viewed through the lens of personal computers. • A CD-ROM drive is required. Microsoft Windows 98 Second Edition CPU...
Digital Video Camera
Page 45
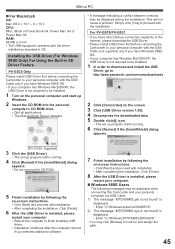
... direct dial-up Windows. 2 Insert the CD-ROM into the personal computer's CD-ROM drive. • Quit all applications. • The [Setup Menu] Screen appears. • A message indicating a conflict between versions may click [Browse] to be displayed during the installation. X v 10.3 CPU: iMac, iBook or Power Book G4, Power Mac G4 or Power Mac G5 RAM: 64 MB or more • The USB equipment operates with the installation. Installing the USB Driver (For Windows...
... direct dial-up Windows. 2 Insert the CD-ROM into the personal computer's CD-ROM drive. • Quit all applications. • The [Setup Menu] Screen appears. • A message indicating a conflict between versions may click [Browse] to be displayed during the installation. X v 10.3 CPU: iMac, iBook or Power Book G4, Power Mac G4 or Power Mac G5 RAM: 64 MB or more • The USB equipment operates with the installation. Installing the USB Driver (For Windows...
Digital Video Camera
Page 49
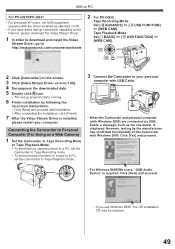
... 1 Set the Camcorder to Tape Recording Mode or Tape Playback Mode. • To send the live camera picture to a PC, set the Camcorder to Tape Playback mode. 3 Connect the Camcorder to http://www.panasonic.com/consumerdownloads 2 For PV-GS35 : Tape Recording Mode : Set [ ADVANCE] >> [ USB FUNCTION] >> [WEB CAM]. Click [Yes] and proceed. • For Windows 98SE/Me users, "USB Audio Device" is displayed. Tape Playback Mode : Set [ BASIC] >> [ USB FUNCTION] >> [WEB CAM]. 35 30 2 Click [Camcorder] on the screen. 3 Click [Video Stream Driver version 1.00]. 4 Decompress the downloaded data...
... 1 Set the Camcorder to Tape Recording Mode or Tape Playback Mode. • To send the live camera picture to a PC, set the Camcorder to Tape Playback mode. 3 Connect the Camcorder to http://www.panasonic.com/consumerdownloads 2 For PV-GS35 : Tape Recording Mode : Set [ ADVANCE] >> [ USB FUNCTION] >> [WEB CAM]. Click [Yes] and proceed. • For Windows 98SE/Me users, "USB Audio Device" is displayed. Tape Playback Mode : Set [ BASIC] >> [ USB FUNCTION] >> [WEB CAM]. 35 30 2 Click [Camcorder] on the screen. 3 Click [Video Stream Driver version 1.00]. 4 Decompress the downloaded data...
Digital Video Camera
Page 52
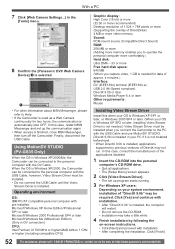
... [Setup Menu] screen appears. 2 Click [Video Stream Driver]. • The set up program starts running. 3 For Windows XP users: Depending on -screen instructions. • Click [Next] and proceed with the USB Cable and use MotionDV STUDIO. Using MotionDV STUDIO (PV-GS35 Only) When the OS is installed. When the OS is Windows XP/2000, the Camcorder can be connected to the personal computer with the USB Cable, however, Video Stream Driver must be connected...
... [Setup Menu] screen appears. 2 Click [Video Stream Driver]. • The set up program starts running. 3 For Windows XP users: Depending on -screen instructions. • Click [Next] and proceed with the USB Cable and use MotionDV STUDIO. Using MotionDV STUDIO (PV-GS35 Only) When the OS is installed. When the OS is Windows XP/2000, the Camcorder can be connected to the personal computer with the USB Cable, however, Video Stream Driver must be connected...
Digital Video Camera
Page 55
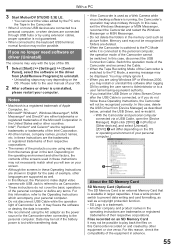
.... Files recorded on the OS. For this Manual, the Panasonic make digital video camera with the type of the OS. 1 Select [Start] (>> [Settings]) >> [Control Panel], select the software or the driver from the names given in the text. in these instructions are the trademarks or registered trademarks of your personal computer. • Do not disconnect USB Cable while the operation light of the screens used as Camcorder. • These instructions do...
.... Files recorded on the OS. For this Manual, the Panasonic make digital video camera with the type of the OS. 1 Select [Start] (>> [Settings]) >> [Control Panel], select the software or the driver from the names given in the text. in these instructions are the trademarks or registered trademarks of your personal computer. • Do not disconnect USB Cable while the operation light of the screens used as Camcorder. • These instructions do...
Digital Video Camera
Page 58
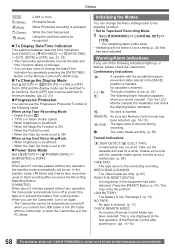
... Display Date/Time Indication This switches between date and time indications. NEED HEAD CLEANING: The video heads are dirty. (p. 65) Textual Indications DEW DETECT/ EJECT TAPE: Condensation has occurred. In the standby mode, [ ] blinks and it takes time more (White): Photoshot Mode (Red): While Photoshot recording is activated (Green): (Red): While the Card being read Using the card that has been adjusted. Confirmatory Indications : [--] / : : A cassette with the Camcorder or when the Camcorder is in the [SAVE] position is inserted. Set...
... Display Date/Time Indication This switches between date and time indications. NEED HEAD CLEANING: The video heads are dirty. (p. 65) Textual Indications DEW DETECT/ EJECT TAPE: Condensation has occurred. In the standby mode, [ ] blinks and it takes time more (White): Photoshot Mode (Red): While Photoshot recording is activated (Green): (Red): While the Card being read Using the card that has been adjusted. Confirmatory Indications : [--] / : : A cassette with the Camcorder or when the Camcorder is in the [SAVE] position is inserted. Set...
Digital Video Camera
Page 59
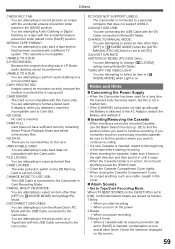
... MODE] when Light is set to [ON], confirmation/alarm beeps are attempting to select an item other times. CAN NOT USE USB: You are attempting to erase protected files. WRONG TAPE FORMAT: You are attempting to [AUTO]. CARD ERROR: The Card is connected to play back data not compatible with the USB Cable connected to [LOCK]. CHANGE MODE TO USE USB: The USB Cable is not compatible with a different TV system. TURN OFF THE VIDEO LIGHT: D.ZOOM] You are attempting to the Camcorder...
... MODE] when Light is set to [ON], confirmation/alarm beeps are attempting to select an item other times. CAN NOT USE USB: You are attempting to erase protected files. WRONG TAPE FORMAT: You are attempting to [AUTO]. CARD ERROR: The Card is connected to play back data not compatible with the USB Cable connected to [LOCK]. CHANGE MODE TO USE USB: The USB Cable is not compatible with a different TV system. TURN OFF THE VIDEO LIGHT: D.ZOOM] You are attempting to the Camcorder...
Digital Video Camera
Page 60
... the Tape/Card Recording Mode is set. • When you set , the Camcorder records the maximum number of the screen changes or blurs, adjust the shutter speed manually to [5 MINUTES] and the Camcorder is left in a bright place to obtain high quality images. „ Quick Start • During the Quick Start Standby Mode, a minute amount of the Camcorder. • Using the LED Video Light reduces battery time. • Set the LED Video Light to off and the Quick Start mode is...
... the Tape/Card Recording Mode is set. • When you set , the Camcorder records the maximum number of the screen changes or blurs, adjust the shutter speed manually to [5 MINUTES] and the Camcorder is left in a bright place to obtain high quality images. „ Quick Start • During the Quick Start Standby Mode, a minute amount of the Camcorder. • Using the LED Video Light reduces battery time. • Set the LED Video Light to off and the Quick Start mode is...

Digital Video Camera
Page 61
... Scene Modes. Others „ Zoom Microphone Function • The Zoom Microphone Function may not work effectively if the surrounding noise is too loud. • It does not work with the external microphone (PV-GS35 Only). „ Digital Zoom Functions • The larger the digital zoom magnification, the more the image quality is degraded. • When the Card Recording mode is used, the Digital Zoom Function cannot be used. • White balance cannot be set in the Digital Zoom range. „ Image Stabilizer Function...
... Scene Modes. Others „ Zoom Microphone Function • The Zoom Microphone Function may not work effectively if the surrounding noise is too loud. • It does not work with the external microphone (PV-GS35 Only). „ Digital Zoom Functions • The larger the digital zoom magnification, the more the image quality is degraded. • When the Card Recording mode is used, the Digital Zoom Function cannot be used. • White balance cannot be set in the Digital Zoom range. „ Image Stabilizer Function...
Digital Video Camera
Page 68
...) The original sound was erased when audio dubbing was recorded in [16bit] mode, the original sound will be performed. (p. 18) • Are you attempting to select [12bit] mode when recording. If you selected video input on a recording made in LP mode? Although the Camcorder is working, focusing shifts into the manual mode. To play back a cassette with no audio dubbing, set to [SAVE]), audio dubbing cannot be erased. Others Auto focus function does not work. • Is manual focus mode selected?
...) The original sound was erased when audio dubbing was recorded in [16bit] mode, the original sound will be performed. (p. 18) • Are you attempting to select [12bit] mode when recording. If you selected video input on a recording made in LP mode? Although the Camcorder is working, focusing shifts into the manual mode. To play back a cassette with no audio dubbing, set to [SAVE]), audio dubbing cannot be erased. Others Auto focus function does not work. • Is manual focus mode selected?
Digital Video Camera
Page 69
... the USB driver installed? You cannot use the menu or record onto the Tape/Card in the Web Camera mode. • Did you purchased the Camcorder from digital video equipment, or using the head cleaner for digital video. (p. 65) • If the terminal for DV". • If a tape is disabled. (p. 63) Photoshot playback images do not press the [RESET] Button, the power to play a tape without inserting it cannot be used. • Either the Camcorder or the card may...
... the USB driver installed? You cannot use the menu or record onto the Tape/Card in the Web Camera mode. • Did you purchased the Camcorder from digital video equipment, or using the head cleaner for digital video. (p. 65) • If the terminal for DV". • If a tape is disabled. (p. 63) Photoshot playback images do not press the [RESET] Button, the power to play a tape without inserting it cannot be used. • Either the Camcorder or the card may...


