
PT56DLX25 User Guide
Page 2
... as power-supply cord or plug is intended to tell the user that parts inside the product are provided for future reference. 3) Heed all warnings on top of the building, as practical. Do not install in a built-in particular, specifies that produces heat. A grounding type plug has two blades and a third grounding prong. No user-serviceable parts inside part of this Operating Instructions manual. 4) Follow all servicing...
... as power-supply cord or plug is intended to tell the user that parts inside the product are provided for future reference. 3) Heed all warnings on top of the building, as practical. Do not install in a built-in particular, specifies that produces heat. A grounding type plug has two blades and a third grounding prong. No user-serviceable parts inside part of this Operating Instructions manual. 4) Follow all servicing...

PT56DLX25 User Guide
Page 7
... the remote control acts sporadically or stops operating the Projection Display set . 2. Do not combine a used batteries. 5. Do not mix battery types (example: "Zinc Carbon" with Alkaline batteries for more than 3 seconds. Emergency Alert System (EAS) Forced Tuning If a CableCARD™ is installed, the cable MSO (multiple system owner/operator) may need to setting up the remote. 2. If the channel has been blocked using the parental control, the parental...
... the remote control acts sporadically or stops operating the Projection Display set . 2. Do not combine a used batteries. 5. Do not mix battery types (example: "Zinc Carbon" with Alkaline batteries for more than 3 seconds. Emergency Alert System (EAS) Forced Tuning If a CableCARD™ is installed, the cable MSO (multiple system owner/operator) may need to setting up the remote. 2. If the channel has been blocked using the parental control, the parental...

PT56DLX25 User Guide
Page 9
... TV/VCR DVD/VCR CH OPEN/CLOSE 27 15 28 29 30 1 POWER TV 2 VCR, DVD, DTV, RCVR, DBS/CBL, AUX 3 TV/VIDEO 4 SD 5 ASPECT 6 MUTE 7 VOL -+ / ŻŹ 8 OK 9 MENU 10 Number Press to enter minor (-) channel numbers. While remote is in menus. Getting Started Location of time. Sets the remote to adjust TV sound and navigate in VCR or DVD mode, press to fast forward. Changes display aspect ratio. Press to communicate with Split screen. Press to select menu and sub-menu...
... TV/VCR DVD/VCR CH OPEN/CLOSE 27 15 28 29 30 1 POWER TV 2 VCR, DVD, DTV, RCVR, DBS/CBL, AUX 3 TV/VIDEO 4 SD 5 ASPECT 6 MUTE 7 VOL -+ / ŻŹ 8 OK 9 MENU 10 Number Press to enter minor (-) channel numbers. While remote is in menus. Getting Started Location of time. Sets the remote to adjust TV sound and navigate in VCR or DVD mode, press to fast forward. Changes display aspect ratio. Press to communicate with Split screen. Press to select menu and sub-menu...

PT56DLX25 User Guide
Page 10
...3) 5 Video Input Connector 3 Connect from other component. (Video 3) Audio Input Connect from other 6 Connector (Shared component. (Video 3) with both Video 3 and PC) Connect from PC. (PC) 7 PC (RGB) Input Connector Connect from Remote Control. Location of Controls (continued) Controls and Terminals on the Projection Display Front View 12 3 4 5 1 MENU Press to display Main Menu. 2 OK Press to select menu and sub-menu items. 3 TV/VIDEO Changes Input source. 4 VOL -+ / ŻŹ Press to adjust TV sound and navigate in menus. Note: • Buttons listed above operate...
...3) 5 Video Input Connector 3 Connect from other component. (Video 3) Audio Input Connect from other 6 Connector (Shared component. (Video 3) with both Video 3 and PC) Connect from PC. (PC) 7 PC (RGB) Input Connector Connect from Remote Control. Location of Controls (continued) Controls and Terminals on the Projection Display Front View 12 3 4 5 1 MENU Press to display Main Menu. 2 OK Press to select menu and sub-menu items. 3 TV/VIDEO Changes Input source. 4 VOL -+ / ŻŹ Press to adjust TV sound and navigate in menus. Note: • Buttons listed above operate...
PT56DLX25 User Guide
Page 12
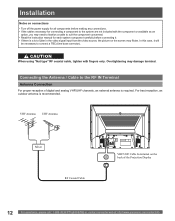
... connect a TBC (time base corrector). Installation Notes on connections • Turn off the power supply for all components before making any connections. • If the cables necessary for connecting a component to the system are not included with fingers only. CAUTION When using "Nut type" RF coaxial cable, tighten with the component or available as an option, you may need to fashion a cable to suit the component concerned. • Read the instruction manual...
... connect a TBC (time base corrector). Installation Notes on connections • Turn off the power supply for all components before making any connections. • If the cables necessary for connecting a component to the system are not included with fingers only. CAUTION When using "Nut type" RF coaxial cable, tighten with the component or available as an option, you may need to fashion a cable to suit the component concerned. • Read the instruction manual...

PT56DLX25 User Guide
Page 19
... sound. 19 But, if NTSC channel is selected, the output from the Digital Audio Out jack on your Projection Display to the Digital Audio In connection on the Dolby Digital decoder. Firmly connect the cable to the Digital Audio Out jack on the unit. Getting Started Digital Audio Out Use the diagram below to connect the Digital Audio Output of your DVD player and DVD-Audio software the copyright protection function may operate and disable optical output. Notes: • When ATSC channel is selected, the output...
... sound. 19 But, if NTSC channel is selected, the output from the Digital Audio Out jack on your Projection Display to the Digital Audio In connection on the Dolby Digital decoder. Firmly connect the cable to the Digital Audio Out jack on the unit. Getting Started Digital Audio Out Use the diagram below to connect the Digital Audio Output of your DVD player and DVD-Audio software the copyright protection function may operate and disable optical output. Notes: • When ATSC channel is selected, the output...

PT56DLX25 User Guide
Page 22
... a DVD player. Installation (continued) How to the HDMI terminal of the unit. One jack supports both video and audio information. This unit is digital. Connection diagram Follow the diagram below to connect the unit to a set top box or DVD player equipped with personal computers. The HDMI/HDCP*1 input can be displayed on the screen in their digital form. Select the output of the connected device to AUDIO IN 1. Likewise, if AV 2 connection is analog. The HDMI input terminal is used , connect...
... a DVD player. Installation (continued) How to the HDMI terminal of the unit. One jack supports both video and audio information. This unit is digital. Connection diagram Follow the diagram below to connect the unit to a set top box or DVD player equipped with personal computers. The HDMI/HDCP*1 input can be displayed on the screen in their digital form. Select the output of the connected device to AUDIO IN 1. Likewise, if AV 2 connection is analog. The HDMI input terminal is used , connect...
PT56DLX25 User Guide
Page 25
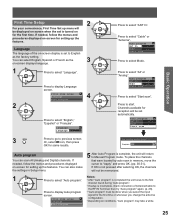
... the on-screen display is set is incomplete, check connection of Antenna/Cable to the RF IN Terminal, then try "Auto program" again. (p. 29). • "Auto program" must be displayed on screen when the set to Manual Program mode. Now scanning analog channel ... Basic Operation First Time Setup For your convenience, First Time Set up menu will be done when you select the input signal for the first time or whenever you change the antenna configuration. • Depending on conditions, "Auto program" may...
... the on-screen display is set is incomplete, check connection of Antenna/Cable to the RF IN Terminal, then try "Auto program" again. (p. 29). • "Auto program" must be displayed on screen when the set to Manual Program mode. Now scanning analog channel ... Basic Operation First Time Setup For your convenience, First Time Set up menu will be done when you select the input signal for the first time or whenever you change the antenna configuration. • Depending on conditions, "Auto program" may...

PT56DLX25 User Guide
Page 31
... "Apply". No 5 - - - - - - Press to display the Caption input screen. CH VOL OK VOL CH Press to input/ change . No 4 - - - - - - No 8 - - - - - - Press to select Favorite number. Caption detail Caption Apply Press to select the character to select "Yes" or "No". „ Preview (CH) You can display a program by selecting "Yes." CH Press to move to the character to "Caption". Press to enter the Caption. 6 RETURN Press to enter...
... "Apply". No 5 - - - - - - Press to display the Caption input screen. CH VOL OK VOL CH Press to input/ change . No 4 - - - - - - No 8 - - - - - - Press to select Favorite number. Caption detail Caption Apply Press to select the character to select "Yes" or "No". „ Preview (CH) You can display a program by selecting "Yes." CH Press to move to the character to "Caption". Press to enter the Caption. 6 RETURN Press to enter...
PT56DLX25 User Guide
Page 39
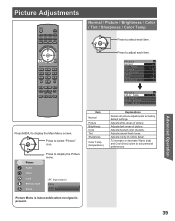
...blue) colors to factory default settings. CH VOL OK VOL CH Picture Audio Timer Lock Memory Card Setup Press to display the Picture menu. (PC input menu) Menu Picture Audio Picture Menu is inaccessible when no signal is present. Adjusts desired color intensity. Press to select "Picture" icon. Adjusts dark areas of picture. Picture Normal Pic. Advanced Operation CALL Picture Adjustments POWER SAP LIGHT TV VCR DVD DTV RCVR DBS/CBL AUX TV/VIDEO SLEEP EXIT E ASPECT FAVORITE RE CH MUT VOL OK VOL MENU CH RETURN 1 2 4 5 7 8 R-TUNE 0 3 6 9 PROG REW PLAY FF...
...blue) colors to factory default settings. CH VOL OK VOL CH Picture Audio Timer Lock Memory Card Setup Press to display the Picture menu. (PC input menu) Menu Picture Audio Picture Menu is inaccessible when no signal is present. Adjusts desired color intensity. Press to select "Picture" icon. Adjusts dark areas of picture. Picture Normal Pic. Advanced Operation CALL Picture Adjustments POWER SAP LIGHT TV VCR DVD DTV RCVR DBS/CBL AUX TV/VIDEO SLEEP EXIT E ASPECT FAVORITE RE CH MUT VOL OK VOL MENU CH RETURN 1 2 4 5 7 8 R-TUNE 0 3 6 9 PROG REW PLAY FF...

PT56DLX25 User Guide
Page 41
... displayed with regular TV (NTSC) program. • When viewing a nonstandard DTV signal format, you can change color parameters manually for HD (high definition) or SD (standard definition). Off: Set to adjust color parameters automatically for the best picture quality. Press to factory default settings. Adjusts the red component. (PC input only.) Adjusts the green component. (PC input only.) Adjusts the blue component. (PC input only.) Advanced Operation 41 Notes: • This feature is faithfully reproduced on the unit. Select Light...
... displayed with regular TV (NTSC) program. • When viewing a nonstandard DTV signal format, you can change color parameters manually for HD (high definition) or SD (standard definition). Off: Set to adjust color parameters automatically for the best picture quality. Press to factory default settings. Adjusts the red component. (PC input only.) Adjusts the green component. (PC input only.) Adjusts the blue component. (PC input only.) Advanced Operation 41 Notes: • This feature is faithfully reproduced on the unit. Select Light...

PT56DLX25 User Guide
Page 42
... REW PLAY FF PAUSE STOP REC SPLIT SWAP TV/VCR DVD/VCR CH OPEN/CLOSE Normal / Bass / Treble / Balance CH VOL OK VOL CH Item Normal Bass Treble Balance Press to Al Sound "On," BBE "On," or "VIVA 3D," the other adjust items will not function. Picture Audio Timer Lock Memory Card Setup (PC input menu) Menu Picture Audio If unit is set Audio Modes that best suits the program to select "Audio" icon. Increase...
... REW PLAY FF PAUSE STOP REC SPLIT SWAP TV/VCR DVD/VCR CH OPEN/CLOSE Normal / Bass / Treble / Balance CH VOL OK VOL CH Item Normal Bass Treble Balance Press to Al Sound "On," BBE "On," or "VIVA 3D," the other adjust items will not function. Picture Audio Timer Lock Memory Card Setup (PC input menu) Menu Picture Audio If unit is set Audio Modes that best suits the program to select "Audio" icon. Increase...

PT56DLX25 User Guide
Page 45
... used as guidelines for blocking the programs. The default mode for the Lock category is the Unlocked state. Enter Secret Code A 4-digit code must be accessed unless the secret code is easy to display the Main Menu screen. Enter new password, again. ---- If you can surf the various categories of movies and television programs according to enter your secret code. 7 8 9 Enter password. 0 ---- In this state, you display the Lock menu. Picture Audio Timer Lock Memory Card Setup...
... used as guidelines for blocking the programs. The default mode for the Lock category is the Unlocked state. Enter Secret Code A 4-digit code must be accessed unless the secret code is easy to display the Main Menu screen. Enter new password, again. ---- If you can surf the various categories of movies and television programs according to enter your secret code. 7 8 9 Enter password. 0 ---- In this state, you display the Lock menu. Picture Audio Timer Lock Memory Card Setup...

PT56DLX25 User Guide
Page 46
...Categories: MPAA (Motion Picture Association of video games, VCR tapes, channels and Video modes. Press to select CH 1 - 7. Lock Mode Off Channel Program Change password 2 CH VOL OK VOL CH Press to enter program lock screen. The available modes are used as guidelines for blocking programs. • The default mode for Canadian French ratings Program lock MPAA U.S.TV C.E.L.R. Press to prevent viewing of America), U.S.TV Program, Canadian English ratings and Canadian French ratings. Lock Feature (continued) Lock Set Select Lock mode to enter program lock menu.
...Categories: MPAA (Motion Picture Association of video games, VCR tapes, channels and Video modes. Press to select CH 1 - 7. Lock Mode Off Channel Program Change password 2 CH VOL OK VOL CH Press to enter program lock screen. The available modes are used as guidelines for blocking programs. • The default mode for Canadian French ratings Program lock MPAA U.S.TV C.E.L.R. Press to prevent viewing of America), U.S.TV Program, Canadian English ratings and Canadian French ratings. Lock Feature (continued) Lock Set Select Lock mode to enter program lock menu.

PT56DLX25 User Guide
Page 55
... output in analog format. Input labels To label video input connections for on-screen display. 1 CH VOL OK VOL Press to select the setting. If CC is used for displaying or recording, closed caption (CC) should be set On/Off on the television screen, and displays program guide or any language. T2/T3/T4 Other modes that display information and blank out a large portion of the picture of the TV will overlap. Setup CH scan All Language Program channel Input...
... output in analog format. Input labels To label video input connections for on-screen display. 1 CH VOL OK VOL Press to select the setting. If CC is used for displaying or recording, closed caption (CC) should be set On/Off on the television screen, and displays program guide or any language. T2/T3/T4 Other modes that display information and blank out a large portion of the picture of the TV will overlap. Setup CH scan All Language Program channel Input...

PT56DLX25 User Guide
Page 56
... (if selected under style) (Automatic, Black, White, Red, Green, Blue, Yellow, Magenta, Cyan) CC Reset Reset the CC settings. Setup Features (continued) CC Mode for Digital The Digital Closed Caption menu lets you configure the way you choose to select the setting. CC Mode Analog Digital Off CC1 Primary Digital setting CC reset 56 For assistance, please call : 1-888-VIEW PTV(843-9788) or, contact us via the web at: http://www.panasonic.com...
... (if selected under style) (Automatic, Black, White, Red, Green, Blue, Yellow, Magenta, Cyan) CC Reset Reset the CC settings. Setup Features (continued) CC Mode for Digital The Digital Closed Caption menu lets you configure the way you choose to select the setting. CC Mode Analog Digital Off CC1 Primary Digital setting CC reset 56 For assistance, please call : 1-888-VIEW PTV(843-9788) or, contact us via the web at: http://www.panasonic.com...
PT56DLX25 User Guide
Page 58
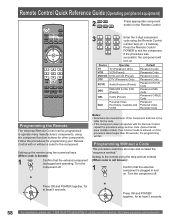
... procedure using the Remote Control number keys (0 ~ 9 buttons). 7 8 9 Press the Remote Control 0 POWER to test the component. Turn the component off . + CH VOL OK VOL CH Press OK and POWER together, for other components. Setting to operate many manufacturers' components, using the step and set method (When code is not known): 1 POWER Confirm that the external component is plugged in the table for the component. Remote Control Quick Reference Guide (Operating peripheral equipment) POWER SAP LIGHT TV VCR DVD DTV RCVR DBS/CBL AUX TV/VIDEO SLEEP EXIT E ASPECT...
... procedure using the Remote Control number keys (0 ~ 9 buttons). 7 8 9 Press the Remote Control 0 POWER to test the component. Turn the component off . + CH VOL OK VOL CH Press OK and POWER together, for other components. Setting to operate many manufacturers' components, using the step and set method (When code is not known): 1 POWER Confirm that the external component is plugged in the table for the component. Remote Control Quick Reference Guide (Operating peripheral equipment) POWER SAP LIGHT TV VCR DVD DTV RCVR DBS/CBL AUX TV/VIDEO SLEEP EXIT E ASPECT...

PT56DLX25 User Guide
Page 59
... for programming procedures. Notes: • The Remote Control memory is capable of peripheral equipment. Write the code numbers from tables in all models. • After entering the proper infrared code, press the desired Mode Selection button on operating peripheral equipment using the Remote Control. CABLE Cable Box DBS Digital Broadcast System VCR Video Cassette Recorder RCVR Receiver or Amplifier CD Compact Disc Player DVD Digital Versatile Player Other Component Other Component Other Component Infrared Codes Index The Remote Control is...
... for programming procedures. Notes: • The Remote Control memory is capable of peripheral equipment. Write the code numbers from tables in all models. • After entering the proper infrared code, press the desired Mode Selection button on operating peripheral equipment using the Remote Control. CABLE Cable Box DBS Digital Broadcast System VCR Video Cassette Recorder RCVR Receiver or Amplifier CD Compact Disc Player DVD Digital Versatile Player Other Component Other Component Other Component Infrared Codes Index The Remote Control is...

PT56DLX25 User Guide
Page 62
... PRESS POWER Select a Channel 1 2 3 4 5 6 7 8 9 0 Change Channels Up/Down Back to previous channel CH VOL OK VOL CH R-TUNE Operating a DBS Program the Remote Control to use with Remote Control Note: • Refer to use with VCR. E. Operating a VCR Program the Remote Control to page 9 for VCR Change Channels up/down Record Play Stop Fast Forward Rewind the Tape Pause Change to TV or VCR Mode TV/VIDEO SPLIT SWAP DVD/VCR CH REC PLAY STOP FF REW PAUSE TV/VCR On screen VCR Display Operating a CABLE BOX Program the Remote Control to previous channel Select next...
... PRESS POWER Select a Channel 1 2 3 4 5 6 7 8 9 0 Change Channels Up/Down Back to previous channel CH VOL OK VOL CH R-TUNE Operating a DBS Program the Remote Control to use with Remote Control Note: • Refer to use with VCR. E. Operating a VCR Program the Remote Control to page 9 for VCR Change Channels up/down Record Play Stop Fast Forward Rewind the Tape Pause Change to TV or VCR Mode TV/VIDEO SPLIT SWAP DVD/VCR CH REC PLAY STOP FF REW PAUSE TV/VCR On screen VCR Display Operating a CABLE BOX Program the Remote Control to previous channel Select next...

PT56DLX25 User Guide
Page 68
No picture even if the power is displayed with a new one . Firmly replace the cover. • Please replace lamp with unnatural colors (as • Change "Color Corr." If the connected device has a format selection switch, set the Remote Control code? Image appears doubled or tripled. • Is the antenna receiving any signals reflected off of the lamp and not a malfunction. Please adjust the V-Size. Some parts of light? • Did you call : 1-888-VIEW PTV...
No picture even if the power is displayed with a new one . Firmly replace the cover. • Please replace lamp with unnatural colors (as • Change "Color Corr." If the connected device has a format selection switch, set the Remote Control code? Image appears doubled or tripled. • Is the antenna receiving any signals reflected off of the lamp and not a malfunction. Please adjust the V-Size. Some parts of light? • Did you call : 1-888-VIEW PTV...


