
Digital Ptv Monitor
Page 3
... Chart 3 Congratulations 4 Customer Record 4 Specifications 4 Care and Cleaning 5 Installation 6 Television Location 6 Optional Cable Connections 6 AC Power Supply Cord 6 Cable / Antenna 6 Optional Equipment Connections 7 VCR Connection 7 Cable Box Connection 8 VCR and Cable Box Connection 9 Amplifier Connection (To Audio Amp 10 Program Out Connection (Prog.Out 10 Dolby Center Channel Input Connection 11 SPLIT Screen Operation 12 Basic SPLIT Operation 12 SPLIT Screen Operation with a Cable Box 13 Digital TV - Contents are subject to change without notice or obligation...
... Chart 3 Congratulations 4 Customer Record 4 Specifications 4 Care and Cleaning 5 Installation 6 Television Location 6 Optional Cable Connections 6 AC Power Supply Cord 6 Cable / Antenna 6 Optional Equipment Connections 7 VCR Connection 7 Cable Box Connection 8 VCR and Cable Box Connection 9 Amplifier Connection (To Audio Amp 10 Program Out Connection (Prog.Out 10 Dolby Center Channel Input Connection 11 SPLIT Screen Operation 12 Basic SPLIT Operation 12 SPLIT Screen Operation with a Cable Box 13 Digital TV - Contents are subject to change without notice or obligation...
Digital Ptv Monitor
Page 4
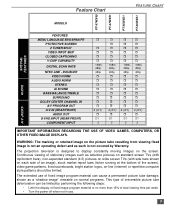
... AI SOUND BASS/BALANCE/TREBLE SURROUND DOLBY CENTER CHANNEL IN A/V PROGRAM OUT A/V IN (REAR/FRONT) AUDIO OUT S-VHS INPUT (REAR/FRONT) COMPONENT INPUT r r r r r 1080i, 480p 480p r r r r r r r r 4 (3/1) r 2/1 2 r r r r r r 1080i, 480p 480p r r r r r r r r 4 (3/1) r 2/1 2 r r r r r r 1080i, 480p 480p r r r r r r r r 4 (3/1) r 2/1 2 r r r r r r 1080i, 480p 480p r r r r r r r r 4 (3/1) r 2/1 2 AUDIO A/V JACKS IMPORTANT INFORMATION REGARDING THE USE OF VIDEO GAMES, COMPUTERS, OR OTHER FIXED IMAGE DISPLAYS. WARNING: The marking or retained image on the picture tube resulting from viewing fixed...
... AI SOUND BASS/BALANCE/TREBLE SURROUND DOLBY CENTER CHANNEL IN A/V PROGRAM OUT A/V IN (REAR/FRONT) AUDIO OUT S-VHS INPUT (REAR/FRONT) COMPONENT INPUT r r r r r 1080i, 480p 480p r r r r r r r r 4 (3/1) r 2/1 2 r r r r r r 1080i, 480p 480p r r r r r r r r 4 (3/1) r 2/1 2 r r r r r r 1080i, 480p 480p r r r r r r r r 4 (3/1) r 2/1 2 r r r r r r 1080i, 480p 480p r r r r r r r r 4 (3/1) r 2/1 2 AUDIO A/V JACKS IMPORTANT INFORMATION REGARDING THE USE OF VIDEO GAMES, COMPUTERS, OR OTHER FIXED IMAGE DISPLAYS. WARNING: The marking or retained image on the picture tube resulting from viewing fixed...
Digital Ptv Monitor
Page 5
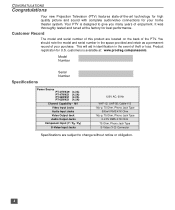
... the PTV. Model Number Specifications Serial Number Power Source PT-47WX49 PT-47WX51 PT-56WX51 PT-65WX51 (4.2A) (4.2A) (4.2A) (4.2A) Channel Capability - 181 Video Input Jacks Audio Input Jacks Video Output Jack Audio Output Jacks Component Input (Y / PB / PR) S-Video Input Jacks 120V AC, 60Hz VHF-12; CONGRATULATIONS Congratulations Your new Projection Television (PTV) features state-of-the-art technology for high quality picture and sound with complete audio/video connections for your purchase...
... the PTV. Model Number Specifications Serial Number Power Source PT-47WX49 PT-47WX51 PT-56WX51 PT-65WX51 (4.2A) (4.2A) (4.2A) (4.2A) Channel Capability - 181 Video Input Jacks Audio Input Jacks Video Output Jack Audio Output Jacks Component Input (Y / PB / PR) S-Video Input Jacks 120V AC, 60Hz VHF-12; CONGRATULATIONS Congratulations Your new Projection Television (PTV) features state-of-the-art technology for high quality picture and sound with complete audio/video connections for your purchase...
Digital Ptv Monitor
Page 7
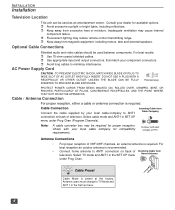
... connection on back of television. Antenna users must change to minimize interference. Select cable mode and ANT1 in SET UP Incoming Cable from television. Inadequate ventilation may reduce remote control transmitting range. r Keep away from excessive heat or moisture. For best reception an outdoor antenna is required. Select TV mode and ANT1 in the Set Up menu. 6 Optional Cable Connections Shielded audio and video cables should be required for available options. Note: A cable converter box may be used...
... connection on back of television. Antenna users must change to minimize interference. Select cable mode and ANT1 in SET UP Incoming Cable from television. Inadequate ventilation may reduce remote control transmitting range. r Keep away from excessive heat or moisture. For best reception an outdoor antenna is required. Select TV mode and ANT1 in the Set Up menu. 6 Optional Cable Connections Shielded audio and video cables should be required for available options. Note: A cable converter box may be used...
Digital Ptv Monitor
Page 8
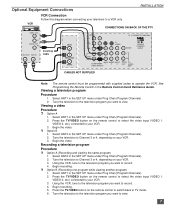
...VIDEO INPUT L L AUDIO R 1 2 INPUT INPUT INPUT COMPONENT 1 2 3 VIDEO INPUTS R PROG TO OUT AUDIO AMP CABLES NOT SUPPLIED Note: The remote control must be programmed with supplied codes to TV mode. 6. Select ANT1 in the SET UP menu under Prog Chan (Program Channels). 2. Select ANT2 in the SET UP menu under Prog Chan (Program Channels). 2. Tune the television to the television program you want to a VCR only. Optional Equipment Connections INSTALLATION VCR Connection Follow this diagram when connecting your VCR. 3. See Programming the Remote Control in the SET UP menu...
...VIDEO INPUT L L AUDIO R 1 2 INPUT INPUT INPUT COMPONENT 1 2 3 VIDEO INPUTS R PROG TO OUT AUDIO AMP CABLES NOT SUPPLIED Note: The remote control must be programmed with supplied codes to TV mode. 6. Select ANT1 in the SET UP menu under Prog Chan (Program Channels). 2. Select ANT2 in the SET UP menu under Prog Chan (Program Channels). 2. Tune the television to the television program you want to a VCR only. Optional Equipment Connections INSTALLATION VCR Connection Follow this diagram when connecting your VCR. 3. See Programming the Remote Control in the SET UP menu...
Digital Ptv Monitor
Page 9
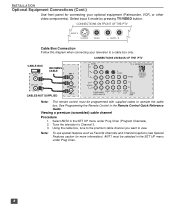
... OUT CABLES NOT SUPPLIED SPLIT OUT ANT 2 VIDEO Y 12 W 50 WATTS (DIN) MAX. Tune the television to a cable box only. CONNECTIONS ON FRONT OF THE PTV INPUT 4 S-VIDEO VIDEO L - Select ANT2 in the Remote Control Quick Reference Guide. Select input 4 mode by pressing TV/VIDEO button. INSTALLATION Optional Equipment Connections (Cont.) Use front panel for more information), ANT1 must be selected in the SET UP menu under Prog Chan (Program Channels). 2. AUDIO - Viewing a premium (scrambled) cable channel Procedure 1. Using the cable box, tune...
... OUT CABLES NOT SUPPLIED SPLIT OUT ANT 2 VIDEO Y 12 W 50 WATTS (DIN) MAX. Tune the television to a cable box only. CONNECTIONS ON FRONT OF THE PTV INPUT 4 S-VIDEO VIDEO L - Select ANT2 in the Remote Control Quick Reference Guide. Select input 4 mode by pressing TV/VIDEO button. INSTALLATION Optional Equipment Connections (Cont.) Use front panel for more information), ANT1 must be selected in the SET UP menu under Prog Chan (Program Channels). 2. AUDIO - Viewing a premium (scrambled) cable channel Procedure 1. Using the cable box, tune...
Digital Ptv Monitor
Page 10
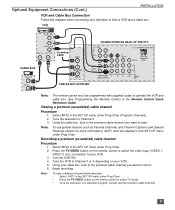
....) INSTALLATION VCR and Cable Box Connection Follow this diagram when connecting your VCR. 5. Viewing a premium (scrambled) cable channel Procedure 1. Using your VCR. 3. PB SVIDEO CENTER CHANNEL PR VIDEO INPUT L L AUDIO R 1 2 INPUT INPUT INPUT COMPONENT 1 2 3 VIDEO INPUTS R PROG TO OUT AUDIO AMP ANT IN CABLES NOT SUPPLIED Note: The remote control must be programmed with supplied codes to both a VCR and a cable box. Select ANT2 in the SET UP menu under Prog Chan. • Press the TV/VIDEO button on the remote control to select the video input (VIDEO 1, VIDEO...
....) INSTALLATION VCR and Cable Box Connection Follow this diagram when connecting your VCR. 5. Viewing a premium (scrambled) cable channel Procedure 1. Using your VCR. 3. PB SVIDEO CENTER CHANNEL PR VIDEO INPUT L L AUDIO R 1 2 INPUT INPUT INPUT COMPONENT 1 2 3 VIDEO INPUTS R PROG TO OUT AUDIO AMP ANT IN CABLES NOT SUPPLIED Note: The remote control must be programmed with supplied codes to both a VCR and a cable box. Select ANT2 in the SET UP menu under Prog Chan. • Press the TV/VIDEO button on the remote control to select the video input (VIDEO 1, VIDEO...

Digital Ptv Monitor
Page 11
...1. OUT video and TO AUDIO AMP R/L Audio terminals. 2. Set amplifier volume to control speakers from the external amplifier. 6. See optional equipment manual for further instructions for recording or monitoring. Audio Adjustments 1. PB SVIDEO CENTER CHANNEL PR VIDEO INPUT L L AUDIO R 1 2 INPUT INPUT INPUT COMPONENT 1 2 3 VIDEO INPUTS R PROG TO OUT AUDIO AMP Program Out Connection (PROG. Select SPEAKERS OFF & VARIABLE AUDIO OUT from AUDIO menu to control speakers from the PTV, if you select VARIABLE AUDIO OUT mode. CABLES NOT SUPPLIED CONNECTIONS ON BACK...
...1. OUT video and TO AUDIO AMP R/L Audio terminals. 2. Set amplifier volume to control speakers from the external amplifier. 6. See optional equipment manual for further instructions for recording or monitoring. Audio Adjustments 1. PB SVIDEO CENTER CHANNEL PR VIDEO INPUT L L AUDIO R 1 2 INPUT INPUT INPUT COMPONENT 1 2 3 VIDEO INPUTS R PROG TO OUT AUDIO AMP Program Out Connection (PROG. Select SPEAKERS OFF & VARIABLE AUDIO OUT from AUDIO menu to control speakers from the PTV, if you select VARIABLE AUDIO OUT mode. CABLES NOT SUPPLIED CONNECTIONS ON BACK...
Digital Ptv Monitor
Page 12
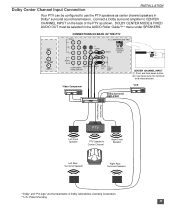
... ANT 2 L R-AUDIO-LLVIDEO S-VIDEO AUDIO R ANT 2 1 2 INPUT INPUT INPUT COMSPPOLNITENT 1 2 3 VIDEOOUITNPUTS R PROG TO OUT AUDIO AMP INPUT 1 INPUT 2 INPUT 3 CENTER CHANNEL INPUT (1) Push and hold down button. Video ComVpidoenoenCtomponent R L PROG. Connect a Dolby surround amplifier to use the PTV speakers as shown. OUT TO AUDIO AMP CENTER CHANNEL INPUT (1) Push and hold down button. (2) Insert bare wire into terminal and release button. ANT 1 (2) Insert bare wire into terminal and release button. DOLBY CENTER MODE & FIXED AUDIO OUT...
... ANT 2 L R-AUDIO-LLVIDEO S-VIDEO AUDIO R ANT 2 1 2 INPUT INPUT INPUT COMSPPOLNITENT 1 2 3 VIDEOOUITNPUTS R PROG TO OUT AUDIO AMP INPUT 1 INPUT 2 INPUT 3 CENTER CHANNEL INPUT (1) Push and hold down button. Video ComVpidoenoenCtomponent R L PROG. Connect a Dolby surround amplifier to use the PTV speakers as shown. OUT TO AUDIO AMP CENTER CHANNEL INPUT (1) Push and hold down button. (2) Insert bare wire into terminal and release button. ANT 1 (2) Insert bare wire into terminal and release button. DOLBY CENTER MODE & FIXED AUDIO OUT...
Digital Ptv Monitor
Page 14
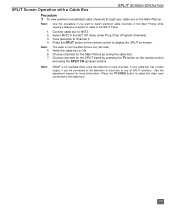
... available when using the SPLIT CH up/down buttons. See the equipment manual for the Main Picture by pressing the TV button on -screen. SPLIT Screen Operation with a Cable Box SPLIT SCREEN OPERATION Procedure r To view premium (scrambled) cable channels through your cable box has a video output, it can be connected to the television to allow you want to watch premium cable channels in the Main Picture while viewing a television program or video in the SET UP menu under Prog Chan (Program Channels). 3.
... available when using the SPLIT CH up/down buttons. See the equipment manual for the Main Picture by pressing the TV button on -screen. SPLIT Screen Operation with a Cable Box SPLIT SCREEN OPERATION Procedure r To view premium (scrambled) cable channels through your cable box has a video output, it can be connected to the television to allow you want to watch premium cable channels in the Main Picture while viewing a television program or video in the SET UP menu under Prog Chan (Program Channels). 3.
Digital Ptv Monitor
Page 15
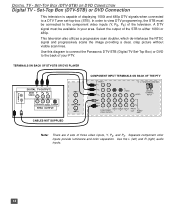
... the output of the television. This television also utilizes a progressive scan doubler, which de-interlaces the NTSC signal and progressively scans the image providing a clear, crisp picture without visible scan lines. Use the L (left) and R (right) audio inputs. 14 Use this diagram to connect the Panasonic DTV-STB (Digital TV-Set-Top Box) or DVD to a DTV Tuner set-top-box (STB). SET-TOP BOX (DTV-STB) OR DVD CONNECTION Digital TV - PB SVIDEO CENTER CHANNEL PR VIDEO INPUT L L AUDIO R 1 2 INPUT INPUT INPUT COMPONENT 1 2 3 VIDEO INPUTS R PROG TO OUT AUDIO AMP...
... the output of the television. This television also utilizes a progressive scan doubler, which de-interlaces the NTSC signal and progressively scans the image providing a clear, crisp picture without visible scan lines. Use the L (left) and R (right) audio inputs. 14 Use this diagram to connect the Panasonic DTV-STB (Digital TV-Set-Top Box) or DVD to a DTV Tuner set-top-box (STB). SET-TOP BOX (DTV-STB) OR DVD CONNECTION Digital TV - PB SVIDEO CENTER CHANNEL PR VIDEO INPUT L L AUDIO R 1 2 INPUT INPUT INPUT COMPONENT 1 2 3 VIDEO INPUTS R PROG TO OUT AUDIO AMP...
Digital Ptv Monitor
Page 16
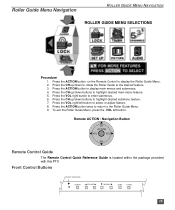
... buttons to enter submenus. 6. Press the VOL right/left button. Press the VOL right button to highlight desired main menu feature. 5. Press the ACTION button twice to return to highlight desired submenu feature. 7. Front Control Buttons ON/OFF INDICATOR POWER VOLUME CHANNEL ACTION TV/VIDEO 15 Press the CH up /down buttons to the Roller Guide Menu. 9. Press the ACTION button on the Remote Control to select or adjust...
... buttons to enter submenus. 6. Press the VOL right/left button. Press the VOL right button to highlight desired main menu feature. 5. Press the ACTION button twice to return to highlight desired submenu feature. 7. Front Control Buttons ON/OFF INDICATOR POWER VOLUME CHANNEL ACTION TV/VIDEO 15 Press the CH up /down buttons to the Roller Guide Menu. 9. Press the ACTION button on the Remote Control to select or adjust...
Digital Ptv Monitor
Page 17
... Cable or TV. Automatically program channels having a signal into memory. r AUTO POWER ON - Adjustment may be selected by pressing the SAP button on the projection tubes. Select STEREO, SAP (Second Audio Program) or MONO. (Use MONO when stereo signal is moved because of the effects of the Earth's magnetic field on the Remote Control. r BASS - r BALANCE - r CC MODE - r CONVERGENCE 1 - r CONVERGENCE 2 - r TREBLE - Emphasize the left/right speaker volume. r MANUAL PROGRAM - Activate C1-C4 for Closed Captioning, program guides and...
... Cable or TV. Automatically program channels having a signal into memory. r AUTO POWER ON - Adjustment may be selected by pressing the SAP button on the projection tubes. Select STEREO, SAP (Second Audio Program) or MONO. (Use MONO when stereo signal is moved because of the effects of the Earth's magnetic field on the Remote Control. r BASS - r BALANCE - r CC MODE - r CONVERGENCE 1 - r CONVERGENCE 2 - r TREBLE - Emphasize the left/right speaker volume. r MANUAL PROGRAM - Activate C1-C4 for Closed Captioning, program guides and...
Digital Ptv Monitor
Page 18
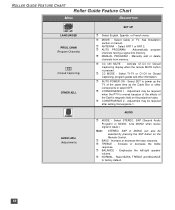
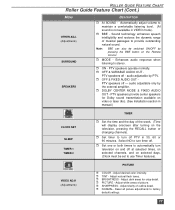
... be switched ON/OFF by pressing the BBE button on the television, pressing the RECALL button or changing channels). ROLLER GUIDE FEATURE CHART Roller Guide Feature Chart (Cont.) MENU OTHER ADJ. (Adjustments) SURROUND SPEAKERS DESCRIPTION r AI SOUND - r BBE - Sound technology enhances speech intelligibility and restores the dynamic range of the week. (Time will display onscreen after turning on the Remote Control. r ON - PTV speakers operate normally. r OFF & VARIABLE AUDIO OUT - audio adjustable by the external...
... be switched ON/OFF by pressing the BBE button on the television, pressing the RECALL button or changing channels). ROLLER GUIDE FEATURE CHART Roller Guide Feature Chart (Cont.) MENU OTHER ADJ. (Adjustments) SURROUND SPEAKERS DESCRIPTION r AI SOUND - r BBE - Sound technology enhances speech intelligibility and restores the dynamic range of the week. (Time will display onscreen after turning on the Remote Control. r ON - PTV speakers operate normally. r OFF & VARIABLE AUDIO OUT - audio adjustable by the external...
Digital Ptv Monitor
Page 19
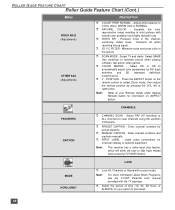
... to COOL (blue), WARM (red) or NORMAL. Reduces noise in the picture. Remains off when receiving strong signal. Press the ASPECT button on ASPECT button. r PRESET CAPTION - Minimize noise and cross color in the channel, commonly called snow. Select GAME (line doubling) to select Zoom mode, then adjust the vertical position by pressing the VOL left or right button. POSITION - r MANUAL CAPTION - LOCK MODE HOW LONG? Adjust white balance to be locked. 18 r V - Enter channel numbers for onscreen display of time...
... to COOL (blue), WARM (red) or NORMAL. Reduces noise in the picture. Remains off when receiving strong signal. Press the ASPECT button on ASPECT button. r PRESET CAPTION - Minimize noise and cross color in the channel, commonly called snow. Select GAME (line doubling) to select Zoom mode, then adjust the vertical position by pressing the VOL left or right button. POSITION - r MANUAL CAPTION - LOCK MODE HOW LONG? Adjust white balance to be locked. 18 r V - Enter channel numbers for onscreen display of time...
Digital Ptv Monitor
Page 20
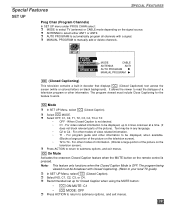
... MODE: OFF r Press ACTION to return to work. r Recommended set up to C4 - r ANTENNA to manually add or delete channels. r In SET UP Menu, select CC (Closed Caption). For program guide and other modes of information. (Blocks a large portion of the picture). MODE CABLE ANTENNA ANT1 AUTO PROGRAM MANUAL PROGRAM CC (Closed Captioning) This television contains a built-in any language. • C2 to 4 lines onscreen at a time. (It does not block relevant parts of the picture on the signal...
... MODE: OFF r Press ACTION to return to work. r Recommended set up to C4 - r ANTENNA to manually add or delete channels. r In SET UP Menu, select CC (Closed Caption). For program guide and other modes of information. (Blocks a large portion of the picture). MODE CABLE ANTENNA ANT1 AUTO PROGRAM MANUAL PROGRAM CC (Closed Captioning) This television contains a built-in any language. • C2 to 4 lines onscreen at a time. (It does not block relevant parts of the picture on the signal...

Digital Ptv Monitor
Page 21
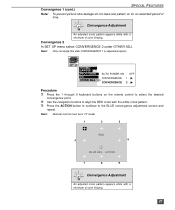
AUTO POWER ON OFF CONVERGENCE 1 CONVERGENCE 2 Note: Convergence seldom needs adjusting except after moving the PTV. CC ON MUTE CC MODE NO OFF Convergence 1 In SET UP menu select CONVERGENCE under OTHER ADJ. IDIOMA/ LANUGE PROG CHAN CC OTHER ADJ. Use the navigation buttons to move the RED CONVERGENCE screen. Press the ACTION button to align the horizontal and vertical green lines on screen with the white cross pattern at the center of the...
AUTO POWER ON OFF CONVERGENCE 1 CONVERGENCE 2 Note: Convergence seldom needs adjusting except after moving the PTV. CC ON MUTE CC MODE NO OFF Convergence 1 In SET UP menu select CONVERGENCE under OTHER ADJ. IDIOMA/ LANUGE PROG CHAN CC OTHER ADJ. Use the navigation buttons to move the RED CONVERGENCE screen. Press the ACTION button to align the horizontal and vertical green lines on screen with the white cross pattern at the center of the...
Digital Ptv Monitor
Page 22
... leave test pattern on the remote control to select the desired convergence point. AUTO POWER ON OFF CONVERGENCE 1 CONVERGENCE 2 Procedure r Press the 1 through 9 keyboard buttons on for an extended period of time. r Use the navigation buttons to the BLUE convergence adjustment screen and repeat. Convergence Adjustment An adjusted cross pattern appears white with a minimum of color fringing. 21 Convergence 2 In SET UP menu select CONVERGENCE 2 under OTHER ADJ. Note: Only converge this after CONVERGENCE 1 is adjusted properly.
... leave test pattern on the remote control to select the desired convergence point. AUTO POWER ON OFF CONVERGENCE 1 CONVERGENCE 2 Procedure r Press the 1 through 9 keyboard buttons on for an extended period of time. r Use the navigation buttons to the BLUE convergence adjustment screen and repeat. Convergence Adjustment An adjusted cross pattern appears white with a minimum of color fringing. 21 Convergence 2 In SET UP menu select CONVERGENCE 2 under OTHER ADJ. Note: Only converge this after CONVERGENCE 1 is adjusted properly.

Digital Ptv Monitor
Page 27
... onscreen display will change your secret code, the television must be locked (12, 24, 48 hours or ALWAYS). MODE HOW LONG? LOCK SET OFF BLOCK PROGRAMS: U.S. TV PROGRAMS STATUS OFF ENTER CODE FIRST - - - - To turn lock function off. • ALL - To use LOCK options: r ENTER CODE FIRST - After entering your option to remember or record it in CHANGE CODE you forget your four-digit secret code. Note: Use a code that is easy to be serviced...
... onscreen display will change your secret code, the television must be locked (12, 24, 48 hours or ALWAYS). MODE HOW LONG? LOCK SET OFF BLOCK PROGRAMS: U.S. TV PROGRAMS STATUS OFF ENTER CODE FIRST - - - - To turn lock function off. • ALL - To use LOCK options: r ENTER CODE FIRST - After entering your option to remember or record it in CHANGE CODE you forget your four-digit secret code. Note: Use a code that is easy to be serviced...
Digital Ptv Monitor
Page 28
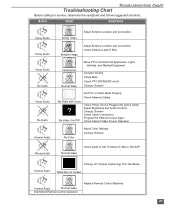
... Antenna Location and Connection Check Antenna Lead-in Wire Interference Normal Video Move PTV from Text Mode Black Box on /off Change Channel No Video with Snow ? No Video / No PIP Set PTV or Cable Mode Properly Check Antenna Cables Check Power Cord is Plugged into Active Outlet Adjust Brightness and Audio Controls Change Channel Check Cable Connections Program the Remote Control Again Check Second Video Source Operation No Color Adjust Color Settings Change Channel Wrong Audio Normal Video Check Audio Is Set To Stereo Or Mono, Not SAP Normal Audio Change CC (Closed Captioning...
... Antenna Location and Connection Check Antenna Lead-in Wire Interference Normal Video Move PTV from Text Mode Black Box on /off Change Channel No Video with Snow ? No Video / No PIP Set PTV or Cable Mode Properly Check Antenna Cables Check Power Cord is Plugged into Active Outlet Adjust Brightness and Audio Controls Change Channel Check Cable Connections Program the Remote Control Again Check Second Video Source Operation No Color Adjust Color Settings Change Channel Wrong Audio Normal Video Check Audio Is Set To Stereo Or Mono, Not SAP Normal Audio Change CC (Closed Captioning...


