Multi-media Display
Page 2
...to cause electric shock. This is dangerous to Article 820-40 of space from overheating. If you are a risk of burns to the point of the projection display and to your home consult your television dealer or local power company. 10. Do not defeat the safety purpose of electric... ventilation, to ensure reliable operation of cable entry as close to persons. This projection display shall not be connected to the grounding system of power source indicated on an unstable cart, stand or table. This projection display is provided to call : 1-888-VIEW PTV(843-9788) Do not overload...
...to cause electric shock. This is dangerous to Article 820-40 of space from overheating. If you are a risk of burns to the point of the projection display and to your home consult your television dealer or local power company. 10. Do not defeat the safety purpose of electric... ventilation, to ensure reliable operation of cable entry as close to persons. This projection display shall not be connected to the grounding system of power source indicated on an unstable cart, stand or table. This projection display is provided to call : 1-888-VIEW PTV(843-9788) Do not overload...

Multi-media Display
Page 3
... been spilled into such power lines or circuits. If the projection display does not operate normally by a qualified technician to restore the projection display to environmental considerations. This... to the television equipment, be fully inserted to lightning and power-line surges. 16. CAUTION: To prevent electric shock, match wide blade of...LCD panel can be located in wire to an antenna discharge unit, size of grounding conductors, location of the set to CINEMA, brightness will prevent damage to the receiver due to prevent blade exposure. f. If the projection display...
... been spilled into such power lines or circuits. If the projection display does not operate normally by a qualified technician to restore the projection display to environmental considerations. This... to the television equipment, be fully inserted to lightning and power-line surges. 16. CAUTION: To prevent electric shock, match wide blade of...LCD panel can be located in wire to an antenna discharge unit, size of grounding conductors, location of the set to CINEMA, brightness will prevent damage to the receiver due to prevent blade exposure. f. If the projection display...

Multi-media Display
Page 5
... VIDEO Input Terminals 16 How to connect ...Power ON and OFF 21 Flow Chart of Main menu ...22 Tuning channels ...24 Automatic channel setting 24 Manual channel setting ...26 Projection display operation ...28 TV Status display ...29 Using the number keys ...29 Using projection display... Channel up/down buttons to connect the PC Input Terminals 18 Analog RGB signals that can be input 19 Basic Operation Advanced Operation Information Use Now ! Adjusting screen position and size 40...
... VIDEO Input Terminals 16 How to connect ...Power ON and OFF 21 Flow Chart of Main menu ...22 Tuning channels ...24 Automatic channel setting 24 Manual channel setting ...26 Projection display operation ...28 TV Status display ...29 Using the number keys ...29 Using projection display... Channel up/down buttons to connect the PC Input Terminals 18 Analog RGB signals that can be input 19 Basic Operation Advanced Operation Information Use Now ! Adjusting screen position and size 40...
Multi-media Display
Page 8
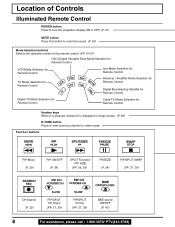
Location of Controls Illuminated Remote Control POWER button Press to turn the projection display ON or OFF. (P. 21) MUTE button Press this button to mute the sound. (P. 34) Mode Selection buttons Selects the operation mode for the remote control. (... Satellite for Remote Control Digital TV Mode Selection for Remote Control Cable TV Mode Selection for Remote Control Number keys When 6 is pressed, channel 6 is displayed in single screen. (P. 29) R-TUNE button Press to view previous channel or video mode. Function buttons PIP Move (P. 39) PIP ON/OFF (P. 38) SPLIT Function...
Location of Controls Illuminated Remote Control POWER button Press to turn the projection display ON or OFF. (P. 21) MUTE button Press this button to mute the sound. (P. 34) Mode Selection buttons Selects the operation mode for the remote control. (... Satellite for Remote Control Digital TV Mode Selection for Remote Control Cable TV Mode Selection for Remote Control Number keys When 6 is pressed, channel 6 is displayed in single screen. (P. 29) R-TUNE button Press to view previous channel or video mode. Function buttons PIP Move (P. 39) PIP ON/OFF (P. 38) SPLIT Function...
Multi-media Display
Page 10
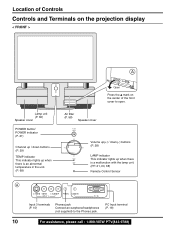
... the unit. (P. 68) A Air filter (P. 58) Speaker cover Open Press the mark on the center of Controls Controls and Terminals on the projection display < FRONT > A Lamp unit (P. 60) Speaker cover POWER button/ POWER indicator (P. 21) Channel up / down (-) buttons (P. 28) LAMP indicator This indicator lights up when there is a malfunction with the lamp unit...
... the unit. (P. 68) A Air filter (P. 58) Speaker cover Open Press the mark on the center of Controls Controls and Terminals on the projection display < FRONT > A Lamp unit (P. 60) Speaker cover POWER button/ POWER indicator (P. 21) Channel up / down (-) buttons (P. 28) LAMP indicator This indicator lights up when there is a malfunction with the lamp unit...

Multi-media Display
Page 12
VHF Antenna UHF Antenna Mixer RF Coaxial Cable VHF/UHF TERMINAL ON THE BACK OF THE PROJECTION DISPLAY WARNING When using "Nut type" RF coaxial cables, tighten with the component or available as an option, you may need to fashion a cable to suit ... recommended. Connecting the Antenna / Cable to the RF in the video signal input from the video source, the picture on connections • Turn off the power supply for all components before making any connections. • If the cables necessary for each system component carefully before connecting it will be necessary to...
VHF Antenna UHF Antenna Mixer RF Coaxial Cable VHF/UHF TERMINAL ON THE BACK OF THE PROJECTION DISPLAY WARNING When using "Nut type" RF coaxial cables, tighten with the component or available as an option, you may need to fashion a cable to suit ... recommended. Connecting the Antenna / Cable to the RF in the video signal input from the video source, the picture on connections • Turn off the power supply for all components before making any connections. • If the cables necessary for each system component carefully before connecting it will be necessary to...

Multi-media Display
Page 20
...If using Cable Box, DSS Receiver, or VCR, • Turn on Cable Box. • Turn off DSS Receiver, or VCR. 1 Press the POWER button to turn the projection display on. (Refer to the RF in progress, press the SWAP button. Case 1 When setup is performed. 20 For assistance, please call : 1-888-...PRESS ACT I ON KEY AGAIN Note: When the unit is turned on for "Turning the Power ON and OFF".) Automatic Channel Setting is incomplete, the following screen appears. Case 2 If setup is performed. Power ON and OFF Initial Setup First, check the connection of Antenna/Cable to page 21 for...
...If using Cable Box, DSS Receiver, or VCR, • Turn on Cable Box. • Turn off DSS Receiver, or VCR. 1 Press the POWER button to turn the projection display on. (Refer to the RF in progress, press the SWAP button. Case 1 When setup is performed. 20 For assistance, please call : 1-888-...PRESS ACT I ON KEY AGAIN Note: When the unit is turned on for "Turning the Power ON and OFF".) Automatic Channel Setting is incomplete, the following screen appears. Case 2 If setup is performed. Power ON and OFF Initial Setup First, check the connection of Antenna/Cable to page 21 for...
Multi-media Display
Page 21
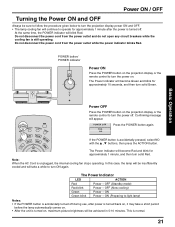
...to follow the procedure given below to turn the power off. At the same time, the POWER indicator will appear. Basic Operation Power OFF Press the POWER button on the projection display or the remote control to turn the projection display power ON and OFF. • The lamp cooling ...fan will continue to turn solid Green. The Power Indicator will take a short...
...to follow the procedure given below to turn the power off. At the same time, the POWER indicator will appear. Basic Operation Power OFF Press the POWER button on the projection display or the remote control to turn the projection display power ON and OFF. • The lamp cooling ...fan will continue to turn solid Green. The Power Indicator will take a short...

Multi-media Display
Page 28
... number and volume level are stored even after the projection display is turned off. • Power consumption can be reduced if the volume level is lowered. 28 For assistance, please call : 1-888-VIEW PTV(843-9788) POWER button/ POWER indicator Channel up / down buttons Volume up(+) /... down(-) buttons Remote Control Sensor 1 Press to operate the projection display with the remote control. 2 Press to turn the projection display on the next page. CH125 Press to "Using the...
... number and volume level are stored even after the projection display is turned off. • Power consumption can be reduced if the volume level is lowered. 28 For assistance, please call : 1-888-VIEW PTV(843-9788) POWER button/ POWER indicator Channel up / down buttons Volume up(+) /... down(-) buttons Remote Control Sensor 1 Press to operate the projection display with the remote control. 2 Press to turn the projection display on the next page. CH125 Press to "Using the...

Multi-media Display
Page 33
... the connected equipment. 33 LINE 3: Signal of source connected to INPUT 3 is displayed. Basic Operation Turning the power on and switching input modes 1 Turn the projection display on the front of source connected to COMPONENT VIDEO INPUT 1 is displayed. COMPONENT 1: Signal of the projection display. Playing peripheral equipment Confirming connections A video camera uses the Input 3 terminal on...
... the connected equipment. 33 LINE 3: Signal of source connected to INPUT 3 is displayed. Basic Operation Turning the power on and switching input modes 1 Turn the projection display on the front of source connected to COMPONENT VIDEO INPUT 1 is displayed. COMPONENT 1: Signal of the projection display. Playing peripheral equipment Confirming connections A video camera uses the Input 3 terminal on...

Multi-media Display
Page 34
Press FREEZE button again to mute the sound. FREEZE Note: The video output from AV OUT is changed. Freezing pictures Projection can be switched between a frozen (still) picture and a moving picture each time the FREEZE button on the remote control unit is not frozen. 34 For ...assistance, please call : 1-888-VIEW PTV(843-9788) Sound is also reactivated when power is turned off or volume level is not muted. Mute / Freeze / SAP Sound mute Useful when answering the phone or receiving unexpected visitors Press this...
Press FREEZE button again to mute the sound. FREEZE Note: The video output from AV OUT is changed. Freezing pictures Projection can be switched between a frozen (still) picture and a moving picture each time the FREEZE button on the remote control unit is not frozen. 34 For ...assistance, please call : 1-888-VIEW PTV(843-9788) Sound is also reactivated when power is turned off or volume level is not muted. Mute / Freeze / SAP Sound mute Useful when answering the phone or receiving unexpected visitors Press this...

Multi-media Display
Page 39
... Main screen NORMAL. +0 ! 212 +0 # Basic Operation +0 ! 212 +0 $ +0 # 212 +0 ! Initial position Note: The last position chosen is saved and will not be erased even if the power is turned off . 39 Note: PIP , buttons can choose PIP screen size of the PIP screen Press to select an outside input for PIP screen... and PIP screens Press to select PIP position. +0 ! Initial size Note: The last size chosen is saved and will not be erased even if the power is turned off . +0 ! !
... Main screen NORMAL. +0 ! 212 +0 # Basic Operation +0 ! 212 +0 $ +0 # 212 +0 ! Initial position Note: The last position chosen is saved and will not be erased even if the power is turned off . 39 Note: PIP , buttons can choose PIP screen size of the PIP screen Press to select an outside input for PIP screen... and PIP screens Press to select PIP position. +0 ! Initial size Note: The last size chosen is saved and will not be erased even if the power is turned off . +0 ! !
Multi-media Display
Page 49
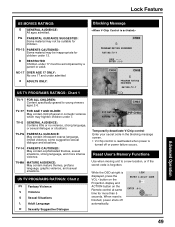
.... ENTER : 0 - 9 Temporarily deactivate V-Chip control Enter your secret code in the blocking message screen. • V-Chip control is reactivated when power is displayed, press the VOL - Reset User's Memory Functions Use when moving unit to young viewers ages 2-6. ENTER : 0 - 9 CH03 P I P ...I T RECALL 49 Advanced Operation ENTER : 0 - 9 CH03 CH08 PROGRAM RAT I NG EXCEEDED RAT I NG : T V - button on the Projection display and ACTION button on the Remote control at right is turned off automatically. LOCK ENT ER 4 - Y CODE - - - TV-G GENERAL AUDIENCE: ...
.... ENTER : 0 - 9 Temporarily deactivate V-Chip control Enter your secret code in the blocking message screen. • V-Chip control is reactivated when power is displayed, press the VOL - Reset User's Memory Functions Use when moving unit to young viewers ages 2-6. ENTER : 0 - 9 CH03 P I P ...I T RECALL 49 Advanced Operation ENTER : 0 - 9 CH03 CH08 PROGRAM RAT I NG EXCEEDED RAT I NG : T V - button on the Projection display and ACTION button on the Remote control at right is turned off automatically. LOCK ENT ER 4 - Y CODE - - - TV-G GENERAL AUDIENCE: ...
Multi-media Display
Page 58
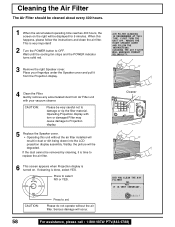
... and clean the air filter. Press to damage or rip the filter material. Serious damage will result in dust or dirt being drawn into the LCD projection display assembly. I T I S VERY I ONS . Cleaning the Air Filter The Air Filter should be cleaned about every 400 hours. 1 When the accumulated...cleaning is turned on the right will be displayed for 5 minutes. NO . SELECT 58 For assistance, please call : 1-888-VIEW PTV(843-9788) This is very important! 2 Turn the POWER button to set. Wait until the cooling fan stops and the POWER indicator turns solid red. 3 Remove the ...
... and clean the air filter. Press to damage or rip the filter material. Serious damage will result in dust or dirt being drawn into the LCD projection display assembly. I T I S VERY I ONS . Cleaning the Air Filter The Air Filter should be cleaned about every 400 hours. 1 When the accumulated...cleaning is turned on the right will be displayed for 5 minutes. NO . SELECT 58 For assistance, please call : 1-888-VIEW PTV(843-9788) This is very important! 2 Turn the POWER button to set. Wait until the cooling fan stops and the POWER indicator turns solid red. 3 Remove the ...
Multi-media Display
Page 59
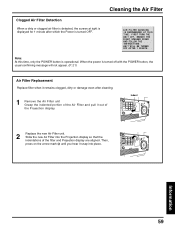
... mark until you hear it out of the filter and Projection display are aligned. Information 59 Indent 2 Replace the new Air Filter unit. F I RST TURN THE UN I NUTE . Slide the new Air Filter into place. When the power is turned off with the POWER button, the usual confirming message will not appear. (P. 21) Air...
... mark until you hear it out of the filter and Projection display are aligned. Information 59 Indent 2 Replace the new Air Filter unit. F I RST TURN THE UN I NUTE . Slide the new Air Filter into place. When the power is turned off with the POWER button, the usual confirming message will not appear. (P. 21) Air...
Multi-media Display
Page 60
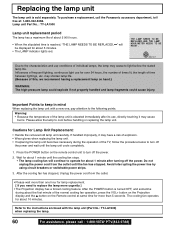
...attention to the instructions enclosed with the lamp unit (Part No.: TY-LA1500) when replacing the lamp. 60 For assistance, please call the Panasonic accessory department, toll free at same time for more than one hour for lamp replacement. [ If you need to cool before the stated...first minute of the TV, follow the procedure below to turn off the power and wait until the fan has stopped. Do not unplug the power cord from the outlet. • Please wait more urgently ] • The Projection display has a forced cooling feature. Influences of frequent lighting, continuous light use...
...attention to the instructions enclosed with the lamp unit (Part No.: TY-LA1500) when replacing the lamp. 60 For assistance, please call the Panasonic accessory department, toll free at same time for more than one hour for lamp replacement. [ If you need to cool before the stated...first minute of the TV, follow the procedure below to turn off the power and wait until the fan has stopped. Do not unplug the power cord from the outlet. • Please wait more urgently ] • The Projection display has a forced cooling feature. Influences of frequent lighting, continuous light use...
Multi-media Display
Page 61
...Players, PVR (Preset) DVD & LD & CD Player (Preset) Panasonic Code Panasonic Code Panasonic Code Panasonic Cassette Players Code Panasonic DVD Code DTV STB (Only Panasonic) Panasonic Code Notes: • Due to flash. If your particular component ...cannot be preset for other manufacturers, by manufacturers, some brands have several codes. If the correct code is known): 1 + Press and hold the POWER...
...Players, PVR (Preset) DVD & LD & CD Player (Preset) Panasonic Code Panasonic Code Panasonic Code Panasonic Cassette Players Code Panasonic DVD Code DTV STB (Only Panasonic) Panasonic Code Notes: • Due to flash. If your particular component ...cannot be preset for other manufacturers, by manufacturers, some brands have several codes. If the correct code is known): 1 + Press and hold the POWER...

Multi-media Display
Page 62
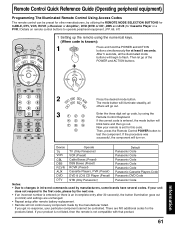
...except for at least 5 seconds. Remote Control Quick Reference Guide (Operating peripheral equipment) 2 Setting to the remote using the " " button. Press POWER button to reprogram your components in the space provided below. After 5 seconds, all others will begin to the next code. This will start from ...the current device (not the beginning of the POWER and ACTION button. 2 Press the mode button. Then let go out. 3 Press " " button to step to flash. Continue doing this ...
...except for at least 5 seconds. Remote Control Quick Reference Guide (Operating peripheral equipment) 2 Setting to the remote using the " " button. Press POWER button to reprogram your components in the space provided below. After 5 seconds, all others will begin to the next code. This will start from ...the current device (not the beginning of the POWER and ACTION button. 2 Press the mode button. Then let go out. 3 Press " " button to step to flash. Continue doing this ...

Multi-media Display
Page 66
... DTV Menu Enter DBS Menu Select DVD Menu Menu On/Off Menu On/Off Page Up/Down Skip -/+ Previous Channel Previous STB Channel Deck A/B Onscreen Display Onscreen Display Time Format Selects Channel Selects Code Selects Track Selects chapter Keys 1,2,3 and 4 select A/V inputs; 5 CD; 6 Tuner; 7Phono; 8 Cassette Deck; 9... you to match programming format. Remote Control Quick Reference Guide (Operating peripheral equipment) Quick Reference Functional Button Chart BUTTON MODE FUNCTION POWER SAP MUTE ASPECT TV/ VIDEO LIGHT DVD VCR DTV AUX RCV CBL All Components TV TV CBL RCVR TV DTV DBS TV ...
... DTV Menu Enter DBS Menu Select DVD Menu Menu On/Off Menu On/Off Page Up/Down Skip -/+ Previous Channel Previous STB Channel Deck A/B Onscreen Display Onscreen Display Time Format Selects Channel Selects Code Selects Track Selects chapter Keys 1,2,3 and 4 select A/V inputs; 5 CD; 6 Tuner; 7Phono; 8 Cassette Deck; 9... you to match programming format. Remote Control Quick Reference Guide (Operating peripheral equipment) Quick Reference Functional Button Chart BUTTON MODE FUNCTION POWER SAP MUTE ASPECT TV/ VIDEO LIGHT DVD VCR DTV AUX RCV CBL All Components TV TV CBL RCVR TV DTV DBS TV ...
Multi-media Display
Page 68
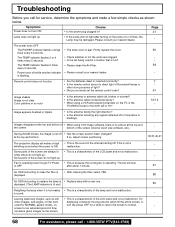
... 5 times • Please clean the Air Filter. 58 every 5 seconds. Power turns off • Has the screen position been changed? Images disappear at the top and bottom of • When using 16:9 image software, there is no color Image appears doubled or tripled. •...is a characteristic of the screen are clogged. - If so, adjust screen positioning. 30,31,40,41 The projection display set to normal. - Please consult your nearest dealer. - Some parts of the LCD panel and not a malfunction. Leaving stationary images, such as shown below. Firmly replace the cover...
... 5 times • Please clean the Air Filter. 58 every 5 seconds. Power turns off • Has the screen position been changed? Images disappear at the top and bottom of • When using 16:9 image software, there is no color Image appears doubled or tripled. •...is a characteristic of the screen are clogged. - If so, adjust screen positioning. 30,31,40,41 The projection display set to normal. - Please consult your nearest dealer. - Some parts of the LCD panel and not a malfunction. Leaving stationary images, such as shown below. Firmly replace the cover...


