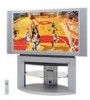

Multi-media Display
Page 4
...PT-50LC13/PT-60LC13 Trade Name: Panasonic Responsible party: Matsushita Electric Corporation of the FCC Rules. Address: One Panasonic Way Secaucus New Jersey 07094 Telephone number: 1-888-VIEW PTV(843-9788) This device complies with Part 15 of America. To obtain maximum benefit from your new projection display. Visit our Panasonic...on the rear cover of these instructions. Any changes or modifications not expressly approved by turning the equipment ...• Consult the dealer or an experienced radio / TV technician for future reference. These limits are designed to which...
...PT-50LC13/PT-60LC13 Trade Name: Panasonic Responsible party: Matsushita Electric Corporation of the FCC Rules. Address: One Panasonic Way Secaucus New Jersey 07094 Telephone number: 1-888-VIEW PTV(843-9788) This device complies with Part 15 of America. To obtain maximum benefit from your new projection display. Visit our Panasonic...on the rear cover of these instructions. Any changes or modifications not expressly approved by turning the equipment ...• Consult the dealer or an experienced radio / TV technician for future reference. These limits are designed to which...
Multi-media Display
Page 5
... Receiver Location ...6 Optional External Equipment 6 Safety Precaution...6 Viewing position ...6 Accessories...7 Remote Control Battery Installation 7 Location of Controls ...8 Illuminated Remote Control 8 Controls and Terminals on the projection display 10 Installation...12 Connecting the Antenna / Cable to the RF in Terminal (No VCR 12 Connecting the Antenna / Cable to the RF in Terminal... to connect the DIGITAL IN Terminal 20 RGB/DIGITAL IN signals that can be input 21 Power ON and OFF...22 Initial Setup ...22 Turning the Power ON and OFF 23 Flow Chart of Contents To Start !
... Receiver Location ...6 Optional External Equipment 6 Safety Precaution...6 Viewing position ...6 Accessories...7 Remote Control Battery Installation 7 Location of Controls ...8 Illuminated Remote Control 8 Controls and Terminals on the projection display 10 Installation...12 Connecting the Antenna / Cable to the RF in Terminal (No VCR 12 Connecting the Antenna / Cable to the RF in Terminal... to connect the DIGITAL IN Terminal 20 RGB/DIGITAL IN signals that can be input 21 Power ON and OFF...22 Initial Setup ...22 Turning the Power ON and OFF 23 Flow Chart of Contents To Start !
Multi-media Display
Page 7
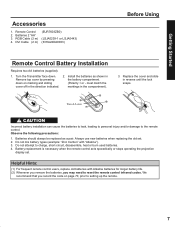
... . We recommend that you may need to the remote control. Battery replacement is necessary when the remote control acts sporadically or stops operating the projection display set . 2. Do not mix battery types (example: "Zinc Carbon" with Alkaline batteries for longer battery life. (2) Whenever you remove ...Installation Requires two AA batteries (supplied). 1. Remove top cover by pressing down . Replace the cover and slide in the compartment). 3. Turn the Transmitter face down on page 70, prior to charge, short-circuit, disassemble, heat or burn used batteries. 4.
... . We recommend that you may need to the remote control. Battery replacement is necessary when the remote control acts sporadically or stops operating the projection display set . 2. Do not mix battery types (example: "Zinc Carbon" with Alkaline batteries for longer battery life. (2) Whenever you remove ...Installation Requires two AA batteries (supplied). 1. Remove top cover by pressing down . Replace the cover and slide in the compartment). 3. Turn the Transmitter face down on page 70, prior to charge, short-circuit, disassemble, heat or burn used batteries. 4.

Multi-media Display
Page 8
... for Remote Control AUX Mode Selection for Remote Control Receiver / Amplifier Mode Selection for Remote Control Digital Broadcasting Satellite for Remote Control Cable TV Mode Selection for Remote Control PC/MENU button RGB input mode is displayed. Function buttons PIP MIN (P. 41) SD (P. 35) PIP MAX (P. 41) ...SPLIT SWAP (PP. 39, 41) 8 For assistance, please call : 1-888-VIEW PTV(843-9788) Location of Controls Illuminated Remote Control POWER button Press to turn the projection display ON or OFF. (P. 22) MUTE button Press this button to view previous channel or video mode.
... for Remote Control AUX Mode Selection for Remote Control Receiver / Amplifier Mode Selection for Remote Control Digital Broadcasting Satellite for Remote Control Cable TV Mode Selection for Remote Control PC/MENU button RGB input mode is displayed. Function buttons PIP MIN (P. 41) SD (P. 35) PIP MAX (P. 41) ...SPLIT SWAP (PP. 39, 41) 8 For assistance, please call : 1-888-VIEW PTV(843-9788) Location of Controls Illuminated Remote Control POWER button Press to turn the projection display ON or OFF. (P. 22) MUTE button Press this button to view previous channel or video mode.

Multi-media Display
Page 12
...Terminal (No VCR) Antenna Connection For proper reception of jitter in the video signal input from the video source, the picture on connections • Turn off the power supply for connecting a component to the system are not included with fingers only. VHF Antenna UHF Antenna Mixer RF Coaxial ...Cable VHF/UHF TERMINAL ON THE BACK OF THE PROJECTION DISPLAY CAUTION When using "Nut type" RF coaxial cables, tighten with the component or available as an option, you may need to fashion a ...
...Terminal (No VCR) Antenna Connection For proper reception of jitter in the video signal input from the video source, the picture on connections • Turn off the power supply for connecting a component to the system are not included with fingers only. VHF Antenna UHF Antenna Mixer RF Coaxial ...Cable VHF/UHF TERMINAL ON THE BACK OF THE PROJECTION DISPLAY CAUTION When using "Nut type" RF coaxial cables, tighten with the component or available as an option, you may need to fashion a ...

Multi-media Display
Page 22
... to the RF in progress, press the SWAP button. Press the POWER button to turn the projection display on. (Refer to the RF in Terminal. (PP. 12-14.) If using Cable Box, DSS Receiver, or VCR, • Turn on for "Turning the Power ON and OFF".) Automatic Channel Setting is performed. Check connection of... the Plug to the Wall Outlet and the Antenna/Cable to page 23 for the first time, Automatic Channel Setting is turned on Cable Box. • Turn off DSS Receiver, or VCR. CH AUTO SET PROCEEDING Note: To cancel AUTO SET in Terminal, then try Automatic Channel Setting again. (PP...
... to the RF in progress, press the SWAP button. Press the POWER button to turn the projection display on. (Refer to the RF in Terminal. (PP. 12-14.) If using Cable Box, DSS Receiver, or VCR, • Turn on for "Turning the Power ON and OFF".) Automatic Channel Setting is performed. Check connection of... the Plug to the Wall Outlet and the Antenna/Cable to page 23 for the first time, Automatic Channel Setting is turned on Cable Box. • Turn off DSS Receiver, or VCR. CH AUTO SET PROCEEDING Note: To cancel AUTO SET in Terminal, then try Automatic Channel Setting again. (PP...
Multi-media Display
Page 23
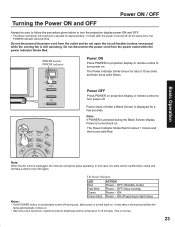
...Power shuts off after a Black Screen is displayed for approximately 1 minute after power is turned back on, it may take a short period before the lamp automatically comes on projection display or remote control to turn power off during the Black Screen display, Power is unplugged, the internal cooling fan ...stops operating. OFF (Now cooling) Power - Turning the Power ON and OFF Power ON / OFF Always be sure to follow the procedure given below to turn the projection display power ON and OFF. • The lamp cooling fan will continue to operate...
...Power shuts off after a Black Screen is displayed for approximately 1 minute after power is turned back on, it may take a short period before the lamp automatically comes on projection display or remote control to turn power off during the Black Screen display, Power is unplugged, the internal cooling fan ...stops operating. OFF (Now cooling) Power - Turning the Power ON and OFF Power ON / OFF Always be sure to follow the procedure given below to turn the projection display power ON and OFF. • The lamp cooling fan will continue to operate...

Multi-media Display
Page 30
POWER button/ POWER indicator Volume up(+) / down(-) buttons Remote Control Sensor 1 Channel up / down buttons Press to operate the projection display with the remote control. 2 Press to turn the projection display on. 3 Press to select CABLE TV 125 or 69 the desired CH 01 channel. (Or use number keys ) CH 02 Or CH 125 Note...
POWER button/ POWER indicator Volume up(+) / down(-) buttons Remote Control Sensor 1 Channel up / down buttons Press to operate the projection display with the remote control. 2 Press to turn the projection display on. 3 Press to select CABLE TV 125 or 69 the desired CH 01 channel. (Or use number keys ) CH 02 Or CH 125 Note...

Multi-media Display
Page 35
...on and switching input modes 1 Turn the projection display on the front of source connected to COMPONENT VIDEO INPUT 2 is displayed. VIDEO 3 * COMPONENT 1 * Card input mode is displayed. VIDEO 2 Signal of the projection display. COMPONENT 2 Signal of source connected to DIGITAL IN is displayed. TV CARD VIDEO 1 * DIGITAL ... displayed. COMPONENT 1 Signal of source connected to INPUT 1 is displayed for details. COMPONENT 3 Signal of source connected to the rear terminals. RGB 1 Signal of source connected to COMPONENT VIDEO INPUT 1 is displayed.
...on and switching input modes 1 Turn the projection display on the front of source connected to COMPONENT VIDEO INPUT 2 is displayed. VIDEO 3 * COMPONENT 1 * Card input mode is displayed. VIDEO 2 Signal of the projection display. COMPONENT 2 Signal of source connected to DIGITAL IN is displayed. TV CARD VIDEO 1 * DIGITAL ... displayed. COMPONENT 1 Signal of source connected to INPUT 1 is displayed for details. COMPONENT 3 Signal of source connected to the rear terminals. RGB 1 Signal of source connected to COMPONENT VIDEO INPUT 1 is displayed.

Multi-media Display
Page 36
Sound is also reactivated when power is turned off or volume level is pressed. MUTE Note: The audio output from AV OUT is not muted. Freezing pictures Projection can be switched between a frozen (still) picture and a moving picture each time the FREEZE button on the remote control unit is changed. Press again to...
Sound is also reactivated when power is turned off or volume level is pressed. MUTE Note: The audio output from AV OUT is not muted. Freezing pictures Projection can be switched between a frozen (still) picture and a moving picture each time the FREEZE button on the remote control unit is changed. Press again to...

Multi-media Display
Page 38
... screen Splitting the screen Press to split. (The previously selected screen appears on the projection display set. • When the screen is split, signals of the Left screen are output from the rear monitor output terminal. • The left and right screens are processed by individual circuits... and, therefore, may vary in image quality. • Split screen returns to single screen when the projection display is turned off. • With the Left screen...
... screen Splitting the screen Press to split. (The previously selected screen appears on the projection display set. • When the screen is split, signals of the Left screen are output from the rear monitor output terminal. • The left and right screens are processed by individual circuits... and, therefore, may vary in image quality. • Split screen returns to single screen when the projection display is turned off. • With the Left screen...

Multi-media Display
Page 40
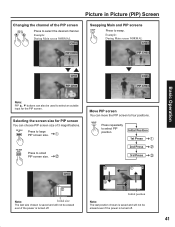
... (Sub picture) Notes: • Sound from the Main screen is output from the speakers on the projection display set. • In PIP mode, the Main screen signal is output from the rear monitor output terminal. • Because Main and PIP screens are processed by individual circuits, image quality may...single screen when the projection display is in ZOOM mode, PIP feature cannot be used. (P. 32) 40 For assistance, please call : 1-888-VIEW PTV(843-9788) Picture in Picture (PIP) Screen You can change the input, change channels, and adjust the volume. • When ASPECT is turned off. •...
... (Sub picture) Notes: • Sound from the Main screen is output from the speakers on the projection display set. • In PIP mode, the Main screen signal is output from the rear monitor output terminal. • Because Main and PIP screens are processed by individual circuits, image quality may...single screen when the projection display is in ZOOM mode, PIP feature cannot be used. (P. 32) 40 For assistance, please call : 1-888-VIEW PTV(843-9788) Picture in Picture (PIP) Screen You can change the input, change channels, and adjust the volume. • When ASPECT is turned off. •...
Multi-media Display
Page 41
... position Note: The last position chosen is saved and will not be erased even if the power is turned off . +0 ! ! Note: PIP ▲, ▼ buttons can also be erased even if the power is turned off . 41 Move PIP screen You can choose PIP screen size of the PIP screen Press to...
... position Note: The last position chosen is saved and will not be erased even if the power is turned off . +0 ! ! Note: PIP ▲, ▼ buttons can also be erased even if the power is turned off . 41 Move PIP screen You can choose PIP screen size of the PIP screen Press to...

Multi-media Display
Page 43
...Operation H SIZE Press ► button. Select the proper screen mode with a different aspect from the monitor output terminal on a wide screen TV will appear differently. The image moves to the left. Adjusting screen position and size Adjustment Button Adjustment Details item H Position Press ► ...; For 1080i and 720p input images, screen size cannot be adjusted. • The adjusted setting will be kept even when the projection display is turned off. • The signals output from the broadcast program is selected, image will be cut off or distorted at the edges,...
...Operation H SIZE Press ► button. Select the proper screen mode with a different aspect from the monitor output terminal on a wide screen TV will appear differently. The image moves to the left. Adjusting screen position and size Adjustment Button Adjustment Details item H Position Press ► ...; For 1080i and 720p input images, screen size cannot be adjusted. • The adjusted setting will be kept even when the projection display is turned off. • The signals output from the broadcast program is selected, image will be cut off or distorted at the edges,...

Multi-media Display
Page 44
... to display AUDIO screen. PICTURE AUDIO POSITION/SIZE INFORMATION Press to select ADJUST SET UP AUDIO. Surround sound effect is pressed from the rear AUDIO OUT terminal. • When volume is adjusted or the mute button is not available for normal (mono) broadcasts. MUSIC Sound suited...music. SELECT EXIT AUDIO AUDIO MENU AUDIO ADJUST SPEAKER SURROUND BBE :NORMAL :ON :OFF :OFF SELECT EXIT See next page You can turn off the internal speakers when it is automatically adjusted to set each item. CINEMA Sound suited to external audio equipment. AUDIO MENU AUDIO ADJUST...
... to display AUDIO screen. PICTURE AUDIO POSITION/SIZE INFORMATION Press to select ADJUST SET UP AUDIO. Surround sound effect is pressed from the rear AUDIO OUT terminal. • When volume is adjusted or the mute button is not available for normal (mono) broadcasts. MUSIC Sound suited...music. SELECT EXIT AUDIO AUDIO MENU AUDIO ADJUST SPEAKER SURROUND BBE :NORMAL :ON :OFF :OFF SELECT EXIT See next page You can turn off the internal speakers when it is automatically adjusted to set each item. CINEMA Sound suited to external audio equipment. AUDIO MENU AUDIO ADJUST...

Multi-media Display
Page 51
button on the projection display and ACTION button on the Remote control at right is turned off automatically. NC-17 OVER AGE 17 ONLY: No one 17 and under 7. PARENTAL GUIDANCE: TV-PG May contain infrequent coarse language, limited violence, some suggestive sexual dialogue and situations. MATURE AUDIENCE: TV-MA May contain mature themes, profane...
button on the projection display and ACTION button on the Remote control at right is turned off automatically. NC-17 OVER AGE 17 ONLY: No one 17 and under 7. PARENTAL GUIDANCE: TV-PG May contain infrequent coarse language, limited violence, some suggestive sexual dialogue and situations. MATURE AUDIENCE: TV-MA May contain mature themes, profane...

Multi-media Display
Page 55
...clearly visible. Weak Signal Display Feature When "ON" is selected, the picture is displayed even when a broadcast signal is absent or weak. (Screen turns solid black during PIP or SPLIT functions.) 3 Press to exit menu. MANUAL SET CHANNEL CAPTION 2 WEAK SIGNAL DISPLAY:OFF Press to display the ... select SELECT WEAK SIGNAL EXIT DISPLAY. Press to display the SET UP SET UP CHANNEL CHANNEL ANTENNA : CABLE AUTO SET screen. OFF: Screen turns solid blue when signal is weak or non-existent. LOCK CAPTION VIDEO OTHER PAGE SELECT END Press to set "ON" or "OFF". ADJUST...
...clearly visible. Weak Signal Display Feature When "ON" is selected, the picture is displayed even when a broadcast signal is absent or weak. (Screen turns solid black during PIP or SPLIT functions.) 3 Press to exit menu. MANUAL SET CHANNEL CAPTION 2 WEAK SIGNAL DISPLAY:OFF Press to display the ... select SELECT WEAK SIGNAL EXIT DISPLAY. Press to display the SET UP SET UP CHANNEL CHANNEL ANTENNA : CABLE AUTO SET screen. OFF: Screen turns solid blue when signal is weak or non-existent. LOCK CAPTION VIDEO OTHER PAGE SELECT END Press to set "ON" or "OFF". ADJUST...
Multi-media Display
Page 57
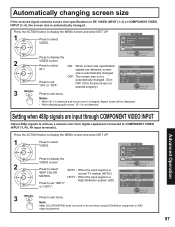
... or "HDTV". 3D IP :ON SELECT EXIT 3 Press to select 480P COLOR SDTV : When the input signal is a normal TV system (NTSC). ID-1 :OFF OFF: The screen size is automatically changed . (Turn OFF if this function does not operate properly.) 3D Y/C 3D IP :ON :ON SELECT EXIT 3 Press to select VIDEO. Advanced...
... or "HDTV". 3D IP :ON SELECT EXIT 3 Press to select 480P COLOR SDTV : When the input signal is a normal TV system (NTSC). ID-1 :OFF OFF: The screen size is automatically changed . (Turn OFF if this function does not operate properly.) 3D Y/C 3D IP :ON :ON SELECT EXIT 3 Press to select VIDEO. Advanced...
Multi-media Display
Page 62
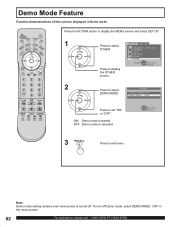
... screen. 62 For assistance, please call : 1-888-VIEW PTV(843-9788) SELECT EXIT 3 Press to set "ON" or "OFF". OFF: Demo mode is turned off Demo mode, select DEMO MODE : OFF in Demo mode. LANGUAGE :ENGLISH CHANNEL LOCK CAPTION VIDEO OTHER Press to select OTHER DEMO MODE. Note: Demo... mode setting remains even when power is canceled. PAGE SELECT END 2 Press to display the OTHER screen. To turn off . ON: Demo mode is started. Press the ACTION button to display the MENU screen and select SET UP. 1 Press to select ADJUST SET...
... screen. 62 For assistance, please call : 1-888-VIEW PTV(843-9788) SELECT EXIT 3 Press to set "ON" or "OFF". OFF: Demo mode is turned off Demo mode, select DEMO MODE : OFF in Demo mode. LANGUAGE :ENGLISH CHANNEL LOCK CAPTION VIDEO OTHER Press to select OTHER DEMO MODE. Note: Demo... mode setting remains even when power is canceled. PAGE SELECT END 2 Press to display the OTHER screen. To turn off . ON: Demo mode is started. Press the ACTION button to display the MENU screen and select SET UP. 1 Press to select ADJUST SET...
Multi-media Display
Page 68
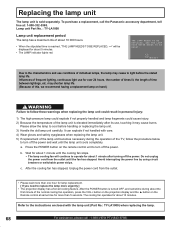
... on the remote control unit to replace the lamp more urgently ] • The projection display has a forced cooling feature. Do not unplug the power cord from the outlet... the fan has stopped. Replacing the lamp unit The lamp unit is turned OFF, and sometime during the operation of the TV, follow these warnings when replacing the lamp unit could result in personal injury... lamp unit (Part No.: TY-LA1000) when replacing the lamp. 68 For assistance, please call the Panasonic accessory department, toll free at same time for more than 5 seconds. Wait for about the first...
... on the remote control unit to replace the lamp more urgently ] • The projection display has a forced cooling feature. Do not unplug the power cord from the outlet... the fan has stopped. Replacing the lamp unit The lamp unit is turned OFF, and sometime during the operation of the TV, follow these warnings when replacing the lamp unit could result in personal injury... lamp unit (Part No.: TY-LA1000) when replacing the lamp. 68 For assistance, please call the Panasonic accessory department, toll free at same time for more than 5 seconds. Wait for about the first...


