
User Manual
Page 4
...electronic apparatus-Safety requirements EN 55022 Information technology equipment---Radio disturbance characteristics--- Part 1: Common technical requirements TRADEMARK INFORMATION HDMI, the HDMI Logo and High-Definition Multimedia Interface are trademarks of sight. 3 Part 17: Specific conditions for radio equipment; Electro ... to the 2.4 GHz band rather than the 5GHz band. Optimal range between WHD200 transmitter and receiver is between the transmitter and receiver. WHD200 may result in the walls made of concrete. Product is no guarantee that may...
...electronic apparatus-Safety requirements EN 55022 Information technology equipment---Radio disturbance characteristics--- Part 1: Common technical requirements TRADEMARK INFORMATION HDMI, the HDMI Logo and High-Definition Multimedia Interface are trademarks of sight. 3 Part 17: Specific conditions for radio equipment; Electro ... to the 2.4 GHz band rather than the 5GHz band. Optimal range between WHD200 transmitter and receiver is between the transmitter and receiver. WHD200 may result in the walls made of concrete. Product is no guarantee that may...
User Manual
Page 9
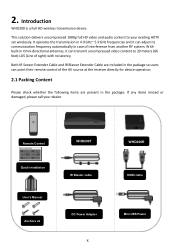
... case of interference from another RF system. Remote Control Quick Installation User's Manual Anchors x2 WHD200T IR Blaster cable DC Power Adapter 8 WHD200R HDMI cable Mini USB Power Introduction WHD200 is a Full HD wireless transmission device. It operates the transmission in the package. This solution delivers uncompressed 1080p full HD video and...
... case of interference from another RF system. Remote Control Quick Installation User's Manual Anchors x2 WHD200T IR Blaster cable DC Power Adapter 8 WHD200R HDMI cable Mini USB Power Introduction WHD200 is a Full HD wireless transmission device. It operates the transmission in the package. This solution delivers uncompressed 1080p full HD video and...
User Manual
Page 10
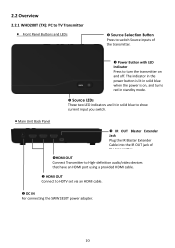
...the IR Blaster Extender Cable into the IR OUT jack of the transmitter. Power Button with LED Indicator Press to HDTV set via an HDMI cable. DC IN For connecting the SWW1810T power adapter. 10 2.2 Overview 2.2.1 WHD200T (TX): PC to TV Transmitter Front ...Panel Buttons and LEDs Source Selection Button Press to switch Source inputs of the transmitter. HDMI OUT Connect Transmitter to High-definition audio/video devices that have an HDMI port using a provided HDMI cable. HDMI OUT Connect to turn the transmitter on and off.
...the IR Blaster Extender Cable into the IR OUT jack of the transmitter. Power Button with LED Indicator Press to HDTV set via an HDMI cable. DC IN For connecting the SWW1810T power adapter. 10 2.2 Overview 2.2.1 WHD200T (TX): PC to TV Transmitter Front ...Panel Buttons and LEDs Source Selection Button Press to switch Source inputs of the transmitter. HDMI OUT Connect Transmitter to High-definition audio/video devices that have an HDMI port using a provided HDMI cable. HDMI OUT Connect to turn the transmitter on and off.
User Manual
Page 11
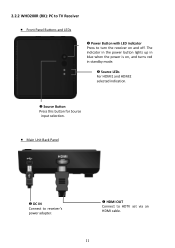
The indicator in the power button lights up in blue when the power is on and off. 2.2.2 WHD200R (RX): PC to TV Receiver Front Panel Buttons and LEDs Power Button with LED indicator Press to turn the receiver on , and turns red in standby mode. Source LEDs For HDMI1 and HDMI2 selected indication. Source Button Press this button for Source input selection. Main Unit Back Panel DC IN Connect to receiver's power adapter. HDMI OUT Connect to HDTV set via an HDMI cable. 11
The indicator in the power button lights up in blue when the power is on and off. 2.2.2 WHD200R (RX): PC to TV Receiver Front Panel Buttons and LEDs Power Button with LED indicator Press to turn the receiver on , and turns red in standby mode. Source LEDs For HDMI1 and HDMI2 selected indication. Source Button Press this button for Source input selection. Main Unit Back Panel DC IN Connect to receiver's power adapter. HDMI OUT Connect to HDTV set via an HDMI cable. 11

User Manual
Page 13
... for the High-Definition source device, like PS3, Blu-ray Player. (2) Connect the transmitter's "HDMI OUT" to the HDTV set's "HDMI IN" port with an HDMI cable for the loop-through by HDMI cable. 3. The LED indicator in the POWER button lights up in blue when the WHD200T is connected to... and a wall socket. Installation Step1: Setup the WHD200T transmitter Connect Two High-Definition Audio/Video Sources to the transmitter: (1) Connect the transmitter's "HDMI IN" to the High-Definition AV sources' "HDMI OUT" through connection. (3) Connect the supplied power adapter to the power mains. 13
... for the High-Definition source device, like PS3, Blu-ray Player. (2) Connect the transmitter's "HDMI OUT" to the HDTV set's "HDMI IN" port with an HDMI cable for the loop-through by HDMI cable. 3. The LED indicator in the POWER button lights up in blue when the WHD200T is connected to... and a wall socket. Installation Step1: Setup the WHD200T transmitter Connect Two High-Definition Audio/Video Sources to the transmitter: (1) Connect the transmitter's "HDMI IN" to the High-Definition AV sources' "HDMI OUT" through connection. (3) Connect the supplied power adapter to the power mains. 13
User Manual
Page 14
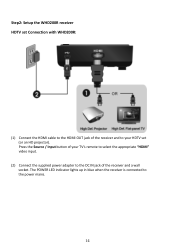
The POWER LED indicator lights up in blue when the receiver is connected to the DC IN jack of the receiver and to your TV's remote to select the appropriate "HDMI" video input. (2) Connect the supplied power adapter to the power mains. 14 Step2: Setup the WHD200R receiver HDTV set (or an HD projector). Press the Source / Input button of your HDTV set Connection with WHD200R: (1) Connect the HDMI cable to the HDMI OUT jack of the receiver and a wall socket.
The POWER LED indicator lights up in blue when the receiver is connected to the DC IN jack of the receiver and to your TV's remote to select the appropriate "HDMI" video input. (2) Connect the supplied power adapter to the power mains. 14 Step2: Setup the WHD200R receiver HDTV set (or an HD projector). Press the Source / Input button of your HDTV set Connection with WHD200R: (1) Connect the HDMI cable to the HDMI OUT jack of the receiver and a wall socket.
User Manual
Page 16
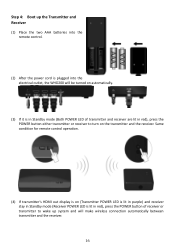
Same condition for remote control operation. (4) If transmitter's HDMI out display is on (Transmitter POWER LED is lit in purple) and receiver stay in Standby mode (Receiver POWER LED is lit in red), press ... are lit in red), press the POWER button of receiver or transmitter to turn on automatically. (3) If it is plugged into the electrical outlet, the WHD200 will be turned on the transmitter and the receiver.
Same condition for remote control operation. (4) If transmitter's HDMI out display is on (Transmitter POWER LED is lit in purple) and receiver stay in Standby mode (Receiver POWER LED is lit in red), press ... are lit in red), press the POWER button of receiver or transmitter to turn on automatically. (3) If it is plugged into the electrical outlet, the WHD200 will be turned on the transmitter and the receiver.

User Manual
Page 17
(5) During the warm-up successfully. (6) Ensure your device. 17 It will blink in blue until the signal link between the WHD200T and the WHD200R is already powered on. (7) Press the Source button on the RCU or on the top of receiver / transmitter for system boot up , the POWER LED will take 15 ~ 20 seconds for Source input switch until you see the video being broadcasted from your TV set or projector is in "HDMI input" mode, and is established.
(5) During the warm-up successfully. (6) Ensure your device. 17 It will blink in blue until the signal link between the WHD200T and the WHD200R is already powered on. (7) Press the Source button on the RCU or on the top of receiver / transmitter for system boot up , the POWER LED will take 15 ~ 20 seconds for Source input switch until you see the video being broadcasted from your TV set or projector is in "HDMI input" mode, and is established.

User Manual
Page 19
D. If you have more than one pair of WHD200, each transmitter and receiver should be displayed for user reference. Please make sure the HDMI connector had settled well. also try to re-plug the HDMI cable to make sure the computer have to 66 feet in the same room, the suggested ... will be at least 6.5 feet away from the computer is not supported, please refer chapter 5 to receiver, receiver enter Standby mode and transmitter's HDMI out is an indication that the video frame rate from one another. OSD Displayed: (Display 3secs and then enter Standby mode.) OFF Press...
D. If you have more than one pair of WHD200, each transmitter and receiver should be displayed for user reference. Please make sure the HDMI connector had settled well. also try to re-plug the HDMI cable to make sure the computer have to 66 feet in the same room, the suggested ... will be at least 6.5 feet away from the computer is not supported, please refer chapter 5 to receiver, receiver enter Standby mode and transmitter's HDMI out is an indication that the video frame rate from one another. OSD Displayed: (Display 3secs and then enter Standby mode.) OFF Press...
User Manual
Page 20
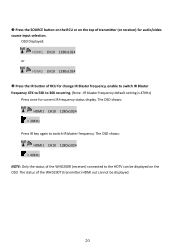
... CH10 1280x1024 Press the IR button of the WHD200R (receiver) connected to the HDTV can be displayed on the top of the WHD200T (transmitter) HDMI out cannot be displayed. 20 The OSD shows: HDMI1 CH10 1280x1024 = 38KHz Press IR key again to 36K recurring. (Note : IR blaster frequency default setting...
... CH10 1280x1024 Press the IR button of the WHD200R (receiver) connected to the HDTV can be displayed on the top of the WHD200T (transmitter) HDMI out cannot be displayed. 20 The OSD shows: HDMI1 CH10 1280x1024 = 38KHz Press IR key again to 36K recurring. (Note : IR blaster frequency default setting...
User Manual
Page 22
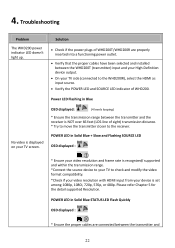
Troubleshooting Problem The WHD200 power indicator LED doesn't light up. 4. POWER LED in Blue No video...feet (LOS-line of sight) transmission distance. * Try to move the transmitter closer to the WHD200R), select the HDMI as input source. Verify the POWER LED and SOURCE LED indicator of WHD200T/WHD200R are connected between the... the source device to your TV to check and modify the video format compatibility. *Check if your video resolution with HDMI input from your TV side (connected to the receiver. OSD displayed: (4 levels looping) * Ensure the transmission range ...
Troubleshooting Problem The WHD200 power indicator LED doesn't light up. 4. POWER LED in Blue No video...feet (LOS-line of sight) transmission distance. * Try to move the transmitter closer to the WHD200R), select the HDMI as input source. Verify the POWER LED and SOURCE LED indicator of WHD200T/WHD200R are connected between the... the source device to your TV to check and modify the video format compatibility. *Check if your video resolution with HDMI input from your TV side (connected to the receiver. OSD displayed: (4 levels looping) * Ensure the transmission range ...

User Manual
Page 23
... output for reference setup. No 3D video output OSD displayed : TX or/and RX * Check both of Source player (ex. Please refer to the WHD200 transmitter are powered on. * Ensure the proper cables are connected between the receiver and your 2nd HDTV near the receiver. Check if your video... resolution with HDMI input from your HD AV device WHD200 can be abnormal display on HDTV which supported 3D video, please turn off 2D HDTV and RE-power on 3D HDTV. Please...
... output for reference setup. No 3D video output OSD displayed : TX or/and RX * Check both of Source player (ex. Please refer to the WHD200 transmitter are powered on. * Ensure the proper cables are connected between the receiver and your 2nd HDTV near the receiver. Check if your video... resolution with HDMI input from your HD AV device WHD200 can be abnormal display on HDTV which supported 3D video, please turn off 2D HDTV and RE-power on 3D HDTV. Please...

User Manual
Page 26
6. Audio Bit Rate Support Digital Audio from HDMI inputs: Up to 6Mbit/s bit-rate support. Support AC3 and DTS. 2-channel PCM: 16~24 bits audio sample with 32~96KHz sampling rate as below: 2channel PCM 16 bits 24 bits 32KHz YES YES 44.1KHz YES YES 48KHz YES YES 96KHz YES YES 26
6. Audio Bit Rate Support Digital Audio from HDMI inputs: Up to 6Mbit/s bit-rate support. Support AC3 and DTS. 2-channel PCM: 16~24 bits audio sample with 32~96KHz sampling rate as below: 2channel PCM 16 bits 24 bits 32KHz YES YES 44.1KHz YES YES 48KHz YES YES 96KHz YES YES 26

User Manual
Page 27
... Supported Audio Formats Digital Audio Transmission Distance System Latency Antenna Operating Frequencies Power Supply Operating Temperature Interfaces A/V HDMI Input Interfaces HDMI Output Control IR Sensor Signal IR Blaster Extender Interfaces IR Sensor Extender Power Interface Power Input Switches Front Power Switch Front Source Switch Power LED ...
... Supported Audio Formats Digital Audio Transmission Distance System Latency Antenna Operating Frequencies Power Supply Operating Temperature Interfaces A/V HDMI Input Interfaces HDMI Output Control IR Sensor Signal IR Blaster Extender Interfaces IR Sensor Extender Power Interface Power Input Switches Front Power Switch Front Source Switch Power LED ...


