
User Manual
Page 1
...14 Warning Indicator 14 Adjusting the Projected Image 15 Adjusting the Projector's Height 15 Adjusting the Projector's Zoom / Focus 16 Adjusting Projected Image Size 16 User Controls 17 Control Panel & Remote Control 17 On-screen Display Menus 20 How to operate ...20 Menu Tree...21 Image ...22 Display ...26 Setup...29 System ...32 Appendices 36 Troubleshooting 36 Image Problems 36 Intermission Problems 38 Projector Status Indication 39 Remote Control Problems 40 Replacing the Lamp 41 Compatibility Modes 42 RS232 Commands and Protocol Function List 43 Ceiling Mount Installation...
...14 Warning Indicator 14 Adjusting the Projected Image 15 Adjusting the Projector's Height 15 Adjusting the Projector's Zoom / Focus 16 Adjusting Projected Image Size 16 User Controls 17 Control Panel & Remote Control 17 On-screen Display Menus 20 How to operate ...20 Menu Tree...21 Image ...22 Display ...26 Setup...29 System ...32 Appendices 36 Troubleshooting 36 Image Problems 36 Intermission Problems 38 Projector Status Indication 39 Remote Control Problems 40 Replacing the Lamp 41 Compatibility Modes 42 RS232 Commands and Protocol Function List 43 Ceiling Mount Installation...
User Manual
Page 2
... near any ventilation openings To ensure reliable operation of the projector and to rain or moisture, does not oper- Do not use attachments/accessories specified by anyone except properly qualified service personnel. 2 Clean only with the manufacturer's instructions A. Servicing is required when the projector has been damaged in any way: ▀■ Such as power supply cord or plug...
... near any ventilation openings To ensure reliable operation of the projector and to rain or moisture, does not oper- Do not use attachments/accessories specified by anyone except properly qualified service personnel. 2 Clean only with the manufacturer's instructions A. Servicing is required when the projector has been damaged in any way: ▀■ Such as power supply cord or plug...
User Manual
Page 3
... the life of its life time, the message "Replacement suggested" will not ▀■ Warning- Reset the "Lamp Reset" function from the onscreen display "System|Lamp Setting" menu after replacing the lamp module (refer to cool down . When the lamp is approaching to the end of fire or electric shock, do not open or disassemble the projector as this projector to change the lamp as soon as recommended in operation. Do...
... the life of its life time, the message "Replacement suggested" will not ▀■ Warning- Reset the "Lamp Reset" function from the onscreen display "System|Lamp Setting" menu after replacing the lamp module (refer to cool down . When the lamp is approaching to the end of fire or electric shock, do not open or disassemble the projector as this projector to change the lamp as soon as recommended in operation. Do...
User Manual
Page 5
..., they are located out of the line of sight from the screen to stare at all times. ▀■ Minimize standing facing into the projector beam at the projector lamp. The best way to achieve this ensures that projectors are asked to point out something on the screen. ▀■ In order to minimize the lamp power needed, use room blinds...
..., they are located out of the line of sight from the screen to stare at all times. ▀■ Minimize standing facing into the projector beam at the projector lamp. The best way to achieve this ensures that projectors are asked to point out something on the screen. ▀■ In order to minimize the lamp power needed, use room blinds...
User Manual
Page 6
.../p) ▪ RGB signal: HD, XGA, SVGA, VGA res-sizing ▀■ Macintosh compatible ▀■ Full function IR remote control with back light ▀■ Advanced vertical digital keystone correction and high quality full screen image re-scaling ▀■ User friendly control panel ▀■ Optoma's patent-pending O2AirTM Photo Catalyst air purification technology ▀■ HDMI & DVI support HDCP function. ▀■ HDMI(support HDMI 1.3) x2, DVI-I (support HDMI 1.1, SCART...
.../p) ▪ RGB signal: HD, XGA, SVGA, VGA res-sizing ▀■ Macintosh compatible ▀■ Full function IR remote control with back light ▀■ Advanced vertical digital keystone correction and high quality full screen image re-scaling ▀■ User friendly control panel ▀■ Optoma's patent-pending O2AirTM Photo Catalyst air purification technology ▀■ HDMI & DVI support HDCP function. ▀■ HDMI(support HDMI 1.3) x2, DVI-I (support HDMI 1.1, SCART...
User Manual
Page 13
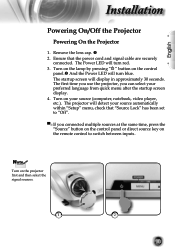
... the remote control to switch between inputs. The first time you use the projector, you connected multiple sources at the same time, press the "Source" button on the control panel or direct source key on your preferred language from quick menu after the startup screen display. 4. Remove the lens cap. 2. The projector will display in approximately 30 seconds. The startup screen will detect your source automatically within "Setup" menu, check that the power cord and signal cable are securely connected...
... the remote control to switch between inputs. The first time you use the projector, you connected multiple sources at the same time, press the "Source" button on the control panel or direct source key on your preferred language from quick menu after the startup screen display. 4. Remove the lens cap. 2. The projector will display in approximately 30 seconds. The startup screen will detect your source automatically within "Setup" menu, check that the power cord and signal cable are securely connected...
User Manual
Page 14
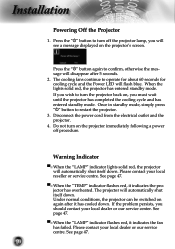
Warning Indicator ▀■ When the "LAMP" indicator lights solid red, the projector will disappear after it has cooled down. See page 47. ▀■ When the "TEMP" indicator flashes red, it indicates the fan has failed. See page 47. 14 Installation Powering Off the Projector 1. Press the " " button again to confirm, otherwise the message will automatically shut itself down . When the lights solid red, the projector has entered...
Warning Indicator ▀■ When the "LAMP" indicator lights solid red, the projector will disappear after it has cooled down. See page 47. ▀■ When the "TEMP" indicator flashes red, it indicates the fan has failed. See page 47. 14 Installation Powering Off the Projector 1. Press the " " button again to confirm, otherwise the message will automatically shut itself down . When the lights solid red, the projector has entered...
User Manual
Page 18
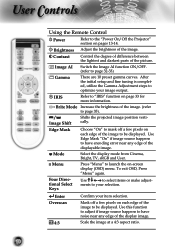
... page 33 for more information. Menu Press "Menu" to the "Power On/Off the Projector" section on pages 13-14. Use this function to adjust if image source happens to have encoding error near any edge of the image to be displayed. User Controls Using the Remote Control Power Refer to launch the on-screen display (OSD) menu. Brightness Adjust the brightness of the picture. Mode Select the display mode from Cinema, Bright, TV, sRGB...
... page 33 for more information. Menu Press "Menu" to the "Power On/Off the Projector" section on pages 13-14. Use this function to adjust if image source happens to have encoding error near any edge of the image to be displayed. User Controls Using the Remote Control Power Refer to launch the on-screen display (OSD) menu. Brightness Adjust the brightness of the picture. Mode Select the display mode from Cinema, Bright, TV, sRGB...
User Manual
Page 21
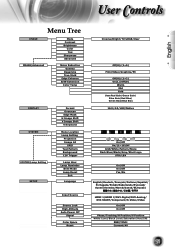
... SETUP Color Space LaRnegsueatge SYSTEM SYSTEM|Lamp Setting SYSTEM SYSTEM MIennputLSoocuatricoen Lamp Setting InPpruotjeScotiuornce SoImuracgeeLAoIck HighIARlItSitude AuTSteoosutPrcPoeawtLetoercrOknff HBiagchSkiAggnlrtoaitulundde Au1t2oVPTorwigegreOr ff Signal Lamp Hour LaCmoploRr eSmpaincdeer BriRteesMeot de CLaomlopr SRpeasceet MenuREeLxsoiecttation Lamp Setting MePnruojLeocctiaotnion LaImmpaSgeetAtiIng ProIjReIcStion User Controls Off(0)/(1~5) Film/Video/Graphics/PC Off(0)/(1~2) On(1)/Off(0) Warm Mid Cold CinUesmera:/RBedrigGhatin//TGVr/eseRnGGBa/inU/ser Blue Gain/Red Bias/ Green...
... SETUP Color Space LaRnegsueatge SYSTEM SYSTEM|Lamp Setting SYSTEM SYSTEM MIennputLSoocuatricoen Lamp Setting InPpruotjeScotiuornce SoImuracgeeLAoIck HighIARlItSitude AuTSteoosutPrcPoeawtLetoercrOknff HBiagchSkiAggnlrtoaitulundde Au1t2oVPTorwigegreOr ff Signal Lamp Hour LaCmoploRr eSmpaincdeer BriRteesMeot de CLaomlopr SRpeasceet MenuREeLxsoiecttation Lamp Setting MePnruojLeocctiaotnion LaImmpaSgeetAtiIng ProIjReIcStion User Controls Off(0)/(1~5) Film/Video/Graphics/PC Off(0)/(1~2) On(1)/Off(0) Warm Mid Cold CinUesmera:/RBedrigGhatin//TGVr/eseRnGGBa/inU/ser Blue Gain/Red Bias/ Green...
User Manual
Page 22
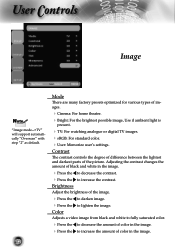
User Controls Image Noottee "Image mode-->TV" will support automatically "Overscan" with step "2" as default. 22 Mode There are many factory presets optimized for various types of black and white in the image. Adjusting the contrast changes the amount of images. Cinema: For home theater. Bright: For the brightest possible image, Use if ambient light is present. TV: For watching analogue or digital TV images. sRGB: For...
User Controls Image Noottee "Image mode-->TV" will support automatically "Overscan" with step "2" as default. 22 Mode There are many factory presets optimized for various types of black and white in the image. Adjusting the contrast changes the amount of images. Cinema: For home theater. Bright: For the brightest possible image, Use if ambient light is present. TV: For watching analogue or digital TV images. sRGB: For...
User Manual
Page 24
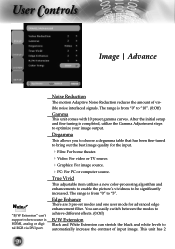
... has 2 24 After the initial setup and fine tuning is from "0" to optimize your image output. Noise Reduction The motion Adaptive Noise Reduction reduces the amount of input image. ible noise interlaced signals. The range is HDMI, analog or digital RGB via DVI port. User Controls Image | Advance Noottee "B/W Extension" can stretch the black and white levels to bring out the best...
... has 2 24 After the initial setup and fine tuning is from "0" to optimize your image output. Noise Reduction The motion Adaptive Noise Reduction reduces the amount of input image. ible noise interlaced signals. The range is HDMI, analog or digital RGB via DVI port. User Controls Image | Advance Noottee "B/W Extension" can stretch the black and white levels to bring out the best...
User Manual
Page 27
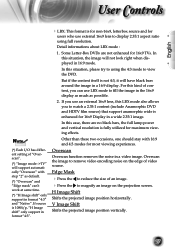
... "Edge mask" can use an external 16x9 lens, this kind of video source. V Image Shift Shifts the projected image position vertically. 27 In this situation, the image will not look right when displayed in format "4:3" and "Native". For this LBX mode also allows you can 't work at same time. (*) "H Image shift" only support in 16:9 mode. If you use LBX mode to using full resolution. In this situation, please...
... "Edge mask" can use an external 16x9 lens, this kind of video source. V Image Shift Shifts the projected image position vertically. 27 In this situation, the image will not look right when displayed in format "4:3" and "Native". For this LBX mode also allows you can 't work at same time. (*) "H Image shift" only support in 16:9 mode. If you use LBX mode to using full resolution. In this situation, please...
User Manual
Page 30
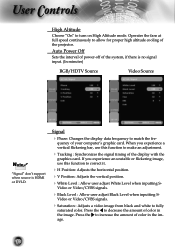
Video or Video/CVBS signals. Black Level : Allow user adjust Black Level when inputting S- Signal Phase: Changes the display data frequency to fully saturated color. quency of the system, if there is no signal input. (In minutes) RGB/HDTV Source Video Source Noottee "Signal" don't support when source is HDMI or DVI-D. Video or Video/CVBS signals. Saturation : Adjusts a video image from black and white to match the fre- Auto Power Off Sets the interval of power-off of...
Video or Video/CVBS signals. Black Level : Allow user adjust Black Level when inputting S- Signal Phase: Changes the display data frequency to fully saturated color. quency of the system, if there is no signal input. (In minutes) RGB/HDTV Source Video Source Noottee "Signal" don't support when source is HDMI or DVI-D. Video or Video/CVBS signals. Saturation : Adjusts a video image from black and white to match the fre- Auto Power Off Sets the interval of power-off of...
User Manual
Page 32
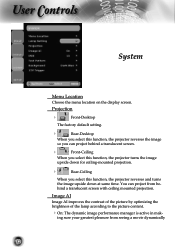
... the brightness of the lamp according to the picture content. On: The dynamic image performance manager is active in mak- Projection Front-Desktop The factory default setting. Rear-Desktop When you select this function, the projector reverses the image so you select this function, the projector reverses and turns the image upside down at same time. User Controls System Menu Location Choose the menu location on the display screen.
... the brightness of the lamp according to the picture content. On: The dynamic image performance manager is active in mak- Projection Front-Desktop The factory default setting. Rear-Desktop When you select this function, the projector reverses the image so you select this function, the projector reverses and turns the image upside down at same time. User Controls System Menu Location Choose the menu location on the display screen.
User Manual
Page 35
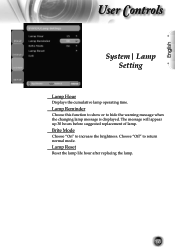
Lamp Reset Reset the lamp life hour after replacing the lamp. 35 Brite Mode Choose "On" to hide the warning message when the changing lamp message is displayed. Lamp Reminder Choose this function to show or to increase the brightness. English User Controls System| Lamp Setting Lamp Hour Displays the cumulative lamp operating time. Choose "Off" to return normal mode. The message will appear up 30 hours before suggested replacement of lamp.
Lamp Reset Reset the lamp life hour after replacing the lamp. 35 Brite Mode Choose "On" to hide the warning message when the changing lamp message is displayed. Lamp Reminder Choose this function to show or to increase the brightness. English User Controls System| Lamp Setting Lamp Hour Displays the cumulative lamp operating time. Choose "Off" to return normal mode. The message will appear up 30 hours before suggested replacement of lamp.
User Manual
Page 36
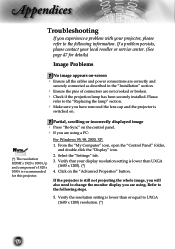
... for this projector. 2. From the "My Computer" icon, open the "Control Panel" folder, and double click the "Display" icon. (*) The resolution: HDMI's 1920 x 1080 i/p and component's 1920 x 1080 i is recommended for details) Image Problems No image appears on the control panel. If you are not crooked or broken. Check if the projection lamp has been securely installed. Please refer to the "Replacing the lamp" section. ...
... for this projector. 2. From the "My Computer" icon, open the "Control Panel" folder, and double click the "Display" icon. (*) The resolution: HDMI's 1920 x 1080 i/p and component's 1920 x 1080 i is recommended for details) Image Problems No image appears on the control panel. If you are not crooked or broken. Check if the projection lamp has been securely installed. Please refer to the "Replacing the lamp" section. ...
User Manual
Page 38
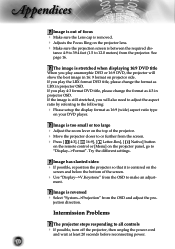
... Image is out of focus Make sure the Lens cap is removed. Adjusts the Focus Ring on the projector lens. Make sure the projection screen is centered on the screen and below the bottom of the projector. Move the projector closer to or further from the screen. Press [ 4:3], [ 16:9], [ Letter-Box], [ Native] button on the remote control or [Menu] on the projector panel, go to "Display...
... Image is out of focus Make sure the Lens cap is removed. Adjusts the Focus Ring on the projector lens. Make sure the projection screen is centered on the screen and below the bottom of the projector. Move the projector closer to or further from the screen. Press [ 4:3], [ 16:9], [ Letter-Box], [ Native] button on the remote control or [Menu] on the projector panel, go to "Display...
User Manual
Page 39
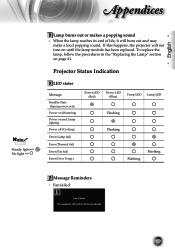
... Message Standby State (Input power cord) Power on (Warming) Power on until the lamp module has been replaced. If this happens, the projector will burn out and may make a loud popping sound. English Appendices Noottee Steady light => No light => Lamp burns out or makes a popping sound When the lamp reaches its end of life, it will not turn on and Lamp lighting Power off (Cooling) Error (Lamp fail) Error (Thermal fail) Error (Fan fail) Error (Over Temp.) Power LED (Red) Power LED (Blue) Temp-LED Lamp-LED Flashing Flashing Flashing Flashing Message...
... Message Standby State (Input power cord) Power on (Warming) Power on until the lamp module has been replaced. If this happens, the projector will burn out and may make a loud popping sound. English Appendices Noottee Steady light => No light => Lamp burns out or makes a popping sound When the lamp reaches its end of life, it will not turn on and Lamp lighting Power off (Cooling) Error (Lamp fail) Error (Thermal fail) Error (Fan fail) Error (Over Temp.) Power LED (Red) Power LED (Blue) Temp-LED Lamp-LED Flashing Flashing Flashing Flashing Message...
User Manual
Page 40
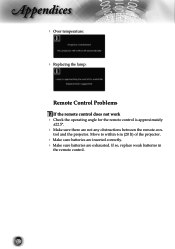
trol and the projector. If so, replace weak batteries in the remote control. 40 Move to within 6 m (20 ft) of the projector. Make sure batteries are inserted correctly. Make sure batteries are not any obstructions between the remote con- Appendices Over temperature: Replacing the lamp: Remote Control Problems If the remote control does not work Check the operating angle for the remote control is approximately ±22.5°. Make sure there are exhausted.
trol and the projector. If so, replace weak batteries in the remote control. 40 Move to within 6 m (20 ft) of the projector. Make sure batteries are inserted correctly. Make sure batteries are not any obstructions between the remote con- Appendices Over temperature: Replacing the lamp: Remote Control Problems If the remote control does not work Check the operating angle for the remote control is approximately ±22.5°. Make sure there are exhausted.
User Manual
Page 41
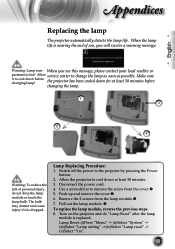
... changing lamp! Push up and remove the cover. 6. Make sure it is replaced. Allow service center to the projector by pressing the Power button. 2. Turn on the projector and do not drop the lamp module or touch the lamp bulb. When you will receive a warning message. English Appendices Replacing the lamp The projector automatically detects the lamp life. When the lamp life is nearing the end of personal injury, do "Lamp Reset" after the lamp...
... changing lamp! Push up and remove the cover. 6. Make sure it is replaced. Allow service center to the projector by pressing the Power button. 2. Turn on the projector and do not drop the lamp module or touch the lamp bulb. When you will receive a warning message. English Appendices Replacing the lamp The projector automatically detects the lamp life. When the lamp life is nearing the end of personal injury, do "Lamp Reset" after the lamp...


