
User Manual
Page 1
...Remote Control...11 Installation 12 Connecting the Projector 12 Powering On/Off the Projector 13 Powering On the Projector 13 Powering Off the projector 14 Warning Indicator 14 Adjusting the Projected Image 15 Adjusting the Projector's Height 15 Adjusting the Projector's Zoom / Focus 16 Adjusting Projected...21 Image ...22 Display ...26 Setup...29 System ...32 Appendices 36 Troubleshooting 36 Image Problems 36 Intermission Problems 38 Projector Status Indication 39 Remote Control Problems 40 Replacing the Lamp 41 Compatibility Modes 42 RS232 Commands and Protocol Function List ...
...Remote Control...11 Installation 12 Connecting the Projector 12 Powering On/Off the Projector 13 Powering On the Projector 13 Powering Off the projector 14 Warning Indicator 14 Adjusting the Projected Image 15 Adjusting the Projector's Height 15 Adjusting the Projector's Zoom / Focus 16 Adjusting Projected...21 Image ...22 Display ...26 Setup...29 System ...32 Appendices 36 Troubleshooting 36 Image Problems 36 Intermission Problems 38 Projector Status Indication 39 Remote Control Problems 40 Replacing the Lamp 41 Compatibility Modes 42 RS232 Commands and Protocol Function List ...

User Manual
Page 2
... way: ▀■ Such as radiators, heaters, stoves or other hazards. Refer all servicing to service this projector near you to persons. Do not attempt to qualified service personnel. Please call Optoma to an authorized service center near water or moisture. DO NOT OPEN THE CABINET. To reduce the risk...
... way: ▀■ Such as radiators, heaters, stoves or other hazards. Refer all servicing to service this projector near you to persons. Do not attempt to qualified service personnel. Please call Optoma to an authorized service center near water or moisture. DO NOT OPEN THE CABINET. To reduce the risk...

User Manual
Page 3
... Please contact your eyes. turn back on . To reduce the risk of fire or electric shock, do not open or disassemble the projector as this projector to cool down . When replacing the lamp, please allow unit to rain or moisture. Do not use lens cap when...the lamp when it shows warning messages. When the lamp is on until the lamp module has been replaced. This projector will show on page 41. When switching the projector off, please ensure the cooling cycle has been completed before disconnecting power. English Usage Notice Precautions Please follow all warnings,...
... Please contact your eyes. turn back on . To reduce the risk of fire or electric shock, do not open or disassemble the projector as this projector to cool down . When replacing the lamp, please allow unit to rain or moisture. Do not use lens cap when...the lamp when it shows warning messages. When the lamp is on until the lamp module has been replaced. This projector will show on page 41. When switching the projector off, please ensure the cooling cycle has been completed before disconnecting power. English Usage Notice Precautions Please follow all warnings,...

User Manual
Page 5
...asked to point out something on the screen. ▀■ In order to minimize the lamp power needed, use room blinds to stare at the projector lamp. Keep your back to the beam as much as possible. ▀■ A stick or laser pointer is used in a classroom, adequately supervise...Safety Warnings ▀■ Avoid staring directly into the beam. this is by ceiling-mounting rather than floor or table-mounting the projector. ▀■ When projector is recommended to avoid the need for the user to enter the beam. ▀■ Ensure that , when presenters look at all ...
...asked to point out something on the screen. ▀■ In order to minimize the lamp power needed, use room blinds to stare at the projector lamp. Keep your back to the beam as much as possible. ▀■ A stick or laser pointer is used in a classroom, adequately supervise...Safety Warnings ▀■ Avoid staring directly into the beam. this is by ceiling-mounting rather than floor or table-mounting the projector. ▀■ When projector is recommended to avoid the need for the user to enter the beam. ▀■ Ensure that , when presenters look at all ...
User Manual
Page 6
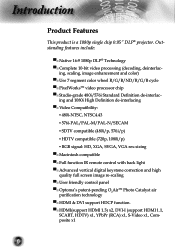
...Advanced vertical digital keystone correction and high quality full screen image re-scaling ▀■ User friendly control panel ▀■ Optoma's patent-pending O2AirTM Photo Catalyst air purification technology ▀■ HDMI & DVI support HDCP function. ▀■...9632; Complete 10-bit video processing (decoding, deinterlac- Introduction Product Features This product is a 1080p single chip 0.95" DLP® projector. ing, scaling, image enhancement and color) ▀■ Use 7 segment color wheel R/G/B/ND/R/G/B cycle ▀■ PixelWorksTM video processor...
...Advanced vertical digital keystone correction and high quality full screen image re-scaling ▀■ User friendly control panel ▀■ Optoma's patent-pending O2AirTM Photo Catalyst air purification technology ▀■ HDMI & DVI support HDCP function. ▀■...9632; Complete 10-bit video processing (decoding, deinterlac- Introduction Product Features This product is a 1080p single chip 0.95" DLP® projector. ing, scaling, image enhancement and color) ▀■ Use 7 segment color wheel R/G/B/ND/R/G/B cycle ▀■ PixelWorksTM video processor...
User Manual
Page 7
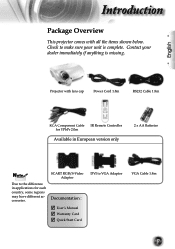
... 2 x AA Batteries Noottee Due to VGA Adaptor VGA Cable 1.8m 7 Check to make sure your dealer immediately if anything is complete. Introduction Package Overview This projector comes with lens cap Power Cord 1.8m RS232 Cable 1.8m RCA Component Cable IR Remote Controller for each country, some regions may have different accessories...
... 2 x AA Batteries Noottee Due to VGA Adaptor VGA Cable 1.8m 7 Check to make sure your dealer immediately if anything is complete. Introduction Package Overview This projector comes with lens cap Power Cord 1.8m RS232 Cable 1.8m RCA Component Cable IR Remote Controller for each country, some regions may have different accessories...
User Manual
Page 12
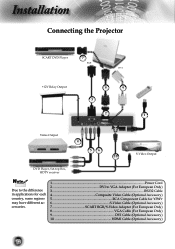
Installation Connecting the Projector SCART DVD Player 7 RGB DVI +12V Relay Output 8 9 3 2 1 Video Output 4 56 10 S-Video Output DVD Player, Set-top Box, HDTV receiver Noottee Due to the ...
Installation Connecting the Projector SCART DVD Player 7 RGB DVI +12V Relay Output 8 9 3 2 1 Video Output 4 56 10 S-Video Output DVD Player, Set-top Box, HDTV receiver Noottee Due to the ...

User Manual
Page 13
...panel. And the Power LED will turn red. 3. The startup screen will turn blue. The first time you use the projector, you can select your source automatically within "Setup" menu, check that the power cord and signal cable are securely connected. Remove the ...cap. 2. English Installation Powering On/Off the Projector Powering On the Projector 1. The Power LED will display in approximately 30 seconds. Turn on the projector first and then select the signal sources. 1 2 13 The projector will detect your preferred language from quick menu after the ...
...panel. And the Power LED will turn red. 3. The startup screen will turn blue. The first time you use the projector, you can select your source automatically within "Setup" menu, check that the power cord and signal cable are securely connected. Remove the ...cap. 2. English Installation Powering On/Off the Projector Powering On the Projector 1. The Power LED will display in approximately 30 seconds. Turn on the projector first and then select the signal sources. 1 2 13 The projector will detect your preferred language from quick menu after the ...

User Manual
Page 14
... ▀■ When the "LAMP" indicator flashes red, it indicates the projector has overheated. Installation Powering Off the Projector 1. Press the " " button again to turn the projector back on the projector's screen. If you wish to confirm, otherwise the message will see a..., simply press " " button to turn on again after 5 seconds. 2. Under normal conditions, the projector can be switched on the projector immediately following a power off the projector lamp, you will disappear after it has cooled down . Please contact your local dealer or our service ...
... ▀■ When the "LAMP" indicator flashes red, it indicates the projector has overheated. Installation Powering Off the Projector 1. Press the " " button again to turn the projector back on the projector's screen. If you wish to confirm, otherwise the message will see a..., simply press " " button to turn on again after 5 seconds. 2. Under normal conditions, the projector can be switched on the projector immediately following a power off the projector lamp, you will disappear after it has cooled down . Please contact your local dealer or our service ...
User Manual
Page 15
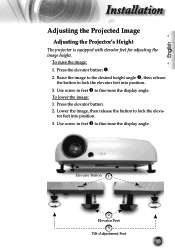
.... Use screw in feet to fine-tune the display angle. tor feet into position. 3. English Installation Adjusting the Projected Image Adjusting the Projector's Height The projector is equipped with elevator feet for adjusting the image height. Lower the image, then release the button to lock the elevator feet into position...
.... Use screw in feet to fine-tune the display angle. tor feet into position. 3. English Installation Adjusting the Projected Image Adjusting the Projector's Height The projector is equipped with elevator feet for adjusting the image height. Lower the image, then release the button to lock the elevator feet into position...
User Manual
Page 16
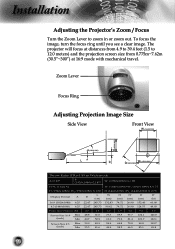
The projector will focus at distances from 4.9 to 39.4 feet (1.5 to zoom in ) 16:9 (1920x1080) 6.25 22.47 245.73 132.83 74.72 26.90 152....) X 0.75 W H H' D D' (cm) (cm) (cm) (cm) (in or zoom out. To focus the image, turn the focus ring until you see a clear image. Installation Adjusting the Projector's Zoom / Focus Turn the Zoom Lever to 12.0 meters) and the projection screen size from 0.775m~7.62m (30.5"~300") at 16:9 mode with mechanical travel.
The projector will focus at distances from 4.9 to 39.4 feet (1.5 to zoom in ) 16:9 (1920x1080) 6.25 22.47 245.73 132.83 74.72 26.90 152....) X 0.75 W H H' D D' (cm) (cm) (cm) (cm) (in or zoom out. To focus the image, turn the focus ring until you see a clear image. Installation Adjusting the Projector's Zoom / Focus Turn the Zoom Lever to 12.0 meters) and the projection screen size from 0.775m~7.62m (30.5"~300") at 16:9 mode with mechanical travel.
User Manual
Page 17
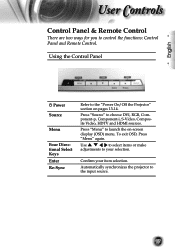
.... Use to select items or make adjustments to choose DVI, RGB, Component-p, Component-i, S-Video, Composite Video, HDTV and HDMI sources. Automatically synchronizes the projector to control the functions: Control Panel and Remote Control. Using the Control Panel Power Source Menu Four Directional Select Keys Enter Re-Sync Refer to... launch the on pages 13-14. Press "Menu" to the "Power On/Off the Projector" section on -screen display (OSD) menu. To exit OSD, Press "Menu" again. Press "Source" to your item selection.
.... Use to select items or make adjustments to choose DVI, RGB, Component-p, Component-i, S-Video, Composite Video, HDTV and HDMI sources. Automatically synchronizes the projector to control the functions: Control Panel and Remote Control. Using the Control Panel Power Source Menu Four Directional Select Keys Enter Re-Sync Refer to... launch the on pages 13-14. Press "Menu" to the "Power On/Off the Projector" section on -screen display (OSD) menu. To exit OSD, Press "Menu" again. Press "Source" to your item selection.
User Manual
Page 18
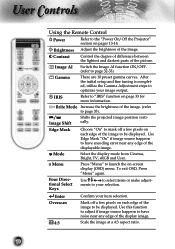
... adjust- Scale the image at a 4:3 aspect ratio. 18 To exit OSD, Press "Menu" again. Four Directional Select Keys Use to the "Power On/Off the Projector" section on -screen display (OSD) menu. Brightness Adjust the brightness of the picture. Contrast Control the degree of difference between the lightest and darkest parts...
... adjust- Scale the image at a 4:3 aspect ratio. 18 To exit OSD, Press "Menu" again. Four Directional Select Keys Use to the "Power On/Off the Projector" section on -screen display (OSD) menu. Brightness Adjust the brightness of the picture. Contrast Control the degree of difference between the lightest and darkest parts...
User Manual
Page 20
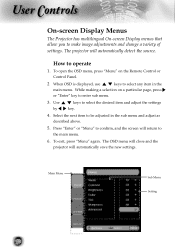
How to select the desired item and adjust the settings key. 4. Use by keys to operate 1. User Controls On-screen Display Menus The Projector has multilingual On-screen Display menus that allow you to the main menu. 6. Press "Enter" or "Menu" to confirm, and the...on the Remote Control or Control Panel. 2 When OSD is displayed, use keys to enter sub menu. 3. The projector will automatically save the new settings. The OSD menu will close and the projector will automatically detect the source. To open the OSD menu, press "Menu" on a particular page, press or "...
How to select the desired item and adjust the settings key. 4. Use by keys to operate 1. User Controls On-screen Display Menus The Projector has multilingual On-screen Display menus that allow you to the main menu. 6. Press "Enter" or "Menu" to confirm, and the...on the Remote Control or Control Panel. 2 When OSD is displayed, use keys to enter sub menu. 3. The projector will automatically save the new settings. The OSD menu will close and the projector will automatically detect the source. To open the OSD menu, press "Menu" on a particular page, press or "...
User Manual
Page 29
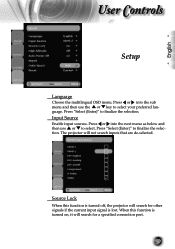
The projector will search for other signals if the current input signal is turned on, it will not search inputs that are de-selected. Press or into ... select. English User Controls Setup Language Choose the multilingual OSD menu. Source Lock When this function is lost. When this function is turned off, the projector will search for a specified connection port. 29 Input Source Enable input sources. Press "Select (Enter)" to finalize the selection. Press or into...
The projector will search for other signals if the current input signal is turned on, it will not search inputs that are de-selected. Press or into ... select. English User Controls Setup Language Choose the multilingual OSD menu. Source Lock When this function is lost. When this function is turned off, the projector will search for a specified connection port. 29 Input Source Enable input sources. Press "Select (Enter)" to finalize the selection. Press or into...
User Manual
Page 30
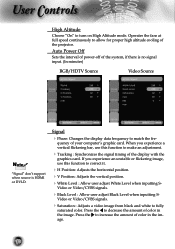
.... Black Level : Allow user adjust Black Level when inputting S- User Controls High Altitude Choose "On" to allow for proper high altitude cooling of the projector. Operates the fans at full speed continuously to turn on High Altitude mode. Press the to fully saturated color. quency of the system, if there...
.... Black Level : Allow user adjust Black Level when inputting S- User Controls High Altitude Choose "On" to allow for proper high altitude cooling of the projector. Operates the fans at full speed continuously to turn on High Altitude mode. Press the to fully saturated color. quency of the system, if there...
User Manual
Page 32
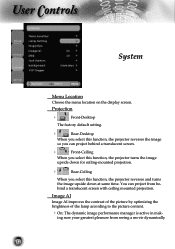
Projection Front-Desktop The factory default setting. Rear-Desktop When you select this function, the projector reverses the image so you can project from seeing a movie dynamically 32 User Controls System Menu Location Choose the menu ...from behind a translucent screen. Front-Ceiling When you select this function, the projector turns the image upside down for ceiling-mounted projection. Rear-Ceiling When you select this function, the projector reverses and turns the image upside down at same time. You can project behind a ...
Projection Front-Desktop The factory default setting. Rear-Desktop When you select this function, the projector reverses the image so you can project from seeing a movie dynamically 32 User Controls System Menu Location Choose the menu ...from behind a translucent screen. Front-Ceiling When you select this function, the projector turns the image upside down for ceiling-mounted projection. Rear-Ceiling When you select this function, the projector reverses and turns the image upside down at same time. You can project behind a ...

User Manual
Page 34
User Controls 12V Trigger STD: When "STD" is "4:3", "16:9", or "Native", 12V trigger port won't send 12V, it will be 0V. 34 Format change to "LBX",12V trigger port will send 12V when projector turn on. LBX: When 12V trigger set as "LBX" -- 1. Format is selected, 12V Trigger will send 12V. 2.
User Controls 12V Trigger STD: When "STD" is "4:3", "16:9", or "Native", 12V trigger port won't send 12V, it will be 0V. 34 Format change to "LBX",12V trigger port will send 12V when projector turn on. LBX: When 12V trigger set as "LBX" -- 1. Format is selected, 12V Trigger will send 12V. 2.
User Manual
Page 36
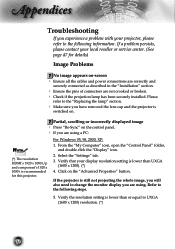
...details) Image Problems No image appears on . Click on the control panel. If you have removed the lens cap and the projector is lower than UXGA (1600 x 1200). (*) 4. Appendices Troubleshooting If you experience a problem with your display resolution setting is lower than ...or equal to UXGA (1600 x 1200) resolution. (*) 36 Verify that your projector, please refer to the following information. Verify the resolution setting is switched on -screen Ensure all the cables and power connections are...
...details) Image Problems No image appears on . Click on the control panel. If you have removed the lens cap and the projector is lower than UXGA (1600 x 1200). (*) 4. Appendices Troubleshooting If you experience a problem with your display resolution setting is lower than ...or equal to UXGA (1600 x 1200) resolution. (*) 36 Verify that your projector, please refer to the following information. Verify the resolution setting is switched on -screen Ensure all the cables and power connections are...
User Manual
Page 37
.... Change the monitor color setting on "Show all equipment including the projector. Select the "Change" button under the "Monitor" tab. 7. Each has a different way to correct it compatible with the projector. 37 tion. Check and reconfigure the display mode of ...above to adjust resolution of your graphic card to your computer. Refer to make an adjustment. Click on your computer's manual for this projector. English Appendices 6. The screen of the monitor display is lower (*) The resolution: than or equal to make it . Image has ...
.... Change the monitor color setting on "Show all equipment including the projector. Select the "Change" button under the "Monitor" tab. 7. Each has a different way to correct it compatible with the projector. 37 tion. Check and reconfigure the display mode of ...above to adjust resolution of your graphic card to your computer. Refer to make an adjustment. Click on your computer's manual for this projector. English Appendices 6. The screen of the monitor display is lower (*) The resolution: than or equal to make it . Image has ...


