
User Manual
Page 1
... ...6 Main Unit ...6 Control Panel ...7 Connection Ports ...8 Wireless Remote Control 9 Installation Connecting the Projector 10 Powering On/Off the Projector 11 Powering On the Projector 11 Powering Off the Projector 12 Adjusting the Projected Image 13 Adjusting the Projector's Height 13 Adjusting the Projector's Zoom/Focus 14 User Controls Control Panel & Remote Control 15 Onscreen Display Menus 18 How to Operate ...18 Menu Tree ...19 Picture ...20 Image ...22 System ...24 Display ...25 Appendices Troubleshooting ...27 Replacing the Lamp ...30 Ceiling Mount Installation 31 1
... ...6 Main Unit ...6 Control Panel ...7 Connection Ports ...8 Wireless Remote Control 9 Installation Connecting the Projector 10 Powering On/Off the Projector 11 Powering On the Projector 11 Powering Off the Projector 12 Adjusting the Projected Image 13 Adjusting the Projector's Height 13 Adjusting the Projector's Zoom/Focus 14 User Controls Control Panel & Remote Control 15 Onscreen Display Menus 18 How to Operate ...18 Menu Tree ...19 Picture ...20 Image ...22 System ...24 Display ...25 Appendices Troubleshooting ...27 Replacing the Lamp ...30 Ceiling Mount Installation 31 1
User Manual
Page 2
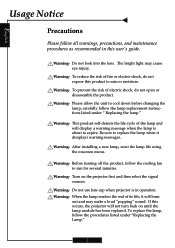
... warning messages. After installing a new lamp, reset the lamp life using the onscreen menu. Warning- When the lamp reaches the end of the lamp and will display a warning message when the lamp is in this user's guide. Warning- To replace the lamp, follow all warnings, precautions, and maintenance procedures as recommended in operation. Warning- Be sure to expire. Warning- If this product to run for several minutes. Warning- Warning- Before turning off the product, follow the lamp replacement instructions listed under "Replacing the Lamp...
... warning messages. After installing a new lamp, reset the lamp life using the onscreen menu. Warning- When the lamp reaches the end of the lamp and will display a warning message when the lamp is in this user's guide. Warning- To replace the lamp, follow all warnings, precautions, and maintenance procedures as recommended in operation. Warning- Be sure to expire. Warning- If this product to run for several minutes. Warning- Warning- Before turning off the product, follow the lamp replacement instructions listed under "Replacing the Lamp...
User Manual
Page 4
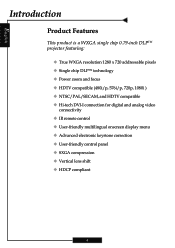
...-inch DLPTM projector featuring: ‹ True WXGA resolution 1280 x 720 addressable pixels ‹ Single chip DLPTM technology ‹ Power zoom and focus ‹ HDTV compatible (480i/p, 576i/p, 720p, 1080i ) ‹ NTSC/PAL/SECAM, and HDTV compatible ‹ Hi-tech DVI-I connection for digital and analog video connectivity ‹ IR remote control ‹ User-friendly multilingual onscreen display menu ‹ Advanced electronic keystone correction ‹ User-friendly control panel ‹ SXGA...
...-inch DLPTM projector featuring: ‹ True WXGA resolution 1280 x 720 addressable pixels ‹ Single chip DLPTM technology ‹ Power zoom and focus ‹ HDTV compatible (480i/p, 576i/p, 720p, 1080i ) ‹ NTSC/PAL/SECAM, and HDTV compatible ‹ Hi-tech DVI-I connection for digital and analog video connectivity ‹ IR remote control ‹ User-friendly multilingual onscreen display menu ‹ Advanced electronic keystone correction ‹ User-friendly control panel ‹ SXGA...
User Manual
Page 10
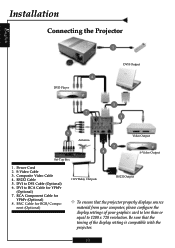
... RGB/Compo- Be sure that the projector properly displays source material from your computer, please configure the display settings of the display setting is compatible with the projector. 10 DVI to 1280 x 720 resolution. BNC Cable for YPbPr (Optional) 7. English Installation Connecting the Projector 1 6 DVD Player DVI-I Output 5 7 3 8 Antenna 2 4 Video Output S-Video Output Set-Top Box 1. Composite Video Cable 4. S-Video Cable 3. Power Cord 2. RCA Component Cable for YPbPr (Optional) 8. nent (Optional) +12V Relay...
... RGB/Compo- Be sure that the projector properly displays source material from your computer, please configure the display settings of the display setting is compatible with the projector. 10 DVI to 1280 x 720 resolution. BNC Cable for YPbPr (Optional) 7. English Installation Connecting the Projector 1 6 DVD Player DVI-I Output 5 7 3 8 Antenna 2 4 Video Output S-Video Output Set-Top Box 1. Composite Video Cable 4. S-Video Cable 3. Power Cord 2. RCA Component Cable for YPbPr (Optional) 8. nent (Optional) +12V Relay...
User Manual
Page 11
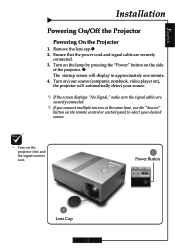
... the power cord and signal cable are securely connected. ™ If you connect multiple sources at the same time, use the "Source" button on the remote control or control panel to select your desired source. ™ Turn on the side of the projector. Remove the lens cap.n 2. Turn on the lamp by pressing the "Power" button on the projector first and the signal sources next. 2 Power Button 1 Lens Cap 11 o The startup screen will automatically detect your source. ™ If the screen displays "No Signal...
... the power cord and signal cable are securely connected. ™ If you connect multiple sources at the same time, use the "Source" button on the remote control or control panel to select your desired source. ™ Turn on the side of the projector. Remove the lens cap.n 2. Turn on the lamp by pressing the "Power" button on the projector first and the signal sources next. 2 Power Button 1 Lens Cap 11 o The startup screen will automatically detect your source. ™ If the screen displays "No Signal...
User Manual
Page 12
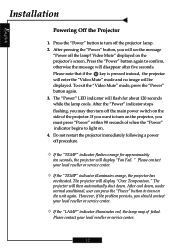
... message will display "Fan Fail. However, if the problem persists, you will then automatically shut down , under normal conditional, user can press the "Power" button to light on the side of when the "Power" indicator begins to turn off the projector lamp. 2. Do not restart the projector immediately following a power off the lamp? Please contact your local reseller or service center. ™ If the "TEMP" indicator illuminates orange, the projector has overheated. The projector...
... message will display "Fan Fail. However, if the problem persists, you will then automatically shut down , under normal conditional, user can press the "Power" button to light on the side of when the "Power" indicator begins to turn off the projector lamp. 2. Do not restart the projector immediately following a power off the lamp? Please contact your local reseller or service center. ™ If the "TEMP" indicator illuminates orange, the projector has overheated. The projector...
User Manual
Page 14
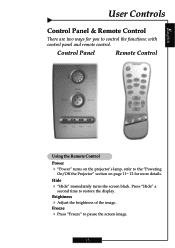
English User Controls Control Panel & Remote Control There are two ways for more details. Press "Hide" a second time to pause the screen image. 15 Brightness 4 Adjust the brightness of the image. Freeze 4 Press "Freeze" to restore the display. Control Panel Remote Control Using the Remote Control Power 4 "Power" turns on the projector's lamp, refer to the "Powering On/Off the Projector" section on page 11~ 12 for you to control the functions: with control panel and remote control. Hide 4 "Hide" immediately turns the screen black.
English User Controls Control Panel & Remote Control There are two ways for more details. Press "Hide" a second time to pause the screen image. 15 Brightness 4 Adjust the brightness of the image. Freeze 4 Press "Freeze" to restore the display. Control Panel Remote Control Using the Remote Control Power 4 "Power" turns on the projector's lamp, refer to the "Powering On/Off the Projector" section on page 11~ 12 for you to control the functions: with control panel and remote control. Hide 4 "Hide" immediately turns the screen black.
User Manual
Page 15
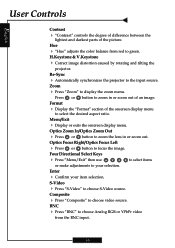
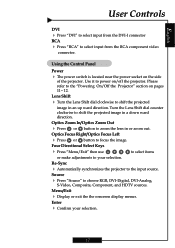
... S-Video source. Zoom 4 Press "Zoom" to zoom the lens in or zoom out of an image. Optics Zoom In/Optics Zoom Out 4 Press or button to display the zoom menu. Hue 4 "Hue" adjusts the color balance from the BNC input. 16 Format 4 Display the "Format" section of the picture. H.Keystone & V.Keystone 4 Correct image distortion caused by rotating and tilting the projector. Press or button to green. Optics Focus Right/Optics Focus Left 4 Press or button to the input source. Re-Sync 4 Automatically...
... S-Video source. Zoom 4 Press "Zoom" to zoom the lens in or zoom out of an image. Optics Zoom In/Optics Zoom Out 4 Press or button to display the zoom menu. Hue 4 "Hue" adjusts the color balance from the BNC input. 16 Format 4 Display the "Format" section of the picture. H.Keystone & V.Keystone 4 Correct image distortion caused by rotating and tilting the projector. Press or button to green. Optics Focus Right/Optics Focus Left 4 Press or button to the input source. Re-Sync 4 Automatically...
User Manual
Page 16
.../Optics Focus Left 4 Press or button to choose RGB, DVI-Digital, DVI-Analog, S-Video, Composite, Component, and HDTV sources. Enter 4 Confirm your selection. Use it to your selection. 17 Four Directional Select Keys 4 Press "Menu/Exit" then use or make adjustments to power on the side of the projector. Using the Control Panel Power 4 The power switch is located near the power socket on /off the projector. Turn the Lens Shift dial counter...
.../Optics Focus Left 4 Press or button to choose RGB, DVI-Digital, DVI-Analog, S-Video, Composite, Component, and HDTV sources. Enter 4 Confirm your selection. Use it to your selection. 17 Four Directional Select Keys 4 Press "Menu/Exit" then use or make adjustments to power on the side of the projector. Using the Control Panel Power 4 The power switch is located near the power socket on /off the projector. Turn the Lens Shift dial counter...
User Manual
Page 17
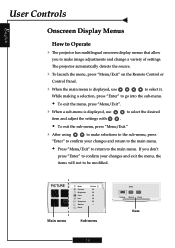
...'t press "Enter" to confirm your changes and return to the main menu. Š Press "Menu/Exit" to return to make image adjustments and change a variety of settings. The projector automatically detects the source. 4 To launch the menu, press "Menu/Exit" on the Remote Control or Control Panel. 4 When the main menu is displayed, use to select it. PICTURE Main menu Mode Contrast Brightness Color Hue Sharpness Gamma Reset Cinéma 50 50...
...'t press "Enter" to confirm your changes and return to the main menu. Š Press "Menu/Exit" to return to make image adjustments and change a variety of settings. The projector automatically detects the source. 4 To launch the menu, press "Menu/Exit" on the Remote Control or Control Panel. 4 When the main menu is displayed, use to select it. PICTURE Main menu Mode Contrast Brightness Color Hue Sharpness Gamma Reset Cinéma 50 50...
User Manual
Page 18
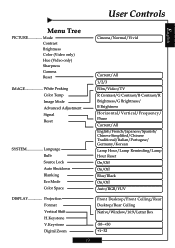
User Controls English Menu Tree PICTURE Mode Contrast Brightness Color (Video only) Hue (Video only) Sharpness Gamma Reset IMAGE White Peaking Color Temp Image Mode Advanced Adjustment Signal Reset SYSTEM Language Bulb Source Lock Auto Shutdown Blanking Eco Mode Color Space DISPLAY Projection Format Vertical Shift H.Keystone V.Keystone Digital Zoom 19 Cinema/Normal/Vivid Current/All 1/2/3 Film/Video/TV R Contrast/G Contrast/B Contrast/R Brightness/G Brightness/ B Brightness Horizontal/Vertical/Frequency/ Phase Current/All English/French/Japanese/Spanish/ Chinese Simplified/Chinese ...
User Controls English Menu Tree PICTURE Mode Contrast Brightness Color (Video only) Hue (Video only) Sharpness Gamma Reset IMAGE White Peaking Color Temp Image Mode Advanced Adjustment Signal Reset SYSTEM Language Bulb Source Lock Auto Shutdown Blanking Eco Mode Color Space DISPLAY Projection Format Vertical Shift H.Keystone V.Keystone Digital Zoom 19 Cinema/Normal/Vivid Current/All 1/2/3 Film/Video/TV R Contrast/G Contrast/B Contrast/R Brightness/G Brightness/ B Brightness Horizontal/Vertical/Frequency/ Phase Current/All English/French/Japanese/Spanish/ Chinese Simplified/Chinese ...
User Manual
Page 19
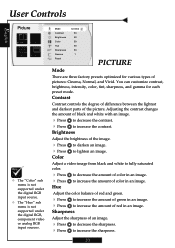
... supported under the digital RGB input source. ™ The "Hue" sub menu is not supported under the digital RGB, component video or analog RGB input sources. Contrast Contrast controls the degree of difference between the lightest and darkest parts of an image. 4 Press 4 Press to lighten an image. Adjust the color balance of red and green. 4 Press to increase the amount of red in an image. 4 Press to darken an image. Mode...
... supported under the digital RGB input source. ™ The "Hue" sub menu is not supported under the digital RGB, component video or analog RGB input sources. Contrast Contrast controls the degree of difference between the lightest and darkest parts of an image. 4 Press 4 Press to lighten an image. Adjust the color balance of red and green. 4 Press to increase the amount of red in an image. 4 Press to darken an image. Mode...
User Manual
Page 20
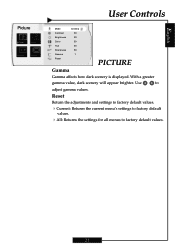
Use to factory default values. 21 Reset Return the adjustments and settings to factory default values. 4Current: Returns the current menu's settings to factory default values. 4All: Returns the settings for all menus to adjust gamma values. With a greater gamma value, dark scenery will appear brighter. English Picture User Controls Mode Contrast Brightness Color Hue Sharpness Gamma Reset Cinema 50 50 50 50 50 1 PICTURE Gamma Gamma affects how dark scenery is displayed.
Use to factory default values. 21 Reset Return the adjustments and settings to factory default values. 4Current: Returns the current menu's settings to factory default values. 4All: Returns the settings for all menus to adjust gamma values. With a greater gamma value, dark scenery will appear brighter. English Picture User Controls Mode Contrast Brightness Color Hue Sharpness Gamma Reset Cinema 50 50 50 50 50 1 PICTURE Gamma Gamma affects how dark scenery is displayed.

User Manual
Page 21
... flickering bar, use this function to make an adjustment. 4Phase : Synchronizes the signal timing of images: 4 Film : For home theater 4 Video : For video mode 4 TV : For TV Advanced Adjustment Use or to match the frequency of the DMD chip. The range is supported under the Analog RGB and Analog YPbPr input sources. Signal 4Horizontal: Adjusts the horizontal position. 4Vertical: Adjusts the vertical position. 4Frequency: Changes the display data frequency to select R (Red), G (Green), or B (Blue) for...
... flickering bar, use this function to make an adjustment. 4Phase : Synchronizes the signal timing of images: 4 Film : For home theater 4 Video : For video mode 4 TV : For TV Advanced Adjustment Use or to match the frequency of the DMD chip. The range is supported under the Analog RGB and Analog YPbPr input sources. Signal 4Horizontal: Adjusts the horizontal position. 4Vertical: Adjusts the vertical position. 4Frequency: Changes the display data frequency to select R (Red), G (Green), or B (Blue) for...
User Manual
Page 23
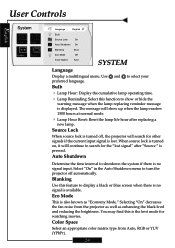
... when the lamp reaches 1500 hours at normal mode. 4 Lamp Hour Reset: Reset the lamp life hour after "Source " is no signal is displayed. You may find this function to display a black or blue screen when there is no signal input. Source Lock When source lock is lost signal" after replacing a new lamp. Select "On" in the Auto Shutdown menu to search for the "lost . Color Space Select an appropriate color matrix type from the projector as well as "Economy Mode." Use and...
... when the lamp reaches 1500 hours at normal mode. 4 Lamp Hour Reset: Reset the lamp life hour after "Source " is no signal is displayed. You may find this function to display a black or blue screen when there is no signal input. Source Lock When source lock is lost signal" after replacing a new lamp. Select "On" in the Auto Shutdown menu to search for the "lost . Color Space Select an appropriate color matrix type from the projector as well as "Economy Mode." Use and...
User Manual
Page 24
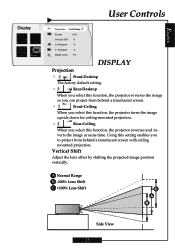
..., the projector turns the image upside down for ceiling-mounted projection. 4 Rear-Ceiling When you select this setting enables you to project from behind a translucent screen with ceiling mounted projection. Vertical Shift Adjust the lens offset by shifting the projected image position vertically. English Display User Controls Projection Front Desktop Format 16:9 Vertical Shift 0 H. Using this function, the projector reverses and in- A Normal Range B -100% Lens Shift C +100% Lens Shift Side View 25 Keystone 0 V. verts the image at same time.
..., the projector turns the image upside down for ceiling-mounted projection. 4 Rear-Ceiling When you select this setting enables you to project from behind a translucent screen with ceiling mounted projection. Vertical Shift Adjust the lens offset by shifting the projected image position vertically. English Display User Controls Projection Front Desktop Format 16:9 Vertical Shift 0 H. Using this function, the projector reverses and in- A Normal Range B -100% Lens Shift C +100% Lens Shift Side View 25 Keystone 0 V. verts the image at same time.
User Manual
Page 26
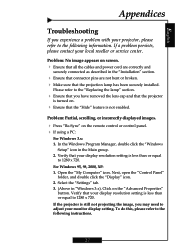
... the cables and power cord are correctly and securely connected as described in the "Installation" section. 4 Ensure that connector pins are not bent or broken. 4 Make sure that your display resolution setting is still not projecting the image, you experience a problem with your projector, please refer to the following instructions. 27 In the Windows Program Manager, double click the "Windows Setup" icon in "Windows 3.x). Next, open the "Control Panel" folder...
... the cables and power cord are correctly and securely connected as described in the "Installation" section. 4 Ensure that connector pins are not bent or broken. 4 Make sure that your display resolution setting is still not projecting the image, you experience a problem with your projector, please refer to the following instructions. 27 In the Windows Program Manager, double click the "Windows Setup" icon in "Windows 3.x). Next, open the "Control Panel" folder...
User Manual
Page 27
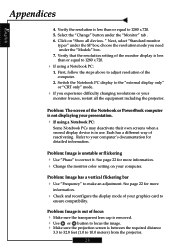
... transparent lens cap is removed. 4 Use or button to focus the image. 4 Make sure the projection screen is less than or equal to 10.0 meters) from the projector. 28 Problem: Image is not displaying your computer's documentation for more information. 4 Check and reconfigure the display mode of the Notebook or PowerBook computer is unstable or flickering 4 Use "Phase" to 1280 x 720. 5. Switch the Notebook PC display to the "external display...
... transparent lens cap is removed. 4 Use or button to focus the image. 4 Make sure the projection screen is less than or equal to 10.0 meters) from the projector. 28 Problem: Image is not displaying your computer's documentation for more information. 4 Check and reconfigure the display mode of the Notebook or PowerBook computer is unstable or flickering 4 Use "Phase" to 1280 x 720. 5. Switch the Notebook PC display to the "external display...
User Manual
Page 28
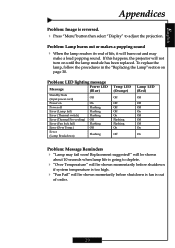
... Replacement suggested!" Problem: LED lighting message Message Power LED (Blue) Standby State (Input power cord) Off Power on On Power off Flashing Error (Lamp fail) Flashing Error (Thermal switch) Flashing Error (Thermal Pre-cooling) Off Error (Fan lock fail) Flashing Error (Over Temp.) Off Error (Lamp Breakdown) Flashing Temp LED (Orange) Off Off Off Off On Flashing Flashing On Off Lamp LED (Red) Off Off Off On Off Off Off On On Problem: Message Reminders 4 "Lamp may make a loud popping sound. English Appendices Problem: Image is out of life, it will not turn...
... Replacement suggested!" Problem: LED lighting message Message Power LED (Blue) Standby State (Input power cord) Off Power on On Power off Flashing Error (Lamp fail) Flashing Error (Thermal switch) Flashing Error (Thermal Pre-cooling) Off Error (Fan lock fail) Flashing Error (Over Temp.) Off Error (Lamp Breakdown) Flashing Temp LED (Orange) Off Off Off Off On Flashing Flashing On Off Lamp LED (Red) Off Off Off On Off Off Off On On Problem: Message Reminders 4 "Lamp may make a loud popping sound. English Appendices Problem: Image is out of life, it will not turn...
User Manual
Page 29
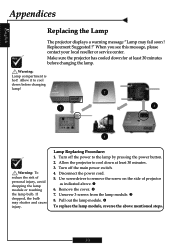
... power button. 2. Use screwdriver to cool down at least 30 minutes before changing lamp! 2 1 3 4 Warning: To reduce the risk of projector as indicated above mentioned steps. 30 Remove the cover. Unscrew 3 screws from the lamp module. Disconnect the power cord. 5. Pull out the lamp module. q To replace the lamp module, reverse the above . If dropped, the bulb may fail soon ! Lamp Replacing Procedure: 1. o 7. Turn off the main power switch. 4. p 8. English Appendices Replacing the Lamp The projector displays a warning message "Lamp...
... power button. 2. Use screwdriver to cool down at least 30 minutes before changing lamp! 2 1 3 4 Warning: To reduce the risk of projector as indicated above mentioned steps. 30 Remove the cover. Unscrew 3 screws from the lamp module. Disconnect the power cord. 5. Pull out the lamp module. q To replace the lamp module, reverse the above . If dropped, the bulb may fail soon ! Lamp Replacing Procedure: 1. o 7. Turn off the main power switch. 4. p 8. English Appendices Replacing the Lamp The projector displays a warning message "Lamp...


