
User's Manual
Page 1
... | Advanced 26 DISPLAY 28 DISPLAY | 3D 30 SETUP 31 SETUP | Security 33 SETUP | Signal 35 OPTIONS 36 OPTIONS | Advanced 37 OPTIONS | Lamp Settings 38 Appendices 39 Troubleshooting 39 Replacing the lamp 44 Compatibility Modes 46 Computer Compatibility 46 Video Compatibility 47 RS232 Commands and Protocol Function List 48 RS232 Pin Assignments 48 RS232...
... | Advanced 26 DISPLAY 28 DISPLAY | 3D 30 SETUP 31 SETUP | Security 33 SETUP | Signal 35 OPTIONS 36 OPTIONS | Advanced 37 OPTIONS | Lamp Settings 38 Appendices 39 Troubleshooting 39 Replacing the lamp 44 Compatibility Modes 46 Computer Compatibility 46 Video Compatibility 47 RS232 Commands and Protocol Function List 48 RS232 Pin Assignments 48 RS232...
User's Manual
Page 3
... into your eyes. ▀■ Warning- To reduce the risk of its life, the pro- When the lamp is on -screen display "OPTIONS | Lamp Settings" menu after replacing the lamp module (refer to cool down . To replace the lamp, follow all warnings, precautions and maintenance as described on pages 44-45. ▀■ Warning- will not...
... into your eyes. ▀■ Warning- To reduce the risk of its life, the pro- When the lamp is on -screen display "OPTIONS | Lamp Settings" menu after replacing the lamp module (refer to cool down . To replace the lamp, follow all warnings, precautions and maintenance as described on pages 44-45. ▀■ Warning- will not...

User's Manual
Page 38
... to increase the brightness. The message will appear 30 hours before suggested replacement of lamp. When ambient temperature is displayed. Lamp Reset Reset the lamp hour counter after replacing the lamp. English 38 User Controls OPTIONS | Lamp Settings Lamp Hours Display the projection time. Lamp Reminder Choose this function to show or to hide the warning message when...
... to increase the brightness. The message will appear 30 hours before suggested replacement of lamp. When ambient temperature is displayed. Lamp Reset Reset the lamp hour counter after replacing the lamp. English 38 User Controls OPTIONS | Lamp Settings Lamp Hours Display the projection time. Lamp Reminder Choose this function to show or to hide the warning message when...
User's Manual
Page 39
If a problem persists, please contact your display resolution setting is lower than or equal to the "Replacing the lamp" section. Make sure you have removed the lens cap and the projector is lower than or equal to change the monitor display you are ...not bent or broken. Check if the projection lamp has been securely installed. Verify the resolution setting is switched on the remote. If you are using . Partial, scrolling or incorrectly displayed image ...
If a problem persists, please contact your display resolution setting is lower than or equal to the "Replacing the lamp" section. Make sure you have removed the lens cap and the projector is lower than or equal to change the monitor display you are ...not bent or broken. Check if the projection lamp has been securely installed. Verify the resolution setting is switched on the remote. If you are using . Partial, scrolling or incorrectly displayed image ...
User's Manual
Page 42
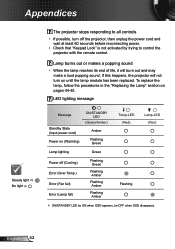
... LED be ON when OSD appears, be OFF when OSD disappears. LED lighting message Message Standby State (Input power cord) Power on until the lamp module has been replaced. Appendices The projector stops responding to all controls If possible, turn on (Warming) ON/STANDBY LED (Green/Amber) Amber Flashing Green Temp... least 60 seconds before reconnecting power. Check that "Keypad Lock" is not activated by trying to control the projector with the remote control. To replace the lamp, follow the procedures in the "Replacing the Lamp" section on pages 44-45. English 42
... LED be ON when OSD appears, be OFF when OSD disappears. LED lighting message Message Standby State (Input power cord) Power on until the lamp module has been replaced. Appendices The projector stops responding to all controls If possible, turn on (Warming) ON/STANDBY LED (Green/Amber) Amber Flashing Green Temp... least 60 seconds before reconnecting power. Check that "Keypad Lock" is not activated by trying to control the projector with the remote control. To replace the lamp, follow the procedures in the "Replacing the Lamp" section on pages 44-45. English 42

User's Manual
Page 43
Appendices On Screen Messages Temperature warning: Fan failed: Lamp warming: Out of display range: If the remote control does not work Check the operating angle of the remote control is within 7 m (±0&#... English Move to within ±15° both horizontally and vertically of one of the projector. Make sure the batteries are inserted correctly. Replace batteries if they are not any obstructions between the remote control and the projector.
Appendices On Screen Messages Temperature warning: Fan failed: Lamp warming: Out of display range: If the remote control does not work Check the operating angle of the remote control is within 7 m (±0&#... English Move to within ±15° both horizontally and vertically of one of the projector. Make sure the batteries are inserted correctly. Replace batteries if they are not any obstructions between the remote control and the projector.
User's Manual
Page 44
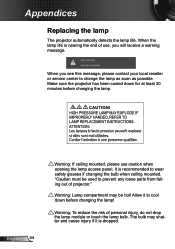
... or service center to prevent any loose parts from falling out of personal injury, do not drop the lamp module or touch the lamp bulb. Appendices Replacing the lamp The projector automatically detects the lamp life. When the lamp life is dropped. It is recommended to cool down for at least 30 minutes before changing the...
... or service center to prevent any loose parts from falling out of personal injury, do not drop the lamp module or touch the lamp bulb. Appendices Replacing the lamp The projector automatically detects the lamp life. When the lamp life is dropped. It is recommended to cool down for at least 30 minutes before changing the...
User's Manual
Page 45
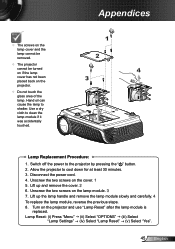
... not touch the glass area of the lamp. Lift up and remove the cover. 2 6. Appendices 1 2 4 3 Lamp Replacement Procedure: 1. Use a dry cloth to shatter. Allow the projector to the projector by pressing the " " button. 2. Lift up the lamp handle and remove the lamp module slowly and carefully. 4 To replace the lamp module, reverse the previous steps. 8. Switch off...
... not touch the glass area of the lamp. Lift up and remove the cover. 2 6. Appendices 1 2 4 3 Lamp Replacement Procedure: 1. Use a dry cloth to shatter. Allow the projector to the projector by pressing the " " button. 2. Lift up the lamp handle and remove the lamp module slowly and carefully. 4 To replace the lamp module, reverse the previous steps. 8. Switch off...


