

User's Manual
Page 1
... 11 Connect to Video Sources 12 Powering On/Off the Projector..........13 Powering On the Projector 13 Powering off the projector 14 Warning Indicator 14 Adjusting the Projected Image..........15 Adjusting the Projector's Height ........ 15 Adjusting the Projector's Focus.......... 16 Adjusting Projection Image Size......... 16 User Controls 18 Control Panel & Remote Control.......18 Control Panel 18 Remote Control 19 On-screen Display Menus 21 How to operate 21 Menu Tree 22 IMAGE 24 IMAGE | Advanced 26 DISPLAY 28 DISPLAY | 3D 30 SETUP 31 SETUP | Security 33 SETUP | Signal 35...
... 11 Connect to Video Sources 12 Powering On/Off the Projector..........13 Powering On the Projector 13 Powering off the projector 14 Warning Indicator 14 Adjusting the Projected Image..........15 Adjusting the Projector's Height ........ 15 Adjusting the Projector's Focus.......... 16 Adjusting Projection Image Size......... 16 User Controls 18 Control Panel & Remote Control.......18 Control Panel 18 Remote Control 19 On-screen Display Menus 21 How to operate 21 Menu Tree 22 IMAGE 24 IMAGE | Advanced 26 DISPLAY 28 DISPLAY | 3D 30 SETUP 31 SETUP | Security 33 SETUP | Signal 35...
User's Manual
Page 3
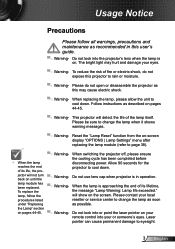
.... projector to change the lamp as soon under "Replacing as this user's guide. ▀■ Warning- Reset the "Lamp Reset" function from the on pages 44-45. ▀■ Warning- jector will show on the screen. Do not use lens cap when projector is in this may hurt and damage your local reseller or service center to rain or moisture. ▀■ Warning- the Lamp" section on -screen display "OPTIONS | Lamp Settings" menu...
.... projector to change the lamp as soon under "Replacing as this user's guide. ▀■ Warning- Reset the "Lamp Reset" function from the on pages 44-45. ▀■ Warning- jector will show on the screen. Do not use lens cap when projector is in this may hurt and damage your local reseller or service center to rain or moisture. ▀■ Warning- the Lamp" section on -screen display "OPTIONS | Lamp Settings" menu...
User's Manual
Page 13
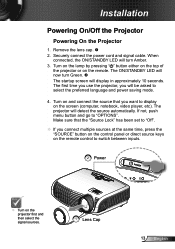
... "SOURCE" button on the control panel or direct source keys on the remote control to display on the remote. When connected, the ON/STANDBY LED will turn Green. The startup screen will now turn Amber. 3. Turn on the lamp by pressing " " button either on the top of the projector or on the screen (computer, notebook, video player, etc). Make sure that you will detect the source automatically. Securely connect the power cord and signal cable. The ON/STANDBY LED...
... "SOURCE" button on the control panel or direct source keys on the remote control to display on the remote. When connected, the ON/STANDBY LED will turn Green. The startup screen will now turn Amber. 3. Turn on the lamp by pressing " " button either on the top of the projector or on the screen (computer, notebook, video player, etc). Make sure that you will detect the source automatically. Securely connect the power cord and signal cable. The ON/STANDBY LED...
User's Manual
Page 14
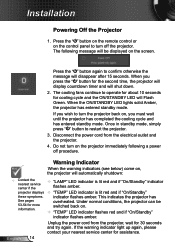
... confirm otherwise the message will shut down. 2. Press the " " button on the remote control or on the control panel to restart the projector. 3. Warning Indicator When the warning indicators (see below) come on . "TEMP" LED indicator flashes red and if "On/Standby" indicator flashes amber. Unplug the power cord from the electrical outlet and the projector. 4. This indicates the projector has See pages 53-54 for the second time, the projector will display countdown timer and will disappear...
... confirm otherwise the message will shut down. 2. Press the " " button on the remote control or on the control panel to restart the projector. 3. Warning Indicator When the warning indicators (see below) come on . "TEMP" LED indicator flashes red and if "On/Standby" indicator flashes amber. Unplug the power cord from the electrical outlet and the projector. 4. This indicates the projector has See pages 53-54 for the second time, the projector will display countdown timer and will disappear...
User's Manual
Page 18
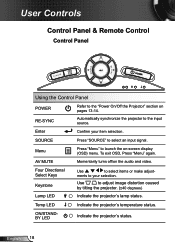
... the projector to adjust image distortion caused by tilting the projector. (±40 degrees) Indicate the projector's lamp status. To exit OSD, Press "Menu" again. ON/STANDBY LED Indicate the projector's status. User Controls Control Panel & Remote Control Control Panel POWER Using the Control Panel POWER RE-SYNC Refer to the "Power On/Off the Projector" section on -screen display (OSD) menu. Use to the input source. SOURCE Press "SOURCE" to select items or make adjust- Menu Press "Menu" to your item selection. Four Directional Select Keys Keystone Lamp LED Use to...
... the projector to adjust image distortion caused by tilting the projector. (±40 degrees) Indicate the projector's lamp status. To exit OSD, Press "Menu" again. ON/STANDBY LED Indicate the projector's status. User Controls Control Panel & Remote Control Control Panel POWER Using the Control Panel POWER RE-SYNC Refer to the "Power On/Off the Projector" section on -screen display (OSD) menu. Use to the input source. SOURCE Press "SOURCE" to select items or make adjust- Menu Press "Menu" to your item selection. Four Directional Select Keys Keystone Lamp LED Use to...
User's Manual
Page 22
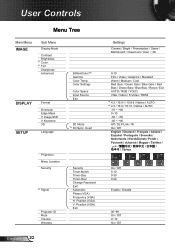
... Off 0-12 0-30 0-24 Enable / Disable 00~99 On / Off 0~10 On / Off User Controls Menu Tree Main Menu IMAGE Sub Menu Display Mode Contrast Brightness #1 Color #1 Tint Sharpness Advanced DISPLAY SETUP Format Overscan Edge Mask V Image Shift V Keystone 3D Language BrilliantColor™ Gamma Color Temp. Position (VGA) V. Color Settings Color Space Input Source Exit 3D Mode #4 3D Sync. Invert Projection Menu Location Security #5 Signal Projector ID Mute Volume Wireless English 22 Security Timer-Month Timer-Day Timer-Hour Change Password Exit Automatic Phase (VGA) Frequency (VGA) H.
... Off 0-12 0-30 0-24 Enable / Disable 00~99 On / Off 0~10 On / Off User Controls Menu Tree Main Menu IMAGE Sub Menu Display Mode Contrast Brightness #1 Color #1 Tint Sharpness Advanced DISPLAY SETUP Format Overscan Edge Mask V Image Shift V Keystone 3D Language BrilliantColor™ Gamma Color Temp. Position (VGA) V. Color Settings Color Space Input Source Exit 3D Mode #4 3D Sync. Invert Projection Menu Location Security #5 Signal Projector ID Mute Volume Wireless English 22 Security Timer-Month Timer-Day Timer-Hour Change Password Exit Automatic Phase (VGA) Frequency (VGA) H.
User's Manual
Page 23
User Controls Main Menu OPTIONS Sub Menu Source Lock High Altitude Information Hide Keypad Lock Background Color Test Pattern Advanced Lamp Settings Reset Direct Power On Auto Power Off (min) Sleep Timer (min) Exit Lamp Hours Lamp Reminder Brightness Mode Lamp Reset Exit Settings On / Off On / Off On / Off On / Off Black / Red / Blue / Green / White None / Grid / White Pattern On / Off 0-180 0-995 On / Off STD / BRIGHT Yes/No Please note that the on-screen display (OSD) menus...
User Controls Main Menu OPTIONS Sub Menu Source Lock High Altitude Information Hide Keypad Lock Background Color Test Pattern Advanced Lamp Settings Reset Direct Power On Auto Power Off (min) Sleep Timer (min) Exit Lamp Hours Lamp Reminder Brightness Mode Lamp Reset Exit Settings On / Off On / Off On / Off On / Off Black / Red / Blue / Green / White None / Grid / White Pattern On / Off 0-180 0-995 On / Off STD / BRIGHT Yes/No Please note that the on-screen display (OSD) menus...

User's Manual
Page 29
... size of an image. Press the to remove video encoding noise on the projection screen. If the image looks trapezoidal, this option can 't work at same time. Aspect ratio (source detected) Resize image WXGA model 4:3 1067 x 800 center 16:9 16:10 Native 1280 x 720 center 1280 x 800 center Resize image of native change to adjust image distortion vertically. User Controls WXGA 4:3: This format is for 4×3 input sources...
... size of an image. Press the to remove video encoding noise on the projection screen. If the image looks trapezoidal, this option can 't work at same time. Aspect ratio (source detected) Resize image WXGA model 4:3 1067 x 800 center 16:9 16:10 Native 1280 x 720 center 1280 x 800 center Resize image of native change to adjust image distortion vertically. User Controls WXGA 4:3: This format is for 4×3 input sources...
User's Manual
Page 31
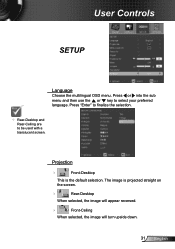
Press or into the sub menu and then use the or key to be used with a translucent screen. Press "Enter" to finalize the selection. Rear-Desktop and Rear-Ceiling are to select your preferred language. Projection Front-Desktop This is projected straight on the screen. Rear-Desktop When selected, the image will appear reversed. Front-Ceiling When selected, the image will turn upside down. 31 English The image is the default selection. User Controls SETUP Language Choose the multilingual OSD menu.
Press or into the sub menu and then use the or key to be used with a translucent screen. Press "Enter" to finalize the selection. Rear-Desktop and Rear-Ceiling are to select your preferred language. Projection Front-Desktop This is projected straight on the screen. Rear-Desktop When selected, the image will appear reversed. Front-Ceiling When selected, the image will turn upside down. 31 English The image is the default selection. User Controls SETUP Language Choose the multilingual OSD menu.

User's Manual
Page 33
... projector without password verification. Enter new password (4 digits in length) using the number buttons on the remote, then press " " to confirm. 33 English Enter new password again and press " " to confirm. 4. Change Password First time: 1. Once this time has elapsed you will be requested to be able to switch on the remote to enter your new password and then press " " key to confirm your password again. User Controls SETUP | Security Pass-code default...
... projector without password verification. Enter new password (4 digits in length) using the number buttons on the remote, then press " " to confirm. 33 English Enter new password again and press " " to confirm. 4. Change Password First time: 1. Once this time has elapsed you will be requested to be able to switch on the remote to enter your new password and then press " " key to confirm your password again. User Controls SETUP | Security Pass-code default...

User's Manual
Page 38
... the projector lamp which will switch to increase the brightness. User Controls OPTIONS | Lamp Settings Lamp Hours Display the projection time. Lamp Reset Reset the lamp hour counter after replacing the lamp. English 38 The message will appear 30 hours before suggested replacement of lamp. When ambient temperature is displayed. Lamp Reminder Choose this function to show or to hide the warning message when the changing lamp message is over 35°C in operating, the projector will lower power consumption and extend the lamp life. ...
... the projector lamp which will switch to increase the brightness. User Controls OPTIONS | Lamp Settings Lamp Hours Display the projection time. Lamp Reset Reset the lamp hour counter after replacing the lamp. English 38 The message will appear 30 hours before suggested replacement of lamp. When ambient temperature is displayed. Lamp Reminder Choose this function to show or to hide the warning message when the changing lamp message is over 35°C in operating, the projector will lower power consumption and extend the lamp life. ...
User's Manual
Page 39
...-SYNC" on -screen Ensure all the cables and power connections are correctly and securely connected as described in the "Installation" section. Ensure all the pins of connectors are using . Select the "Settings" tab. 3. Verify the resolution setting is still not projecting the whole image, you are not bent or broken. Check if the projection lamp has been securely installed. Open the "My Computer" icon, the "Control Panel...
...-SYNC" on -screen Ensure all the cables and power connections are correctly and securely connected as described in the "Installation" section. Ensure all the pins of connectors are using . Select the "Settings" tab. 3. Verify the resolution setting is still not projecting the whole image, you are not bent or broken. Check if the projection lamp has been securely installed. Open the "My Computer" icon, the "Control Panel...
User's Manual
Page 41
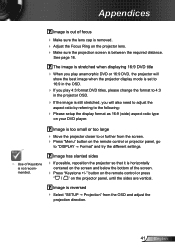
... Select "SETUP Projection" from the screen. Press "Menu" button on the remote control or projector panel, go to the following: Please setup the display format as 16:9 (wide) aspect ratio type on your DVD player. Image is horizontally centered on the screen and below the bottom of the screen. Press "Keystone +/-" button on the remote control or press " / " on the projector panel, until the sides...
... Select "SETUP Projection" from the screen. Press "Menu" button on the remote control or projector panel, go to the following: Please setup the display format as 16:9 (wide) aspect ratio type on your DVD player. Image is horizontally centered on the screen and below the bottom of the screen. Press "Keystone +/-" button on the remote control or press " / " on the projector panel, until the sides...
User's Manual
Page 42
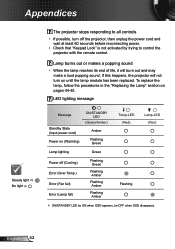
... out and may make a loud popping sound. To replace the lamp, follow the procedures in the "Replacing the Lamp" section on (Warming) ON/STANDBY LED (Green/Amber) Amber Flashing Green Temp-LED (Red) Lamp-LED (Red) Lamp lighting Green Power off the projector, then unplug the power cord and wait at least 60 seconds before reconnecting power. Check that "Keypad Lock" is not activated by trying to control the projector with the remote control. LED lighting message Message Standby State (Input power cord) Power on pages 44-45.
... out and may make a loud popping sound. To replace the lamp, follow the procedures in the "Replacing the Lamp" section on (Warming) ON/STANDBY LED (Green/Amber) Amber Flashing Green Temp-LED (Red) Lamp-LED (Red) Lamp lighting Green Power off the projector, then unplug the power cord and wait at least 60 seconds before reconnecting power. Check that "Keypad Lock" is not activated by trying to control the projector with the remote control. LED lighting message Message Standby State (Input power cord) Power on pages 44-45.
User's Manual
Page 45
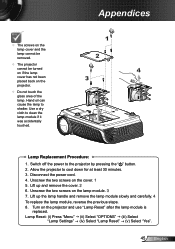
Use a dry cloth to the projector by pressing the " " button. 2. Disconnect the power cord. 4. Lamp Reset: (i) Press "Menu" (ii) Select "OPTIONS" (iii) Select "Lamp Settings" (iv) Select "Lamp Reset" (v) Select "Yes". 45 English Lift up the lamp handle and remove the lamp module slowly and carefully. 4 To replace the lamp module, reverse the previous steps. 8. Turn on the cover. 1 5. Switch off the power to clean the lamp module if it...
Use a dry cloth to the projector by pressing the " " button. 2. Disconnect the power cord. 4. Lamp Reset: (i) Press "Menu" (ii) Select "OPTIONS" (iii) Select "Lamp Settings" (iv) Select "Lamp Reset" (v) Select "Yes". 45 English Lift up the lamp handle and remove the lamp module slowly and carefully. 4 To replace the lamp module, reverse the previous steps. 8. Turn on the cover. 1 5. Switch off the power to clean the lamp module if it...

User's Manual
Page 51
Appendices ~XX105 1 7E 30 30 31 30 35 20 31 0D Advanced Direct Power On On ~XX105 0 7E 30 30 31 30 35 20 30 0D Off (0/2 for backward compatible) ~XX106 n 7E 30 30 31 30 36 20 a 0D Auto Power Off (min) n = 0 (a=30) ~ 180 (a=31 38 30) step:5 ~XX107 n 7E 30 30 31 30 37 20 a 0D Sleep Timer (min) n = 0 (a=30) ~ 995 (a=39 39 39) step:5 ~XX114 1 7E 30 30 31 31 34 20 31 0D Power Mode(Standby) Eco.(
Appendices ~XX105 1 7E 30 30 31 30 35 20 31 0D Advanced Direct Power On On ~XX105 0 7E 30 30 31 30 35 20 30 0D Off (0/2 for backward compatible) ~XX106 n 7E 30 30 31 30 36 20 a 0D Auto Power Off (min) n = 0 (a=30) ~ 180 (a=31 38 30) step:5 ~XX107 n 7E 30 30 31 30 37 20 a 0D Sleep Timer (min) n = 0 (a=30) ~ 995 (a=39 39 39) step:5 ~XX114 1 7E 30 30 31 31 34 20 31 0D Power Mode(Standby) Eco.(

ProtocolFunction
Page 4
Appendices ~XX105 1 7E 30 30 31 30 35 20 31 0D Advanced Direct Power On On ~XX105 0 7E 30 30 31 30 35 20 30 0D Off (0/2 for backward compatible) ~XX106 n 7E 30 30 31 30 36 20 a 0D Auto Power Off (min) n = 0 (a=30) ~ 180 (a=31 38 30) step:5 ~XX107 n 7E 30 30 31 30 37 20 a 0D Sleep Timer (min) n = 0 (a=30) ~ 995 (a=39 39 39) step:5 ~XX114 1 7E 30 30 31 31 34 20 31 0D Power Mode(Standby) Eco.(
Appendices ~XX105 1 7E 30 30 31 30 35 20 31 0D Advanced Direct Power On On ~XX105 0 7E 30 30 31 30 35 20 30 0D Off (0/2 for backward compatible) ~XX106 n 7E 30 30 31 30 36 20 a 0D Auto Power Off (min) n = 0 (a=30) ~ 180 (a=31 38 30) step:5 ~XX107 n 7E 30 30 31 30 37 20 a 0D Sleep Timer (min) n = 0 (a=30) ~ 995 (a=39 39 39) step:5 ~XX114 1 7E 30 30 31 31 34 20 31 0D Power Mode(Standby) Eco.(
Datasheet
Page 1
... HD consoles and gaming PCs, the GT720 energizes games with a high contrast ratio of 3000:1 Projects a 150" diagonal image less than eight feet away Supports resolutions up to 480i Projection Lens F=2.55, f=10.19 Projection Method Front, Rear, Ceiling Mount, Table Top User Controls Complete On-Screen Menu Adjustments in , Stereo Audio-out & RS-232 NO FILTER REQUIRED Specifications Display Technology 0.65" DC3 DMD DLP® Technology by Texas Instruments...
... HD consoles and gaming PCs, the GT720 energizes games with a high contrast ratio of 3000:1 Projects a 150" diagonal image less than eight feet away Supports resolutions up to 480i Projection Lens F=2.55, f=10.19 Projection Method Front, Rear, Ceiling Mount, Table Top User Controls Complete On-Screen Menu Adjustments in , Stereo Audio-out & RS-232 NO FILTER REQUIRED Specifications Display Technology 0.65" DC3 DMD DLP® Technology by Texas Instruments...
Brochure
Page 1
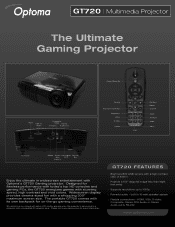
...-232 www.optoma.com GT720 | Multimedia Projector The Ultimate Gaming Projector HDMI VGA-In/ YPbPr Composite Video Stereo S-Video Audio-Out Power/Stand By Source Keystone Correction Brightness HDMI S-Video Freeze VGA Re-Sync Select Volume Zoom AV Mute Video Menu AC Power RS232 Stereo Kensington Security RCA Lock Bar Audio-In Enjoy the ultimate in widescreen entertainment with a high contrast ratio of 3000:1 ❏ Projects a 150" diagonal image less than eight feet away ❏ Supports resolutions up...
...-232 www.optoma.com GT720 | Multimedia Projector The Ultimate Gaming Projector HDMI VGA-In/ YPbPr Composite Video Stereo S-Video Audio-Out Power/Stand By Source Keystone Correction Brightness HDMI S-Video Freeze VGA Re-Sync Select Volume Zoom AV Mute Video Menu AC Power RS232 Stereo Kensington Security RCA Lock Bar Audio-In Enjoy the ultimate in widescreen entertainment with a high contrast ratio of 3000:1 ❏ Projects a 150" diagonal image less than eight feet away ❏ Supports resolutions up...
Brochure
Page 2
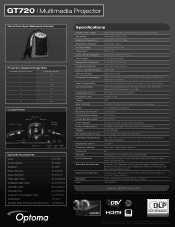
...Panel AV Mute Menu Keystone + Source Re-Sync Power/ Standby Four Directional Keys Select Keystone - Power Lamp Temp LED LED LED Optional Accessories Lamp: BL-FP180E Remote Control: BR-3052N Backpack: BK-4029 Power Cord (1m): BC-PUPIXY01 Power Cord (11m): BC-PUPIXY11 HDMI Cable (7.5m): BC-HMHMXX08 Composite Cable (1.8m): BC-COCOXX02 VGA Cable (1.8m): BC-VGVGXX02 VGA Cable (5m): BC-VGVGXX05 Component to VGA Adapter Cable: BC-CRVGYX00 Ceiling Mount: BM-5001U 92" Matte White 16:9 Manual Pull-Down Screen: DS-9092PMG+ Specifications Display Technology: Resolution...
...Panel AV Mute Menu Keystone + Source Re-Sync Power/ Standby Four Directional Keys Select Keystone - Power Lamp Temp LED LED LED Optional Accessories Lamp: BL-FP180E Remote Control: BR-3052N Backpack: BK-4029 Power Cord (1m): BC-PUPIXY01 Power Cord (11m): BC-PUPIXY11 HDMI Cable (7.5m): BC-HMHMXX08 Composite Cable (1.8m): BC-COCOXX02 VGA Cable (1.8m): BC-VGVGXX02 VGA Cable (5m): BC-VGVGXX05 Component to VGA Adapter Cable: BC-CRVGYX00 Ceiling Mount: BM-5001U 92" Matte White 16:9 Manual Pull-Down Screen: DS-9092PMG+ Specifications Display Technology: Resolution...


