

User Manual
Page 1
... the Remote Control Batteries ...16 Setup and Operation...17 Connecting Input Devices...17 Starting and Shutting down the Projector ...19 Setting an Access Password (Security Lock) ...21 Adjusting the Projector Level ...23 Adjusting the Zoom, Focus and Keystone...24 Adjusting the Volume ...24 OSD Menu Controls ...25 Setting the OSD Language...26 Menu Setting ...27 OSD Menu Overview ...27 Image Menu ...28 Display Menu...30 Setup Menu ...32 Color setting Menu ...35 Language Menu ...36 Management Menu ...37 Appendices...39 Replacing the Projection Lamp ...39 Resetting the Lamp ...42 Cleaning the...
... the Remote Control Batteries ...16 Setup and Operation...17 Connecting Input Devices...17 Starting and Shutting down the Projector ...19 Setting an Access Password (Security Lock) ...21 Adjusting the Projector Level ...23 Adjusting the Zoom, Focus and Keystone...24 Adjusting the Volume ...24 OSD Menu Controls ...25 Setting the OSD Language...26 Menu Setting ...27 OSD Menu Overview ...27 Image Menu ...28 Display Menu...30 Setup Menu ...32 Color setting Menu ...35 Language Menu ...36 Management Menu ...37 Appendices...39 Replacing the Projection Lamp ...39 Resetting the Lamp ...42 Cleaning the...

User Manual
Page 3
... from the projection lamp, there are used on the unit and in this example: "Push the Menu button on the unit. 3 Follow all warnings and cautions in this manual for pointing out items on the unit case. Important: It is on Optoma product. The following styles are no user-serviceable parts in the eyes. Caution: Alerts you to open the unit case...
... from the projection lamp, there are used on the unit and in this example: "Push the Menu button on the unit. 3 Follow all warnings and cautions in this manual for pointing out items on the unit case. Important: It is on Optoma product. The following styles are no user-serviceable parts in the eyes. Caution: Alerts you to open the unit case...

User Manual
Page 4
.... Refer to cool for about one hour. Important Recycle Instructions: Lamp(s) inside this procedure. Replacing the Lamp Replacing the lamp can be hazardous if not disposed of foot traffic. This product may contain other electronic waste that can be in use the supplied power cord. For lamp specific disposal information check WWW.LAMPRECYCLE.ORG. Regulatory Warnings Before installing and using the projector, read the regulatory notices in accordance...
.... Refer to cool for about one hour. Important Recycle Instructions: Lamp(s) inside this procedure. Replacing the Lamp Replacing the lamp can be hazardous if not disposed of foot traffic. This product may contain other electronic waste that can be in use the supplied power cord. For lamp specific disposal information check WWW.LAMPRECYCLE.ORG. Regulatory Warnings Before installing and using the projector, read the regulatory notices in accordance...
User Manual
Page 5
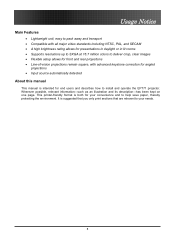
... SECAM • A high brightness rating allows for presentations in daylight or in lit rooms • Supports resolutions up to SXGA at 16.7 million colors to deliver crisp, clear images • Flexible setup allows for front and rear projections • Line-of-vision projections remain square, with advanced keystone correction for angled projections • Input source automatically detected About this manual This manual is intended...
... SECAM • A high brightness rating allows for presentations in daylight or in lit rooms • Supports resolutions up to SXGA at 16.7 million colors to deliver crisp, clear images • Flexible setup allows for front and rear projections • Line-of-vision projections remain square, with advanced keystone correction for angled projections • Input source automatically detected About this manual This manual is intended...
User Manual
Page 6
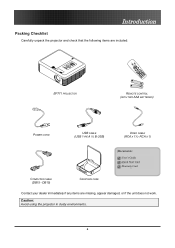
Caution: Avoid using the projector in dusty environments. 6 Introduction Packing Checklist Introduction Carefully unpack the projector and check that the following items are missing, appear damaged, or if the unit does not work. DB15) CARRYING CASE Contact your dealer immediately if any items are included: EP771 PROJECTOR REMOTE CONTROL (WITH TWO AAA BATTERIES) POWER CORD USB CABLE (USB TYPE A TO B USB) VIDEO CABLE (RCA X 1TO RCA X 1) Documents: User's Guide Quick Start Card Warranty Card COMPUTER CABLE (DB15 -
Caution: Avoid using the projector in dusty environments. 6 Introduction Packing Checklist Introduction Carefully unpack the projector and check that the following items are missing, appear damaged, or if the unit does not work. DB15) CARRYING CASE Contact your dealer immediately if any items are included: EP771 PROJECTOR REMOTE CONTROL (WITH TWO AAA BATTERIES) POWER CORD USB CABLE (USB TYPE A TO B USB) VIDEO CABLE (RCA X 1TO RCA X 1) Documents: User's Guide Quick Start Card Warranty Card COMPUTER CABLE (DB15 -
User Manual
Page 7
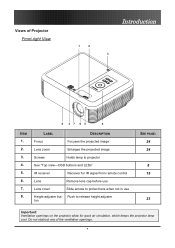
... height adjuster ton SEE PAGE: 24 24 8 15 23 Important: Ventilation openings on the projector allow for IR signal from remote control Lens Remove lens cap before use Lens cover Slide across to projector See "Top view-OSD buttons and LEDs" IR receiver Receiver for good air circulation, which keeps the projector lamp cool. Views of the ventilation openings. 7 LABEL DESCRIPTION Focus Focuses the projected image Lens zoom Enlarges the projected image Screws Holds lamp to protect lens when not in use Height-adjuster but...
... height adjuster ton SEE PAGE: 24 24 8 15 23 Important: Ventilation openings on the projector allow for IR signal from remote control Lens Remove lens cap before use Lens cover Slide across to projector See "Top view-OSD buttons and LEDs" IR receiver Receiver for good air circulation, which keeps the projector lamp cool. Views of the ventilation openings. 7 LABEL DESCRIPTION Focus Focuses the projected image Lens zoom Enlarges the projected image Screws Holds lamp to protect lens when not in use Height-adjuster but...
User Manual
Page 8
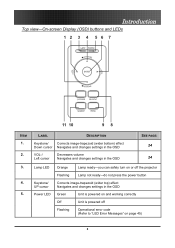
... PAGE: 24 24 Lamp LED Keystone/ UP cursor Power LED Orange Lamp ready-you can safely turn on or off the projector Flashing Lamp not ready-do not press the power button Corrects image-trapezoid (wider top) effect Navigates and changes settings in the OSD Green Unit is powered on and working correctly Off Unit is powered off Flashing Operational error code (Refer to "LED Error Messages" on page 45) 8 Introduction Top view-On-screen Display (OSD) buttons and LEDs 12 3 4 56...
... PAGE: 24 24 Lamp LED Keystone/ UP cursor Power LED Orange Lamp ready-you can safely turn on or off the projector Flashing Lamp not ready-do not press the power button Corrects image-trapezoid (wider top) effect Navigates and changes settings in the OSD Green Unit is powered on and working correctly Off Unit is powered off Flashing Operational error code (Refer to "LED Error Messages" on page 45) 8 Introduction Top view-On-screen Display (OSD) buttons and LEDs 12 3 4 56...
User Manual
Page 13
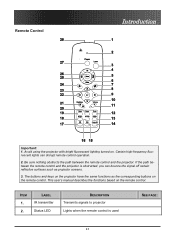
... between the remote control and the projector is used SEE PAGE: 13 The buttons and keys on the projector have the same functions as projector screens. 3. LABEL IR transmitter Status LED DESCRIPTION Transmits signals to projector Lights when the remote control is obstructed, you can disrupt remote control operation. 2. If the path between the remote control and the projector. ITEM 1. 2. Remote Control Introduction Important: 1. Avoid using the projector with bright fluorescent lighting turned on the remote control. This user's manual describes...
... between the remote control and the projector is used SEE PAGE: 13 The buttons and keys on the projector have the same functions as projector screens. 3. LABEL IR transmitter Status LED DESCRIPTION Transmits signals to projector Lights when the remote control is obstructed, you can disrupt remote control operation. 2. If the path between the remote control and the projector. ITEM 1. 2. Remote Control Introduction Important: 1. Avoid using the projector with bright fluorescent lighting turned on the remote control. This user's manual describes...
User Manual
Page 14
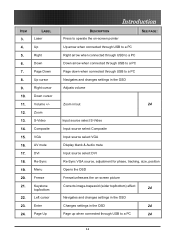
... when connected through USB to a PC Page down when connected through USB to a PC Navigates and changes settings in the OSD Adjusts volume Zoom in/out 24 Input source select S-Video Input source select Composite Input source select VGA Display blank & Audio mute Input source select DVI Re-Sync VGA source, adjustment for phase, tracking, size, position Opens the OSD Freeze/unfreezes the on-screen picture Corrects image-trapezoid (wider top/bottom) effect 24 Navigates and changes settings in the OSD Changes settings...
... when connected through USB to a PC Page down when connected through USB to a PC Navigates and changes settings in the OSD Adjusts volume Zoom in/out 24 Input source select S-Video Input source select Composite Input source select VGA Display blank & Audio mute Input source select DVI Re-Sync VGA source, adjustment for phase, tracking, size, position Opens the OSD Freeze/unfreezes the on-screen picture Corrects image-trapezoid (wider top/bottom) effect 24 Navigates and changes settings in the OSD Changes settings...

User Manual
Page 17
... video cable (supplied) from the computer's audio-out connector. Audio-in - Check the user manual of the connecting device to a monitor. ITEM A B C D E F G H I and DVI-D are supported. Connect the audio cable (not supplied) from remote control. VGA out Connect a VGA cable (supplied) to confirm it has the appropriate output connector. Audio-out Audio loop-through 17 Receiver DVI-D Connect the computer cable from a video device. S-video Connect the supplied S-video cable (not supplied) from a computer. Setup and Operation Connecting Input Devices Setup...
... video cable (supplied) from the computer's audio-out connector. Audio-in - Check the user manual of the connecting device to a monitor. ITEM A B C D E F G H I and DVI-D are supported. Connect the audio cable (not supplied) from remote control. VGA out Connect a VGA cable (supplied) to confirm it has the appropriate output connector. Audio-out Audio loop-through 17 Receiver DVI-D Connect the computer cable from a video device. S-video Connect the supplied S-video cable (not supplied) from a computer. Setup and Operation Connecting Input Devices Setup...

User Manual
Page 18
ITEM LABEL USB 12V RS-232 Setup and Operation DESCRIPTION Connect the supplied USB cable from the screen to this connector. Warning: As a safety precaution, disconnect all power to match the screen aspect ratio. When connected, the screen automatically adjusts vertically to the projector and connecting devices before making connections. 18 Reserved for USB mouse function and firmware upgrades. Connect a 12-volt trigger cable from a computer for installation control.
ITEM LABEL USB 12V RS-232 Setup and Operation DESCRIPTION Connect the supplied USB cable from the screen to this connector. Warning: As a safety precaution, disconnect all power to match the screen aspect ratio. When connected, the screen automatically adjusts vertically to the projector and connecting devices before making connections. 18 Reserved for USB mouse function and firmware upgrades. Connect a 12-volt trigger cable from a computer for installation control.

User Manual
Page 19
... "Setting an Access Password (Security Lock)" on the connected devices. 4. The projector splash screen displays and connected devices are supported through the VGA connector.) Setup and Operation 6. If the connected device is enabled. 5. The projector prepares for shutdown and a "Wait a moment please..." Switch [B] from off the projector, press the Power button. The POWER and LAMP LEDs on the projector turn on ( - ) 3. Ensure the LAMP LED is connected, press the Source button repeatedly to on . If more than one input...
... "Setting an Access Password (Security Lock)" on the connected devices. 4. The projector splash screen displays and connected devices are supported through the VGA connector.) Setup and Operation 6. If the connected device is enabled. 5. The projector prepares for shutdown and a "Wait a moment please..." Switch [B] from off the projector, press the Power button. The POWER and LAMP LEDs on the projector turn on ( - ) 3. Ensure the LAMP LED is connected, press the Source button repeatedly to on . If more than one input...
User Manual
Page 24
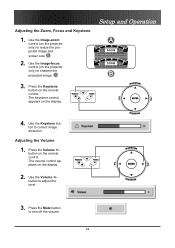
... to sharpen the projected image. Adjusting the Volume 1. Use the Image-focus control (on the display. 2. Press the Keystone button on the display. Use the Keystone button to adjust the level. 3. The keystone control appears on the remote control. Setup and Operation 4. Use the Volume +/button to correct image distortion. Press the Mute button to resize the projected image and screen size B . 2. Press the Volume +/button on the projector only) to turn off the volume. 24 Adjusting the Zoom, Focus and Keystone 1. Use the Image-zoom control (on the remote control.
... to sharpen the projected image. Adjusting the Volume 1. Use the Image-focus control (on the display. 2. Press the Keystone button on the display. Use the Keystone button to adjust the level. 3. The keystone control appears on the remote control. Setup and Operation 4. Use the Volume +/button to correct image distortion. Press the Mute button to resize the projected image and screen size B . 2. Press the Volume +/button on the projector only) to turn off the volume. 24 Adjusting the Zoom, Focus and Keystone 1. Use the Image-zoom control (on the remote control.
User Manual
Page 29
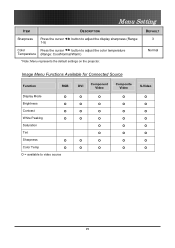
DEFAULT 3 Normal Image Menu Functions Available for Connected Source Function RGB Display Mode O Brightness O Contrast O White Peaking O Saturation Tint Sharpness O Color Temp O O = available to adjust the color temperature Temperature (Range: Cool/Normal/Warm) *Note: Menu represents the default settings on the projector. Menu Setting ITEM DESCRIPTION Sharpness Press the cursor 1-5) button to adjust the display sharpness (Range: Color Press the cursor button to video source DVI Component Video Composite Video O O O O O O O O O O O O O O O O O...
DEFAULT 3 Normal Image Menu Functions Available for Connected Source Function RGB Display Mode O Brightness O Contrast O White Peaking O Saturation Tint Sharpness O Color Temp O O = available to adjust the color temperature Temperature (Range: Cool/Normal/Warm) *Note: Menu represents the default settings on the projector. Menu Setting ITEM DESCRIPTION Sharpness Press the cursor 1-5) button to adjust the display sharpness (Range: Color Press the cursor button to video source DVI Component Video Composite Video O O O O O O O O O O O O O O O O O...

User Manual
Page 32
... DEFAULT button to choose from four projection methods: Desktop mount, front of screen Desktop front Desktop mount, rear of screen Ceiling mount, front of screen Ceiling mount, rear of screen Video Type Audio Input Press the cursor button to confirm the new setting. Press to change values for settings, and then press Enter or to select the video standard (Range: Auto - SECAM) Press the cursor channels. Menu Setting Setup Menu Press the Menu button to toggle between PC and Video input Auto Data Source...
... DEFAULT button to choose from four projection methods: Desktop mount, front of screen Desktop front Desktop mount, rear of screen Ceiling mount, front of screen Ceiling mount, rear of screen Video Type Audio Input Press the cursor button to confirm the new setting. Press to change values for settings, and then press Enter or to select the video standard (Range: Auto - SECAM) Press the cursor channels. Menu Setting Setup Menu Press the Menu button to toggle between PC and Video input Auto Data Source...

User Manual
Page 34
Menu Setting Setup Menu Functions Available for Connected Source Function RGB Projection Type O Video Type Audio Input O Volume O Source Lock O Auto Power Off O Direct Power On O Lamp Mode O Fan Mode O O = available video source DVI Component Video Composite Video O O O O O O O O O O O O O O O O O O O O O O O O O S-Video O O O O O O O O O 34
Menu Setting Setup Menu Functions Available for Connected Source Function RGB Projection Type O Video Type Audio Input O Volume O Source Lock O Auto Power Off O Direct Power On O Lamp Mode O Fan Mode O O = available video source DVI Component Video Composite Video O O O O O O O O O O O O O O O O O O O O O O O O O S-Video O O O O O O O O O 34
User Manual
Page 35
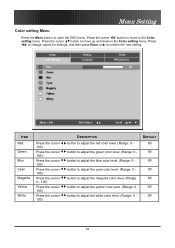
... button to confirm the new setting. DEFAULT 80 button to adjust the green color level. (Range: 0 - 80 button to adjust the blue color level. (Range: 0 - 80 button to adjust the cyan color level. (Range: 0 - 80 button to adjust the magenta color level. (Range: 80 button to adjust the yellow color level. (Range: 0 - 80 button to open the OSD menu. Menu Setting Color setting Menu Press the Menu button to adjust the white color level. (Range: 0 - 80 35 Press the cursor button to the Color setting menu. Press the cursor button...
... button to confirm the new setting. DEFAULT 80 button to adjust the green color level. (Range: 0 - 80 button to adjust the blue color level. (Range: 0 - 80 button to adjust the cyan color level. (Range: 0 - 80 button to adjust the magenta color level. (Range: 80 button to adjust the yellow color level. (Range: 0 - 80 button to open the OSD menu. Menu Setting Color setting Menu Press the Menu button to adjust the white color level. (Range: 0 - 80 35 Press the cursor button to the Color setting menu. Press the cursor button...

User Manual
Page 44
... useful when calling for technical support or for assistance. Check the following before proceeding to the problem-specific solutions. • Use some other electrical device to confirm that the electrical outlet is working. • Ensure the projector is turned on. • Ensure all connections are securely attached. • Ensure the attached device is turned on the notebook.) Tips for Troubleshooting In each problem-specific...
... useful when calling for technical support or for assistance. Check the following before proceeding to the problem-specific solutions. • Use some other electrical device to confirm that the electrical outlet is working. • Ensure the projector is turned on. • Ensure all connections are securely attached. • Ensure the attached device is turned on the notebook.) Tips for Troubleshooting In each problem-specific...

User Manual
Page 46
... is clean. Adjust the Color Temperature and Gamma settings on the Utility menu of the OSD to the screen as perpendicular to the default settings. 2. Ensure the power source is reversed or upside down Check the Projection setting on the Main menu of the projected image does not match the source image. Put the old lamp back in the correct order. Press the Auto button on the projector. 2. Problem: The image is good by a connected PC's video card, connect...
... is clean. Adjust the Color Temperature and Gamma settings on the Utility menu of the OSD to the screen as perpendicular to the default settings. 2. Ensure the power source is reversed or upside down Check the Projection setting on the Main menu of the projected image does not match the source image. Put the old lamp back in the correct order. Press the Auto button on the projector. 2. Problem: The image is good by a connected PC's video card, connect...

User Manual
Page 47
... path between remote and sensor is distorted 1. Check the audio cable connection. 4. Have the projector serviced. 47 Adjust the volume on the projector. 2. Test the source audio output with other Infrared-enabled devices in the room. 4. Replace the batteries. 6. Have the projector serviced. Turn off other speakers. 5. Direct the remote control towards remote sensor on the remote control. 2. Check the battery polarity. 5. Turn off any fluorescent lights in the vicinity. 7. Audio Problems Problem: There is no sound 1.
... path between remote and sensor is distorted 1. Check the audio cable connection. 4. Have the projector serviced. 47 Adjust the volume on the projector. 2. Test the source audio output with other Infrared-enabled devices in the room. 4. Replace the batteries. 6. Have the projector serviced. Turn off other speakers. 5. Direct the remote control towards remote sensor on the remote control. 2. Check the battery polarity. 5. Turn off any fluorescent lights in the vicinity. 7. Audio Problems Problem: There is no sound 1.


