

User Manual
Page 1
... Notice 2 Precautions ...2 Introduction 4 Product Features 4 Package Overview 5 Product Overview 6 Main Unit ...6 Control Panel ...7 Connection Ports ...8 Remote Control ...9 Installation 10 Connecting the Projector 10 Powering On/Off the Projector 11 Powering On the Projector 11 Powering Off the projector 12 Warning...the Projector Image Height 13 Adjusting the Projector Zoom / Focus 14 Adjusting Projected Image Size 14 User Controls 15 Control Panel & Remote Control 15 On-Screen Display Menus 18 How to operate ...18 Language ...19 Image-I ...20 Image-II (Computer Mode 22 Image...
... Notice 2 Precautions ...2 Introduction 4 Product Features 4 Package Overview 5 Product Overview 6 Main Unit ...6 Control Panel ...7 Connection Ports ...8 Remote Control ...9 Installation 10 Connecting the Projector 10 Powering On/Off the Projector 11 Powering On the Projector 11 Powering Off the projector 12 Warning...the Projector Image Height 13 Adjusting the Projector Zoom / Focus 14 Adjusting Projected Image Size 14 User Controls 15 Control Panel & Remote Control 15 On-Screen Display Menus 18 How to operate ...18 Language ...19 Image-I ...20 Image-II (Computer Mode 22 Image...
User Manual
Page 4
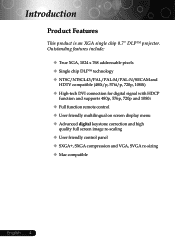
... (480i/p, 576i/p, 720p, 1080i) ‹ High-tech DVI connection for digital signal with HDCP function and supports 480p, 576p, 720p and 1080i ‹ Full function remote control ‹ User friendly multilingual on screen display menu ‹ Advanced digital keystone correction and high quality full screen image re-scaling ‹ User friendly...
... (480i/p, 576i/p, 720p, 1080i) ‹ High-tech DVI connection for digital signal with HDCP function and supports 480p, 576p, 720p and 1080i ‹ Full function remote control ‹ User friendly multilingual on screen display menu ‹ Advanced digital keystone correction and high quality full screen image re-scaling ‹ User friendly...

User Manual
Page 6
Focus Ring 2. Elevator Foot 6. Power Socket 9. Control Panel Zoom Lens 4. Connection Ports 8. Elevator Button 5. Introduction Product Overview Main Unit 2 1 3 6 4 5 9 6 7 8 English ... 6 1. Remote Control Receiver 7. Zoom Ring 3.
Focus Ring 2. Elevator Foot 6. Power Socket 9. Control Panel Zoom Lens 4. Connection Ports 8. Elevator Button 5. Introduction Product Overview Main Unit 2 1 3 6 4 5 9 6 7 8 English ... 6 1. Remote Control Receiver 7. Zoom Ring 3.
User Manual
Page 8
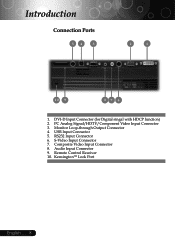
DVI-D Input Connector (for Digital singal with HDCP function) 2. Remote Control Receiver 10. USB Input Connector 5. KensingtonTM Lock Port English ... 8 Monitor Loop-through Output Connector 4. Audio Input Connector 9. Composite Video Input Connector 8. PC Analog Signal/HDTV/Component Video Input Connector 3. Introduction Connection Ports 54 3 2 1 10 9 87 6 1. RS232 Input Connector 6. S-Video Input Connector 7.
DVI-D Input Connector (for Digital singal with HDCP function) 2. Remote Control Receiver 10. USB Input Connector 5. KensingtonTM Lock Port English ... 8 Monitor Loop-through Output Connector 4. Audio Input Connector 9. Composite Video Input Connector 8. PC Analog Signal/HDTV/Component Video Input Connector 3. Introduction Connection Ports 54 3 2 1 10 9 87 6 1. RS232 Input Connector 6. S-Video Input Connector 7.

User Manual
Page 15
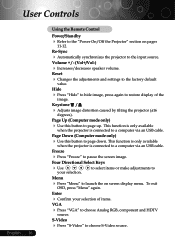
.... Auto Image 4 Automatically synchronizes the projector to choose RGB, S-Video, Composite Video and Component-p, Component-i, HDTV sources. Control Panel Remote Control Using the Control Panel Power/Standby 4 Refer to control the functions: Remote Control and Control Panel. Keystone /Keystone 4 Adjusts image degrees). Menu 4 Press "Menu" to launch the on pages Source 4 Press...
.... Auto Image 4 Automatically synchronizes the projector to choose RGB, S-Video, Composite Video and Component-p, Component-i, HDTV sources. Control Panel Remote Control Using the Control Panel Power/Standby 4 Refer to control the functions: Remote Control and Control Panel. Keystone /Keystone 4 Adjusts image degrees). Menu 4 Press "Menu" to launch the on pages Source 4 Press...
User Manual
Page 16
... is connected to the input source. Four Directional Select Keys 4 Use your selection of the Keystone / 4 Adjusts image degrees). User Controls English ... 16 Using the Remote Control Power/Standby 4 Refer to choose S-Video source. Reset 4 Changes value. to hide image, press again to a computer via an USB cable. Page Down (Computer...
... is connected to the input source. Four Directional Select Keys 4 Use your selection of the Keystone / 4 Adjusts image degrees). User Controls English ... 16 Using the Remote Control Power/Standby 4 Refer to choose S-Video source. Reset 4 Changes value. to hide image, press again to a computer via an USB cable. Page Down (Computer...

User Manual
Page 18
... will return to select any item in the sub menu and adjust as described above. 5. To exit, press "Menu"again. While making a selection on the Remote Control or Control Panel. 2. The OSD menu will close and the projector will automatically detect the source. To open the OSD menu, press "Menu" on...
... will return to select any item in the sub menu and adjust as described above. 5. To exit, press "Menu"again. While making a selection on the Remote Control or Control Panel. 2. The OSD menu will close and the projector will automatically detect the source. To open the OSD menu, press "Menu" on...
User Manual
Page 30
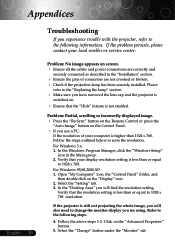
..." you experience trouble with the projector, refer to 1024 x 768 resolution. Problem: Partial, scrolling or incorrectly displayed image. 4 Press the "Re-Sync" button on the Remote Control or press the "Auto Image" button on the "Display" icon. 2. Verify that the resolution setting is less than or equal to the following steps...
..." you experience trouble with the projector, refer to 1024 x 768 resolution. Problem: Partial, scrolling or incorrectly displayed image. 4 Press the "Re-Sync" button on the Remote Control or press the "Auto Image" button on the "Display" icon. 2. Verify that the resolution setting is less than or equal to the following steps...


