
User Manual
Page 1
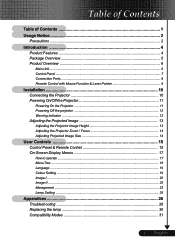
... Overview 6 Main Unit ...6 Control Panel ...7 Connection Ports ...8 Remote Control with Mouse Function & Laser Pointer 9 Installation 10 Connecting the Projector 10 Powering On/Off the Projector 11 Powering On the Projector 11 Powering Off the projector 12 Warning Indicator ...12 Adjusting the Projected Image 13 Adjusting the Projector Image Height 13 Adjusting the Projector...
... Overview 6 Main Unit ...6 Control Panel ...7 Connection Ports ...8 Remote Control with Mouse Function & Laser Pointer 9 Installation 10 Connecting the Projector 10 Powering On/Off the Projector 11 Powering On the Projector 11 Powering Off the projector 12 Warning Indicator ...12 Adjusting the Projected Image 13 Adjusting the Projector Image Height 13 Adjusting the Projector...
User Manual
Page 2
... projector will not turn back on until the lamp module has been replaced. When the lamp reaches the end of its cooling cycle before disconnecting power. Usage Notice Precautions Follow all changing instructions. If this user's guide to change the lamp when it will detect the life of your eyes. Warning...
... projector will not turn back on until the lamp module has been replaced. When the lamp reaches the end of its cooling cycle before disconnecting power. Usage Notice Precautions Follow all changing instructions. If this user's guide to change the lamp when it will detect the life of your eyes. Warning...

User Manual
Page 3
... Notice Do: ™ Turn off the product before cleaning. ™ Use a soft cloth moistened with mild detergent to clean the display housing. ™ Disconnect the power plug from AC outlet if the product is not being used for ventilation. ™ Use abrasive cleaners, waxes or solvents to excessive dust and dirt. -
... Notice Do: ™ Turn off the product before cleaning. ™ Use a soft cloth moistened with mild detergent to clean the display housing. ™ Disconnect the power plug from AC outlet if the product is not being used for ventilation. ™ Use abrasive cleaners, waxes or solvents to excessive dust and dirt. -
User Manual
Page 5
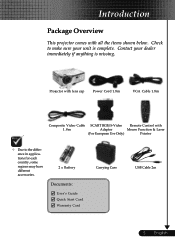
Projector with lens cap Power Cord 1.8m VGA Cable 1.8m Composite Video Cable SCART RGB/S-Video Remote Control with all the items shown below. Contact your unit is missing. English ...
Projector with lens cap Power Cord 1.8m VGA Cable 1.8m Composite Video Cable SCART RGB/S-Video Remote Control with all the items shown below. Contact your unit is missing. English ...

User Manual
Page 6
Zoom Lens 5. Elevator Foot 7. Power Socket 8 10 9 Lens Cap 6. Elevator Button 8. Connection Ports 10. IR Receivers 9. Zoom Lever 3. Introduction Product Overview Main Unit 1 8 2 3 4 7 6 5 1 English ... 6 1. Control Panel 2. Focus Ring 4.
Zoom Lens 5. Elevator Foot 7. Power Socket 8 10 9 Lens Cap 6. Elevator Button 8. Connection Ports 10. IR Receivers 9. Zoom Lever 3. Introduction Product Overview Main Unit 1 8 2 3 4 7 6 5 1 English ... 6 1. Control Panel 2. Focus Ring 4.
User Manual
Page 7
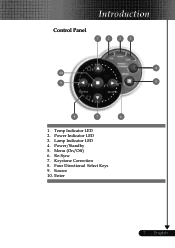
Power/Standby 5. Source 10. Enter 7 ... Introduction Control Panel 7 1 2 3 4 10 9 5 8 7 6 1. Four Directional Select Keys 9. Temp Indicator LED 2. Menu (On/Off) 6. Keystone Correction 8. Re-Sync 7. Power Indicator LED 3. English Lamp Indicator LED 4.
Power/Standby 5. Source 10. Enter 7 ... Introduction Control Panel 7 1 2 3 4 10 9 5 8 7 6 1. Four Directional Select Keys 9. Temp Indicator LED 2. Menu (On/Off) 6. Keystone Correction 8. Re-Sync 7. Power Indicator LED 3. English Lamp Indicator LED 4.

User Manual
Page 9
Laser Indicator LED 4. Mouse Left Click Hide 16. Mouse 9 ... Laser Button 10 6 5. Auto Image 6. Enter 7. Source Menu 11. Mouse Right Click 14 13 14. 15. Four Directional Select Keys 15 12 12. English Introduction Remote Control with Mouse Function & Laser Pointer 1 1 3 7 8 4 1. Keystone Correction 13. Power 16 11 9. 10. IR LED 2. Freeze 8. Laser Pointer 9 5 3.
Laser Indicator LED 4. Mouse Left Click Hide 16. Mouse 9 ... Laser Button 10 6 5. Auto Image 6. Enter 7. Source Menu 11. Mouse Right Click 14 13 14. 15. Four Directional Select Keys 15 12 12. English Introduction Remote Control with Mouse Function & Laser Pointer 1 1 3 7 8 4 1. Keystone Correction 13. Power 16 11 9. 10. IR LED 2. Freeze 8. Laser Pointer 9 5 3.

User Manual
Page 10
S-Video Output 1...Power Cord 2...VGA Cable 3 Composite Video Cable 4 SCART RGB/S-Video Adaptor (For European Use Only) 5 S-Video Cable (Optional Accessory) 6 USB Cable (Optional Accessory) 7 D-15 to RCA ...
S-Video Output 1...Power Cord 2...VGA Cable 3 Composite Video Cable 4 SCART RGB/S-Video Adaptor (For European Use Only) 5 S-Video Cable (Optional Accessory) 6 USB Cable (Optional Accessory) 7 D-15 to RCA ...
User Manual
Page 11
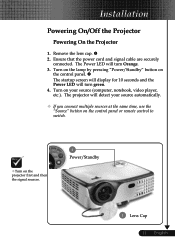
...the control panel. Remove the lens cap. English o The startup screen will display for 10 seconds and the Power LED will turn Orange. 3. Turn on the lamp by pressing "Power/Standby" button on your source automatically. ™ If you connect multiple sources at the same time, use ...switch. ™Turn on the projector first and then the signal sources. 2 Power/Standby 1 Lens Cap 11 ... The projector will turn green. 4. Ensure that the power cord and signal cable are securely connected. The Power LED will detect your source (computer, notebook, video player, etc.). Installation...
...the control panel. Remove the lens cap. English o The startup screen will display for 10 seconds and the Power LED will turn Orange. 3. Turn on the lamp by pressing "Power/Standby" button on your source automatically. ™ If you connect multiple sources at the same time, use ...switch. ™Turn on the projector first and then the signal sources. 2 Power/Standby 1 Lens Cap 11 ... The projector will turn green. 4. Ensure that the power cord and signal cable are securely connected. The Power LED will detect your source (computer, notebook, video player, etc.). Installation...
User Manual
Page 12
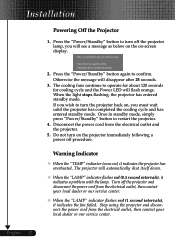
... red (0.5 second intervals), it indicates the projector has overheated. The projector will flash orange. Turn off procedure. Installation Powering Off the Projector 1. Disconnect the power cord from the electrical outlet, then contact your local dealer or our service center. Warning Indicator ™ When the ..."TEMP" indicator turns red, it indicates a problem with the lamp. English ... 12 Stop using the projector and disconnect the power cord from the electrical outlet, then contact your local dealer or our service center. ™ When the "LAMP" indicator flashes red (1 ...
... red (0.5 second intervals), it indicates the projector has overheated. The projector will flash orange. Turn off procedure. Installation Powering Off the Projector 1. Disconnect the power cord from the electrical outlet, then contact your local dealer or our service center. Warning Indicator ™ When the ..."TEMP" indicator turns red, it indicates a problem with the lamp. English ... 12 Stop using the projector and disconnect the power cord from the electrical outlet, then contact your local dealer or our service center. ™ When the "LAMP" indicator flashes red (1 ...
User Manual
Page 15
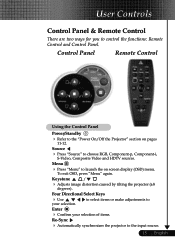
... Directional Select Keys 4youUr sseelection. Keystone / 4 Adjusts image degrees). Control Panel Remote Control Using the Control Panel Power/Standby 4 Refer to launch the on pages Source 4 Press "Source" to the input source. 15 ... the "Power On/Off the Projector" section on screen To exit OSD, press "Menu" again. English to select items...
... Directional Select Keys 4youUr sseelection. Keystone / 4 Adjusts image degrees). Control Panel Remote Control Using the Control Panel Power/Standby 4 Refer to launch the on pages Source 4 Press "Source" to the input source. 15 ... the "Power On/Off the Projector" section on screen To exit OSD, press "Menu" again. English to select items...

User Manual
Page 16
... to adjust the setting. press and hold this is connected to a computer via an USB cable. To exit English ... 16 the "Power On/Off the Projector" section on screen display menu. black. Mouse/Mouse Right Click/Mouse Left Click (*) 4 These functions are only ...PC or Mac. Auto 4 Automatically synchronizes the projector to 11-12. Keystone 4 Adjusts image distortion caused by degrees). Using the Remote Control Power 4 Refer to the input source. Hide 4 "Hide" immediately turns the screen to launch the press "Menu" again. Enter to select ...
... to adjust the setting. press and hold this is connected to a computer via an USB cable. To exit English ... 16 the "Power On/Off the Projector" section on screen display menu. black. Mouse/Mouse Right Click/Mouse Left Click (*) 4 These functions are only ...PC or Mac. Auto 4 Automatically synchronizes the projector to 11-12. Keystone 4 Adjusts image distortion caused by degrees). Using the Remote Control Power 4 Refer to the input source. Hide 4 "Hide" immediately turns the screen to launch the press "Menu" again. Enter to select ...
User Manual
Page 25
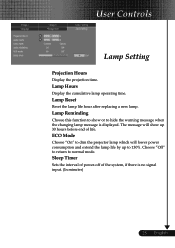
Lamp Reset Reset the lamp life hour after replacing a new lamp. The message will show or to dim the projector lamp which will lower power consumption and extend the lamp life by up 30 hours before end of the system, if there is displayed. Lamp Hours Display the cumulative lamp ...operating time. Choose "Off" to return to 130%. Sleep Timer Sets the interval of power-off of life. ECO Mode Choose "On" to hide the warning message when the changing lamp message is no signal input. (In minutes) 25 ... Lamp...
Lamp Reset Reset the lamp life hour after replacing a new lamp. The message will show or to dim the projector lamp which will lower power consumption and extend the lamp life by up 30 hours before end of the system, if there is displayed. Lamp Hours Display the cumulative lamp ...operating time. Choose "Off" to return to 130%. Sleep Timer Sets the interval of power-off of life. ECO Mode Choose "On" to hide the warning message when the changing lamp message is no signal input. (In minutes) 25 ... Lamp...
User Manual
Page 26
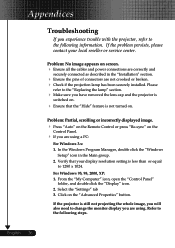
... or broken. 4 Check if the projection lamp has been securely installed. For Windows 95, 98, 2000, XP: 1. Click on screen. 4 Ensure all the cables and power connections are correctly and securely connected as described in the Main group. 2. If the projector is switched on .
... or broken. 4 Check if the projection lamp has been securely installed. For Windows 95, 98, 2000, XP: 1. Click on screen. 4 Ensure all the cables and power connections are correctly and securely connected as described in the Main group. 2. If the projector is switched on .

User Manual
Page 28
... sound 4 When the lamp reaches its end of focus 4 Adjusts the Focus Ring on the projector lens. Problem: LED lighting message Message Power LED Green Orange Standby State (Input power cord) Normal Mode Warming Flashing Cooling Flashing Error (Lamp failed) Error (Fan failed) Error (Over Temp.) Error (Lamp cover failed) Temp LED...
... sound 4 When the lamp reaches its end of focus 4 Adjusts the Focus Ring on the projector lens. Problem: LED lighting message Message Power LED Green Orange Standby State (Input power cord) Normal Mode Warming Flashing Cooling Flashing Error (Lamp failed) Error (Fan failed) Error (Over Temp.) Error (Lamp cover failed) Temp LED...
User Manual
Page 30
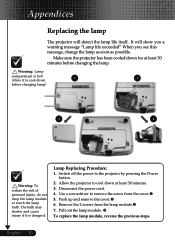
... The projector will show you a warning message "Lamp life exceeded" When you see this message, change the lamp as soon as possible. Switch off the power to cool down for at least 30 minutes. 3. Warning: Lamp compartment is dropped. Push up and remove the cover.o 6. q To replace the lamp ...module, reverse the previous steps. The bulb may shatter and cause injury if it to the projector by pressing the Power button. 2. Disconnect the power cord. 4. Make sure the projector has been cooled down 1 3 before changing the lamp. Pull out the lamp module.
... The projector will show you a warning message "Lamp life exceeded" When you see this message, change the lamp as soon as possible. Switch off the power to cool down for at least 30 minutes. 3. Warning: Lamp compartment is dropped. Push up and remove the cover.o 6. q To replace the lamp ...module, reverse the previous steps. The bulb may shatter and cause injury if it to the projector by pressing the Power button. 2. Disconnect the power cord. 4. Make sure the projector has been cooled down 1 3 before changing the lamp. Pull out the lamp module.


