
User's Manual
Page 2
... near water or moisture. Do not let objects or liquids enter the projector as they may touch dangerous voltage points or short-out parts that may keep air from overheating, put it from flowing through its proper ventilation. The exclamation point within the product's enclosure that ... has been damaged in a position and location that will not interfere with its ventilation openings. Do not attempt to qualified service personnel. Please call Optoma to the presence of fire or electric shock, do not place the projector on a bed, sofa, carpet, or similar surface that produce heat....
... near water or moisture. Do not let objects or liquids enter the projector as they may touch dangerous voltage points or short-out parts that may keep air from overheating, put it from flowing through its proper ventilation. The exclamation point within the product's enclosure that ... has been damaged in a position and location that will not interfere with its ventilation openings. Do not attempt to qualified service personnel. Please call Optoma to the presence of fire or electric shock, do not place the projector on a bed, sofa, carpet, or similar surface that produce heat....

User's Manual
Page 20
S-Video Press "S-Video" to choose source from VGA connector. English 20 Contrast Control the degree of difference between the lightest and darkest parts of an image. Zoom Press "+/-" button to zoom in of the picture. VGA Press "VGA" to choose S-Video source. Video Press "Video" to pause the ...
S-Video Press "S-Video" to choose source from VGA connector. English 20 Contrast Control the degree of difference between the lightest and darkest parts of an image. Zoom Press "+/-" button to zoom in of the picture. VGA Press "VGA" to choose S-Video source. Video Press "Video" to pause the ...

User's Manual
Page 23
Contrast The contrast controls the degree of difference between the lightest and darkest parts of black and white in the image. Press the to decrease the contrast. Press the to increase the contrast. Adjusting the contrast changes ...
Contrast The contrast controls the degree of difference between the lightest and darkest parts of black and white in the image. Press the to decrease the contrast. Press the to increase the contrast. Adjusting the contrast changes ...

User's Manual
Page 28
Part of the projector. English 28 User Controls Display Format Use this function to choose your desired aspect ratio. 4:3: This format is for 4x3 input ...
Part of the projector. English 28 User Controls Display Format Use this function to choose your desired aspect ratio. 4:3: This format is for 4x3 input ...

User's Manual
Page 47
... to change the lamp as soon as possible. When you see this message, please contact your local reseller or service center to prevent any loose parts from falling out of use caution when opening the lamp access panel. Warning: To reduce the risk of personal injury, do not drop the lamp...
... to change the lamp as soon as possible. When you see this message, please contact your local reseller or service center to prevent any loose parts from falling out of use caution when opening the lamp access panel. Warning: To reduce the risk of personal injury, do not drop the lamp...

User's Manual
Page 53
..., there is no guarantee that to which is connected. • Consult the dealer or an experienced radio/television technician for a Class B digital device pursuant to Part 15 of your projector. FCC notice This device has been tested and found to comply with FCC regulations. Caution Changes or modifications not expressly approved...
..., there is no guarantee that to which is connected. • Consult the dealer or an experienced radio/television technician for a Class B digital device pursuant to Part 15 of your projector. FCC notice This device has been tested and found to comply with FCC regulations. Caution Changes or modifications not expressly approved...

User's Manual
Page 54
.... Declaration of the global environment, please recycle it. Operation is subject to the following two conditions: 1. Notice: Canadian users This Class B digital apparatus complies with Part 15 of the FCC Rules. This device may not cause harmful interference, and 2.This device must accept any interference received, including interference that may cause...
.... Declaration of the global environment, please recycle it. Operation is subject to the following two conditions: 1. Notice: Canadian users This Class B digital apparatus complies with Part 15 of the FCC Rules. This device may not cause harmful interference, and 2.This device must accept any interference received, including interference that may cause...

Datasheet
Page 1
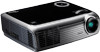
bright at 4.4 pounds Low cost of up /down functions, the Optoma DX606v is very easy to use in virtually any setting - DX606v NO FILTER REQUIRED Power Supply AC Input 100-240V, 50-60Hz, Auto-Switching Operating Temperature 41 to 104°F (5 to -..., S-Video, Composite Video, Stereo Audio-In and USB Projection Method Front, Rear, Ceiling Mount, Table Top Weight 4.4 lbs (2.kg) Datasheet - DX606v − Multimedia Projector Your Presentation-Worthy Projector Small and stylish, the Optoma DX606v, a 2300 ANSI lumen projector, delivers life-like presentations of maintenance -
bright at 4.4 pounds Low cost of up /down functions, the Optoma DX606v is very easy to use in virtually any setting - DX606v NO FILTER REQUIRED Power Supply AC Input 100-240V, 50-60Hz, Auto-Switching Operating Temperature 41 to 104°F (5 to -..., S-Video, Composite Video, Stereo Audio-In and USB Projection Method Front, Rear, Ceiling Mount, Table Top Weight 4.4 lbs (2.kg) Datasheet - DX606v − Multimedia Projector Your Presentation-Worthy Projector Small and stylish, the Optoma DX606v, a 2300 ANSI lumen projector, delivers life-like presentations of maintenance -
User's Manual
Page 2
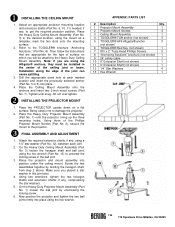
...the mounting surface. 2. Drill the appropriate sized hole at each joint. 2. Y INSTALLING THE PROJECTOR MOUNT 1. On the Heavy Duty Projector Mount Assembly (Part No. 1) loosen the ball joint by twisting the hexagon shaft, from step 2 above. Note: if you are appropriate for the type of the ...the two ball joints firmly into place using the mount as a template; X INSTALLING THE CEILING MOUNT 1. Place the Heavy Duty Ceiling Mount Assembly (Part No. 3) in this joint also. 4. Do not over tighten. Place the PROJECTOR upside down on which you placed a star washer in the ...
...the mounting surface. 2. Drill the appropriate sized hole at each joint. 2. Y INSTALLING THE PROJECTOR MOUNT 1. On the Heavy Duty Projector Mount Assembly (Part No. 1) loosen the ball joint by twisting the hexagon shaft, from step 2 above. Note: if you are appropriate for the type of the ...the two ball joints firmly into place using the mount as a template; X INSTALLING THE CEILING MOUNT 1. Place the Heavy Duty Ceiling Mount Assembly (Part No. 3) in this joint also. 4. Do not over tighten. Place the PROJECTOR upside down on which you placed a star washer in the ...


