
User Manual
Page 1
...Safety Warnings ...5 Introduction Product Features ...6 Package Overview ...7 Product Overview ...8 Main Unit ...8 Projector Panel ...9 DVD Panel...9 Connection Ports ...10 Remote Control ...11 Installation Setting up the Projector ...12 Connecting the Computer/Notebook 12 Connecting the Video ...13 Connecting the Audio Input......Player ...17 Turn Off the DVD Player ...17 Powering Off the Projector ...18 Warning Indicator ...19 Adjusting the Projected Image...20 Adjusting the Projector's Height 20 Adjusting the Projector's Focus 21 Adjusting the Projection Image Size 21 Adjusting the Aspect ...
...Safety Warnings ...5 Introduction Product Features ...6 Package Overview ...7 Product Overview ...8 Main Unit ...8 Projector Panel ...9 DVD Panel...9 Connection Ports ...10 Remote Control ...11 Installation Setting up the Projector ...12 Connecting the Computer/Notebook 12 Connecting the Video ...13 Connecting the Audio Input......Player ...17 Turn Off the DVD Player ...17 Powering Off the Projector ...18 Warning Indicator ...19 Adjusting the Projected Image...20 Adjusting the Projector's Height 20 Adjusting the Projector's Focus 21 Adjusting the Projection Image Size 21 Adjusting the Aspect ...
User Manual
Page 2
......26 Using the DVD Panel ...27 On-screen Display Menus ...28 How to Operate Projector Menu 28 Menu Tree for Projector ...29 Language ...30 Image-I ...31 Image-II...33 Display ...35 System ...37 Lamp setting...39 How to Operate WMA/MP3/JPEG Program 40 ... DVD ...42 System Setup ...43 Language Setup...45 Digital Setup ...46 Video Setup ...47 Speaker Setup...48 Maintenance Troubleshooting ...49 Image Problems ...49 Projector Operation Problems...51 LED Problems...51 DVD Player Problems ...52 Sound Problems ...53 Remote Control Problems...54 Replacing the Lamp...55 Compatibility Modes...56 Ceiling...
......26 Using the DVD Panel ...27 On-screen Display Menus ...28 How to Operate Projector Menu 28 Menu Tree for Projector ...29 Language ...30 Image-I ...31 Image-II...33 Display ...35 System ...37 Lamp setting...39 How to Operate WMA/MP3/JPEG Program 40 ... DVD ...42 System Setup ...43 Language Setup...45 Digital Setup ...46 Video Setup ...47 Speaker Setup...48 Maintenance Troubleshooting ...49 Image Problems ...49 Projector Operation Problems...51 LED Problems...51 DVD Player Problems ...52 Sound Problems ...53 Remote Control Problems...54 Replacing the Lamp...55 Compatibility Modes...56 Ceiling...

User Manual
Page 3
...the risk of fire or electric shock, do not open or disassemble the product. ▀■ Please allow the unit to expire. DVD Projector * 3 carefully follow the lamp replacement instructions listed under "Replacing the Lamp". If this product to rain or moisture. ▀■ To prevent ...the risk of electric shock, do not expose this occurs, the projector will not turn back on the projector first and then select the signal sources. ▀■ Do not use lens cap when projector is about to cool down before changing the lamp; English USAGE NOTICE ...
...the risk of fire or electric shock, do not open or disassemble the product. ▀■ Please allow the unit to expire. DVD Projector * 3 carefully follow the lamp replacement instructions listed under "Replacing the Lamp". If this product to rain or moisture. ▀■ To prevent ...the risk of electric shock, do not expose this occurs, the projector will not turn back on the projector first and then select the signal sources. ▀■ Do not use lens cap when projector is about to cool down before changing the lamp; English USAGE NOTICE ...

User Manual
Page 4
..., cold or humidity. - Do not: ▀■ Block the slots and openings on the unit provided for a long period of time. In direct sunlight. 4 * DVD Projector Near any appliance generating a strong magnetic field. - In areas susceptible to clean the unit. ▀■ Use under the following conditions: - English USAGE NOTICE...
..., cold or humidity. - Do not: ▀■ Block the slots and openings on the unit provided for a long period of time. In direct sunlight. 4 * DVD Projector Near any appliance generating a strong magnetic field. - In areas susceptible to clean the unit. ▀■ Use under the following conditions: - English USAGE NOTICE...

User Manual
Page 5
...Use of the sight line from the screen to the audience; this is by ceiling-mounting rather than floor or table-mounting the projector. ▀■ When projector is recommended. ▀■ Ensure that , when presenters look at all times. ▀■ Minimize standing facing into the beam. ...English Eye Safety USAGE NOTICE ▀■ Avoid staring directly into the projector beam at the audience, they are located out of a stick or laser pointer to avoid the need for the user to enter the beam...
...Use of the sight line from the screen to the audience; this is by ceiling-mounting rather than floor or table-mounting the projector. ▀■ When projector is recommended. ▀■ Ensure that , when presenters look at all times. ▀■ Minimize standing facing into the beam. ...English Eye Safety USAGE NOTICE ▀■ Avoid staring directly into the projector beam at the audience, they are located out of a stick or laser pointer to avoid the need for the user to enter the beam...
User Manual
Page 6
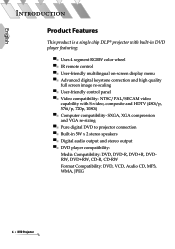
SXGA, XGA compression and VGA re-sizing ▀■ Pure digital DVD to projector connection ▀■ Built-in DVD player featuring: ▀■ Uses 4 segment RGBW color wheel ▀■ IR remote control ▀■... DVD player compatibilityMedia Compatibility: DVD, DVD-R, DVD+R, DVDRW, DVD+RW, CD-R, CD-RW Format Compatibility: DVD, VCD, Audio CD, MP3, WMA, JPEG 6 * DVD Projector English INTRODUCTION Product Features This product is a single chip DLP® projector with S-video, composite and HDTV (480i/p, 576i/p, 720p, 1080i) ▀■ Computer compatibility-
SXGA, XGA compression and VGA re-sizing ▀■ Pure digital DVD to projector connection ▀■ Built-in DVD player featuring: ▀■ Uses 4 segment RGBW color wheel ▀■ IR remote control ▀■... DVD player compatibilityMedia Compatibility: DVD, DVD-R, DVD+R, DVDRW, DVD+RW, CD-R, CD-RW Format Compatibility: DVD, VCD, Audio CD, MP3, WMA, JPEG 6 * DVD Projector English INTRODUCTION Product Features This product is a single chip DLP® projector with S-video, composite and HDTV (480i/p, 576i/p, 720p, 1080i) ▀■ Computer compatibility-
User Manual
Page 7
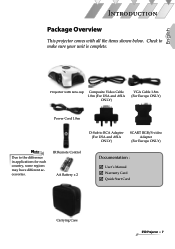
English INTRODUCTION Package Overview This projector comes with lens cap Composite Video Cable 1.8m (For USA and ASIA ONLY) VGA Cable 1.8m (For Europe ONLY) Power Cord 1.8m Noottee Due to ... USA and ASIA ONLY) SCART RGB/S-video Adapter (For Europe ONLY) Documentation : User's Manual Warranty Card Quick Start Card Carrying Case DVD Projector * 7 Projector with all the items shown below. IR Remote Control AA Battery x 2 D-Sub to make sure your unit is complete.
English INTRODUCTION Package Overview This projector comes with lens cap Composite Video Cable 1.8m (For USA and ASIA ONLY) VGA Cable 1.8m (For Europe ONLY) Power Cord 1.8m Noottee Due to ... USA and ASIA ONLY) SCART RGB/S-video Adapter (For Europe ONLY) Documentation : User's Manual Warranty Card Quick Start Card Carrying Case DVD Projector * 7 Projector with all the items shown below. IR Remote Control AA Battery x 2 D-Sub to make sure your unit is complete.

User Manual
Page 8
DVD Panel 8. Connection Ports 10.Power Socket 11.Speakers Elevator Button 5. Zoom Lens 4. IR Receivers 11 7. Projector Panel 9. Focus Ring 3. English INTRODUCTION Product Overview Main Unit 6 11 1 2 3 4 6 5 8 7 9 10 8 * DVD Projector 1. Zoom Lever 2. Elevator Foot 6.
DVD Panel 8. Connection Ports 10.Power Socket 11.Speakers Elevator Button 5. Zoom Lens 4. IR Receivers 11 7. Projector Panel 9. Focus Ring 3. English INTRODUCTION Product Overview Main Unit 6 11 1 2 3 4 6 5 8 7 9 10 8 * DVD Projector 1. Zoom Lever 2. Elevator Foot 6.

User Manual
Page 9
Volume - 8. DVD LED 4. NEXT Button 8. Enter 10.Four Directional Select Keys 6 7 8 9 5 10 DVD Panel 1. Play/Pause 2. Volume + 9. PREV Button 7. Eject Button 4 1 23 56 78 DVD Projector * 9 Stand by Button/Power LED 7. English INTRODUCTION Projector Panel 12 3 4 1. Four Directional Select Keys 6. Menu 5. Enter 5. Source 4. Resync 6. Temperture LED 3. Stop 3. Lamp LED 2.
Volume - 8. DVD LED 4. NEXT Button 8. Enter 10.Four Directional Select Keys 6 7 8 9 5 10 DVD Panel 1. Play/Pause 2. Volume + 9. PREV Button 7. Eject Button 4 1 23 56 78 DVD Projector * 9 Stand by Button/Power LED 7. English INTRODUCTION Projector Panel 12 3 4 1. Four Directional Select Keys 6. Menu 5. Enter 5. Source 4. Resync 6. Temperture LED 3. Stop 3. Lamp LED 2.

User Manual
Page 11
... 21.Display 12 22.Pause Button 30 23.FWD Button 13 24.NEXT Button 31 25.DVD Menu 14 26.Four Directional Select Keys 27.Projector Menu 15 32 28.Volume +/- 29.Subtitle 30.Native 31.16:9-II 32.Angle 16 17 18 19 DVD...
... 21.Display 12 22.Pause Button 30 23.FWD Button 13 24.NEXT Button 31 25.DVD Menu 14 26.Four Directional Select Keys 27.Projector Menu 15 32 28.Volume +/- 29.Subtitle 30.Native 31.16:9-II 32.Angle 16 17 18 19 DVD...
User Manual
Page 12
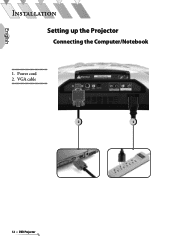
VGA cable 2 1 12 * DVD Projector English INSTALLATION Setting up the Projector Connecting the Computer/Notebook 1. Power cord 2.
VGA cable 2 1 12 * DVD Projector English INSTALLATION Setting up the Projector Connecting the Computer/Notebook 1. Power cord 2.

User Manual
Page 13
SCART RGB/S- D-Sub to their 5 1 environment of audio and video equipments or demand. Power cord 2. Video cable 3. video Adapter 4 Noottee The user can install the connection port according to RCA Adapter 5. DVD Projector * 13 S-Video Cable 4. English INSTALLATION Connecting the Video 6 1. RCA Compo- 32 nent Cable for YPbPr 6.
SCART RGB/S- D-Sub to their 5 1 environment of audio and video equipments or demand. Power cord 2. Video cable 3. video Adapter 4 Noottee The user can install the connection port according to RCA Adapter 5. DVD Projector * 13 S-Video Cable 4. English INSTALLATION Connecting the Video 6 1. RCA Compo- 32 nent Cable for YPbPr 6.

User Manual
Page 14
Power cord 2. Audio cable 1 14 * DVD Projector Audio cable (L/R) 1 2 Connecting the Audio Output(External Subwoofer/Stereo System) 2 1. Power cord 2. English INSTALLATION Connecting the Audio Input 1.
Power cord 2. Audio cable 1 14 * DVD Projector Audio cable (L/R) 1 2 Connecting the Audio Output(External Subwoofer/Stereo System) 2 1. Power cord 2. English INSTALLATION Connecting the Audio Input 1.

User Manual
Page 15
English 1. Digital audio cable INSTALLATION Connecting the Audio Output(2.1 Channel/5.1 Channel) 2 Coaxial Digital Audio Input Jack 1 2.1 Channel 5.1 Channel DVD Projector * 15 Power cord 2.
English 1. Digital audio cable INSTALLATION Connecting the Audio Output(2.1 Channel/5.1 Channel) 2 Coaxial Digital Audio Input Jack 1 2.1 Channel 5.1 Channel DVD Projector * 15 Power cord 2.
User Manual
Page 16
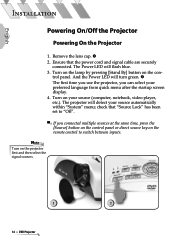
... are securely connected. Turn on the lamp by pressing [Stand By] button on your preferred language from quick menu after the startup screen display. 4. The projector will flash blue. 3. Ensure that "Source Lock" has been set to "Off". ▀■ If you can select your source (computer, notebook, video ... to switch between inputs. Remove the lens cap. 2. And the Power LED will turn green. The first time you use the projector, you connected multiple sources at the same time, press the [Source] button on the control panel or direct source key on the...
... are securely connected. Turn on the lamp by pressing [Stand By] button on your preferred language from quick menu after the startup screen display. 4. The projector will flash blue. 3. Ensure that "Source Lock" has been set to "Off". ▀■ If you can select your source (computer, notebook, video ... to switch between inputs. Remove the lens cap. 2. And the Power LED will turn green. The first time you use the projector, you connected multiple sources at the same time, press the [Source] button on the control panel or direct source key on the...

User Manual
Page 17
... If the DVD player does not load the disc, the start-up screen will see a message "Read disc" displayed on the unit. 2 3 DVD Projector * 17 English INSTALLATION Turn On the DVD Player 1. Ensure that the power cord and signal cable are securely connected. The DVD LED will turn green.... Turn on the lamp by pressing [Stand By] button on the projector's screen. 4. Press [Eject] on the unit. 1 Turn Off the DVD Player 1. Insert the DVD disc on DVD panel. 2. If the DVD...
... If the DVD player does not load the disc, the start-up screen will see a message "Read disc" displayed on the unit. 2 3 DVD Projector * 17 English INSTALLATION Turn On the DVD Player 1. Ensure that the power cord and signal cable are securely connected. The DVD LED will turn green.... Turn on the lamp by pressing [Stand By] button on the projector's screen. 4. Press [Eject] on the unit. 1 Turn Off the DVD Player 1. Insert the DVD disc on DVD panel. 2. If the DVD...
User Manual
Page 18
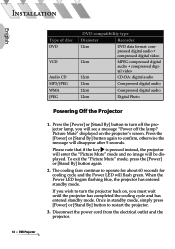
... cycle and has entered standby mode. Once in standby mode, simply press [Power] or [Stand By] button to turn the projector back on the projector's screen. INSTALLATION English Type of disc DVD VCD Audio CD MP3/JPEG WMA JPEG DVD compatibility type Diameter Recorder 12cm DVD data ...12cm CD-DA: digital audio 12cm Compressed digital audio 12cm Compressed digital audio 12cm Digital Photo Powering Off the Projector 1. When the Power LED begins flashing blue, the projector has entered standby mode. If you wish to confirm, otherwise the message will flash green...
... cycle and has entered standby mode. Once in standby mode, simply press [Power] or [Stand By] button to turn the projector back on the projector's screen. INSTALLATION English Type of disc DVD VCD Audio CD MP3/JPEG WMA JPEG DVD compatibility type Diameter Recorder 12cm DVD data ...12cm CD-DA: digital audio 12cm Compressed digital audio 12cm Compressed digital audio 12cm Digital Photo Powering Off the Projector 1. When the Power LED begins flashing blue, the projector has entered standby mode. If you wish to confirm, otherwise the message will flash green...
User Manual
Page 19
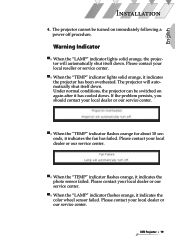
... "LAMP" indicator flashes orange, it indicates the projector has been overheated. Warning Indicator ▀■ When the "LAMP" indicator lights solid orange, the projector will automatically shut itself down . The projector cannot be switched on immediately following a power off procedure... "TEMP" indicator flashes orange, it indicates the fan has failed. DVD Projector * 19 English INSTALLATION 4. The projector will automatically shut itself down. Under normal conditions, the projector can be turned on again after it has cooled down . Please contact your local...
... "LAMP" indicator flashes orange, it indicates the projector has been overheated. Warning Indicator ▀■ When the "LAMP" indicator lights solid orange, the projector will automatically shut itself down . The projector cannot be switched on immediately following a power off procedure... "TEMP" indicator flashes orange, it indicates the fan has failed. DVD Projector * 19 English INSTALLATION 4. The projector will automatically shut itself down. Under normal conditions, the projector can be turned on again after it has cooled down . Please contact your local...

User Manual
Page 20
... elevator foot into position. 3. Elevator Button 2. Tilt-adjustment 3 Feet 2 1 3 20 * DVD Projector Locate the elevator foot. Press the elevator button to modify the height of the projector. Elevator Foot 3. English INSTALLATION Adjusting the Projected Image Adjusting the Projector's Height The projector is equipped with three adjustable feet to extend the foot so it...
... elevator foot into position. 3. Elevator Button 2. Tilt-adjustment 3 Feet 2 1 3 20 * DVD Projector Locate the elevator foot. Press the elevator button to modify the height of the projector. Elevator Foot 3. English INSTALLATION Adjusting the Projected Image Adjusting the Projector's Height The projector is equipped with three adjustable feet to extend the foot so it...

User Manual
Page 21
The projector will focus at distances from 4.92 to 32.80 feet (1.5 to zoom in or zoom out. Zoom Lever Focus Ring Adjusting Projection Image Size Side ....56 289.49 263.17 9.0 298.93 271.75 325.67 296.07 10.0 332.14 301.95 361.86 328.86 DVD Projector * 21 English INSTALLATION Adjusting the Projector's Zoom/Focus Turn the Zoom Lever to 10.0 meters). To focus the image, turn the focus ring until you see a clear image...
The projector will focus at distances from 4.92 to 32.80 feet (1.5 to zoom in or zoom out. Zoom Lever Focus Ring Adjusting Projection Image Size Side ....56 289.49 263.17 9.0 298.93 271.75 325.67 296.07 10.0 332.14 301.95 361.86 328.86 DVD Projector * 21 English INSTALLATION Adjusting the Projector's Zoom/Focus Turn the Zoom Lever to 10.0 meters). To focus the image, turn the focus ring until you see a clear image...


