
User Manual
Page 1
... System 14 Connecting the Audio Output-(2.1 Channel/5.1 Channel 15 Powering On/Off the Projector ...16 Powering On the Projector ...16 Turn On the DVD Player ...17 Turn Off the DVD Player ...17 Powering Off the Projector ...18 Warning Indicator ...19 Adjusting the Projected Image...20 Adjusting the Projector's Height 20 Adjusting the Projector's Focus 21 Adjusting the Projection Image Size 21 Adjusting the Aspect Ratio of the Image 22 Adjusting the Sloping Image ...23 User Controls Control Panel & Remote Control...24 Using the Remote Control ...24 DVD Projector * 1
... System 14 Connecting the Audio Output-(2.1 Channel/5.1 Channel 15 Powering On/Off the Projector ...16 Powering On the Projector ...16 Turn On the DVD Player ...17 Turn Off the DVD Player ...17 Powering Off the Projector ...18 Warning Indicator ...19 Adjusting the Projected Image...20 Adjusting the Projector's Height 20 Adjusting the Projector's Focus 21 Adjusting the Projection Image Size 21 Adjusting the Aspect Ratio of the Image 22 Adjusting the Sloping Image ...23 User Controls Control Panel & Remote Control...24 Using the Remote Control ...24 DVD Projector * 1
User Manual
Page 2
... Menu Tree for Projector ...29 Language ...30 Image-I ...31 Image-II...33 Display ...35 System ...37 Lamp setting...39 How to Operate WMA/MP3/JPEG Program 40 How to Operate DVD Menu...41 Menu Tree for DVD ...42 System Setup ...43 Language Setup...45 Digital Setup ...46 Video Setup ...47 Speaker Setup...48 Maintenance Troubleshooting ...49 Image Problems ...49 Projector Operation Problems...51 LED Problems...51 DVD Player Problems ...52 Sound Problems ...53 Remote Control Problems...54 Replacing the Lamp...55 Compatibility Modes...56 Ceiling Mount Installation ...57 Optoma...
... Menu Tree for Projector ...29 Language ...30 Image-I ...31 Image-II...33 Display ...35 System ...37 Lamp setting...39 How to Operate WMA/MP3/JPEG Program 40 How to Operate DVD Menu...41 Menu Tree for DVD ...42 System Setup ...43 Language Setup...45 Digital Setup ...46 Video Setup ...47 Speaker Setup...48 Maintenance Troubleshooting ...49 Image Problems ...49 Projector Operation Problems...51 LED Problems...51 DVD Player Problems ...52 Sound Problems ...53 Remote Control Problems...54 Replacing the Lamp...55 Compatibility Modes...56 Ceiling Mount Installation ...57 Optoma...

User Manual
Page 3
... display a warning message when the lamp is displayed. ▀■ After installing a new lamp, reset the lamp life using the onscreen menu. ▀■ Before turning off the product, follow the cooling fan to run for several minutes. ▀■ Turn on until the lamp module has been replaced. DVD Projector * 3 Be sure to replace the lamp when the warning message is about to expire. carefully follow the lamp replacement instructions listed under "Replacing the Lamp". To replace the lamp...
... display a warning message when the lamp is displayed. ▀■ After installing a new lamp, reset the lamp life using the onscreen menu. ▀■ Before turning off the product, follow the cooling fan to run for several minutes. ▀■ Turn on until the lamp module has been replaced. DVD Projector * 3 Be sure to replace the lamp when the warning message is about to expire. carefully follow the lamp replacement instructions listed under "Replacing the Lamp". To replace the lamp...

User Manual
Page 5
... minimize the lamp power needed to project a visible presentation, use room blinds to reduce ambient light levels. English Eye Safety USAGE NOTICE ▀■ Avoid staring directly into the projector beam at the projector lamp. Keep your back to the beam as much as possible. ▀■ Use of the sight line from the screen to stare at all times. ▀■...
... minimize the lamp power needed to project a visible presentation, use room blinds to reduce ambient light levels. English Eye Safety USAGE NOTICE ▀■ Avoid staring directly into the projector beam at the projector lamp. Keep your back to the beam as much as possible. ▀■ Use of the sight line from the screen to stare at all times. ▀■...
User Manual
Page 6
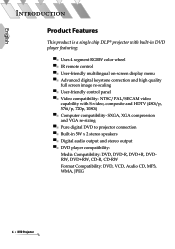
SXGA, XGA compression and VGA re-sizing ▀■ Pure digital DVD to projector connection ▀■ Built-in DVD player featuring: ▀■ Uses 4 segment RGBW color wheel ▀■ IR remote control ▀■ User-friendly multilingual on-screen display menu ▀■ Advanced digital keystone correction and high quality full screen image re-scaling ▀■ User-friendly control panel ▀■ Video compatibility- NTSC/PAL/SECAM video capability with built-in 5W...
SXGA, XGA compression and VGA re-sizing ▀■ Pure digital DVD to projector connection ▀■ Built-in DVD player featuring: ▀■ Uses 4 segment RGBW color wheel ▀■ IR remote control ▀■ User-friendly multilingual on-screen display menu ▀■ Advanced digital keystone correction and high quality full screen image re-scaling ▀■ User-friendly control panel ▀■ Video compatibility- NTSC/PAL/SECAM video capability with built-in 5W...

User Manual
Page 8
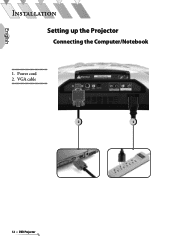
Zoom Lever 2. DVD Panel 8. Projector Panel 9. Focus Ring 3. IR Receivers 11 7. Elevator Button 5. Elevator Foot 6. Zoom Lens 4. Connection Ports 10.Power Socket 11.Speakers English INTRODUCTION Product Overview Main Unit 6 11 1 2 3 4 6 5 8 7 9 10 8 * DVD Projector 1.
Zoom Lever 2. DVD Panel 8. Projector Panel 9. Focus Ring 3. IR Receivers 11 7. Elevator Button 5. Elevator Foot 6. Zoom Lens 4. Connection Ports 10.Power Socket 11.Speakers English INTRODUCTION Product Overview Main Unit 6 11 1 2 3 4 6 5 8 7 9 10 8 * DVD Projector 1.
User Manual
Page 12
Power cord 2. VGA cable 2 1 12 * DVD Projector English INSTALLATION Setting up the Projector Connecting the Computer/Notebook 1.
Power cord 2. VGA cable 2 1 12 * DVD Projector English INSTALLATION Setting up the Projector Connecting the Computer/Notebook 1.
User Manual
Page 16
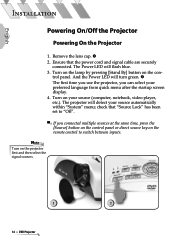
... startup screen display. 4. Ensure that "Source Lock" has been set to switch between inputs. And the Power LED will flash blue. 3. Turn on the projector first and then select the signal sources. 1 2 16 * DVD Projector check that the power cord and signal cable are securely connected. Noottee Turn on your source (computer, notebook, video player, etc.). trol panel. The Power LED will turn green. The first time you use the projector, you connected multiple sources at the same time, press the [Source] button...
... startup screen display. 4. Ensure that "Source Lock" has been set to switch between inputs. And the Power LED will flash blue. 3. Turn on the projector first and then select the signal sources. 1 2 16 * DVD Projector check that the power cord and signal cable are securely connected. Noottee Turn on your source (computer, notebook, video player, etc.). trol panel. The Power LED will turn green. The first time you use the projector, you connected multiple sources at the same time, press the [Source] button...
User Manual
Page 18
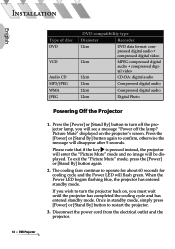
... lamp? INSTALLATION English Type of disc DVD VCD Audio CD MP3/JPEG WMA JPEG DVD compatibility type Diameter Recorder 12cm DVD data format: compressed digital audio + compressed digital video 12cm MPEG compressed digital audio + compressed digital video 12cm CD-DA: digital audio 12cm Compressed digital audio 12cm Compressed digital audio 12cm Digital Photo Powering Off the Projector 1. Press the [Power] or [Stand By] button to turn the projector back on the projector's screen. To exit the "Picture Mute" mode...
... lamp? INSTALLATION English Type of disc DVD VCD Audio CD MP3/JPEG WMA JPEG DVD compatibility type Diameter Recorder 12cm DVD data format: compressed digital audio + compressed digital video 12cm MPEG compressed digital audio + compressed digital video 12cm CD-DA: digital audio 12cm Compressed digital audio 12cm Compressed digital audio 12cm Digital Photo Powering Off the Projector 1. Press the [Power] or [Stand By] button to turn the projector back on the projector's screen. To exit the "Picture Mute" mode...
User Manual
Page 19
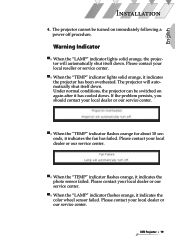
.... ▀■ When the "TEMP" indicator flashes orange for about 10 seconds, it indicates the color wheel sensor failed. Please contact your local dealer or our service center. DVD Projector * 19 Please contact your local reseller or service center. ▀■ When the "TEMP" indicator lights solid orange, it indicates the photo sensor failed. English INSTALLATION 4. The projector cannot be switched on immediately following a power off procedure.
.... ▀■ When the "TEMP" indicator flashes orange for about 10 seconds, it indicates the color wheel sensor failed. Please contact your local dealer or our service center. DVD Projector * 19 Please contact your local reseller or service center. ▀■ When the "TEMP" indicator lights solid orange, it indicates the photo sensor failed. English INSTALLATION 4. The projector cannot be switched on immediately following a power off procedure.

User Manual
Page 23
Keystone + Keystone - Using the [Keystone +/-] button to adjust the image. English INSTALLATION Adjusting the Sloping Image If the projector is tilted up or down, the sides of the image on the screen might slope in or out, even though the top and bottom are level. DVD Projector * 23
Keystone + Keystone - Using the [Keystone +/-] button to adjust the image. English INSTALLATION Adjusting the Sloping Image If the projector is tilted up or down, the sides of the image on the screen might slope in or out, even though the top and bottom are level. DVD Projector * 23

User Manual
Page 24
... tilting the projector. Adjusts to display. using the menu. The input source will be displayed without scaling. Scale the image at a 4:3 aspect ratio. Choose Analog RGB/Component sources from S-VIDEO connector. Projector Menu Four Directional Select Keys Keystone +/- Choose DVD source. Use to the "Powering On/Off the Projector" section on -screen display menus for projector. USER CONTROLS English Control Panel & Remote Control There are two ways for you can select the subtitle language and sound-track language...
... tilting the projector. Adjusts to display. using the menu. The input source will be displayed without scaling. Scale the image at a 4:3 aspect ratio. Choose Analog RGB/Component sources from S-VIDEO connector. Projector Menu Four Directional Select Keys Keystone +/- Choose DVD source. Use to the "Powering On/Off the Projector" section on -screen display menus for projector. USER CONTROLS English Control Panel & Remote Control There are two ways for you can select the subtitle language and sound-track language...

User Manual
Page 26
... the input source. Confirm your selection. 26 * DVD Projector Power LED Lamp LED Temp LED / Volume +/Source Resync Enter Press [Stand By] to turns on -screen display menus for more details. Menu Four Directional Select Keys Display or exit the on the projector's lamp, refer to your item selection. Use to choose RGB, S-Video, Composite, Component, and HDTV sources. Press to select items or make adjust- Indicate the projector's status. English USER CONTROLS Using the Projector Panel...
... the input source. Confirm your selection. 26 * DVD Projector Power LED Lamp LED Temp LED / Volume +/Source Resync Enter Press [Stand By] to turns on -screen display menus for more details. Menu Four Directional Select Keys Display or exit the on the projector's lamp, refer to your item selection. Use to choose RGB, S-Video, Composite, Component, and HDTV sources. Press to select items or make adjust- Indicate the projector's status. English USER CONTROLS Using the Projector Panel...
User Manual
Page 28
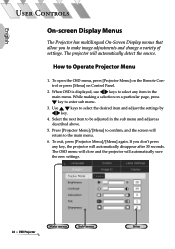
... open the OSD menu, press [Projector Menu] on the Remote Control or press [Menu] on a particular page, press key to the main menu. 6. Select the next item to make image adjustments and change a variety of settings. English USER CONTROLS On-screen Display Menus The Projector has multilingual On-Screen Display menus that allow you don't press any item in the sub menu and adjust as described above. 5. While making a selection on Control Panel...
... open the OSD menu, press [Projector Menu] on the Remote Control or press [Menu] on a particular page, press key to the main menu. 6. Select the next item to make image adjustments and change a variety of settings. English USER CONTROLS On-screen Display Menus The Projector has multilingual On-Screen Display menus that allow you don't press any item in the sub menu and adjust as described above. 5. While making a selection on Control Panel...
User Manual
Page 37
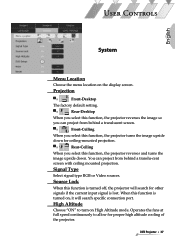
... project from behind a translu-cent screen with ceiling mounted projection. USER CONTROLS English System Menu Location Choose the menu location on , it will search for other signals if the current input signal is turned on the display screen. Operates the fans at full speed continuously to turn on High Altitude mode. When this function, the projector reverses and turns the image upside down for proper high altitude cooling of the projector. DVD Projector * 37 You can project from behind a translucent screen...
... project from behind a translu-cent screen with ceiling mounted projection. USER CONTROLS English System Menu Location Choose the menu location on , it will search for other signals if the current input signal is turned on the display screen. Operates the fans at full speed continuously to turn on High Altitude mode. When this function, the projector reverses and turns the image upside down for proper high altitude cooling of the projector. DVD Projector * 37 You can project from behind a translucent screen...
User Manual
Page 39
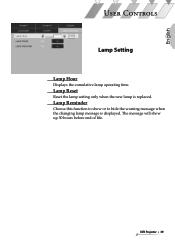
Lamp Reset Reset the lamp setting only when the new lamp is displayed. DVD Projector * 39 Lamp Reminder Choose this function to show up 30 hours before end of life. English USER CONTROLS Lamp Setting Lamp Hour Displays the cumulative lamp operating time. The message will show or to hide the warning message when the changing lamp message is replaced.
Lamp Reset Reset the lamp setting only when the new lamp is displayed. DVD Projector * 39 Lamp Reminder Choose this function to show up 30 hours before end of life. English USER CONTROLS Lamp Setting Lamp Hour Displays the cumulative lamp operating time. The message will show or to hide the warning message when the changing lamp message is replaced.

User Manual
Page 49
... change the monitor display you experience a problem with your projector, please refer to the following steps. 5. Click on the control panel. No image appears on . Make sure that all the cables and power cord are correctly and securely connected as described in the "Installation" section. Please refer to 1280 x 1024. 4. If using . If the projector is powered on screen: Ensure that the projection lamp has been securely installed. DVD Projector...
... change the monitor display you experience a problem with your projector, please refer to the following steps. 5. Click on the control panel. No image appears on . Make sure that all the cables and power cord are correctly and securely connected as described in the "Installation" section. Please refer to 1280 x 1024. 4. If using . If the projector is powered on screen: Ensure that the projection lamp has been securely installed. DVD Projector...
User Manual
Page 51
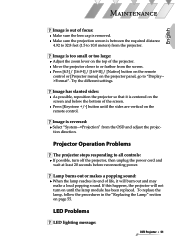
... sound: When the lamp reaches its end of the screen. Try the different settings. To replace the lamp, follow the procedures in the "Replacing the Lamp" section on the remote control. Image is too small or too large: Adjust the zoom lever on the projector panel, go to 10.0 meters) from the OSD and adjust the projection direction. LED Problems LED lighting message: DVD Projector * 51 Press [4:3] / [16:9-I] / [16:9-II] / [Native] button on the remote control...
... sound: When the lamp reaches its end of the screen. Try the different settings. To replace the lamp, follow the procedures in the "Replacing the Lamp" section on the remote control. Image is too small or too large: Adjust the zoom lever on the projector panel, go to 10.0 meters) from the OSD and adjust the projection direction. LED Problems LED lighting message: DVD Projector * 51 Press [4:3] / [16:9-I] / [16:9-II] / [Native] button on the remote control...
User Manual
Page 52
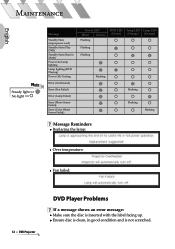
... State (Input power cord) Standby State (Play DVD) Standby State (Burn in good condition and is inserted with the label facing up. Ensure disc is clean, in Mode) Power On/Lamp lighting Lamp lighting (DVD Playing) Power Off/Cooling Error (Overheated) Error (Fan Failed) Error (Lamp Failed) Error (Photo Senser Failed) Error (Color Wheel Senser Failed) Power LED (Blue) (Green) Flashing DVD LED Temp LED Lamp LED (Green) (Orange) (Orange) Flashing Flashing Flashing Flashing Flashing Flashing Message Reminders Replacing the lamp: Over temperature: Fan failed: 52 * DVD Projector DVD...
... State (Input power cord) Standby State (Play DVD) Standby State (Burn in good condition and is inserted with the label facing up. Ensure disc is clean, in Mode) Power On/Lamp lighting Lamp lighting (DVD Playing) Power Off/Cooling Error (Overheated) Error (Fan Failed) Error (Lamp Failed) Error (Photo Senser Failed) Error (Color Wheel Senser Failed) Power LED (Blue) (Green) Flashing DVD LED Temp LED Lamp LED (Green) (Orange) (Orange) Flashing Flashing Flashing Flashing Flashing Flashing Message Reminders Replacing the lamp: Over temperature: Fan failed: 52 * DVD Projector DVD...
User Manual
Page 53
... is not set to start playing. Try a different disc. Most DVDs have an audio cable securely connected between the source device and the projector's audio input. Make sure the volume is completeness, not scratch, dirtiness or warp. English MAINTENANCE The type of disc you inserted might not be displayed. For a DVD, check its region code with very high resolution (high number of pixels) cannot be supported by...
... is not set to start playing. Try a different disc. Most DVDs have an audio cable securely connected between the source device and the projector's audio input. Make sure the volume is completeness, not scratch, dirtiness or warp. English MAINTENANCE The type of disc you inserted might not be displayed. For a DVD, check its region code with very high resolution (high number of pixels) cannot be supported by...


