
Owner Manual
Page 5
... to country). *How to mount the AC plug: AM loop antenna (TX-SR806 only) * In catalogs and on the AV receiver/AV amplifier's power cord (adapter varies from country to country.) 1 2 3 Speaker Cable Speaker cable labels 5 Supplied Accessories Make sure you have the following accessories: Remote controller & two batteries (AA/R6) Speaker setup microphone Indoor FM...
... to country). *How to mount the AC plug: AM loop antenna (TX-SR806 only) * In catalogs and on the AV receiver/AV amplifier's power cord (adapter varies from country to country.) 1 2 3 Speaker Cable Speaker cable labels 5 Supplied Accessories Make sure you have the following accessories: Remote controller & two batteries (AA/R6) Speaker setup microphone Indoor FM...

Owner Manual
Page 6
...) • A/V Sync Control Function (up to come. THX Ultra2 Plus receivers also feature proprietary THX technologies (e.g., THX Mode) which is your guarantee that is...TI (Aureus) 32-bit DSP Processing Connections • 5 HDMI*4 Inputs and 1 Output (ver. 1.3a) • Onkyo for System Control • 6 Digital Inputs (3 Optical / 3 Coaxial) • 5 S-Video Inputs / 2 Outputs ...amplifier performance and operation for iPod • Aluminum Front Panel • Preprogrammed V-Compatible Remote with 3-Step Inverted Dar- Used with permission. *2. and worldwide patents issued & ...
...) • A/V Sync Control Function (up to come. THX Ultra2 Plus receivers also feature proprietary THX technologies (e.g., THX Mode) which is your guarantee that is...TI (Aureus) 32-bit DSP Processing Connections • 5 HDMI*4 Inputs and 1 Output (ver. 1.3a) • Onkyo for System Control • 6 Digital Inputs (3 Optical / 3 Coaxial) • 5 S-Video Inputs / 2 Outputs ...amplifier performance and operation for iPod • Aluminum Front Panel • Preprogrammed V-Compatible Remote with 3-Step Inverted Dar- Used with permission. *2. and worldwide patents issued & ...

Owner Manual
Page 7
...14 Aiming the Remote Controller 14 Controlling the AV Receiver/AV Amplifier 15 About Home Theater 16 Enjoying Home Theater 16 Connections Connecting the AV Receiver/AV Amplifier 17 Connecting Your Speakers 17 Bi-amping the Front Speakers 19 Connecting Antenna (TX-SR806 only 20 About AV Connections 22 Connecting...or DAT Recorder 36 Connecting a Power Amplifier 37 Connecting a Tuner (TX-SA806 only 37 Connecting an RI Dock 38 Connecting Onkyo V Components 39 Connecting the Power Cord 39 Turning On the AV Receiver/AV Amplifier 40 Turning On and Standby 40 First Time Setup First Time...
...14 Aiming the Remote Controller 14 Controlling the AV Receiver/AV Amplifier 15 About Home Theater 16 Enjoying Home Theater 16 Connections Connecting the AV Receiver/AV Amplifier 17 Connecting Your Speakers 17 Bi-amping the Front Speakers 19 Connecting Antenna (TX-SR806 only 20 About AV Connections 22 Connecting...or DAT Recorder 36 Connecting a Power Amplifier 37 Connecting a Tuner (TX-SA806 only 37 Connecting an RI Dock 38 Connecting Onkyo V Components 39 Connecting the Power Cord 39 Turning On the AV Receiver/AV Amplifier 40 Turning On and Standby 40 First Time Setup First Time...
Owner Manual
Page 9
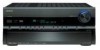
...X RETURN button K PHONES jack (58) This 1/4-inch phone jack is used to select radio presets (see page 60) (TX-SR806 only). When set to set the AV receiver/AV amplifier to access the onscreen setup menus that appear on . M ZONE 2 and OFF buttons (102) The [ZONE 2] button... LEVEL button (103) Used when adjusting the volume level of Zone 2. P HDMI OUT button (41) Used to OFF, the AV receiver/AV amplifier is being received from the remote controller. cs GAME button (64) Selects the listening modes intended for automatic audio input selection setup. C STANDBY indicator (40) ...
...X RETURN button K PHONES jack (58) This 1/4-inch phone jack is used to select radio presets (see page 60) (TX-SR806 only). When set to set the AV receiver/AV amplifier to access the onscreen setup menus that appear on . M ZONE 2 and OFF buttons (102) The [ZONE 2] button... LEVEL button (103) Used when adjusting the volume level of Zone 2. P HDMI OUT button (41) Used to OFF, the AV receiver/AV amplifier is being received from the remote controller. cs GAME button (64) Selects the listening modes intended for automatic audio input selection setup. C STANDBY indicator (40) ...

Owner Manual
Page 12
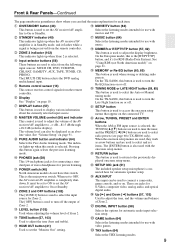
... IN/OUT A commercially available IR receiver can be connected to an V jack on the AV receiver/AV amplifier, a 12volt trigger signal is connected here. When Zone 2 is turned on on another Onkyo AV component. L XM antenna (North ...TX-SR806 only) These push terminals are for connecting a recorder with optical digital audio outputs, such as a DVD player, DVD recorder, or DVR (digital video recorder). They're assignable, which means you can connect a game console, TV, etc. Input jacks include S-Video, composite video, and analog audio. The AV receiver/AV amplifier's remote...
... IN/OUT A commercially available IR receiver can be connected to an V jack on the AV receiver/AV amplifier, a 12volt trigger signal is connected here. When Zone 2 is turned on on another Onkyo AV component. L XM antenna (North ...TX-SR806 only) These push terminals are for connecting a recorder with optical digital audio outputs, such as a DVD player, DVD recorder, or DVR (digital video recorder). They're assignable, which means you can connect a game console, TV, etc. Input jacks include S-Video, composite video, and analog audio. The AV receiver/AV amplifier's remote...

Owner Manual
Page 14
... inside the battery compartment. 3 Replace the cover and push it . • When you want to operate an Onkyo component without V connection, point the remote controller at the AV receiver/AV amplifier's remote control sensor. 14 Remote control sensor STANDBY indicator AV receiver/AV amplifier 2 Insert the two supplied batteries (AA/R6) in mind when installing. • If another component (page...
... inside the battery compartment. 3 Replace the cover and push it . • When you want to operate an Onkyo component without V connection, point the remote controller at the AV receiver/AV amplifier's remote control sensor. 14 Remote control sensor STANDBY indicator AV receiver/AV amplifier 2 Insert the two supplied batteries (AA/R6) in mind when installing. • If another component (page...

Owner Manual
Page 15
...), this AV receiver/AV amplifier. ■ Controlling the tuner (TX-SR806 only) To control the AV receiver's tuner, press the [TUNER] (or [RECEIVER]) button. K MUTING button (58) Mutes or unmutes the AV receiver/AV amplifier. ... when changing settings. Note: An Onkyo cassette recorder connected via V can also be controlled in Receiver mode (see the pages in this...2 Number buttons (59) Used to select Receiver mode. Remote Controller-Continued Controlling the AV Receiver/AV Amplifier To control the AV receiver/AV amplifier, press the [RECEIVER] button to select radio stations directly. ...
...), this AV receiver/AV amplifier. ■ Controlling the tuner (TX-SR806 only) To control the AV receiver's tuner, press the [TUNER] (or [RECEIVER]) button. K MUTING button (58) Mutes or unmutes the AV receiver/AV amplifier. ... when changing settings. Note: An Onkyo cassette recorder connected via V can also be controlled in Receiver mode (see the pages in this...2 Number buttons (59) Used to select Receiver mode. Remote Controller-Continued Controlling the AV Receiver/AV Amplifier To control the AV receiver/AV amplifier, press the [RECEIVER] button to select radio stations directly. ...
Owner Manual
Page 38
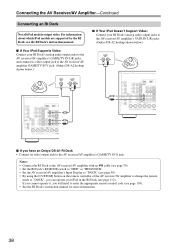
... Dock • Connect its video output jack to the AV receiver/AV amplifier GAME/TV IN V jack. (Onkyo DS-A2 hookup shown below .) AUDIO OUT L R VIDEO OUT AUDIO OUT L R ■ If you will need to enter the appropriate remote control code (see the RI Dock's instruction manual. &#...50). • By using the [CUSTOM] button on the remote controller of the AV receiver/AV amplifier to change the remote mode to "DOCK", you can operate your RI Dock's analog audio output jacks to the AV receiver/AV amplifier's TAPE IN L/R jacks. (Onkyo DS-A2 hookup shown below .) ■ If Your iPod Doesn...
... Dock • Connect its video output jack to the AV receiver/AV amplifier GAME/TV IN V jack. (Onkyo DS-A2 hookup shown below .) AUDIO OUT L R VIDEO OUT AUDIO OUT L R ■ If you will need to enter the appropriate remote control code (see the RI Dock's instruction manual. &#...50). • By using the [CUSTOM] button on the remote controller of the AV receiver/AV amplifier to change the remote mode to "DOCK", you can operate your RI Dock's analog audio output jacks to the AV receiver/AV amplifier's TAPE IN L/R jacks. (Onkyo DS-A2 hookup shown below .) ■ If Your iPod Doesn...
Owner Manual
Page 39
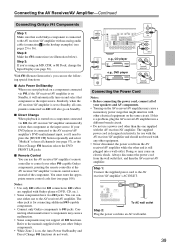
... sure that component as the input source. nect either one supplied with any other V-capable Onkyo components, pointing the remote controller at the AV receiver/AV amplifier's remote control sensor instead of your DVD player is connected to the AV receiver/AV amplifier with Onkyo players (DVD, CD, etc.). • Some components have two V jacks. Step 3: If you 'll need...
... sure that component as the input source. nect either one supplied with any other V-capable Onkyo components, pointing the remote controller at the AV receiver/AV amplifier's remote control sensor instead of your DVD player is connected to the AV receiver/AV amplifier with Onkyo players (DVD, CD, etc.). • Some components have two V jacks. Step 3: If you 'll need...

Owner Manual
Page 40
...turn it for the very first time. To prevent any loud surprises when you turn on the AV receiver/AV amplifier, always turn the AV receiver/AV amplifier off, press the [ON/STANDBY] button, or press the remote controller's [ON/STANDBY] button. For non-North American models: To completely shut down the volume...to the HDMI OUT or COMPONENT VIDEO MONITOR OUT? To turn down the AV receiver/AV amplifier, set the [POWER] switch to be made once. ■ Do the automatic speaker setup-this step if you connected an Onkyo MD recorder, CD recorder, or RI Dock? These settings only need to...
...turn it for the very first time. To prevent any loud surprises when you turn on the AV receiver/AV amplifier, always turn the AV receiver/AV amplifier off, press the [ON/STANDBY] button, or press the remote controller's [ON/STANDBY] button. For non-North American models: To completely shut down the volume...to the HDMI OUT or COMPONENT VIDEO MONITOR OUT? To turn down the AV receiver/AV amplifier, set the [POWER] switch to be made once. ■ Do the automatic speaker setup-this step if you connected an Onkyo MD recorder, CD recorder, or RI Dock? These settings only need to...
Owner Manual
Page 43
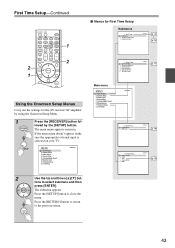
... submenu appears. Component Video Input 3. Miscellaneous 7. Source Setup 5. OSD Setup 7. First Time Setup-Continued 1 ■ Menus for the AV receiver/AV amplifier by the [SETUP] button. Audio Adjust 4. Hardware Setup 8. Audio Adjust 4. Volume Setup 2. Zone2 3. HDMI Input 2. Speaker ... 1. lowed by using the Onscreen Setup Menu. 1 Press the [RECEIVER] button fol- The main menu appears onscreen. Lock Setup 2. Miscellaneous 1. Speaker Setup 3. Speaker Setup 3. Remote Control 2. Speaker Settings 2. If the main menu doesn't appear,...
... submenu appears. Component Video Input 3. Miscellaneous 7. Source Setup 5. OSD Setup 7. First Time Setup-Continued 1 ■ Menus for the AV receiver/AV amplifier by the [SETUP] button. Audio Adjust 4. Hardware Setup 8. Audio Adjust 4. Volume Setup 2. Zone2 3. HDMI Input 2. Speaker ... 1. lowed by using the Onscreen Setup Menu. 1 Press the [RECEIVER] button fol- The main menu appears onscreen. Lock Setup 2. Miscellaneous 1. Speaker Setup 3. Speaker Setup 3. Remote Control 2. Speaker Settings 2. If the main menu doesn't appear,...

Owner Manual
Page 49
...7-3. Note: This procedure can also be performed on the AV receiver/AV amplifier by the [SETUP] button. Hardware Setup 1. tons to select "7. Tuner", and then press [ENTER]. HDMI 3 Use the Up and Down [R]/[X] but - tons to select "3. Remote Control 2. Tuner AM Frequency Step 9kHz 4 Use the Left... and Right [F]/[S] buttons to select: 10kHz: Select if 10 kHz steps are used in your area. 9kHz: Select if 9 kHz steps are deleted. 1 Press the [RECEIVER] button, followed by using its...
...7-3. Note: This procedure can also be performed on the AV receiver/AV amplifier by the [SETUP] button. Hardware Setup 1. tons to select "7. Tuner", and then press [ENTER]. HDMI 3 Use the Up and Down [R]/[X] but - tons to select "3. Remote Control 2. Tuner AM Frequency Step 9kHz 4 Use the Left... and Right [F]/[S] buttons to select: 10kHz: Select if 10 kHz steps are used in your area. 9kHz: Select if 9 kHz steps are deleted. 1 Press the [RECEIVER] button, followed by using its...
Owner Manual
Page 56
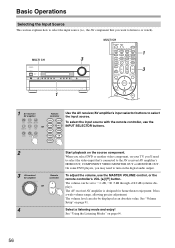
To adjust the volume, use the or INPUT SELECTOR buttons. 2 3 AV receiver/ AV amplifier Remote controller or 4 Start playback on the source component. The AV receiver/AV amplifier is designed for home theater enjoyment. On some DVD players, you 'll need to ...81.5 dB through +18.0 dB (relative dis- Select a listening mode and enjoy! MULTI CH 1 MULTI CH 3 3 1 1 AV receiver/ AV amplifier Remote controller Use the AV receiver/AV amplifier's input selector buttons to select the input source. When you select DVD or another video component, on the digital audio output. ...
To adjust the volume, use the or INPUT SELECTOR buttons. 2 3 AV receiver/ AV amplifier Remote controller or 4 Start playback on the source component. The AV receiver/AV amplifier is designed for home theater enjoyment. On some DVD players, you 'll need to ...81.5 dB through +18.0 dB (relative dis- Select a listening mode and enjoy! MULTI CH 1 MULTI CH 3 3 1 1 AV receiver/ AV amplifier Remote controller Use the AV receiver/AV amplifier's input selector buttons to select the input source. When you select DVD or another video component, on the digital audio output. ...

Owner Manual
Page 57
... can use the AV receiver/AV amplifier's [DIMMER] button (North American models and TX-SA806 only). 57 If the input signal is PCM, the sampling frequency is displayed. Alternatively, you can display various information about three seconds, then the previously displayed information reappears. Information is displayed for hookup information. Remote controller Press the [RECEIVER] button, and...
... can use the AV receiver/AV amplifier's [DIMMER] button (North American models and TX-SA806 only). 57 If the input signal is PCM, the sampling frequency is displayed. Alternatively, you can display various information about three seconds, then the previously displayed information reappears. Information is displayed for hookup information. Remote controller Press the [RECEIVER] button, and...
Owner Manual
Page 59
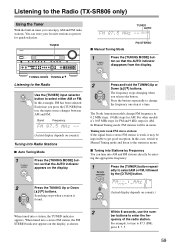
... ■ Auto Tuning Mode 1 Press the [TUNING MODE] but - Listening to the Radio (TX-SR806 only) Using the Tuner With the built-in tuner you can tune into AM and FM stations directly by entering the appropriate frequency. 1 Remote controller Press the [TUNER] button repeatedly to select AM or FM, followed by the...
... ■ Auto Tuning Mode 1 Press the [TUNING MODE] but - Listening to the Radio (TX-SR806 only) Using the Tuner With the built-in tuner you can tune into AM and FM stations directly by entering the appropriate frequency. 1 Remote controller Press the [TUNER] button repeatedly to select AM or FM, followed by the...

Owner Manual
Page 60
ing (about 8 seconds), use the PRESET [F]/[S] buttons, or the remote controller's CH [+/-] button. AV receiver/ AV amplifier To select a preset, use the PRESET [F]/[S] buttons to select a preset from the display. 60 See the previous section. 2 While holding down the [...can name your radio presets for all of your favorite AM/FM radio stations as a preset. 2 Press the [MEMORY] button. Listening to the Radio (TX-SR806 only)-Continued Presetting AM/FM Stations 2, 4 3 Selecting Presets PRESET You can store a combination of up to 40 of your favorite AM/FM radio stations. ...
ing (about 8 seconds), use the PRESET [F]/[S] buttons, or the remote controller's CH [+/-] button. AV receiver/ AV amplifier To select a preset, use the PRESET [F]/[S] buttons to select a preset from the display. 60 See the previous section. 2 While holding down the [...can name your radio presets for all of your favorite AM/FM radio stations as a preset. 2 Press the [MEMORY] button. Listening to the Radio (TX-SR806 only)-Continued Presetting AM/FM Stations 2, 4 3 Selecting Presets PRESET You can store a combination of up to 40 of your favorite AM/FM radio stations. ...

Owner Manual
Page 64
...see "Displaying Source Information" on page 57. • While a pair of the input signal. Pressing this mode is selected, the AV receiver/AV amplifier's display is connected, you can be selected if your DVD player is connected to select the listening mode. When this button ...[MUSIC] button This button selects the listening modes intended for use with the Remote Controller MUSIC MOVIE/TV GAME THX Press the [RECEIVER] button, and then press the LISTENING MODE button repeatedly to the AV receiver/AV amplifier with a digital audio connection (coaxial, optical, or HDMI). • ...
...see "Displaying Source Information" on page 57. • While a pair of the input signal. Pressing this mode is selected, the AV receiver/AV amplifier's display is connected, you can be selected if your DVD player is connected to select the listening mode. When this button ...[MUSIC] button This button selects the listening modes intended for use with the Remote Controller MUSIC MOVIE/TV GAME THX Press the [RECEIVER] button, and then press the LISTENING MODE button repeatedly to the AV receiver/AV amplifier with a digital audio connection (coaxial, optical, or HDMI). • ...

Owner Manual
Page 71
... and movies, video games can also benefit from Dolby. Dolby Digital Plus Button: Developed for information on both the AV receiver/AV amplifier and the remote controller). The LISTENING MODE button illustration shows that fully envelops the listener. They're especially suited to 7.1 channels with... when watching an old movie with analog or PCM multichannel sources. Using the Listening Modes-Continued About the Listening Modes The AV receiver/AV amplifier's listening modes can transform your listening room into a movie theater or concert hall, with any 2-channel source for the...
... and movies, video games can also benefit from Dolby. Dolby Digital Plus Button: Developed for information on both the AV receiver/AV amplifier and the remote controller). The LISTENING MODE button illustration shows that fully envelops the listener. They're especially suited to 7.1 channels with... when watching an old movie with analog or PCM multichannel sources. Using the Listening Modes-Continued About the Listening Modes The AV receiver/AV amplifier's listening modes can transform your listening room into a movie theater or concert hall, with any 2-channel source for the...
Owner Manual
Page 74
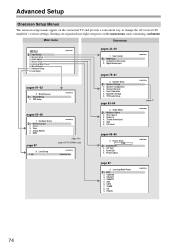
...4. Miscellaneous 7. Remote Control 2. Speaker Settings 2. Equalizer Settings 6. CBL/SAT 4. AUX 6. Input Assign 2. Volume Setup 2. Zone2 3. HDMI Input 2. Audio Adjust 1. Dolby EX 4. CD 9. Listening Mode Preset 6. Speaker Configuration 3. PLIIx / Neo:6 3. A/V Sync 3. PHONO 74 Miscellaneous 1. Lock Setup Lock page 100 page 49 (TX-SR806 only) Unlocked pages... into eight categories on the connected TV and provide a convenient way to change the AV receiver/AV amplifier's various settings. OSD Setup pages 93-96 7. Speaker Distance 4. DVD 2.
...4. Miscellaneous 7. Remote Control 2. Speaker Settings 2. Equalizer Settings 6. CBL/SAT 4. AUX 6. Input Assign 2. Volume Setup 2. Zone2 3. HDMI Input 2. Audio Adjust 1. Dolby EX 4. CD 9. Listening Mode Preset 6. Speaker Configuration 3. PLIIx / Neo:6 3. A/V Sync 3. PHONO 74 Miscellaneous 1. Lock Setup Lock page 100 page 49 (TX-SR806 only) Unlocked pages... into eight categories on the connected TV and provide a convenient way to change the AV receiver/AV amplifier's various settings. OSD Setup pages 93-96 7. Speaker Distance 4. DVD 2.
Owner Manual
Page 81
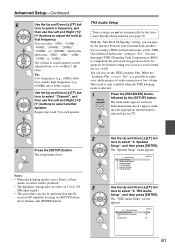
...and Right [F]/ [S] buttons to a room boundary (i.e., wall). When the "Loudness Plus" is set to "On", it is selected on the AV receiver/AV amplifier by using a THX-certified subwoofer, set to select another speaker. The main menu appears onscreen. The "Speaker Setup" menu appears. 2. Speaker...'s Boundary Gain Compensation (BGC) to +6 dB in 1 dB steps. Notes: • When the listening mode is selected. 1 Remote controller Press the [RECEIVER] button, followed by the Automatic Speaker Setup function (see page 51). THX Audio Setup Use the Up and Down [R]/[X] buttons to...
...and Right [F]/ [S] buttons to a room boundary (i.e., wall). When the "Loudness Plus" is set to "On", it is selected on the AV receiver/AV amplifier by using a THX-certified subwoofer, set to select another speaker. The main menu appears onscreen. The "Speaker Setup" menu appears. 2. Speaker...'s Boundary Gain Compensation (BGC) to +6 dB in 1 dB steps. Notes: • When the listening mode is selected. 1 Remote controller Press the [RECEIVER] button, followed by the Automatic Speaker Setup function (see page 51). THX Audio Setup Use the Up and Down [R]/[X] buttons to...


