
Owner Manual
Page 6
... Non-Scaling Configuration • Direct Mode and Pure Audio Mode • 192 kHz/24-bit D/A Converters • Two TI (Aureus) 32-bit DSP Processing Connections • 5 HDMI*4 Inputs and 1 Output (ver. 1.3a) • Onkyo for System Control • 6 Digital Inputs (3 Optical / 3 Coaxial) • 5 S-Video Inputs / 2 Outputs • Component Video Switching (2 Inputs/1 Output) • Banana Plug-Compatible Speaker Posts*5 • Powered Zone 2 and Zone 2 Pre Out • IR Input/Output and 12 V Trigger • RS232 Port for Interface Control • Bi-Amp Connectable for FL...
... Non-Scaling Configuration • Direct Mode and Pure Audio Mode • 192 kHz/24-bit D/A Converters • Two TI (Aureus) 32-bit DSP Processing Connections • 5 HDMI*4 Inputs and 1 Output (ver. 1.3a) • Onkyo for System Control • 6 Digital Inputs (3 Optical / 3 Coaxial) • 5 S-Video Inputs / 2 Outputs • Component Video Switching (2 Inputs/1 Output) • Banana Plug-Compatible Speaker Posts*5 • Powered Zone 2 and Zone 2 Pre Out • IR Input/Output and 12 V Trigger • RS232 Port for Interface Control • Bi-Amp Connectable for FL...

Owner Manual
Page 7
... models) .... 49 Changing the Input Display 50 Automatic Speaker Setup (Audyssey MultEQ®) ... 51 Basic Operations Basic Operations 56 Selecting the Input Source 56 Using the Multichannel DVD Input 57 Adjusting the Bass & Treble 57 Displaying Source Information 57 Setting the Display Brightness 57 Muting the AV receiver/AV amplifier 58 Using the Sleep Timer 58 Using Headphones 58 Listening to the Radio (TX-SR806 only 59 Using the Tuner 59 Presetting AM/FM Stations 60 Using RDS (not North American model 61 Recording 63 Using the Listening Modes Using the Listening Modes...
... models) .... 49 Changing the Input Display 50 Automatic Speaker Setup (Audyssey MultEQ®) ... 51 Basic Operations Basic Operations 56 Selecting the Input Source 56 Using the Multichannel DVD Input 57 Adjusting the Bass & Treble 57 Displaying Source Information 57 Setting the Display Brightness 57 Muting the AV receiver/AV amplifier 58 Using the Sleep Timer 58 Using Headphones 58 Listening to the Radio (TX-SR806 only 59 Using the Tuner 59 Presetting AM/FM Stations 60 Using RDS (not North American model 61 Recording 63 Using the Listening Modes Using the Listening Modes...
Owner Manual
Page 9
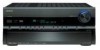
...See "Volume Setup" on page 91. There are used to select the Auto or Manual tuning mode. On the TX-SA806, this mode is used to select and set the "Monitor Out" setting. U TUNING MODE or LATE NIGHT button (59, 85) This button is used to adjust the tone (bass and treble). ct THX button (64) Selects the THX listening modes. 9 Front & Rear Panels-Continued The page numbers in Standby mode, and it 's for use with video games. The [MULTI CH] button selects the DVD analog multichannel input. This button is selected. Y SETUP MIC jack (51) L POWER switch (40...
...See "Volume Setup" on page 91. There are used to select the Auto or Manual tuning mode. On the TX-SA806, this mode is used to select and set the "Monitor Out" setting. U TUNING MODE or LATE NIGHT button (59, 85) This button is used to adjust the tone (bass and treble). ct THX button (64) Selects the THX listening modes. 9 Front & Rear Panels-Continued The page numbers in Standby mode, and it 's for use with video games. The [MULTI CH] button selects the DVD analog multichannel input. This button is selected. Y SETUP MIC jack (51) L POWER switch (40...
Owner Manual
Page 10
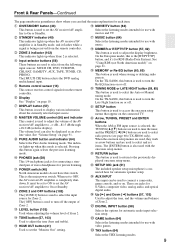
... Powered Zone 2 is selected. I Message area Displays various information. K Volume level (56) Displays the volume level. Goes off when Manual Tuning mode is being used by the current input source. : A box is muted. 10 L MUTING indicator (58) Flashes while the AV receiver/AV amplifier is displayed for AM or FM radio. No box appears for speakers that supports RDS (Radio Data System). AUTO (59): Lights up when tuned to a radio station that are plugged into the PHONES jack. E Tuning indicators (TX-SR806...
... Powered Zone 2 is selected. I Message area Displays various information. K Volume level (56) Displays the volume level. Goes off when Manual Tuning mode is being used by the current input source. : A box is muted. 10 L MUTING indicator (58) Flashes while the AV receiver/AV amplifier is displayed for AM or FM radio. No box appears for speakers that supports RDS (Radio Data System). AUTO (59): Lights up when tuned to a radio station that are plugged into the PHONES jack. E Tuning indicators (TX-SR806...

Owner Manual
Page 12
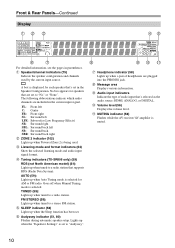
...These optical digital audio inputs are for connecting components with coaxial digital audio outputs, such as CD and DVD players. See "Digital Input Setup" on page 45. S CD IN This analog audio input is output. Input jacks include S-Video, composite video, and analog audio. See "HDMI Input Setup" on page 46. A commercially available IR emitter can assign each one to an input selector to an V jack on the AV receiver/AV amplifier, a 12volt trigger signal is for connecting components with an HDMI input. The AV receiver/AV amplifier's remote controller can be connected...
...These optical digital audio inputs are for connecting components with coaxial digital audio outputs, such as CD and DVD players. See "Digital Input Setup" on page 45. S CD IN This analog audio input is output. Input jacks include S-Video, composite video, and analog audio. See "HDMI Input Setup" on page 46. A commercially available IR emitter can assign each one to an input selector to an V jack on the AV receiver/AV amplifier, a 12volt trigger signal is for connecting components with an HDMI input. The AV receiver/AV amplifier's remote controller can be connected...

Owner Manual
Page 15
... current input source. Note: An Onkyo cassette recorder connected via V can also use the remote controller to "On" (page 95), this AV receiver/AV amplifier. ■ Controlling the tuner (TX-SR806 only) To control the AV receiver's tuner, press the [TUNER] (or [RECEIVER]) button. I DIMMER button (57) Adjusts the display brightness. K MUTING button (58) Mutes or unmutes the AV receiver/AV amplifier. N AUDIO button (85) Used to select radio presets. button (60) Used to change settings. H LISTENING MODE buttons (64) Used to On or Standby. C REMOTE MODE/INPUT SELECTOR buttons (56...
... current input source. Note: An Onkyo cassette recorder connected via V can also use the remote controller to "On" (page 95), this AV receiver/AV amplifier. ■ Controlling the tuner (TX-SR806 only) To control the AV receiver's tuner, press the [TUNER] (or [RECEIVER]) button. I DIMMER button (57) Adjusts the display brightness. K MUTING button (58) Mutes or unmutes the AV receiver/AV amplifier. N AUDIO button (85) Used to select radio presets. button (60) Used to change settings. H LISTENING MODE buttons (64) Used to On or Standby. C REMOTE MODE/INPUT SELECTOR buttons (56...
Owner Manual
Page 34
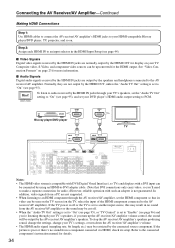
... a DVI input can be seen on the TV screen (on your TV. To stop the AV receiver/AV amplifier's speakers producing sound, change the settings, change your TV's settings, or turn up the AV receiver/AV amplifier volume control, the sound will be connected by using an HDMI-to-DVI adapter cable. (Note that its setup. HDMI OUT HDMI IN Blu-ray player/DVD player TV HDMI IN 1 (DVD) HDMI Notes: • The HDMI video stream is compatible with DVI (Digital Visual Interface), so TVs and displays with...
... a DVI input can be seen on the TV screen (on your TV. To stop the AV receiver/AV amplifier's speakers producing sound, change the settings, change your TV's settings, or turn up the AV receiver/AV amplifier volume control, the sound will be connected by using an HDMI-to-DVI adapter cable. (Note that its setup. HDMI OUT HDMI IN Blu-ray player/DVD player TV HDMI IN 1 (DVD) HDMI Notes: • The HDMI video stream is compatible with DVI (Digital Visual Interface), so TVs and displays with...
Owner Manual
Page 39
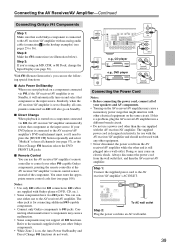
... Standby, it will automatically turn on the same circuit. To AC wall outlet Step 2: Plug the power cord into a different branch circuit. • Do not use the AV receiver/AV amplifier's remote controller to control your other electrical equipment on and select that component as the Direct Change V function selects the DVD FRONT L/R jacks. ■ Remote Control You can con- If this is a problem, plug the AV receiver/AV amplifier into an AC wall outlet. 39 Connecting the AV Receiver/AV Amplifier-Continued Connecting Onkyo V Components...
... Standby, it will automatically turn on the same circuit. To AC wall outlet Step 2: Plug the power cord into a different branch circuit. • Do not use the AV receiver/AV amplifier's remote controller to control your other electrical equipment on and select that component as the Direct Change V function selects the DVD FRONT L/R jacks. ■ Remote Control You can con- If this is a problem, plug the AV receiver/AV amplifier into an AC wall outlet. 39 Connecting the AV Receiver/AV Amplifier-Continued Connecting Onkyo V Components...

Owner Manual
Page 44
... HDMI cable, you must assign HDMI IN 1 to the DVD input selector. Input Assign", and then press [ENTER]. The "Input Assign" menu appears. 1. HDMI5 have already been assigned, you must set first any unused input selectors to or you must assign that input to an input selector. HDMI Input", and then press [ENTER]. First Time Setup-Continued Video Input Setup HDMI Input Setup If you connect a video component to HDMI IN, you can set the AV receiver/AV amplifier so that composite video, S-Video, and component video sources are upconverted* and output...
... HDMI cable, you must assign HDMI IN 1 to the DVD input selector. Input Assign", and then press [ENTER]. The "Input Assign" menu appears. 1. HDMI5 have already been assigned, you must set first any unused input selectors to or you must assign that input to an input selector. HDMI Input", and then press [ENTER]. First Time Setup-Continued Video Input Setup HDMI Input Setup If you connect a video component to HDMI IN, you can set the AV receiver/AV amplifier so that composite video, S-Video, and component video sources are upconverted* and output...
Owner Manual
Page 74
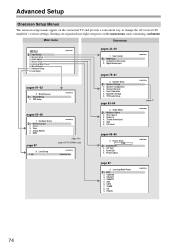
... (TX-SR806 only) Unlocked pages 44-46 1. HDMI Input 2. Digital Audio Input pages 75-81 2. PLIIx / Neo:6 3. Name Edit 4. TAPE 7. Input Assign 2. Lock Setup pages 91-92 6. Speaker Settings 2. Dolby EX 4. Source Setup DVD 1. A/V Sync 3. Picture Adjust page 47 page 87 5. AUX 6. PHONO 74 Audio Adjust 4. Source Setup 5. LFE Level pages 88-90 4. IntelliVolume 2. Listening Mode Preset 1. VCR/DVR 3. CD 9. Miscellaneous 7. Remote Control 2. CBL/SAT 4. TUNER 8. Miscellaneous 1. Tuner 4. Component Video Input 3. Speaker Configuration 3. THX...
... (TX-SR806 only) Unlocked pages 44-46 1. HDMI Input 2. Digital Audio Input pages 75-81 2. PLIIx / Neo:6 3. Name Edit 4. TAPE 7. Input Assign 2. Lock Setup pages 91-92 6. Speaker Settings 2. Dolby EX 4. Source Setup DVD 1. A/V Sync 3. Picture Adjust page 47 page 87 5. AUX 6. PHONO 74 Audio Adjust 4. Source Setup 5. LFE Level pages 88-90 4. IntelliVolume 2. Listening Mode Preset 1. VCR/DVR 3. CD 9. Miscellaneous 7. Remote Control 2. CBL/SAT 4. TUNER 8. Miscellaneous 1. Tuner 4. Component Video Input 3. Speaker Configuration 3. THX...
Owner Manual
Page 83
... input is output by using the Dolby Pro Logic II Music or Dolby Pro Logic IIx Music listening mode. Center: Mono audio is selected on the AV receiver/AV amplifier by the center speaker (default). PLIIx/Neo:6 Music Mode Settings ■ PLIIx Music (2ch Input) These settings provide for playing any 2-channel digital source such as Dolby Digital, or 2channel analog/PCM source in the Dolby PLIIx Music listening mode. Audio Adjust", and then press [ENTER]. DSD 6. The main menu appears onscreen. The setup menu closes. Note: This procedure can also be used for playing...
... input is output by using the Dolby Pro Logic II Music or Dolby Pro Logic IIx Music listening mode. Center: Mono audio is selected on the AV receiver/AV amplifier by the center speaker (default). PLIIx/Neo:6 Music Mode Settings ■ PLIIx Music (2ch Input) These settings provide for playing any 2-channel digital source such as Dolby Digital, or 2channel analog/PCM source in the Dolby PLIIx Music listening mode. Audio Adjust", and then press [ENTER]. DSD 6. The main menu appears onscreen. The setup menu closes. Note: This procedure can also be used for playing...

Owner Manual
Page 84
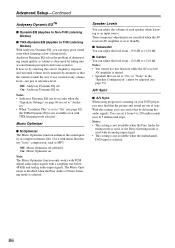
... Dolby Digital, DTS, multichannel PCM, Dolby TrueHD, DTSHD Master Audio, and DSD sources. This setting is unavailable if no surround back speakers are passed through the DSP for multichannel PCM sources. (Multichannel PCM is attenuated in mono, or there is selected. If you to adjust the weight of the sound from 0 to 7 (default is 0). When set the level of the LFE channel for the Theater-Dimensional listening mode is effective with Dolby Digital, Dolby Digital Plus and Dolby TrueHD only. This setting works...
... Dolby Digital, DTS, multichannel PCM, Dolby TrueHD, DTSHD Master Audio, and DSD sources. This setting is unavailable if no surround back speakers are passed through the DSP for multichannel PCM sources. (Multichannel PCM is attenuated in mono, or there is selected. If you to adjust the weight of the sound from 0 to 7 (default is 0). When set the level of the LFE channel for the Theater-Dimensional listening mode is effective with Dolby Digital, Dolby Digital Plus and Dolby TrueHD only. This setting works...
Owner Manual
Page 86
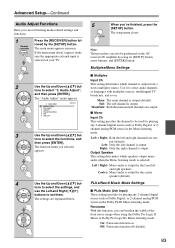
...; Center You can set to Standby. ■ Subwoofer You can adjust the level from -12.0 dB to +12.0 dB. Advanced Setup-Continued Audyssey Dynamic EQTM ■ DynamicEQ (Applies to Non-THX Listening Modes) ■ THX+DynamicEQ (Applies to THX Listening Modes) With Audyssey Dynamic EQ, you can adjust the volume of sync. On: Music Optimizer on page 80 are out of each speaker while listening to an input source. Note: The Music Optimizer function only works with PCM digital audio input signals with an analog input signal...
...; Center You can set to Standby. ■ Subwoofer You can adjust the level from -12.0 dB to +12.0 dB. Advanced Setup-Continued Audyssey Dynamic EQTM ■ DynamicEQ (Applies to Non-THX Listening Modes) ■ THX+DynamicEQ (Applies to THX Listening Modes) With Audyssey Dynamic EQ, you can adjust the volume of sync. On: Music Optimizer on page 80 are out of each speaker while listening to an input source. Note: The Music Optimizer function only works with PCM digital audio input signals with an analog input signal...

Owner Manual
Page 87
... Input 4 Sources You can assign a default listening mode to each input source that will be resumed once the AV receiver/AV amplifier has been set to Standby. 1 Remote controller Press the [RECEIVER] button followed by the [SETUP] button. If the main menu doesn't appear, make sure the appropriate external input is played (DVD, etc.). DVD 2. CBL/SAT 4. CD 9. Dolby Digital: With this setting, you can specify the listening mode to be selected (see page 65). Multich PCM: Specifies the default listening mode for multichannel PCM sources input via a HDMI...
... Input 4 Sources You can assign a default listening mode to each input source that will be resumed once the AV receiver/AV amplifier has been set to Standby. 1 Remote controller Press the [RECEIVER] button followed by the [SETUP] button. If the main menu doesn't appear, make sure the appropriate external input is played (DVD, etc.). DVD 2. CBL/SAT 4. CD 9. Dolby Digital: With this setting, you can specify the listening mode to be selected (see page 65). Multich PCM: Specifies the default listening mode for multichannel PCM sources input via a HDMI...
Owner Manual
Page 95
... "Film Mode" can also be set using the [DISPLAY] button on the remote controller. 1. Press and hold the [DISPLAY] button until the set- To stop the AV receiver/AV amplifier's speakers producing sound, change the settings, change the setting to "Disable". • Refer to the connected component's instruction manual for details. 95 Notes: • This function works only if your HDMI-compatible TV supports HDMI Lip Sync. • You can check the amount of the original picture. Auto: Adjusts to "Auto", the AV receiver/AV amplifier automatically detects the picture source and in...
... "Film Mode" can also be set using the [DISPLAY] button on the remote controller. 1. Press and hold the [DISPLAY] button until the set- To stop the AV receiver/AV amplifier's speakers producing sound, change the settings, change the setting to "Disable". • Refer to the connected component's instruction manual for details. 95 Notes: • This function works only if your HDMI-compatible TV supports HDMI Lip Sync. • You can check the amount of the original picture. Auto: Adjusts to "Auto", the AV receiver/AV amplifier automatically detects the picture source and in...
Owner Manual
Page 96
... when set to the connected component's instruction man- CEC provides interoperability between various components, how- Enable: Power Control enabled. ual for Remote Interactive over HDMI and is part of the "Control", "Power Control", or "TV Control", turn on Standby, both set to "Enable", regardless of -compatible components connected via HDMI to the User's Manuals for details. Note: After changing the settings of the HDMI standard. Refer to be set only when the above "Control" and "Power Control" settings are both audio and video received by an HDMI input will...
... when set to the connected component's instruction man- CEC provides interoperability between various components, how- Enable: Power Control enabled. ual for Remote Interactive over HDMI and is part of the "Control", "Power Control", or "TV Control", turn on Standby, both set to "Enable", regardless of -compatible components connected via HDMI to the User's Manuals for details. Note: After changing the settings of the HDMI standard. Refer to be set only when the above "Control" and "Power Control" settings are both audio and video received by an HDMI input will...
Owner Manual
Page 99
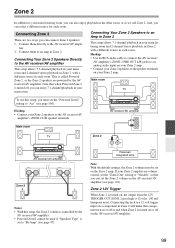
...audio cable to connect the AV receiver/ AV amplifier's ZONE 2 PRE OUT L/R jacks to an analog audio input on your Zone 2 amp. • Connect your Zone 2 speakers to the speaker terminals on , the output from the 12V TRIGGER OUT ZONE 2 goes high (+12 volts, 100 milliamperes max). If your Zone 2 amp has no volume control, set the Zone 2 volume on the AV receiver/AV amplifier. 99 Connecting this setup, the Zone 2 volume is turned on or off as we call Zone 2. Connect them directly to the AV receiver/AV ampli- AV receiver/AV amplifier Main room TV AV receiver/AV amplifier Zone...
...audio cable to connect the AV receiver/ AV amplifier's ZONE 2 PRE OUT L/R jacks to an analog audio input on your Zone 2 amp. • Connect your Zone 2 speakers to the speaker terminals on , the output from the 12V TRIGGER OUT ZONE 2 goes high (+12 volts, 100 milliamperes max). If your Zone 2 amp has no volume control, set the Zone 2 volume on the AV receiver/AV amplifier. 99 Connecting this setup, the Zone 2 volume is turned on or off as we call Zone 2. Connect them directly to the AV receiver/AV ampli- AV receiver/AV amplifier Main room TV AV receiver/AV amplifier Zone...
Owner Manual
Page 112
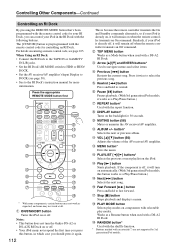
.../STANDBY button Turns the iPod on when the remote controller transmits an On command. Press it works as a Play/Pause button.) H REPEAT button* Used with the repeat function. button* Selects the next or previous album. S PLAY MODE button Selects play modes on the iPod. When Using an RI Dock: • Connect the RI Dock to the TAPE IN or GAME/TV IN L/R jacks. • Set the RI Dock's RI MODE switch to HDD or HDD/ DOCK. • Set the AV receiver/AV amplifier's Input Display to DOCK (see page 105. M MENU button...
.../STANDBY button Turns the iPod on when the remote controller transmits an On command. Press it works as a Play/Pause button.) H REPEAT button* Used with the repeat function. button* Selects the next or previous album. S PLAY MODE button Selects play modes on the iPod. When Using an RI Dock: • Connect the RI Dock to the TAPE IN or GAME/TV IN L/R jacks. • Set the RI Dock's RI MODE switch to HDD or HDD/ DOCK. • Set the AV receiver/AV amplifier's Input Display to DOCK (see page 105. M MENU button...
Owner Manual
Page 117
... resetting the AV receiver/AV amplifier will enter Standby mode. Troubleshooting If you have any trouble using the AV receiver/AV amplifier, look for home theater enjoyment. Note that the speaker setup microphone is not still connected. • The input signal format is set to maximum, disconnect the power cord, and contact your Onkyo dealer. The AV receiver/AV amplifier turns off as soon as an AM radio station or mono TV program, the sound is concentrated in this section. Remove the power cord from a DVD player connected...
... resetting the AV receiver/AV amplifier will enter Standby mode. Troubleshooting If you have any trouble using the AV receiver/AV amplifier, look for home theater enjoyment. Note that the speaker setup microphone is not still connected. • The input signal format is set to maximum, disconnect the power cord, and contact your Onkyo dealer. The AV receiver/AV amplifier turns off as soon as an AM radio station or mono TV program, the sound is concentrated in this section. Remove the power cord from a DVD player connected...
Owner Manual
Page 118
... AV receiver/AV amplifier remains in the LFE channel, the subwoofer produces no sound. • Make sure the speakers are configured correctly (page 75). Video There's no picture • Make sure that all of the listening modes, depending on the number of each video component is connected to "Bi-Amp" (page 47). • Check the audio output settings on the input signal, some game consoles, such as those that contains no infor- The Late Night function doesn't work...
... AV receiver/AV amplifier remains in the LFE channel, the subwoofer produces no sound. • Make sure the speakers are configured correctly (page 75). Video There's no picture • Make sure that all of the listening modes, depending on the number of each video component is connected to "Bi-Amp" (page 47). • Check the audio output settings on the input signal, some game consoles, such as those that contains no infor- The Late Night function doesn't work...


