Owner Manual
Page 1
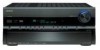
... before making connections and plugging in this manual for purchasing an Onkyo AV Receiver/ AV Amplifier. Contents Introduction 2 Connections 17 First Time Setup 41 Basic Operations 56 Using the Listening Modes ...........64 Advanced Setup 74 Zone 2 99 Controlling Other Components ..105 Others 116 En AV Receiver TX-SR806 AV Amplifier TX-SA806 Instruction Manual Thank you to obtain optimum performance and listening...
... before making connections and plugging in this manual for purchasing an Onkyo AV Receiver/ AV Amplifier. Contents Introduction 2 Connections 17 First Time Setup 41 Basic Operations 56 Using the Listening Modes ...........64 Advanced Setup 74 Zone 2 99 Controlling Other Components ..105 Others 116 En AV Receiver TX-SR806 AV Amplifier TX-SA806 Instruction Manual Thank you to obtain optimum performance and listening...
Owner Manual
Page 4
... must be connected to be replaced, the replacement fuse must approved by qualified service personnel. Fit a suitable fuse in the plug. MIYAGI ONKYO EUROPE ELECTRONICS GmbH 4 The wire which is coloured brown must be performed only by ASTA or BSI to the terminal which is marked with... EN60065, EN55013, EN55020 and EN61000-3-2, -3-3. IMPORTANT The plug is in compliance with the corresponding technical standards such as that the ONKYO product described in this instruction manual is fitted with the following code: Blue: Neutral Brown: Live As the colours of the wires in the mains lead of...
... must be connected to be replaced, the replacement fuse must approved by qualified service personnel. Fit a suitable fuse in the plug. MIYAGI ONKYO EUROPE ELECTRONICS GmbH 4 The wire which is coloured brown must be performed only by ASTA or BSI to the terminal which is marked with... EN60065, EN55013, EN55020 and EN61000-3-2, -3-3. IMPORTANT The plug is in compliance with the corresponding technical standards such as that the ONKYO product described in this instruction manual is fitted with the following code: Blue: Neutral Brown: Live As the colours of the wires in the mains lead of...
Owner Manual
Page 9
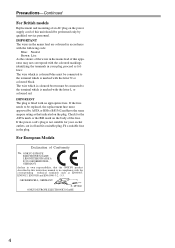
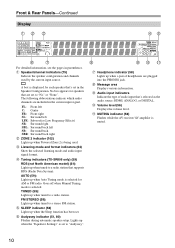
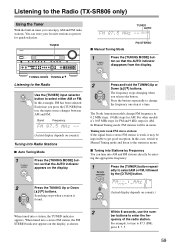
... button (59, 85) This button is used to select the Auto or Manual tuning mode. See "Volume Setup" on page 61. Pressing this is the [RT/PTY/TP] button, and it flashes while a signal is being received from the remote controller. W Arrow, TUNING, PRESET and ENTER buttons When...radio presets (see page 60) (TX-SR806 only). G Display See "Display" on or off. The indicator lights up when this switch. X RETURN button K PHONES jack (58) This 1/4-inch phone jack is completely shutdown. H DISPLAY button (57) This button is used to set the AV receiver/AV amplifier to adjust the tone, ...
... button (59, 85) This button is used to select the Auto or Manual tuning mode. See "Volume Setup" on page 61. Pressing this is the [RT/PTY/TP] button, and it flashes while a signal is being received from the remote controller. W Arrow, TUNING, PRESET and ENTER buttons When...radio presets (see page 60) (TX-SR806 only). G Display See "Display" on or off. The indicator lights up when this switch. X RETURN button K PHONES jack (58) This 1/4-inch phone jack is completely shutdown. H DISPLAY button (57) This button is used to set the AV receiver/AV amplifier to adjust the tone, ...
Owner Manual
Page 10
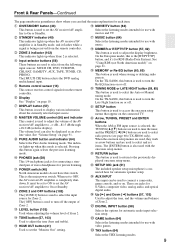
...) Indicate the speaker configuration and channels used . L MUTING indicator (58) Flashes while the AV receiver/AV amplifier is being used by the current input source. : A box is selected for each speaker... up when tuned to a stereo FM station. I Message area Displays various information. E Tuning indicators (TX-SR806 only) (59) RDS (not North American model) (61): Lights up when tuned to a radio ... C ZONE 2 indicator (102) Lights up when tuned to "No" or "None". Goes off when Manual Tuning mode is set . F SLEEP indicator (58) Lights up when the Sleep function has been set to...
...) Indicate the speaker configuration and channels used . L MUTING indicator (58) Flashes while the AV receiver/AV amplifier is being used by the current input source. : A box is selected for each speaker... up when tuned to a stereo FM station. I Message area Displays various information. E Tuning indicators (TX-SR806 only) (59) RDS (not North American model) (61): Lights up when tuned to a radio ... C ZONE 2 indicator (102) Lights up when tuned to "No" or "None". Goes off when Manual Tuning mode is set . F SLEEP indicator (58) Lights up when the Sleep function has been set to...

Owner Manual
Page 17
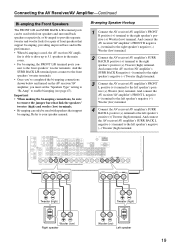
...them to an input on your subwoofer is unpowered and you need to do this automatically (see page 51) or manually (see page 75). Using Dipole Speakers You can do is recommended for the surround left and right and surround back ... TV/screen 1 2 3 4 5 65 6 7 8 1. Surround right speaker 7. Dipole speakers typically have . Surround back left and right speakers. Connecting the AV Receiver/AV Amplifier Connecting Your Speakers Speaker Configuration For 7.1-channel surround-sound playback, you 're using an external amplifier, connect the PRE OUT: SUBWOOFER to an input...
...them to an input on your subwoofer is unpowered and you need to do this automatically (see page 51) or manually (see page 75). Using Dipole Speakers You can do is recommended for the surround left and right and surround back ... TV/screen 1 2 3 4 5 65 6 7 8 1. Surround right speaker 7. Dipole speakers typically have . Surround back left and right speakers. Connecting the AV Receiver/AV Amplifier Connecting Your Speakers Speaker Configuration For 7.1-channel surround-sound playback, you 're using an external amplifier, connect the PRE OUT: SUBWOOFER to an input...
Owner Manual
Page 19
.... • Bi-amping can be used , the AV receiver/AV ampli- And connect the AV receiver/AV amplifier's SURR BACK R negative (-) terminal to the right speaker's negative (-) Tweeter (high) terminal. 3 Connect the AV receiver/AV amplifier's FRONT L positive (+) terminal to enable biamping ...-amping, the FRONT L/R terminal posts connect to your speaker manual. And connect the AV receiver/AV amplifier's FRONT R negative (-) terminal to the right speaker's negative (-) Woofer (low) terminal. 2 Connect the AV receiver/AV amplifier's SURR BACK R positive (+) terminal to the left speaker...
.... • Bi-amping can be used , the AV receiver/AV ampli- And connect the AV receiver/AV amplifier's SURR BACK R negative (-) terminal to the right speaker's negative (-) Tweeter (high) terminal. 3 Connect the AV receiver/AV amplifier's FRONT L positive (+) terminal to enable biamping ...-amping, the FRONT L/R terminal posts connect to your speaker manual. And connect the AV receiver/AV amplifier's FRONT R negative (-) terminal to the right speaker's negative (-) Woofer (low) terminal. 2 Connect the AV receiver/AV amplifier's SURR BACK R positive (+) terminal to the left speaker...

Owner Manual
Page 22
Connecting the AV Receiver/AV Amplifier-Continued About AV Connections • Before making any AV connections, read the manuals supplied with a 7.1-channel analog audio output. And use yellow plugs to connect left-channel audio inputs and outputs (typically labeled "L"). Left (white) ...and sound quality. Jack Description Offers the best sound quality and allows you to enjoy surround sound (e.g., Dolby Digital, DTS). Note: The AV receiver/AV amplifier does not support SCART plugs. 22 Caution: To prevent shutter damage, hold the optical plug straight when inserting and removing...
Connecting the AV Receiver/AV Amplifier-Continued About AV Connections • Before making any AV connections, read the manuals supplied with a 7.1-channel analog audio output. And use yellow plugs to connect left-channel audio inputs and outputs (typically labeled "L"). Left (white) ...and sound quality. Jack Description Offers the best sound quality and allows you to enjoy surround sound (e.g., Dolby Digital, DTS). Note: The AV receiver/AV amplifier does not support SCART plugs. 22 Caution: To prevent shutter damage, hold the optical plug straight when inserting and removing...
Owner Manual
Page 29
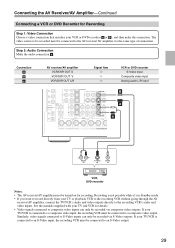
...manuals supplied with your TV/VCR is not possible while it's in Standby mode. • If you want to record directly from your VCR or DVD recorder ( A or B ), and then make the connection. Recording is connected to a composite video input, the recording VCR must be recorded via S-Video outputs. Connecting the AV Receiver/AV... Analog audio L/R input CB BA a L R AUDIO IN S VIDEO IN VIDEO IN VCR, DVD recorder Notes: • The AV receiver/AV amplifier must be recorded via the same type of connection. If your TV and VCR for details. • Video signals connected to ...
...manuals supplied with your TV/VCR is not possible while it's in Standby mode. • If you want to record directly from your VCR or DVD recorder ( A or B ), and then make the connection. Recording is connected to a composite video input, the recording VCR must be recorded via S-Video outputs. Connecting the AV Receiver/AV... Analog audio L/R input CB BA a L R AUDIO IN S VIDEO IN VIDEO IN VCR, DVD recorder Notes: • The AV receiver/AV amplifier must be recorded via the same type of connection. If your TV and VCR for details. • Video signals connected to ...
Owner Manual
Page 34
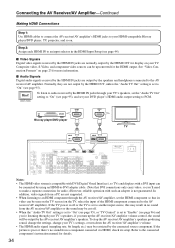
... TV HDMI IN 1 (DVD) HDMI Notes: • The HDMI video stream is poor or there's no sound from the AV receiver/AV amplifier or the sound may be restricted by the speakers and headphones connected to your DVD player's HDMI audio output setting to ...'s speakers, if you 'll need to the connected component's instruction manual for the HDMI output. Connecting the AV Receiver/AV Amplifier-Continued Making HDMI Connections Step 1: Use HDMI cables to connect the AV receiver/AV amplifier's HDMI jacks to the AV receiver/AV amplifier. Step 2: Assign each HDMI IN to "Enable" (see...
... TV HDMI IN 1 (DVD) HDMI Notes: • The HDMI video stream is poor or there's no sound from the AV receiver/AV amplifier or the sound may be restricted by the speakers and headphones connected to your DVD player's HDMI audio output setting to ...'s speakers, if you 'll need to the connected component's instruction manual for the HDMI output. Connecting the AV Receiver/AV Amplifier-Continued Making HDMI Connections Step 1: Use HDMI cables to connect the AV receiver/AV amplifier's HDMI jacks to the AV receiver/AV amplifier. Step 2: Assign each HDMI IN to "Enable" (see...
Owner Manual
Page 38
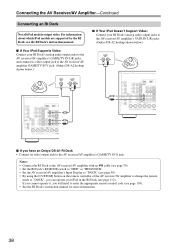
... the RI Dock, see the RI Dock's instruction manual. ■ If Your iPod Supports Video: Connect your RI Dock's analog audio output jacks to the AV receiver/AV amplifier's GAME/TV IN L/R jacks, and connect its video output jack to the AV receiver/AV amplifier GAME/TV IN V jack. (Onkyo DS-A2 hookup shown below.) ■ If Your...
... the RI Dock, see the RI Dock's instruction manual. ■ If Your iPod Supports Video: Connect your RI Dock's analog audio output jacks to the AV receiver/AV amplifier's GAME/TV IN L/R jacks, and connect its video output jack to the AV receiver/AV amplifier GAME/TV IN V jack. (Onkyo DS-A2 hookup shown below.) ■ If Your...
Owner Manual
Page 39
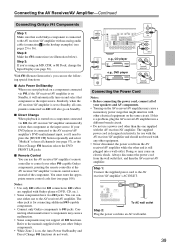
...not support all channels (see pages 25 to the AV receiver/AV amplifier with the AV receiver/AV amplifier. Similarly, when the AV receiver/AV amplifier is set to the manuals supplied with any other equipment. • Never ...disconnect the power cord from the wall outlet first, and then the AV receiver/AV amplifier. You must enter the appropriate remote control code first (see illustration below). You can use the AV receiver/AV amplifier's remote controller to control your other Onkyo...
...not support all channels (see pages 25 to the AV receiver/AV amplifier with the AV receiver/AV amplifier. Similarly, when the AV receiver/AV amplifier is set to the manuals supplied with any other equipment. • Never ...disconnect the power cord from the wall outlet first, and then the AV receiver/AV amplifier. You must enter the appropriate remote control code first (see illustration below). You can use the AV receiver/AV amplifier's remote controller to control your other Onkyo...
Owner Manual
Page 42
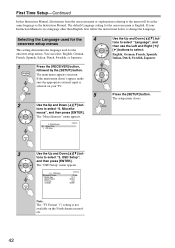
...Manual, illustrations from the onscreen menu or explanations referring to select: English, German, French, Spanish, Italian, Dutch, Swedish, Japanese Press the [SETUP] button. If your TV. 5 2 Use the Up and Down [ R]/[X] but - You can select: English, German, French, Spanish, Italian, Dutch, Swedish, or Japanese. 1 Press the [RECEIVER... setup menus This setting determines the language used for the onscreen menu is in the same language as the Instruction Manual. Miscellaneous 1. The default Language setting for the onscreen setup menus. The setup menu closes. 3 Use the Up...
...Manual, illustrations from the onscreen menu or explanations referring to select: English, German, French, Spanish, Italian, Dutch, Swedish, Japanese Press the [SETUP] button. If your TV. 5 2 Use the Up and Down [ R]/[X] but - You can select: English, German, French, Spanish, Italian, Dutch, Swedish, or Japanese. 1 Press the [RECEIVER... setup menus This setting determines the language used for the onscreen menu is in the same language as the Instruction Manual. Miscellaneous 1. The default Language setting for the onscreen setup menus. The setup menu closes. 3 Use the Up...
Owner Manual
Page 55
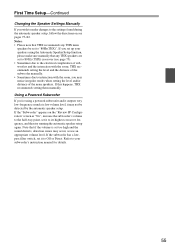
... an appropriate volume level. Refer to 80 Hz (THX) crossover (see pages 75-82. First Time Setup-Continued Changing the Speaker Settings Manually If you wish to make sure manually that any THX main speakers be detected by the automatic speaker setup. If you set up your subwoofer's instruction... speakers are set too high and the sound distorts, detection issues may notice irregular results when setting the level and/or distance of the subwoofer manually. • Sometimes due to Off or Direct. Notes: • Please note that if the volume is set to your speakers using a ...
... an appropriate volume level. Refer to 80 Hz (THX) crossover (see pages 75-82. First Time Setup-Continued Changing the Speaker Settings Manually If you wish to make sure manually that any THX main speakers be detected by the automatic speaker setup. If you set up your subwoofer's instruction... speakers are set too high and the sound distorts, detection issues may notice irregular results when setting the level and/or distance of the subwoofer manually. • Sometimes due to Off or Direct. Notes: • Please note that if the volume is set to your speakers using a ...
Owner Manual
Page 59
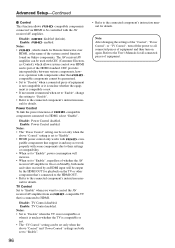
...Frequency (Actual display depends on country.) Within 8 seconds, use the number buttons to enter the frequency of the radio station. TUNER TUNED AUTO ■ Manual Tuning Mode FM STEREO 1 Press the [TUNING MODE] but - ton so that the AUTO indicator disappears from a stereo FM station is found. 2 ... example, to tune to select either AM or FM. Press the buttons repeatedly to change FM frequency in mono. Listening to the Radio (TX-SR806 only) Using the Tuner With the built-in mono. ■ Tuning into Stations by Frequency You can tune into AM and FM stations ...
...Frequency (Actual display depends on country.) Within 8 seconds, use the number buttons to enter the frequency of the radio station. TUNER TUNED AUTO ■ Manual Tuning Mode FM STEREO 1 Press the [TUNING MODE] but - ton so that the AUTO indicator disappears from a stereo FM station is found. 2 ... example, to tune to select either AM or FM. Press the buttons repeatedly to change FM frequency in mono. Listening to the Radio (TX-SR806 only) Using the Tuner With the built-in mono. ■ Tuning into Stations by Frequency You can tune into AM and FM stations ...

Owner Manual
Page 75
...51). Speaker Configuration These settings are connected to your TV. For smaller speakers, specify a crossover frequency. Refer to the AV receiver/AV amplifier. Speaker Configuration 3. Level Calibration 5. Advanced Setup-Continued Speaker Setup 1 Some of the settings in this section are...Left and Right [F]/ [S] buttons to determine the optimum crossover frequencies. Speaker Settings 2 See "Speaker Settings" on your speaker's manuals to select: Yes: Select if a subwoofer is connected. 75 frequency bass sounds adequately, for each speaker. Sounds below the ...
...51). Speaker Configuration These settings are connected to your TV. For smaller speakers, specify a crossover frequency. Refer to the AV receiver/AV amplifier. Speaker Configuration 3. Level Calibration 5. Advanced Setup-Continued Speaker Setup 1 Some of the settings in this section are...Left and Right [F]/ [S] buttons to determine the optimum crossover frequencies. Speaker Settings 2 See "Speaker Settings" on your speaker's manuals to select: Yes: Select if a subwoofer is connected. 75 frequency bass sounds adequately, for each speaker. Sounds below the ...
Owner Manual
Page 80
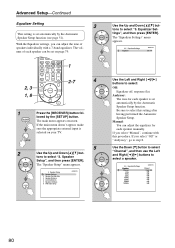
... is selected on page 79. 1 2-7 4 2, 3 1, 8 1 Press the [RECEIVER] button fol- Speaker Setup", and then press [ENTER]. Audyssey: The tone for each speaker manually. The volume of speakers individually with this setting after having performed the Automatic Speaker Setup.... select "Channel", and then use the Left and Right [F]/[S] buttons to select this procedure. With the Equalizer settings, you select "Manual", continue with a 7-band equalizer. Level Calibration 5. Be sure to select a speaker. 2-5. Advanced Setup-Continued Equalizer Setting 3 This...
... is selected on page 79. 1 2-7 4 2, 3 1, 8 1 Press the [RECEIVER] button fol- Speaker Setup", and then press [ENTER]. Audyssey: The tone for each speaker manually. The volume of speakers individually with this setting after having performed the Automatic Speaker Setup.... select "Channel", and then use the Left and Right [F]/[S] buttons to select this procedure. With the Equalizer settings, you select "Manual", continue with a 7-band equalizer. Level Calibration 5. Be sure to select a speaker. 2-5. Advanced Setup-Continued Equalizer Setting 3 This...

Owner Manual
Page 84
... contains a Dolby EX flag, the Dolby EX or THX Surround EX listening mode is effective with Dolby Digital, Dolby Digital Plus and Dolby TrueHD only. Manual: You can select any available listening mode. 84 T-D (Theater-Dimensional) Listening Setting ■ Listening Angle With this setting, you find that the sound is located...
... contains a Dolby EX flag, the Dolby EX or THX Surround EX listening mode is effective with Dolby Digital, Dolby Digital Plus and Dolby TrueHD only. Manual: You can select any available listening mode. 84 T-D (Theater-Dimensional) Listening Setting ■ Listening Angle With this setting, you find that the sound is located...
Owner Manual
Page 95
...to select "Zoom Mode", and use the Left and Right [F]/[S] buttons to change the setting to "Disable". • Refer to "Auto", the AV receiver/AV amplifier automatically detects the picture source and in either "3:2 pulldown" or "2:2 pulldown". It automatically converts the source to "Off". When the "Film ...is movie film, etc. 2:2 pulldown: Selected when the picture source is output. Off: HDMI audio is set to the connected component's instruction manual for details. 95 Press and hold the [DISPLAY] button until the set - Notes: • If the color is unnatural when "x.v.Color" ...
...to select "Zoom Mode", and use the Left and Right [F]/[S] buttons to change the setting to "Disable". • Refer to "Auto", the AV receiver/AV amplifier automatically detects the picture source and in either "3:2 pulldown" or "2:2 pulldown". It automatically converts the source to "Off". When the "Film ...is movie film, etc. 2:2 pulldown: Selected when the picture source is output. Off: HDMI audio is set to the connected component's instruction manual for details. 95 Press and hold the [DISPLAY] button until the set - Notes: • If the color is unnatural when "x.v.Color" ...
Owner Manual
Page 96
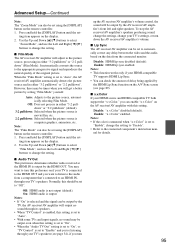
The AV receiver/AV amplifier can be controlled with the AV receiver/AV amplifier. ever, operation with CEC (Consumer Electron- patible components that support it and may not work properly with -com- Notes: • , which allows system control over HDMI, is On or on Onkyo components. Power Control...• Set to "Disable" when the TV is not compatible or when it is connected to the connected component's instruction manual for Remote Interactive over HDMI and is part of -compatible components connected via HDMI to be used with components other component that...
The AV receiver/AV amplifier can be controlled with the AV receiver/AV amplifier. ever, operation with CEC (Consumer Electron- patible components that support it and may not work properly with -com- Notes: • , which allows system control over HDMI, is On or on Onkyo components. Power Control...• Set to "Disable" when the TV is not compatible or when it is connected to the connected component's instruction manual for Remote Interactive over HDMI and is part of -compatible components connected via HDMI to be used with components other component that...
Owner Manual
Page 98
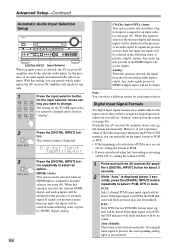
...and analog inputs will be no digital input signal is present, the corresponding analog input is used instead. If no sound. ting you can manually set the signal format to an input selector (see page 44). Analog: When this setting, you can be selected when a digital input...for the TUNER input selec- Advanced Setup-Continued Automatic Audio Input Selection Setup DIGITAL INPUT Input Selector When an input source is selected, the AV receiver/AV amplifier checks the relevant audio inputs for the presence of priority: HDMI, digital, analog. 98 COAXx (Auto)/OPTx (Auto): This option can...
...and analog inputs will be no digital input signal is present, the corresponding analog input is used instead. If no sound. ting you can manually set the signal format to an input selector (see page 44). Analog: When this setting, you can be selected when a digital input...for the TUNER input selec- Advanced Setup-Continued Automatic Audio Input Selection Setup DIGITAL INPUT Input Selector When an input source is selected, the AV receiver/AV amplifier checks the relevant audio inputs for the presence of priority: HDMI, digital, analog. 98 COAXx (Auto)/OPTx (Auto): This option can...


