Owner Manual
Page 4
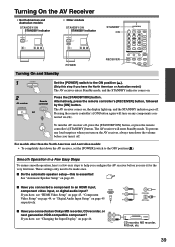
... on the front panel. SN 29344330 (C) Copyright 2006 ONKYO CORPORATION Japan. UME control, or the remote controller's [VOL] button. Before using this function, connect and position all your speakers. 1 Remote controller AV receiver STANDBY/ON RECEIVER or ON Press the [STANDBY/ON] button on the AV receiver or press the remote controller's [RECEIVER] button followed by the [ON] button to...
... on the front panel. SN 29344330 (C) Copyright 2006 ONKYO CORPORATION Japan. UME control, or the remote controller's [VOL] button. Before using this function, connect and position all your speakers. 1 Remote controller AV receiver STANDBY/ON RECEIVER or ON Press the [STANDBY/ON] button on the AV receiver or press the remote controller's [RECEIVER] button followed by the [ON] button to...
Instruction Manual
Page 4
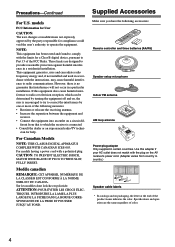
...: TO PREVENT ELECTRIC SHOCK, MATCH WIDE BLADE OF PLUG TO WIDE SLOT, FULLY INSERT. For models having a power cord with the plug on the AV receiver's power cord. (Adapter varies from that interference will not occur in certain countries. Front Left Front Left SP-B / Zone 2 Left SP-B / Zone... cause harmful interference to Part 15 of the product name indicates the color. These limits are the same regardless of the following accessories: Remote controller and three batteries (AA/R6) Speaker setup microphone Indoor FM antenna AM loop antenna Power-plug adapter Only supplied in a particular ...
...: TO PREVENT ELECTRIC SHOCK, MATCH WIDE BLADE OF PLUG TO WIDE SLOT, FULLY INSERT. For models having a power cord with the plug on the AV receiver's power cord. (Adapter varies from that interference will not occur in certain countries. Front Left Front Left SP-B / Zone 2 Left SP-B / Zone... cause harmful interference to Part 15 of the product name indicates the color. These limits are the same regardless of the following accessories: Remote controller and three batteries (AA/R6) Speaker setup microphone Indoor FM antenna AM loop antenna Power-plug adapter Only supplied in a particular ...

Instruction Manual
Page 5
... • Easy-to-use onscreen setup menus • IR IN and OUT • Preprogrammed remote controller for home and other AV components • Remote controller Learning function • Remote controller Macro function *1 THX and Select2 are trademarks of quality and performance tests. All rights reserved...;er • 7-channel amplifier • 105 watts per channel into 8 ohms, 20 Hz to come. THX Select2 receivers also feature proprietary THX technologies (e.g., THX Mode) which is your guarantee that is trademark of Dolby Laboratories. istered in some jurisdictions. ...
... • Easy-to-use onscreen setup menus • IR IN and OUT • Preprogrammed remote controller for home and other AV components • Remote controller Learning function • Remote controller Macro function *1 THX and Select2 are trademarks of quality and performance tests. All rights reserved...;er • 7-channel amplifier • 105 watts per channel into 8 ohms, 20 Hz to come. THX Select2 receivers also feature proprietary THX technologies (e.g., THX Mode) which is your guarantee that is trademark of Dolby Laboratories. istered in some jurisdictions. ...
Instruction Manual
Page 7
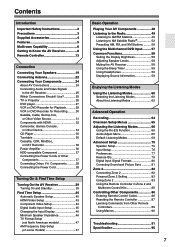
... 4 Features 5 Multiroom Capability 6 Getting to Know the AV Receiver 8 Remote Controller 13 Connection Connecting Your Speakers 19 Connecting Antenna 22 Connecting Your Components 24 About AV Connections 24 Connecting Audio and Video Signals to the AV Receiver 25 Which Connections Should I Use 25 TV or Projector ...compatible Component 37 Connecting the Power Cords of Other Components 37 Connecting Onkyo Components ..........38 Connecting the Power Cord 38 Turning On & First Time Setup Turning On the AV Receiver 39 Turning On and Standby 39 First Time Setup 40 Automatic Speaker...
... 4 Features 5 Multiroom Capability 6 Getting to Know the AV Receiver 8 Remote Controller 13 Connection Connecting Your Speakers 19 Connecting Antenna 22 Connecting Your Components 24 About AV Connections 24 Connecting Audio and Video Signals to the AV Receiver 25 Which Connections Should I Use 25 TV or Projector ...compatible Component 37 Connecting the Power Cords of Other Components 37 Connecting Onkyo Components ..........38 Connecting the Power Cord 38 Turning On & First Time Setup Turning On the AV Receiver 39 Turning On and Standby 39 First Time Setup 40 Automatic Speaker...

Instruction Manual
Page 8
... switch American and Australian models don't have this button again selects the previous listening mode. C ZONE 2 indicator (83) Lights up when the AV receiver is on Standby and flashes while a signal is on. J Input selector buttons (48) Select the following input sources: MULTI CH,... indicator lights up when this mode is the main power switch. D Remote-control sensor (13) Receives control signals from the remote controller. Pressing this switch. See "Volume Setup" on page 10. Getting to Know the AV Receiver Front Panel 1 23 4 5 6 7 STANDBY/ON POWER STANDBY ZONE...
... switch American and Australian models don't have this button again selects the previous listening mode. C ZONE 2 indicator (83) Lights up when the AV receiver is on Standby and flashes while a signal is on. J Input selector buttons (48) Select the following input sources: MULTI CH,... indicator lights up when this mode is the main power switch. D Remote-control sensor (13) Receives control signals from the remote controller. Pressing this switch. See "Volume Setup" on page 10. Getting to Know the AV Receiver Front Panel 1 23 4 5 6 7 STANDBY/ON POWER STANDBY ZONE...
Instruction Manual
Page 11
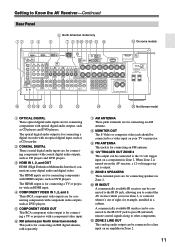
...connecting speakers in Zone 2. J 12V TRIGGER OUT ZONE 2 This output can be connected to the IR OUT jack to pass IR (infrared) remote control signals along to other components. When Zone 2 is turned on on North American model) This jack is output. M ZONE 2 LINE OUT... Zone 2. 11 The HDMI inputs are for connecting components with optical digital audio outputs, such as CD players and DVD players. Getting to Know the AV Receiver-Continued Rear Panel 12 3 4 6 North American model only 5 7 8 9J KL M N O On some models P QRS T U V W X Y Z Not Korean model A OPTICAL DIGITAL...
...connecting speakers in Zone 2. J 12V TRIGGER OUT ZONE 2 This output can be connected to the IR OUT jack to pass IR (infrared) remote control signals along to other components. When Zone 2 is turned on on North American model) This jack is output. M ZONE 2 LINE OUT... Zone 2. 11 The HDMI inputs are for connecting components with optical digital audio outputs, such as CD players and DVD players. Getting to Know the AV Receiver-Continued Rear Panel 12 3 4 6 North American model only 5 7 8 9J KL M N O On some models P QRS T U V W X Y Z Not Korean model A OPTICAL DIGITAL...
Instruction Manual
Page 12
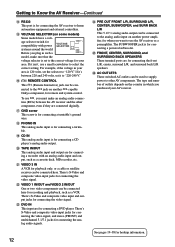
... and SURROUND BACK SPEAKERS These terminal posts are connected digitally. Getting to Know the AV Receiver-Continued N RS232 This port is for connecting a powered subwoofer. O VOLTAGE SELECTOR (on another -capable Onkyo component, for remote and system control. Before you must make sure that the voltage selector is set ...it isn't, use , you plug in which you want to use the AV receiver as a preamplifier. If it to ...
... and SURROUND BACK SPEAKERS These terminal posts are connected digitally. Getting to Know the AV Receiver-Continued N RS232 This port is for connecting a powered subwoofer. O VOLTAGE SELECTOR (on another -capable Onkyo component, for remote and system control. Before you must make sure that the voltage selector is set ...it isn't, use , you plug in which you want to use the AV receiver as a preamplifier. If it to ...
Instruction Manual
Page 13
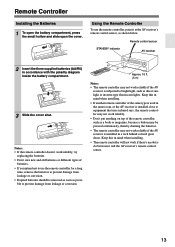
... damage from leakage or corrosion. 30˚ 30˚ Approx. 16 ft. (5 m) Notes: • The remote controller may not work reliably if the AV receiver is subjected to bright light, such as possible to use the remote controller, point it and the AV receiver's remote control sensor. 13 Keep this in mind when installing. • If another...
... damage from leakage or corrosion. 30˚ 30˚ Approx. 16 ft. (5 m) Notes: • The remote controller may not work reliably if the AV receiver is subjected to bright light, such as possible to use the remote controller, point it and the AV receiver's remote control sensor. 13 Keep this in mind when installing. • If another...
Instruction Manual
Page 14
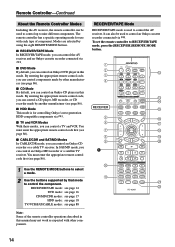
... player, MD recorder, or CD recorder made by using the eight REMOTE MODE buttons. ■ RECEIVER/TAPE Mode In RECEIVER/TAPE mode, you can control the AV receiver and an Onkyo cassette recorder connected via . To set the remote controller to RECEIVER/TAPE mode, press the [RECEIVER] REMOTE MODE button. Modes are selected by other components. By entering the appropriate...
... player, MD recorder, or CD recorder made by using the eight REMOTE MODE buttons. ■ RECEIVER/TAPE Mode In RECEIVER/TAPE mode, you can control the AV receiver and an Onkyo cassette recorder connected via . To set the remote controller to RECEIVER/TAPE mode, press the [RECEIVER] REMOTE MODE button. Modes are selected by other components. By entering the appropriate...
Instruction Manual
Page 15
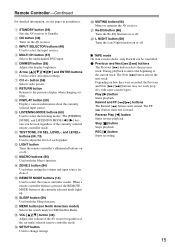
...) Selects radio presets. E DIMMER button (58) Adjusts the display brightness. A STANDBY button (39) Sets the AV receiver to change settings. The [STEREO], [SURR], and LISTENING MODE [ ]/[ ] buttons can be used regardless of the currently selected remote controller mode. Remote Controller-Continued For detailed information, see the pages in parentheses. H RETURN button Returns to adjust...
...) Selects radio presets. E DIMMER button (58) Adjusts the display brightness. A STANDBY button (39) Sets the AV receiver to change settings. The [STEREO], [SURR], and LISTENING MODE [ ]/[ ] buttons can be used regardless of the currently selected remote controller mode. Remote Controller-Continued For detailed information, see the pages in parentheses. H RETURN button Returns to adjust...

Instruction Manual
Page 16
... Standby. CD TAPE TUNER 7 8 9 PHONO T V VOL +10 0 CLEAR --/--- 10 11 12 INPUT SELECTOR MACRO 1 2 3 ZONE2 RECEIVER TAPE/AMP REMOTE MODE DVD CD HDD TV DIMMER + CH DISC ALBUM - VCR CABLE CDR TOP MENU MENU ENTER SAT MD SLEEP VOL PREV CH DISPLAY RETURN ... CH SEL OPEN/CLOSE VIDEO OFF LEVEL L NIGHT LEVEL Re-EQ RC-620M M N O P Q R S A STANDBY button Sets the DVD player to DVD mode, press the [DVD] REMOTE MODE button. E Arrow and ENTER buttons Used to access the DVD player's settings. I T V INPUT V1 V2 V3 1 2 3 + V4 MULTI CH DVD T V CH 4 5 6 - O ...
... Standby. CD TAPE TUNER 7 8 9 PHONO T V VOL +10 0 CLEAR --/--- 10 11 12 INPUT SELECTOR MACRO 1 2 3 ZONE2 RECEIVER TAPE/AMP REMOTE MODE DVD CD HDD TV DIMMER + CH DISC ALBUM - VCR CABLE CDR TOP MENU MENU ENTER SAT MD SLEEP VOL PREV CH DISPLAY RETURN ... CH SEL OPEN/CLOSE VIDEO OFF LEVEL L NIGHT LEVEL Re-EQ RC-620M M N O P Q R S A STANDBY button Sets the DVD player to DVD mode, press the [DVD] REMOTE MODE button. E Arrow and ENTER buttons Used to access the DVD player's settings. I T V INPUT V1 V2 V3 1 2 3 + V4 MULTI CH DVD T V CH 4 5 6 - O ...
Instruction Manual
Page 17
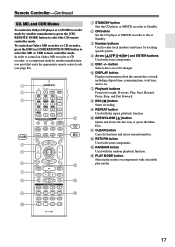
... time, remaining time, total time, and so on components with some components. To control an Onkyo MD recorder or CD recorder, press the [MD] or [CDR] REMOTE MODE button to enter track numbers and times for locating specific points. B ON button Set... 10 11 12 INPUT SELECTOR MACRO 1 2 3 ZONE2 RECEIVER TAPE/AMP REMOTE MODE DVD CD HDD TV DIMMER + CH DISC ALBUM - L RETURN button Used with the random playback function. Remote Controller-Continued CD, MD, and CDR Modes To control an Onkyo CD player or a CD/MD recorder made by another manufacturer...
... time, remaining time, total time, and so on components with some components. To control an Onkyo MD recorder or CD recorder, press the [MD] or [CDR] REMOTE MODE button to enter track numbers and times for locating specific points. B ON button Set... 10 11 12 INPUT SELECTOR MACRO 1 2 3 ZONE2 RECEIVER TAPE/AMP REMOTE MODE DVD CD HDD TV DIMMER + CH DISC ALBUM - L RETURN button Used with the random playback function. Remote Controller-Continued CD, MD, and CDR Modes To control an Onkyo CD player or a CD/MD recorder made by another manufacturer...
Instruction Manual
Page 18
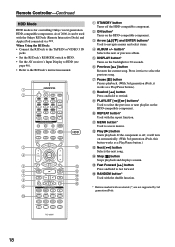
... not supported by 3rd generation iPods. 18 K MENU button* Used to navigate menus and select items. D ALBUM +/- Remote Controller-Continued HDD Mode HDD mode is off the HDD-compatible component. button* Selects the next or previous album. O...VIDEO 3 IN jacks. • Set the RI Dock's RI MODE switch to HDD. • Set the AV receiver's Input Display to HDD (see page 46). • Refer to select the previous or next playlist on ... ] button Pauses playback. (With 3rd generation iPods, it can be used with the Onkyo RI Dock (Remote Interactive Dock) and Apple iPod connected via .
... not supported by 3rd generation iPods. 18 K MENU button* Used to navigate menus and select items. D ALBUM +/- Remote Controller-Continued HDD Mode HDD mode is off the HDD-compatible component. button* Selects the next or previous album. O...VIDEO 3 IN jacks. • Set the RI Dock's RI MODE switch to HDD. • Set the AV receiver's Input Display to HDD (see page 46). • Refer to select the previous or next playlist on ... ] button Pauses playback. (With 3rd generation iPods, it can be used with the Onkyo RI Dock (Remote Interactive Dock) and Apple iPod connected via .
Instruction Manual
Page 37
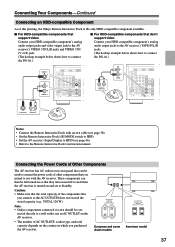
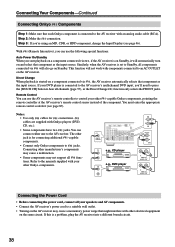
... cable (see page 38). • Set the Remote Interactive Dock's RI MODE switch to HDD. • Set the AV receiver's Input Display to HDD (see page 46). • Refer to the Remote Interactive Dock's instruction manual. Note: • Onkyo components connected via should be used to connect the... power cords of other components that you purchased the AV receiver. These components can be con- Connecting Your Components-Continued Connecting an HDD-compatible Component As of this printing, the Onkyo Remote Interactive Dock is turned on and set to Standby. European and some...
... cable (see page 38). • Set the Remote Interactive Dock's RI MODE switch to HDD. • Set the AV receiver's Input Display to HDD (see page 46). • Refer to the Remote Interactive Dock's instruction manual. Note: • Onkyo components connected via should be used to connect the... power cords of other components that you purchased the AV receiver. These components can be con- Connecting Your Components-Continued Connecting an HDD-compatible Component As of this printing, the Onkyo Remote Interactive Dock is turned on and set to Standby. European and some...
Instruction Manual
Page 38
... connecting additional -capable components. • Connect only Onkyo components to jacks. If this is a problem, plug the AV receiver into a different branch circuit. 38 You must enter the appropriate remote control code first (see page 46). Connecting other -capable Onkyo components, pointing the remote controller at the AV receiver's remote control sensor instead of the component. Refer to...
... connecting additional -capable components. • Connect only Onkyo components to jacks. If this is a problem, plug the AV receiver into a different branch circuit. 38 You must enter the appropriate remote control code first (see page 46). Connecting other -capable Onkyo components, pointing the remote controller at the AV receiver's remote control sensor instead of the component. Refer to...
Instruction Manual
Page 39
...Have you connected an Onkyo MD recorder, CD recorder, or OUT IN next generation HDD-compatible component? The AV receiver will turn on any loud surprises when you turn on the AV receiver, always turn the AV receiver off . ON To turn down the AV receiver, set the [... V VOL +10 0 CLEAR --/ --- 10 11 12 INPUT SELECTOR MACRO 1 2 3 ZONE2 RECEIVER TAPE/AMP REMOTE MODE DVD CD HDD TV DIMMER VCR CABLE CDR SAT MD SLEEP 1 POWER ON OFF 2 AV receiver Remote controller STANDBY/ON RECEIVER or Set the [POWER] switch to the OFF position ( ). Alternatively, press the...
...Have you connected an Onkyo MD recorder, CD recorder, or OUT IN next generation HDD-compatible component? The AV receiver will turn on any loud surprises when you turn on the AV receiver, always turn the AV receiver off . ON To turn down the AV receiver, set the [... V VOL +10 0 CLEAR --/ --- 10 11 12 INPUT SELECTOR MACRO 1 2 3 ZONE2 RECEIVER TAPE/AMP REMOTE MODE DVD CD HDD TV DIMMER VCR CABLE CDR SAT MD SLEEP 1 POWER ON OFF 2 AV receiver Remote controller STANDBY/ON RECEIVER or Set the [POWER] switch to the OFF position ( ). Alternatively, press the...
Instruction Manual
Page 40
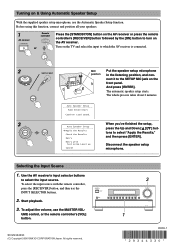
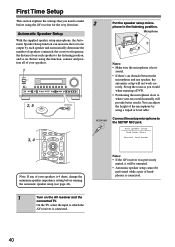
...crossover frequency, the distance from each speaker to the listening position, and so on the AV receiver and the connected TV. Loud sound. On the TV, select the input to which the AV receiver is hori- First Time Setup This section explains the settings that you would when enjoying ...the SETUP MIC jack. CD TAPE TUNER 7 8 9 PHONO T V VOL +10 0 CLEAR --/--- 10 11 12 INPUT SELECTOR MACRO 1 2 3 ZONE2 RECEIVER TAPE/AMP REMOTE MODE DVD CD HDD TV DIMMER + CH DISC ALBUM - L NIGHT Re-EQ 2 Put the speaker setup micro- Microphone Notes: • Make sure the...
...crossover frequency, the distance from each speaker to the listening position, and so on the AV receiver and the connected TV. Loud sound. On the TV, select the input to which the AV receiver is hori- First Time Setup This section explains the settings that you would when enjoying ...the SETUP MIC jack. CD TAPE TUNER 7 8 9 PHONO T V VOL +10 0 CLEAR --/--- 10 11 12 INPUT SELECTOR MACRO 1 2 3 ZONE2 RECEIVER TAPE/AMP REMOTE MODE DVD CD HDD TV DIMMER + CH DISC ALBUM - L NIGHT Re-EQ 2 Put the speaker setup micro- Microphone Notes: • Make sure the...
Instruction Manual
Page 43
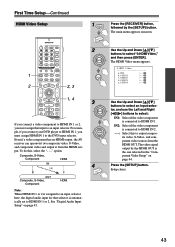
...has no HDMI output, the AV receiver can upconvert (*) composite video, S-Video, and component video and output it from the HDMI OUT. b.VIDEO1 :--- CD TAPE TUNER 7 8 9 PHONO T V VOL +10 0 CLEAR --/--- 10 11 12 INPUT SELECTOR MACRO 1 2 3 ZONE2 RECEIVER TAPE/AMP REMOTE MODE DVD CD HDD TV ... output composite video, S-Video, and component video sources from the HDMI out- put. First Time Setup-Continued HDMI Video Setup 1 RECEIVER Press the [RECEIVER] button, followed by the HDMI OUT is the one selected in the "Component Video Setup" on page 45. 2 ENTER ENTER ...
...has no HDMI output, the AV receiver can upconvert (*) composite video, S-Video, and component video and output it from the HDMI OUT. b.VIDEO1 :--- CD TAPE TUNER 7 8 9 PHONO T V VOL +10 0 CLEAR --/--- 10 11 12 INPUT SELECTOR MACRO 1 2 3 ZONE2 RECEIVER TAPE/AMP REMOTE MODE DVD CD HDD TV ... output composite video, S-Video, and component video sources from the HDMI out- put. First Time Setup-Continued HDMI Video Setup 1 RECEIVER Press the [RECEIVER] button, followed by the HDMI OUT is the one selected in the "Component Video Setup" on page 45. 2 ENTER ENTER ...
Instruction Manual
Page 44
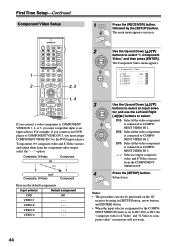
... component is connected to COMPONENT VIDEO IN 2. Press the [SETUP] button. Notes: • This procedure can also be performed on the AV receiver by the [SETUP] button. Input selector Default assignment DVD IN1 VIDEO 1 - - - e.VIDEO4 :--- 3 ENTER ENTER 4 Use the Up...CH DVD T V CH 4 5 6 - CD TAPE TUNER 7 8 9 PHONO T V VOL +10 0 CLEAR - - /- -- 10 11 12 INPUT SELECTOR MACRO 1 2 3 ZONE2 RECEIVER TAPE/AMP REMOTE MODE DVD CD HDD TV DIMMER VCR CABLE CDR SAT MD SLEEP 2 TOP MENU MENU 2, 3 + CH DISC ALBUM ENTER VOL - The Component Video menu...
... component is connected to COMPONENT VIDEO IN 2. Press the [SETUP] button. Notes: • This procedure can also be performed on the AV receiver by the [SETUP] button. Input selector Default assignment DVD IN1 VIDEO 1 - - - e.VIDEO4 :--- 3 ENTER ENTER 4 Use the Up...CH DVD T V CH 4 5 6 - CD TAPE TUNER 7 8 9 PHONO T V VOL +10 0 CLEAR - - /- -- 10 11 12 INPUT SELECTOR MACRO 1 2 3 ZONE2 RECEIVER TAPE/AMP REMOTE MODE DVD CD HDD TV DIMMER VCR CABLE CDR SAT MD SLEEP 2 TOP MENU MENU 2, 3 + CH DISC ALBUM ENTER VOL - The Component Video menu...
Instruction Manual
Page 45
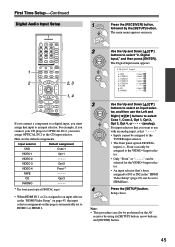
... that you must assign that 's been assigned to IN1 or IN2 in the "HDMI Video Setup" on page 43, the input selector assignment on the AV receiver by the [SETUP] button. Press the [SETUP] button. Input selector Default assignment DVD Coax 1 VIDEO 1 Opt 1 VIDEO 2 - - - - - Setup closes. Digital Input," ...Right [ ]/[ ] buttons to the CD input selector. CD TAPE TUNER 7 8 9 PHONO T V VOL +10 0 CLEAR --/--- 10 11 12 INPUT SELECTOR MACRO 1 2 3 ZONE2 RECEIVER TAPE/AMP REMOTE MODE DVD CD HDD TV DIMMER + CH DISC ALBUM - Here are the default assignments.
... that you must assign that 's been assigned to IN1 or IN2 in the "HDMI Video Setup" on page 43, the input selector assignment on the AV receiver by the [SETUP] button. Press the [SETUP] button. Input selector Default assignment DVD Coax 1 VIDEO 1 Opt 1 VIDEO 2 - - - - - Setup closes. Digital Input," ...Right [ ]/[ ] buttons to the CD input selector. CD TAPE TUNER 7 8 9 PHONO T V VOL +10 0 CLEAR --/--- 10 11 12 INPUT SELECTOR MACRO 1 2 3 ZONE2 RECEIVER TAPE/AMP REMOTE MODE DVD CD HDD TV DIMMER + CH DISC ALBUM - Here are the default assignments.


