Instruction Manual
Page 3
... , so be sure to disconnect this instruction manual is not userserviceable. For North American & Australian models Setting the [STANDBY/ON] switch to country. Memory Backup The AV receiver uses a battery-less memory backup system in the case of this Unit with power systems around the world. The wire which is coloured blue must be replaced, the replacement fuse must be shorter in the mains...
... , so be sure to disconnect this instruction manual is not userserviceable. For North American & Australian models Setting the [STANDBY/ON] switch to country. Memory Backup The AV receiver uses a battery-less memory backup system in the case of this Unit with power systems around the world. The wire which is coloured blue must be replaced, the replacement fuse must be shorter in the mains...
Instruction Manual
Page 7
... Modes 66 Using the Re-EQ Function 66 Audio Adjust Menu 66 Default Listening Modes 69 Advanced Setup 70 Speaker Setup 70 Input Setup 76 Preferences 77 Remote IDs 79 Digital Input Signal Formats 80 Correcting Sound and Picture Sync 81 Zone 2 82 Connecting Zone 2 82 Powered Zone 2 Setting 83 Using Zone 2 83 Using the Remote Controller in Zone 2 and Multiroom Control Kits 85 Controlling Other Components 86 Entering Remote Control Codes 86 Resetting the Remote Controller 87 Learning Commands from Other Remote Controllers 89 Using Macros 90 Troubleshooting 91 Specification...
... Modes 66 Using the Re-EQ Function 66 Audio Adjust Menu 66 Default Listening Modes 69 Advanced Setup 70 Speaker Setup 70 Input Setup 76 Preferences 77 Remote IDs 79 Digital Input Signal Formats 80 Correcting Sound and Picture Sync 81 Zone 2 82 Connecting Zone 2 82 Powered Zone 2 Setting 83 Using Zone 2 83 Using the Remote Controller in Zone 2 and Multiroom Control Kits 85 Controlling Other Components 86 Entering Remote Control Codes 86 Resetting the Remote Controller 87 Learning Commands from Other Remote Controllers 89 Using Macros 90 Troubleshooting 91 Specification...
Instruction Manual
Page 10
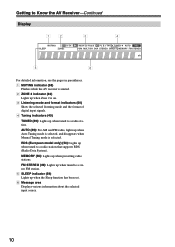
... selected listening mode and the format of digital input signals. 4 Tuning indicators (49) TUNED (49): Lights up when Auto Tuning mode is selected, and disappears when Manual Tuning mode is selected. AUTO (49): For AM and FM radio, lights up when tuned to a radio station. MEMORY (56): Lights up when the Sleep function has been set. 6 Message area Displays various information about the selected input source. 10 FM STEREO (49): Lights up when tuned to a radio station that supports RDS (Radio...
... selected listening mode and the format of digital input signals. 4 Tuning indicators (49) TUNED (49): Lights up when Auto Tuning mode is selected, and disappears when Manual Tuning mode is selected. AUTO (49): For AM and FM radio, lights up when tuned to a radio station. MEMORY (56): Lights up when the Sleep function has been set. 6 Message area Displays various information about the selected input source. 10 FM STEREO (49): Lights up when tuned to a radio station that supports RDS (Radio...
Instruction Manual
Page 14
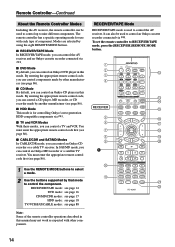
... Controller-Continued About the Remote Controller Modes Including the AV receiver, the remote controller can be used to control an Onkyo cassette recorder connected via . Modes are selected by that mode to RECEIVER/TAPE mode, press the [RECEIVER] REMOTE MODE button. To set the remote controller to control the component. VCR CABLE CDR TOP MENU MENU ENTER SAT MD SLEEP VOL PREV CH DISPLAY RETURN SET UP MUTING REC PLAYLIST RANDOM STEREO LISTENING MODE SURR REPEAT PURE A AUDIO SUBTITLE PLAY MODE DIRECT THX ALLST TESTTONE CH SEL OPEN/CLOSE VIDEO OFF LEVEL L NIGHT LEVEL...
... Controller-Continued About the Remote Controller Modes Including the AV receiver, the remote controller can be used to control an Onkyo cassette recorder connected via . Modes are selected by that mode to RECEIVER/TAPE mode, press the [RECEIVER] REMOTE MODE button. To set the remote controller to control the component. VCR CABLE CDR TOP MENU MENU ENTER SAT MD SLEEP VOL PREV CH DISPLAY RETURN SET UP MUTING REC PLAYLIST RANDOM STEREO LISTENING MODE SURR REPEAT PURE A AUDIO SUBTITLE PLAY MODE DIRECT THX ALLST TESTTONE CH SEL OPEN/CLOSE VIDEO OFF LEVEL L NIGHT LEVEL...

Instruction Manual
Page 16
...DVD mode, press the [DVD] REMOTE MODE button. G RETURN button Exits the DVD player's onscreen setup menu. B ON button Turns on components with selectable play modes on the DVD player. Q PLAY MODE button Selects play modes. VCR CABLE CDR TOP MENU MENU ENTER SAT MD SLEEP VOL PREV CH DISPLAY RETURN SET UP MUTING REC PLAYLIST RANDOM STEREO LISTENING MODE SURR REPEAT PURE A AUDIO SUBTITLE PLAY MODE DIRECT THX ALLST TESTTONE CH SEL OPEN/CLOSE VIDEO OFF LEVEL L NIGHT LEVEL Re-EQ RC-620M M N O P Q R S A STANDBY button Sets the DVD player to access the DVD...
...DVD mode, press the [DVD] REMOTE MODE button. G RETURN button Exits the DVD player's onscreen setup menu. B ON button Turns on components with selectable play modes on the DVD player. Q PLAY MODE button Selects play modes. VCR CABLE CDR TOP MENU MENU ENTER SAT MD SLEEP VOL PREV CH DISPLAY RETURN SET UP MUTING REC PLAYLIST RANDOM STEREO LISTENING MODE SURR REPEAT PURE A AUDIO SUBTITLE PLAY MODE DIRECT THX ALLST TESTTONE CH SEL OPEN/CLOSE VIDEO OFF LEVEL L NIGHT LEVEL Re-EQ RC-620M M N O P Q R S A STANDBY button Sets the DVD player to access the DVD...
Instruction Manual
Page 39
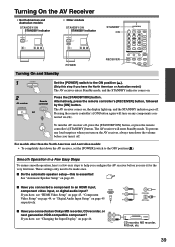
... Onkyo MD recorder, CD recorder, or OUT IN next generation HDD-compatible component? Press the [STANDBY/ON] button. If you connected a component to the ON position ( ). (Skip this is essential! CD TAPE TUNER 7 8 9 PHONO T V VOL +10 0 CLEAR --/ --- 10 11 12 INPUT SELECTOR MACRO 1 2 3 ZONE2 RECEIVER TAPE/AMP REMOTE MODE DVD CD HDD TV DIMMER VCR CABLE CDR SAT MD SLEEP 1 POWER ON OFF 2 AV receiver Remote controller STANDBY/ON RECEIVER or Set the [POWER] switch to an HDMI input, component video input, or digital audio input...
... Onkyo MD recorder, CD recorder, or OUT IN next generation HDD-compatible component? Press the [STANDBY/ON] button. If you connected a component to the ON position ( ). (Skip this is essential! CD TAPE TUNER 7 8 9 PHONO T V VOL +10 0 CLEAR --/ --- 10 11 12 INPUT SELECTOR MACRO 1 2 3 ZONE2 RECEIVER TAPE/AMP REMOTE MODE DVD CD HDD TV DIMMER VCR CABLE CDR SAT MD SLEEP 1 POWER ON OFF 2 AV receiver Remote controller STANDBY/ON RECEIVER or Set the [POWER] switch to an HDMI input, component video input, or digital audio input...
Instruction Manual
Page 40
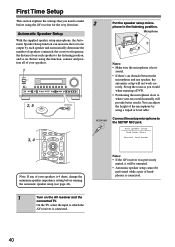
...SETUP MIC jack. SETUP MIC Connect the setup microphone to which the AV receiver is hori- Automatic Speaker Setup With the supplied speaker setup microphone, the Automatic Speaker Setup function can adjust the height of your speakers. 1 STANDBY/ON POWER STANDBY ZONE 2 ON OFF PURE AUDIO MULTI CH DVD VIDEO 1 VIDEO 2 VIDEO 3 VIDEO 4 TAPE TUNER CD PHONO DISPLAY MASTER VOLUME PHONES ZONE 2 OFF TONE ZONE 2 LEVEL STEREO TUNING DIMMER MEMORY MODE SETUP RETURN ENTER SETUP MIC LISTENING MODE CLEAR PRESET PRESET TUNING DIGITAL VIDEO 4 INPUT S VIDEO VIDEO L AUDIO...
...SETUP MIC jack. SETUP MIC Connect the setup microphone to which the AV receiver is hori- Automatic Speaker Setup With the supplied speaker setup microphone, the Automatic Speaker Setup function can adjust the height of your speakers. 1 STANDBY/ON POWER STANDBY ZONE 2 ON OFF PURE AUDIO MULTI CH DVD VIDEO 1 VIDEO 2 VIDEO 3 VIDEO 4 TAPE TUNER CD PHONO DISPLAY MASTER VOLUME PHONES ZONE 2 OFF TONE ZONE 2 LEVEL STEREO TUNING DIMMER MEMORY MODE SETUP RETURN ENTER SETUP MIC LISTENING MODE CLEAR PRESET PRESET TUNING DIGITAL VIDEO 4 INPUT S VIDEO VIDEO L AUDIO...
Instruction Manual
Page 45
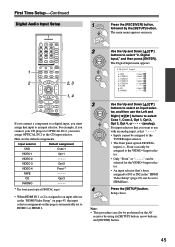
... "HDMI Video Setup" on page 43, the input selector assignment on the AV receiver by the [SETUP] button. The Digital Input menu appears. 2.Digital Input a.DVD :Coax1 b.VIDEO1 :Opt1 c.VIDEO2 :----- CD TAPE TUNER 7 8 9 PHONO T V VOL +10 0 CLEAR --/--- 10 11 12 INPUT SELECTOR MACRO 1 2 3 ZONE2 RECEIVER TAPE/AMP REMOTE MODE DVD CD HDD TV DIMMER + CH DISC ALBUM - VCR CABLE CDR TOP MENU MENU ENTER SAT MD SLEEP VOL PREV CH DISPLAY RETURN SET UP MUTING 2, 3 1, 4 REC PLAYLIST RANDOM LISTENING MODE STEREO SURR REPEAT AUDIO SUBTITLE PLAY MODE...
... "HDMI Video Setup" on page 43, the input selector assignment on the AV receiver by the [SETUP] button. The Digital Input menu appears. 2.Digital Input a.DVD :Coax1 b.VIDEO1 :Opt1 c.VIDEO2 :----- CD TAPE TUNER 7 8 9 PHONO T V VOL +10 0 CLEAR --/--- 10 11 12 INPUT SELECTOR MACRO 1 2 3 ZONE2 RECEIVER TAPE/AMP REMOTE MODE DVD CD HDD TV DIMMER + CH DISC ALBUM - VCR CABLE CDR TOP MENU MENU ENTER SAT MD SLEEP VOL PREV CH DISPLAY RETURN SET UP MUTING 2, 3 1, 4 REC PLAYLIST RANDOM LISTENING MODE STEREO SURR REPEAT AUDIO SUBTITLE PLAY MODE...
Instruction Manual
Page 48
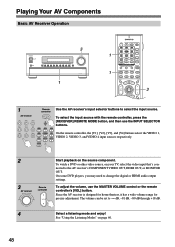
VCR CABLE CDR TOP MENU MENU ENTER SAT MD SLEEP VOL PREV CH DISPLAY RETURN SET UP MUTING 3 1 Remote Use the AV receiver's input selector buttons to change the digital or HDMI audio output settings. On some DVD players, you may need to select the input source. To adjust the volume, use the INPUT SELECTOR buttons. CD TAPE TUNER 7 8 9 PHONO T V VOL +10 0 CLEAR --/ --- 10 11 12 INPUT SELECTOR MACRO 1 2 3 ZONE2 RECEIVER TAPE/AMP REMOTE MODE DVD CD HDD TV DIMMER + CH DISC ALBUM - controller AV receiver DVD VIDEO 1 VIDEO 2 VIDEO 3 VIDEO 4 TAPE TUNER ...
VCR CABLE CDR TOP MENU MENU ENTER SAT MD SLEEP VOL PREV CH DISPLAY RETURN SET UP MUTING 3 1 Remote Use the AV receiver's input selector buttons to change the digital or HDMI audio output settings. On some DVD players, you may need to select the input source. To adjust the volume, use the INPUT SELECTOR buttons. CD TAPE TUNER 7 8 9 PHONO T V VOL +10 0 CLEAR --/ --- 10 11 12 INPUT SELECTOR MACRO 1 2 3 ZONE2 RECEIVER TAPE/AMP REMOTE MODE DVD CD HDD TV DIMMER + CH DISC ALBUM - controller AV receiver DVD VIDEO 1 VIDEO 2 VIDEO 3 VIDEO 4 TAPE TUNER ...
Instruction Manual
Page 57
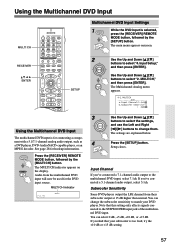
... DVD input source. CD TAPE TUNER 7 8 9 PHONO T V VOL +10 0 CLEAR - - /- -- 10 11 12 INPUT SELECTOR MACRO 1 2 3 ZONE2 RECEIVER TAPE/AMP REMOTE MODE DVD CD HDD TV DIMMER + CH DISC ALBUM - VCR CABLE CDR TOP MENU MENU ENTER SAT MD SLEEP VOL PREV CH DISPLAY RETURN SET UP MUTING SETUP REC PLAYLIST RANDOM LISTENING MODE STEREO SURR REPEAT PURE A AUDIO SUBTITLE PLAY MODE DIRECT THX ALLST TESTTONE CH SEL OPEN/CLOSE VIDEO OFF LEVEL L NIGHT LEVEL Re-EQ Using the Multichannel DVD Input The multichannel DVD input is selected...
... DVD input source. CD TAPE TUNER 7 8 9 PHONO T V VOL +10 0 CLEAR - - /- -- 10 11 12 INPUT SELECTOR MACRO 1 2 3 ZONE2 RECEIVER TAPE/AMP REMOTE MODE DVD CD HDD TV DIMMER + CH DISC ALBUM - VCR CABLE CDR TOP MENU MENU ENTER SAT MD SLEEP VOL PREV CH DISPLAY RETURN SET UP MUTING SETUP REC PLAYLIST RANDOM LISTENING MODE STEREO SURR REPEAT PURE A AUDIO SUBTITLE PLAY MODE DIRECT THX ALLST TESTTONE CH SEL OPEN/CLOSE VIDEO OFF LEVEL L NIGHT LEVEL Re-EQ Using the Multichannel DVD Input The multichannel DVD input is selected...
Instruction Manual
Page 58
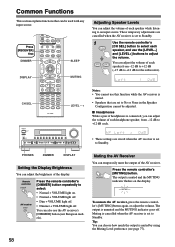
... CH SEL OPEN/CLOSE VIDEO OFF LEVEL L NIGHT LEVEL Re-EQ RC-620M LEVEL - + STANDBY/ON POWER STANDBY ZONE 2 ON OFF PURE AUDIO MULTI CH DVD VIDEO 1 VIDEO 2 VIDEO 3 VIDEO 4 TAPE TUNER CD PHONO DISPLAY MASTER VOLUME PHONES ZONE 2 OFF TONE ZONE 2 LEVEL STEREO TUNING DIMMER MEMORY MODE SETUP RETURN ENTER SETUP MIC LISTENING MODE CLEAR PRESET PRESET TUNING DIGITAL VIDEO 4 INPUT S VIDEO VIDEO L AUDIO R Notes: • You cannot use the AV receiver's [DIMMER] button (not European models). Common Functions This section explains functions that are set to No or...
... CH SEL OPEN/CLOSE VIDEO OFF LEVEL L NIGHT LEVEL Re-EQ RC-620M LEVEL - + STANDBY/ON POWER STANDBY ZONE 2 ON OFF PURE AUDIO MULTI CH DVD VIDEO 1 VIDEO 2 VIDEO 3 VIDEO 4 TAPE TUNER CD PHONO DISPLAY MASTER VOLUME PHONES ZONE 2 OFF TONE ZONE 2 LEVEL STEREO TUNING DIMMER MEMORY MODE SETUP RETURN ENTER SETUP MIC LISTENING MODE CLEAR PRESET PRESET TUNING DIGITAL VIDEO 4 INPUT S VIDEO VIDEO L AUDIO R Notes: • You cannot use the AV receiver's [DIMMER] button (not European models). Common Functions This section explains functions that are set to No or...
Instruction Manual
Page 67
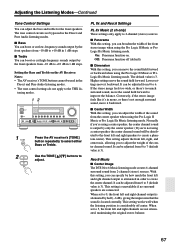
...tening modes. 12 STANDBY/ON POWER STANDBY ZONE 2 ON OFF PURE AUDIO MULTI CH DVD VIDEO 1 VIDEO 2 VIDEO 3 VIDEO 4 TAPE TUNER CD PHONO DISPLAY MASTER VOLUME PHONES ZONE 2 OFF TONE ZONE 2 LEVEL STEREO TUNING DIMMER MEMORY MODE SETUP RETURN ENTER SETUP MIC LISTENING MODE CLEAR PRESET PRESET TUNING DIGITAL VIDEO 4 INPUT S VIDEO VIDEO L AUDIO R 1 TONE 2 Press the AV receiver's [TONE] button repeatedly to adjust. It can move it backward. ■ Center Width With this setting, you can specify by half (-6 dB), giving the impression that the sound is located...
...tening modes. 12 STANDBY/ON POWER STANDBY ZONE 2 ON OFF PURE AUDIO MULTI CH DVD VIDEO 1 VIDEO 2 VIDEO 3 VIDEO 4 TAPE TUNER CD PHONO DISPLAY MASTER VOLUME PHONES ZONE 2 OFF TONE ZONE 2 LEVEL STEREO TUNING DIMMER MEMORY MODE SETUP RETURN ENTER SETUP MIC LISTENING MODE CLEAR PRESET PRESET TUNING DIGITAL VIDEO 4 INPUT S VIDEO VIDEO L AUDIO R 1 TONE 2 Press the AV receiver's [TONE] button repeatedly to adjust. It can move it backward. ■ Center Width With this setting, you can specify by half (-6 dB), giving the impression that the sound is located...
Instruction Manual
Page 68
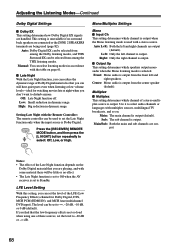
... listening mode is output. Multiplex ■ Multiplex This setting determines which channel of these sources, set the level to Standby. LFE Level Setting With this setting, you are output (default). If you find that you can still hear quiet parts even when listening at low volume levels-ideal for Dolby Digital, DTS, MCH PCM (HDMI IN), and MCH Ana (multichannel DVD input). Adjusting the Listening Modes-Continued Dolby Digital Settings ■ Dolby EX This setting determines how Dolby Digital EX signals are being used (page 82). Setting Late Night with multiplex sources...
... listening mode is output. Multiplex ■ Multiplex This setting determines which channel of these sources, set the level to Standby. LFE Level Setting With this setting, you are output (default). If you find that you can still hear quiet parts even when listening at low volume levels-ideal for Dolby Digital, DTS, MCH PCM (HDMI IN), and MCH Ana (multichannel DVD input). Adjusting the Listening Modes-Continued Dolby Digital Settings ■ Dolby EX This setting determines how Dolby Digital EX signals are being used (page 82). Setting Late Night with multiplex sources...

Instruction Manual
Page 69
...Adjusting the Listening Modes-Continued Default Listening Modes You can specify a default listening mode for each signal format supported by each signal format can be selected. The signal formats are explained below. 5 When you turn on the AV receiver. 1 RECEIVER Press the [RECEIVER] REMOTE MODE button, followed by the [SETUP] button. DTS: Specifies the default listening mode for analog sources and PCM digital audio sources. MCH PCM: Specifies the default listening mode for multichannel PCM sources input via a HDMI IN, such as Dolby Digital and DTS. You can select...
...Adjusting the Listening Modes-Continued Default Listening Modes You can specify a default listening mode for each signal format supported by each signal format can be selected. The signal formats are explained below. 5 When you turn on the AV receiver. 1 RECEIVER Press the [RECEIVER] REMOTE MODE button, followed by the [SETUP] button. DTS: Specifies the default listening mode for analog sources and PCM digital audio sources. MCH PCM: Specifies the default listening mode for multichannel PCM sources input via a HDMI IN, such as Dolby Digital and DTS. You can select...
Instruction Manual
Page 70
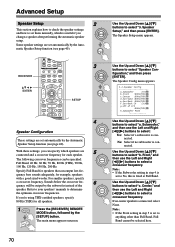
...Use the Up and Down [ ]/[ ] buttons to select "a. RECEIVER ENTER V4 MULTI CH DVD T V CH 4 5 6 - The Speaker Setup menu appears. If you change a speaker after performing the automatic speaker setup. If no subwoofer is useful if you 're using THX-certified speakers, specify 80 Hz (THX) for all speakers. 1 RECEIVER Press the [RECEIVER] REMOTE MODE button, followed by the Automatic Speaker Setup function (see page 40). CD TAPE TUNER 7 8 9 PHONO T V VOL +10 0 CLEAR - - /--- 10 11 12 INPUT SELECTOR MACRO 1 2 3 ZONE2 RECEIVER TAPE/AMP REMOTE MODE DVD...
...Use the Up and Down [ ]/[ ] buttons to select "a. RECEIVER ENTER V4 MULTI CH DVD T V CH 4 5 6 - The Speaker Setup menu appears. If you change a speaker after performing the automatic speaker setup. If no subwoofer is useful if you 're using THX-certified speakers, specify 80 Hz (THX) for all speakers. 1 RECEIVER Press the [RECEIVER] REMOTE MODE button, followed by the Automatic Speaker Setup function (see page 40). CD TAPE TUNER 7 8 9 PHONO T V VOL +10 0 CLEAR - - /--- 10 11 12 INPUT SELECTOR MACRO 1 2 3 ZONE2 RECEIVER TAPE/AMP REMOTE MODE DVD...
Instruction Manual
Page 83
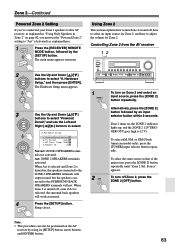
... to turn Zone 2 on Zone 2 and select an input source, press the [ZONE 2] button repeatedly. Controlling Zone 2 from the AV receiver 12 STANDBY/ON POWER STANDBY ZONE 2 ON OFF PURE AUDIO MULTI CH DVD VIDEO 1 VIDEO 2 VIDEO 3 VIDEO 4 TAPE TUNER CD PHONO DISPLAY MASTER VOLUME PHONES ZONE 2 OFF TONE ZONE 2 LEVEL STEREO TUNING DIMMER MEMORY MODE SETUP RETURN ENTER SETUP MIC LISTENING MODE CLEAR PRESET PRESET TUNING DIGITAL VIDEO 4 INPUT S VIDEO VIDEO L AUDIO R 1 ZONE 2 2 OFF To turn off , even if Act is selected, the surround back speakers will not. To select AM...
... to turn Zone 2 on Zone 2 and select an input source, press the [ZONE 2] button repeatedly. Controlling Zone 2 from the AV receiver 12 STANDBY/ON POWER STANDBY ZONE 2 ON OFF PURE AUDIO MULTI CH DVD VIDEO 1 VIDEO 2 VIDEO 3 VIDEO 4 TAPE TUNER CD PHONO DISPLAY MASTER VOLUME PHONES ZONE 2 OFF TONE ZONE 2 LEVEL STEREO TUNING DIMMER MEMORY MODE SETUP RETURN ENTER SETUP MIC LISTENING MODE CLEAR PRESET PRESET TUNING DIGITAL VIDEO 4 INPUT S VIDEO VIDEO L AUDIO R 1 ZONE 2 2 OFF To turn off , even if Act is selected, the surround back speakers will not. To select AM...

Instruction Manual
Page 84
...connected to an amp in Zone 2, use its volume control to an analog input. • When the ZONE 2 SPEAKERS terminals are output by the [MUTING] button. Digital input sources are unavailable. • While Zone 2 is selected, check to see if it's connected to adjust the volume. CD TAPE TUNER 7 8 9 PHONO T V VOL +10 0 CLEAR - -/--- 10 11 12 INPUT SELECTOR MACRO 1 2 3 ZONE2 RECEIVER TAPE/AMP REMOTE MODE DVD CD HDD LISTENING MODE STEREO SURR REPEAT AUDIO SUBTITLE PLAY MODE PURE A DIRECT THX ALLST TESTTONE CH SEL OPEN/CLOSE VIDEO OFF LEVEL L NIGHT LEVEL...
...connected to an amp in Zone 2, use its volume control to an analog input. • When the ZONE 2 SPEAKERS terminals are output by the [MUTING] button. Digital input sources are unavailable. • While Zone 2 is selected, check to see if it's connected to adjust the volume. CD TAPE TUNER 7 8 9 PHONO T V VOL +10 0 CLEAR - -/--- 10 11 12 INPUT SELECTOR MACRO 1 2 3 ZONE2 RECEIVER TAPE/AMP REMOTE MODE DVD CD HDD LISTENING MODE STEREO SURR REPEAT AUDIO SUBTITLE PLAY MODE PURE A DIRECT THX ALLST TESTTONE CH SEL OPEN/CLOSE VIDEO OFF LEVEL L NIGHT LEVEL...
Instruction Manual
Page 91
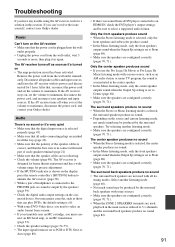
... AV receiver is designed for home theater enjoyment and has a wide volume range for precise adjustment. • If the MUTING indicator is shown on the display, press the remote controller's [MUTING] button to maximum, disconnect the power cord, and contact your Onkyo dealer. Audio There's no sound (page 82). 91 Try selecting another listening mode (page 60). • Not much sound may be sure to select a supported audio format. The surround back speakers...
... AV receiver is designed for home theater enjoyment and has a wide volume range for precise adjustment. • If the MUTING indicator is shown on the display, press the remote controller's [MUTING] button to maximum, disconnect the power cord, and contact your Onkyo dealer. Audio There's no sound (page 82). 91 Try selecting another listening mode (page 60). • Not much sound may be sure to select a supported audio format. The surround back speakers...
Instruction Manual
Page 92
... adjusted (pages 58, 73), the maximum possible volume setting be heard • Since it as those that 's connected to the HDMI OUT or COMPONENT VIDEO OUT. The picture is Dolby Digital (page 68). Check to see if the source is not a malfunction. • When DTS program material ends and the DTS bitstream stops, the AV receiver remains in the "Component Video Setup" on page 44. • To watch a composite video or S-Video source...
... adjusted (pages 58, 73), the maximum possible volume setting be heard • Since it as those that 's connected to the HDMI OUT or COMPONENT VIDEO OUT. The picture is Dolby Digital (page 68). Check to see if the source is not a malfunction. • When DTS program material ends and the DTS bitstream stops, the AV receiver remains in the "Component Video Setup" on page 44. • To watch a composite video or S-Video source...
Instruction Manual
Page 93
... source • Use the "Multiplex" setting on , the functions do I connect my headphones • When a pair of headphones is connected, the listening mode is set the Input Display to MD, CDR, or HDD (see page 46). • The entered remote control code may not work as tuning is in progress. The AV receiver's display doesn't work at the AV receiver. can cause interference. • Concrete walls weaken radio signals. • If nothing improves the reception, install...
... source • Use the "Multiplex" setting on , the functions do I connect my headphones • When a pair of headphones is connected, the listening mode is set the Input Display to MD, CDR, or HDD (see page 46). • The entered remote control code may not work as tuning is in progress. The AV receiver's display doesn't work at the AV receiver. can cause interference. • Concrete walls weaken radio signals. • If nothing improves the reception, install...


