
Instruction Manual
Page 5
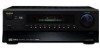
... the THX Select2 logo, which accurately translate movie soundtracks for home and other AV components • Remote controller Learning function • Remote controller Macro function *1...Technology) • Massive High Current Power Supply (H.C.P.S.) trans- All rights reserved. *6 HDMI, the HDMI logo and High Definition Multimedia Interface are trademarks of XM Satellite Radio Inc. ... for use with permission. *2 Manufactured under license from Dolby Laboratories. THX Select2 receivers also feature proprietary THX technologies (e.g., THX Mode) which is your guarantee that is...
... the THX Select2 logo, which accurately translate movie soundtracks for home and other AV components • Remote controller Learning function • Remote controller Macro function *1...Technology) • Massive High Current Power Supply (H.C.P.S.) trans- All rights reserved. *6 HDMI, the HDMI logo and High Definition Multimedia Interface are trademarks of XM Satellite Radio Inc. ... for use with permission. *2 Manufactured under license from Dolby Laboratories. THX Select2 receivers also feature proprietary THX technologies (e.g., THX Mode) which is your guarantee that is...
Instruction Manual
Page 7
... Signals to the AV Receiver 25 Which Connections Should I Use 25 TV or Projector 26 DVD player 27 VCR or DVD Recorder for Playback ...........29 VCR or DVD Recorder for Recording..........30 Satellite, Cable, Set-top box, or Other Video Source 31 Components with HDMI 32 Camcorder, Games... the Power Cords of Other Components 37 Connecting Onkyo Components ..........38 Connecting the Power Cord 38 Turning On & First Time Setup Turning On the AV Receiver 39 Turning On and Standby 39 First Time Setup 40 Automatic Speaker Setup 40 HDMI Video Setup 43 Component Video Setup 44 Digital...
... Signals to the AV Receiver 25 Which Connections Should I Use 25 TV or Projector 26 DVD player 27 VCR or DVD Recorder for Playback ...........29 VCR or DVD Recorder for Recording..........30 Satellite, Cable, Set-top box, or Other Video Source 31 Components with HDMI 32 Camcorder, Games... the Power Cords of Other Components 37 Connecting Onkyo Components ..........38 Connecting the Power Cord 38 Turning On & First Time Setup Turning On the AV Receiver 39 Turning On and Standby 39 First Time Setup 40 Automatic Speaker Setup 40 HDMI Video Setup 43 Component Video Setup 44 Digital...
Instruction Manual
Page 11
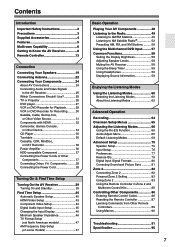
.... When Zone 2 is turned on on an amplifier in Zone 2. K ZONE 2 SPEAKERS These terminal posts are for connecting components with an HDMI input. Getting to Know the AV Receiver-Continued Rear Panel 12 3 4 6 North American model only 5 7 8 9J KL M N O On some models P QRS T U V W X Y Z Not Korean model A OPTICAL DIGITAL These optical digital...
.... When Zone 2 is turned on on an amplifier in Zone 2. K ZONE 2 SPEAKERS These terminal posts are for connecting components with an HDMI input. Getting to Know the AV Receiver-Continued Rear Panel 12 3 4 6 North American model only 5 7 8 9J KL M N O On some models P QRS T U V W X Y Z Not Korean model A OPTICAL DIGITAL These optical digital...
Instruction Manual
Page 24
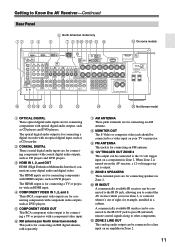
...CR/PR S V Description HDMI connections can be R found on TVs, VCRs, and other AV components. • Don't connect the power cord until you've completed and double-checked all the way. L This cable carries analog audio. Optical Digital Jacks The AV receiver's optical digital jacks have ... slightly differently.) S-Video separates the luminance and color signals and provides better picture quality than composite video. Note: The AV receiver does not support SCART connections. 24 Several standard analog audio cables can carry uncompressed, standard or high definition ...
...CR/PR S V Description HDMI connections can be R found on TVs, VCRs, and other AV components. • Don't connect the power cord until you've completed and double-checked all the way. L This cable carries analog audio. Optical Digital Jacks The AV receiver's optical digital jacks have ... slightly differently.) S-Video separates the luminance and color signals and provides better picture quality than composite video. Note: The AV receiver does not support SCART connections. 24 Several standard analog audio cables can carry uncompressed, standard or high definition ...
Instruction Manual
Page 25
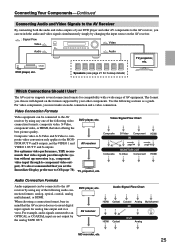
.... Video Signal Flow Chart Composite S-Video Component IN HDMI Composite page 44 page 43 MONITOR OUT S-Video Component HDMI Audio Connection Formats Audio equipment can be connected to the AV receiver by changing the input source on the AV receiver. : Signal Flow Video Video Audio Audio TV,... outputs, not the VIDEO 1 and VIDEO 2 OUT V and S outputs. DVD player, etc. Audio Signal Flow Chart AV receiver HDMI Optical Coaxial Analog Multichannel IN HDMI Optical OUT Analog MD recorder, etc. 25 Composite video to S-Video and S-Video to composite video conversion only applies to...
.... Video Signal Flow Chart Composite S-Video Component IN HDMI Composite page 44 page 43 MONITOR OUT S-Video Component HDMI Audio Connection Formats Audio equipment can be connected to the AV receiver by changing the input source on the AV receiver. : Signal Flow Video Video Audio Audio TV,... outputs, not the VIDEO 1 and VIDEO 2 OUT V and S outputs. DVD player, etc. Audio Signal Flow Chart AV receiver HDMI Optical Coaxial Analog Multichannel IN HDMI Optical OUT Analog MD recorder, etc. 25 Composite video to S-Video and S-Video to composite video conversion only applies to...
Instruction Manual
Page 32
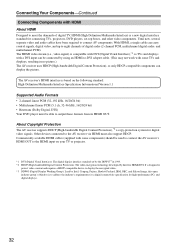
... not work with some components) should be able to output these formats from its HDMI OUT. Other devices connected to the AV receiver via HDMI must be used to connect the AV receiver's HDMI OUT to the HDMI input on the following standard: High-Definition Multimedia Interface Specification ...(5.1 ch, 32-96 kHz, 16/20/24 bit) • Bitstream (Dolby Digital, DTS) Your DVD player must also support HDCP. The AV receiver's HDMI interface is based on your TV or projector. *1 DVI (Digital Visual Interface): The digital display interface standard set by Intel for connecting TVs, ...
... not work with some components) should be able to output these formats from its HDMI OUT. Other devices connected to the AV receiver via HDMI must be used to connect the AV receiver's HDMI OUT to the HDMI input on the following standard: High-Definition Multimedia Interface Specification ...(5.1 ch, 32-96 kHz, 16/20/24 bit) • Bitstream (Dolby Digital, DTS) Your DVD player must also support HDCP. The AV receiver's HDMI interface is based on your TV or projector. *1 DVI (Digital Visual Interface): The digital display interface standard set by Intel for connecting TVs, ...
Instruction Manual
Page 33
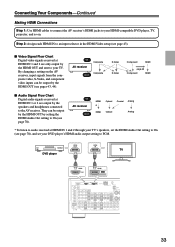
... changing a setting on . IN AV receiver Composite Composite OUT S-Video S-Video Component HDMI page 43 Component HDMI ■ Audio Signal Flow Chart Digital audio signals received at HDMI IN 1 and 2 through your TV's speakers, set your DVD player's HDMI audio output setting to PCM. HDMI OUT HDMI IN TV DVD player HDMI IN 1 HDMI 33 IN AV receiver OUT HDMI * HDMI Optical Optical Coaxial Analog...
... changing a setting on . IN AV receiver Composite Composite OUT S-Video S-Video Component HDMI page 43 Component HDMI ■ Audio Signal Flow Chart Digital audio signals received at HDMI IN 1 and 2 through your TV's speakers, set your DVD player's HDMI audio output setting to PCM. HDMI OUT HDMI IN TV DVD player HDMI IN 1 HDMI 33 IN AV receiver OUT HDMI * HDMI Optical Optical Coaxial Analog...
Instruction Manual
Page 39
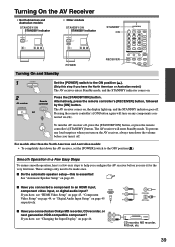
...steps to help you configure the AV receiver before you connected a component to the OFF position ( ). Alternatively, press the remote controller's [RECEIVER] button, followed by the [ON] button. ON To turn down the AV receiver, set the [POWER] switch to an HDMI input, component video input, or digital ...model.) The AV receiver enters Standby mode, and the STANDBY indicator comes on page 40. ■ Have you turn on page 46. For models other than the North American and Australian models: • To completely shut down the volume before you connected an Onkyo MD recorder,...
...steps to help you configure the AV receiver before you connected a component to the OFF position ( ). Alternatively, press the remote controller's [RECEIVER] button, followed by the [ON] button. ON To turn down the AV receiver, set the [POWER] switch to an HDMI input, component video input, or digital ...model.) The AV receiver enters Standby mode, and the STANDBY indicator comes on page 40. ■ Have you turn on page 46. For models other than the North American and Australian models: • To completely shut down the volume before you connected an Onkyo MD recorder,...
Instruction Manual
Page 43
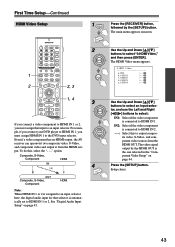
... 3 + V4 MULTI CH DVD T V CH 4 5 6 - put. To do this to HDMI IN 1 or 2. Press the [SETUP] button. First Time Setup-Continued HDMI Video Setup 1 RECEIVER Press the [RECEIVER] button, followed by the HDMI OUT is the one selected in the "Component Video Setup" on page 45. 2 ENTER ENTER 3 ENTER..." on page 44. IN2: Select if the video component is connected to HDMI IN 2. - - -: Select this , select the "- - -" option. Setup closes. 43 Even if a video component has no HDMI output, the AV receiver can upconvert (*) composite video, S-Video, and component video and output it...
... 3 + V4 MULTI CH DVD T V CH 4 5 6 - put. To do this to HDMI IN 1 or 2. Press the [SETUP] button. First Time Setup-Continued HDMI Video Setup 1 RECEIVER Press the [RECEIVER] button, followed by the HDMI OUT is the one selected in the "Component Video Setup" on page 45. 2 ENTER ENTER 3 ENTER..." on page 44. IN2: Select if the video component is connected to HDMI IN 2. - - -: Select this , select the "- - -" option. Setup closes. 43 Even if a video component has no HDMI output, the AV receiver can upconvert (*) composite video, S-Video, and component video and output it...
Instruction Manual
Page 45
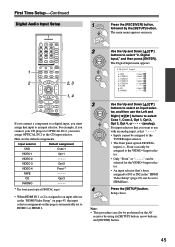
... its [SETUP] button, arrow buttons, and [ENTER] button. 45 For input selectors that input to IN1 or IN2 in the "HDMI Video Setup" on page 43, the input selector assignment on the AV receiver by the [SETUP] button. VIDEO 3 Opt 2 VIDEO 4 Front * TAPE - - - - - Press the [SETUP] button. The Digital Input menu appears. 2.Digital...
... its [SETUP] button, arrow buttons, and [ENTER] button. 45 For input selectors that input to IN1 or IN2 in the "HDMI Video Setup" on page 43, the input selector assignment on the AV receiver by the [SETUP] button. VIDEO 3 Opt 2 VIDEO 4 Front * TAPE - - - - - Press the [SETUP] button. The Digital Input menu appears. 2.Digital...
Instruction Manual
Page 48
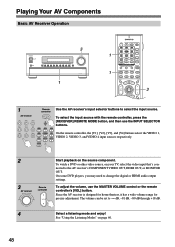
.... To adjust the volume, use the INPUT SELECTOR buttons. The volume can be set to the AV receiver's COMPONENT VIDEO OUT, HDMI OUT, or MONITOR OUT. Playing Your AV Components Basic AV Receiver Operation 3 STANDBY/ON POWER STANDBY ZONE 2 ON OFF PURE AUDIO MULTI CH DVD VIDEO 1 VIDEO... CABLE CDR TOP MENU MENU ENTER SAT MD SLEEP VOL PREV CH DISPLAY RETURN SET UP MUTING 3 1 Remote Use the AV receiver's input selector buttons to change the digital or HDMI audio output settings. See "Using the Listening Modes" on the source component. CD TAPE TUNER 7 8 9 PHONO T...
.... To adjust the volume, use the INPUT SELECTOR buttons. The volume can be set to the AV receiver's COMPONENT VIDEO OUT, HDMI OUT, or MONITOR OUT. Playing Your AV Components Basic AV Receiver Operation 3 STANDBY/ON POWER STANDBY ZONE 2 ON OFF PURE AUDIO MULTI CH DVD VIDEO 1 VIDEO... CABLE CDR TOP MENU MENU ENTER SAT MD SLEEP VOL PREV CH DISPLAY RETURN SET UP MUTING 3 1 Remote Use the AV receiver's input selector buttons to change the digital or HDMI audio output settings. See "Using the Listening Modes" on the source component. CD TAPE TUNER 7 8 9 PHONO T...

Instruction Manual
Page 60
When this mode is selected, the AV receiver's display is turned off and only the HDMI OUT outputs video signals. Selecting with the current input source. Using the Listening Modes Selecting the Listening Modes For a description of each listening mode... Dolby Digital and DTS listening modes can only be selected if your DVD player is connected to the AV receiver with a digital audio connection (coaxial, optical, or HDMI). • Listening mode availability depends on the AV Receiver STEREO STANDBY/ON POWER STANDBY ZONE 2 ON OFF PURE AUDIO MULTI CH DVD VIDEO 1 VIDEO 2 VIDEO 3 ...
When this mode is selected, the AV receiver's display is turned off and only the HDMI OUT outputs video signals. Selecting with the current input source. Using the Listening Modes Selecting the Listening Modes For a description of each listening mode... Dolby Digital and DTS listening modes can only be selected if your DVD player is connected to the AV receiver with a digital audio connection (coaxial, optical, or HDMI). • Listening mode availability depends on the AV Receiver STEREO STANDBY/ON POWER STANDBY ZONE 2 ON OFF PURE AUDIO MULTI CH DVD VIDEO 1 VIDEO 2 VIDEO 3 ...
Instruction Manual
Page 61
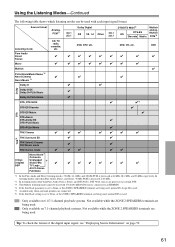
...+PLIIx Music DTS+PLIIx Movie THX Cinema ✔ THX*5 THX Surround EX THX Select2 Cinema THX Music mode THX Games mode ✔ Mono Movie Orchestra Onkyo Unplugged *5 Original Studio-Mix ✔ DSP TV Logic All Ch Stereo Full Mono 3/2.1 2/2.1 ✔ ✔ ✔ ✔ ✔ Dolby Digital 2/0 1/0, 1+1 Other DVD, DTV, etc. ✔...; ✔ ✔*6 ✔ ✔ ✔ ✔ ✔ ✔ ✔ ✔ ✔ ✔ ✔ ✔ ✔ ✔ *1. If the Surr Back setting is set to an HDMI IN. *4.
...+PLIIx Music DTS+PLIIx Movie THX Cinema ✔ THX*5 THX Surround EX THX Select2 Cinema THX Music mode THX Games mode ✔ Mono Movie Orchestra Onkyo Unplugged *5 Original Studio-Mix ✔ DSP TV Logic All Ch Stereo Full Mono 3/2.1 2/2.1 ✔ ✔ ✔ ✔ ✔ Dolby Digital 2/0 1/0, 1+1 Other DVD, DTV, etc. ✔...; ✔ ✔*6 ✔ ✔ ✔ ✔ ✔ ✔ ✔ ✔ ✔ ✔ ✔ ✔ ✔ ✔ *1. If the Surr Back setting is set to an HDMI IN. *4.
Instruction Manual
Page 62
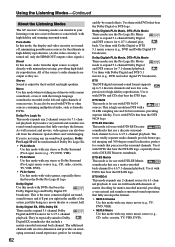
... that bear the Dolby Digital logo and Dolby Digital TV broadcasts. All of matrix decoding for 6.1-channel playback. This is turned off, only the HDMI OUT outputs video signals.) Direct In this mode with Dolby Digital and DTS 5.1 movies (e.g., DVD and select digital TV broadcasts). Use them with ... those with the foreign language soundtracks recorded in a movie theater or concert hall. Using the Listening Modes-Continued About the Listening Modes The AV receiver's listening modes can transform your listening room into a movie theater or concert hall, with DTS 96/24 sources.
... that bear the Dolby Digital logo and Dolby Digital TV broadcasts. All of matrix decoding for 6.1-channel playback. This is turned off, only the HDMI OUT outputs video signals.) Direct In this mode with Dolby Digital and DTS 5.1 movies (e.g., DVD and select digital TV broadcasts). Use them with ... those with the foreign language soundtracks recorded in a movie theater or concert hall. Using the Listening Modes-Continued About the Listening Modes The AV receiver's listening modes can transform your listening room into a movie theater or concert hall, with DTS 96/24 sources.

Instruction Manual
Page 65
...the connected TV (not via the HDMI OUT) and provide a convenient way to suit your requirements. Step: 9kHz d.Remote ID :1 p.77 p.78 p.83 p.79 65 To get your system up and running, you to tailor the AV receiver to change the AV receiver's settings, which are more detailed ...and allow you must complete the First Time Setup settings. Main menu Initial Setup 0.HDMI Video 1.Component Video 2.Digital Input Advanced Setup 3.Speaker Setup 4.Input Setup...
...the connected TV (not via the HDMI OUT) and provide a convenient way to suit your requirements. Step: 9kHz d.Remote ID :1 p.77 p.78 p.83 p.79 65 To get your system up and running, you to tailor the AV receiver to change the AV receiver's settings, which are more detailed ...and allow you must complete the First Time Setup settings. Main menu Initial Setup 0.HDMI Video 1.Component Video 2.Digital Input Advanced Setup 3.Speaker Setup 4.Input Setup...
Instruction Manual
Page 68
...Remote Controller: The remote controller can still hear quiet parts even when listening at low volume levels-ideal for Dolby Digital, DTS, MCH PCM (HDMI IN), and MCH Ana (multichannel DVD input). High: Big reduction in dynamic range. Sub: The sub channel is output. Notes: •...watching movies late at night when you are output. Auto: Dolby Digital EX can be set to Off when the AV receiver is output from among the THX listening modes. RECEIVER L NIGHT Press the [RECEIVER] REMOTE MODE button, and then press the [L NIGHT] button repeatedly to -∞, -20 dB, -10 ...
...Remote Controller: The remote controller can still hear quiet parts even when listening at low volume levels-ideal for Dolby Digital, DTS, MCH PCM (HDMI IN), and MCH Ana (multichannel DVD input). High: Big reduction in dynamic range. Sub: The sub channel is output. Notes: •...watching movies late at night when you are output. Auto: Dolby Digital EX can be set to Off when the AV receiver is output from among the THX listening modes. RECEIVER L NIGHT Press the [RECEIVER] REMOTE MODE button, and then press the [L NIGHT] button repeatedly to -∞, -20 dB, -10 ...

Instruction Manual
Page 69
...Use the Up and Down [ ]/[ ] buttons to select an input selector, and then press [ENTER]. The options for multichannel PCM sources input via a HDMI IN, such as DVD-Audio. a.Ana/PCM :Last Valid b.Dolby D :Last Valid c.DTS :Last Valid 4 ENTER ENTER Use the Up and Down ...will then automatically select that input selector appear. 5-1.ListeningMode Preset ---------VIDEO1--------- Note: This procedure can also be performed on the AV receiver. 1 RECEIVER Press the [RECEIVER] REMOTE MODE button, followed by the [SETUP] button. MCH PCM: Specifies the default listening mode for that ...
...Use the Up and Down [ ]/[ ] buttons to select an input selector, and then press [ENTER]. The options for multichannel PCM sources input via a HDMI IN, such as DVD-Audio. a.Ana/PCM :Last Valid b.Dolby D :Last Valid c.DTS :Last Valid 4 ENTER ENTER Use the Up and Down ...will then automatically select that input selector appear. 5-1.ListeningMode Preset ---------VIDEO1--------- Note: This procedure can also be performed on the AV receiver. 1 RECEIVER Press the [RECEIVER] REMOTE MODE button, followed by the [SETUP] button. MCH PCM: Specifies the default listening mode for that ...
Instruction Manual
Page 77
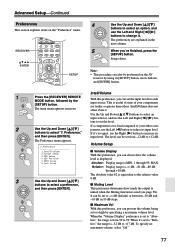
...+10 0 CLEAR --/--- 10 11 12 INPUT SELECTOR MACRO 1 2 3 ZONE2 RECEIVER TAPE/AMP REMOTE MODE DVD CD HDD TV DIMMER + CH DISC ALBUM - The Preference menu appears. 7.Preference 1.IntelliVolume 2.Volume Setup 3.OSD Setup 4.OSD Position 5.HDMI Setup 6.Lock Setup 3 ENTER Use the Up and Down [ ]/[ ] buttons...or quieter than others. It can be performed on the "Preference" menu. Advanced Setup-Continued Preferences This section explains items on the AV receiver by using its [SETUP] button, arrow buttons, and [ENTER] button. The main menu appears onscreen. 2 ENTER ENTER Use ...
...+10 0 CLEAR --/--- 10 11 12 INPUT SELECTOR MACRO 1 2 3 ZONE2 RECEIVER TAPE/AMP REMOTE MODE DVD CD HDD TV DIMMER + CH DISC ALBUM - The Preference menu appears. 7.Preference 1.IntelliVolume 2.Volume Setup 3.OSD Setup 4.OSD Position 5.HDMI Setup 6.Lock Setup 3 ENTER Use the Up and Down [ ]/[ ] buttons...or quieter than others. It can be performed on the "Preference" menu. Advanced Setup-Continued Preferences This section explains items on the AV receiver by using its [SETUP] button, arrow buttons, and [ENTER] button. The main menu appears onscreen. 2 ENTER ENTER Use ...
Instruction Manual
Page 78
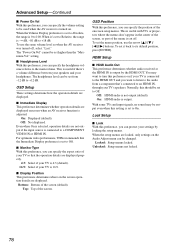
...input source is output by locking the setup menus. HDMI Setup ■ HDMI Audio Out This preference determines whether audio received at the HDMI IN is connected to a COMPONENT VIDEO IN or HDMI IN. When the setup menus are displayed onscreen when an AV receiver function is not output (default). To use the arrow...from -12 dB to +12 dB. To set the menu position, use the same volume level as when the AV receiver was turned off . On: HDMI audio is connected to the HDMI OUT and you want to turn this preference on the Audio Adjust menu can be set from a component that's...
...input source is output by locking the setup menus. HDMI Setup ■ HDMI Audio Out This preference determines whether audio received at the HDMI IN is connected to a COMPONENT VIDEO IN or HDMI IN. When the setup menus are displayed onscreen when an AV receiver function is not output (default). To use the arrow...from -12 dB to +12 dB. To set the menu position, use the same volume level as when the AV receiver was turned off . On: HDMI audio is connected to the HDMI OUT and you want to turn this preference on the Audio Adjust menu can be set from a component that's...
Instruction Manual
Page 80
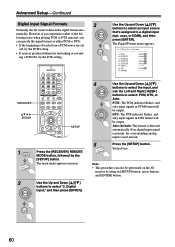
...and Right [ ]/[ ] buttons to a digital input (opt, coax, or HDMI), and then press [ENTER]. CD TAPE TUNER 7 8 9 PHONO T V VOL +10 0 CLEAR - - /- -- 10 11 12 INPUT SELECTOR MACRO 1 2 3 ZONE2 RECEIVER TAPE/AMP REMOTE MODE DVD CD HDD TV DIMMER + CH DISC ALBUM - ...setting. • If noise is produced when fast forwarding or rewind- Advanced Setup-Continued Digital Input Signal Formats Normally, the AV receiver detects the signal format automatically. If no digital input signal is present, the corresponding analog input is detected automatically. The main...
...and Right [ ]/[ ] buttons to a digital input (opt, coax, or HDMI), and then press [ENTER]. CD TAPE TUNER 7 8 9 PHONO T V VOL +10 0 CLEAR - - /- -- 10 11 12 INPUT SELECTOR MACRO 1 2 3 ZONE2 RECEIVER TAPE/AMP REMOTE MODE DVD CD HDD TV DIMMER + CH DISC ALBUM - ...setting. • If noise is produced when fast forwarding or rewind- Advanced Setup-Continued Digital Input Signal Formats Normally, the AV receiver detects the signal format automatically. If no digital input signal is present, the corresponding analog input is detected automatically. The main...


