Owner Manual
Page 6
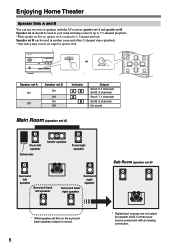
... Set B: 2 channels Set A: 7.1 channels Set B: 2 channels No sound Main Room (speaker set A) Front left speaker Subwoofer Center speaker Front right speaker Surround left speaker Surround back left speaker Surround right speaker Surround back right speaker Sub Room (speaker... are not output by speaker set B. Speaker set B can use two sets of speakers with an analog connection. Connect your main listening room for up to 7.1-channel playback. *While speaker set B is on, speaker set ...You can be used in your source component with the AV receiver: speaker set A and speaker set B.
... Set B: 2 channels Set A: 7.1 channels Set B: 2 channels No sound Main Room (speaker set A) Front left speaker Subwoofer Center speaker Front right speaker Surround left speaker Surround back left speaker Surround right speaker Surround back right speaker Sub Room (speaker... are not output by speaker set B. Speaker set B can use two sets of speakers with an analog connection. Connect your main listening room for up to 7.1-channel playback. *While speaker set B is on, speaker set ...You can be used in your source component with the AV receiver: speaker set A and speaker set B.

Owner Manual
Page 11
... The VCR/DVR inputs and outputs can be used to connect a VCR or DVR (digital video recorder). O SUBWOOFER PRE OUT A powered subwoofer can be connected here. B HDMI IN 1, 2, and OUT (TX-SR505 North American model/TX-SR505E/ TX-SR575 only) These jacks are for hookup information. 11... ANTENNA These push terminals are connected digitally. To use , you must make an analog audio connection (RCA) between the AV receiver and the other component that supports component video can be connected here. The CBL/SAT inputs can be used to connect a cable/satellite receiver, set-top box, etc....
... The VCR/DVR inputs and outputs can be used to connect a VCR or DVR (digital video recorder). O SUBWOOFER PRE OUT A powered subwoofer can be connected here. B HDMI IN 1, 2, and OUT (TX-SR505 North American model/TX-SR505E/ TX-SR575 only) These jacks are for hookup information. 11... ANTENNA These push terminals are connected digitally. To use , you must make an analog audio connection (RCA) between the AV receiver and the other component that supports component video can be connected here. The CBL/SAT inputs can be used to connect a cable/satellite receiver, set-top box, etc....

Owner Manual
Page 17
... a powered subwoofer. Angle them behind the listener about ear enhance the realism of surround level, or at one surround back speaker, connect it close to your own home-just like being in a movie theater or concert hall. You can enjoy Dolby Pro Logic IIx and Onkyo's own DSP...enjoy DVDs featuring DTS and Dolby Digital. They Position it to the left and right sound and improve sound local- Connecting Your Speakers Enjoying Home Theater Thanks to the AV receiver's superb capabilities, you can enjoy surround sound with a real sense of movement in your TV facing forward at about ...
... a powered subwoofer. Angle them behind the listener about ear enhance the realism of surround level, or at one surround back speaker, connect it close to your own home-just like being in a movie theater or concert hall. You can enjoy Dolby Pro Logic IIx and Onkyo's own DSP...enjoy DVDs featuring DTS and Dolby Digital. They Position it to the left and right sound and improve sound local- Connecting Your Speakers Enjoying Home Theater Thanks to the AV receiver's superb capabilities, you can enjoy surround sound with a real sense of movement in your TV facing forward at about ...

Owner Manual
Page 19
... SPEAKERS A L CENTER SPEAKER R R Front right Front left speaker speaker Speaker Set B LINE INPUT Powered subwoofer Surround back right speaker Surround back left speaker Surround right speaker Surround left (L) SURROUND BACK SPEAKERS terminals. Connecting a Powered Subwoofer Using a suitable cable, connect the AV receiver's SUBWOOFER PRE OUT to each pair of terminals. Front right speaker Speaker Set A Front left...
... SPEAKERS A L CENTER SPEAKER R R Front right Front left speaker speaker Speaker Set B LINE INPUT Powered subwoofer Surround back right speaker Surround back left speaker Surround right speaker Surround left (L) SURROUND BACK SPEAKERS terminals. Connecting a Powered Subwoofer Using a suitable cable, connect the AV receiver's SUBWOOFER PRE OUT to each pair of terminals. Front right speaker Speaker Set A Front left...
Owner Manual
Page 26
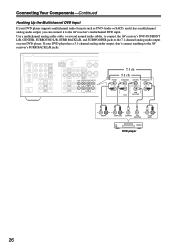
... normal audio cables, to connect the AV receiver's DVD IN FRONT L/R, CENTER, SURROUND L/R, SURR BACK L/R, and SUBWOOFER jacks to the 7.1-channel analog audio output on your DVD player supports multichannel audio formats such as DVD-Audio or SACD, and it has a multichannel analog audio output, you can connect it to the AV receiver's SURR BACK L/R jacks. DIGITAL...
... normal audio cables, to connect the AV receiver's DVD IN FRONT L/R, CENTER, SURROUND L/R, SURR BACK L/R, and SUBWOOFER jacks to the 7.1-channel analog audio output on your DVD player supports multichannel audio formats such as DVD-Audio or SACD, and it has a multichannel analog audio output, you can connect it to the AV receiver's SURR BACK L/R jacks. DIGITAL...

Owner Manual
Page 37
... on the second or third measurment was different to the number detected on the first measurement. Note that cannot be detected are connected properly. 37 To Retry the Automatic Speaker Setup Press the [ENTER] button. This message appears if saving fails. First Time Setup-Continued...; The surround back speakers have to Off or Direct. Make sure speakers that if the volume is usually low down, it to your subwoofer's instruction manual for details. Remove the source of the following error messages may not provide usable results. Write Error Changing the Speaker Settings...
... on the second or third measurment was different to the number detected on the first measurement. Note that cannot be detected are connected properly. 37 To Retry the Automatic Speaker Setup Press the [ENTER] button. This message appears if saving fails. First Time Setup-Continued...; The surround back speakers have to Off or Direct. Make sure speakers that if the volume is usually low down, it to your subwoofer's instruction manual for details. Remove the source of the following error messages may not provide usable results. Write Error Changing the Speaker Settings...

Owner Manual
Page 41
... signal is analog, or AM or FM radio is selected, no format information is displayed for connecting a component with a 7.1-channel analog audio output, such as a DVD-Audio or SACD-capable ... When AM or FM radio is used for the DVD input source. See page 26 for subwoofer (1 means yes). 41 The MULTI CH indicator appears on . Note: • The listening...DISPLAY mation. Note: • While the multichannel DVD input is on the display. Playing Your AV Components-Continued MULTI CH STANDBY/ON REMOTE MODE RECEIVER DVD TAPE/AMP INPUT SELECTOR M D/CDR 1 2 3 VCR/DVR CBL/SAT C D ...
... signal is analog, or AM or FM radio is selected, no format information is displayed for connecting a component with a 7.1-channel analog audio output, such as a DVD-Audio or SACD-capable ... When AM or FM radio is used for the DVD input source. See page 26 for subwoofer (1 means yes). 41 The MULTI CH indicator appears on . Note: • The listening...DISPLAY mation. Note: • While the multichannel DVD input is on the display. Playing Your AV Components-Continued MULTI CH STANDBY/ON REMOTE MODE RECEIVER DVD TAPE/AMP INPUT SELECTOR M D/CDR 1 2 3 VCR/DVR CBL/SAT C D ...

Owner Manual
Page 47
The SLEEP indicator appears on the display for the subwoofer). SLEEP indicator To cancel the sleep timer, press the [SLEEP] button repeatedly until the SLEEP indicator disappears. Adjusting Speaker Levels You can adjust the volume ... • These settings are turned off automatically after a specified period. Notes: • Always turn down the volume before connecting your headphones. • Speaker sets A and B are stored when the AV receiver is set to Standby. • While speaker set B is on , you can adjust the volume of headphones, the listening mode...
The SLEEP indicator appears on the display for the subwoofer). SLEEP indicator To cancel the sleep timer, press the [SLEEP] button repeatedly until the SLEEP indicator disappears. Adjusting Speaker Levels You can adjust the volume ... • These settings are turned off automatically after a specified period. Notes: • Always turn down the volume before connecting your headphones. • Speaker sets A and B are stored when the AV receiver is set to Standby. • While speaker set B is on , you can adjust the volume of headphones, the listening mode...

Owner Manual
Page 54
... for the Theater-Dimensional listening mode is 40 degrees. Wide: Select if the listening angle is based on this setting only affects signals connected to match your subwoofer is 20 degrees. Note that your DVD player. You can specify the angle of the front left and right speakers relative to one of...
... for the Theater-Dimensional listening mode is 40 degrees. Wide: Select if the listening angle is based on this setting only affects signals connected to match your subwoofer is 20 degrees. Note that your DVD player. You can specify the angle of the front left and right speakers relative to one of...

Owner Manual
Page 56
matic Speaker Setup function (see page 35). Cone diameter 1 RECEIVER Press the [RECEIVER] button followed by the Automatic Speaker Setup function (see page 35). None: Select if no center speaker is set to Small, the Large option cannot ... select "Center," and then use the Left and Right [ ]/[ ] buttons to select Small, Large, or None. Note: • If the Front setting in step 4 is connected. None: Select if no subwoofer is small. Note: • If the Front setting in step 3 is set automatically by the Auto- Some speaker settings are...
matic Speaker Setup function (see page 35). Cone diameter 1 RECEIVER Press the [RECEIVER] button followed by the Automatic Speaker Setup function (see page 35). None: Select if no center speaker is set to Small, the Large option cannot ... select "Center," and then use the Left and Right [ ]/[ ] buttons to select Small, Large, or None. Note: • If the Front setting in step 4 is connected. None: Select if no subwoofer is small. Note: • If the Front setting in step 3 is set automatically by the Auto- Some speaker settings are...

Owner Manual
Page 57
... the setting suitable for the speaker. Note: • These settings cannot be changed while headphones are connected, speaker set the crossover frequency according to the size and frequency response of the smallest speaker in your subwoofer. • These settings cannot be selected. 8 Use the Down [ ] button to select "Surr Back Ch," and...
... the setting suitable for the speaker. Note: • These settings cannot be changed while headphones are connected, speaker set the crossover frequency according to the size and frequency response of the smallest speaker in your subwoofer. • These settings cannot be selected. 8 Use the Down [ ] button to select "Surr Back Ch," and...

Owner Manual
Page 58
Setup closes. Speaker Distance These settings are connected, speaker set B is on, or the multichannel DVD input is being ...steps. 5 Use the Down [ ] button to select "Front," and use the Left and Right [ ]/[ ] buttons to the subwoofer. meters: Distances can be selected. 58 Off: Double Bass function off. 11 Press the [SETUP] button. SETUP Note: • ... and make a note of the distance from each speaker to the listening position. 2 RECEIVER Press the [RECEIVER] REMOTE MODE button, followed by feeding bass sounds from the front left and right channels to select "feet...
Setup closes. Speaker Distance These settings are connected, speaker set B is on, or the multichannel DVD input is being ...steps. 5 Use the Down [ ] button to select "Front," and use the Left and Right [ ]/[ ] buttons to the subwoofer. meters: Distances can be selected. 58 Off: Double Bass function off. 11 Press the [SETUP] button. SETUP Note: • ... and make a note of the distance from each speaker to the listening position. 2 RECEIVER Press the [RECEIVER] REMOTE MODE button, followed by feeding bass sounds from the front left and right channels to select "feet...

Owner Manual
Page 59
... , or the AV receiver is to press the remote controller's [TEST TONE] button to turn down the volume if you can be set between 15 and 25 ft. (4.5 and 7.5 m). • The Surround and Surround Back distances can be set B is on , or the multichannel DVD input is connected, speaker set to...• A quick way to adjust the speaker levels is muted. 59 For example, if the Front distance is set to 20 ft. (6 m), the Center and Subwoofer distances can be set between 5 and 25 ft. (1.5 and 7.5 m). • The speaker distance cannot be adjusted while a pair of headphones is being used. As...
... , or the AV receiver is to press the remote controller's [TEST TONE] button to turn down the volume if you can be set between 15 and 25 ft. (4.5 and 7.5 m). • The Surround and Surround Back distances can be set B is on , or the multichannel DVD input is connected, speaker set to...• A quick way to adjust the speaker levels is muted. 59 For example, if the Front distance is set to 20 ft. (6 m), the Center and Subwoofer distances can be set between 5 and 25 ft. (1.5 and 7.5 m). • The speaker distance cannot be adjusted while a pair of headphones is being used. As...

Owner Manual
Page 65
...the wall outlet, wait 5 seconds or more, then plug it and the AV receiver. For TX-SR505 North American model/ TX-SR505E/TX-SR575 with metal part of the speaker cables is selected, only the front speakers and subwoofer produce sound. • Make sure the speakers are configured correctly... the AV receiver before contacting your Onkyo dealer. Disconnect all the way (page 22). • Make sure that the polarity of each speaker terminal (page 19) • Make sure that the power cord is connected via HDMI is output by the speakers connected to maximum. The AV receiver is ...
...the wall outlet, wait 5 seconds or more, then plug it and the AV receiver. For TX-SR505 North American model/ TX-SR505E/TX-SR575 with metal part of the speaker cables is selected, only the front speakers and subwoofer produce sound. • Make sure the speakers are configured correctly... the AV receiver before contacting your Onkyo dealer. Disconnect all the way (page 22). • Make sure that the polarity of each speaker terminal (page 19) • Make sure that the power cord is connected via HDMI is output by the speakers connected to maximum. The AV receiver is ...

Owner Manual
Page 66
...AV receiver remains in which the AV receiver is connected is Dolby Digital (page 52). The volume cannot be connected to a digital input on your DVD player. Video There's no picture • Make sure that all video connecting plugs are configured correctly (page 56). The subwoofer... For TX-SR505/TX-SR505E/TX-SR8550: The AV receiver does not convert between formats, so if a video source component is connected to a component video input, your TV must be connected to the component video output (page 23). • For TX-SR575: If your video component is connected to ...
...AV receiver remains in which the AV receiver is connected is Dolby Digital (page 52). The volume cannot be connected to a digital input on your DVD player. Video There's no picture • Make sure that all video connecting plugs are configured correctly (page 56). The subwoofer... For TX-SR505/TX-SR505E/TX-SR8550: The AV receiver does not convert between formats, so if a video source component is connected to a component video input, your TV must be connected to the component video output (page 23). • For TX-SR575: If your video component is connected to ...

Instruction Manual
Page 6
... Set A: 5.1 channels Set B: 2 channels Set A: 7.1 channels Set B: 2 channels No sound Main Room (speaker set A) Front left speaker Subwoofer Center speaker Front right speaker Surround left speaker Surround back left speaker Surround right speaker Surround back right speaker Sub Room (speaker set B) * While ... Sets A and B You can be used in your source component with the AV receiver: speaker set A and speaker set B. Speaker set B can use two sets of speakers with an analog connection. Connect your main listening room for up to 7.1-channel playback. *While speaker set B...
... Set A: 5.1 channels Set B: 2 channels Set A: 7.1 channels Set B: 2 channels No sound Main Room (speaker set A) Front left speaker Subwoofer Center speaker Front right speaker Surround left speaker Surround back left speaker Surround right speaker Surround back right speaker Sub Room (speaker set B) * While ... Sets A and B You can be used in your source component with the AV receiver: speaker set A and speaker set B. Speaker set B can use two sets of speakers with an analog connection. Connect your main listening room for up to 7.1-channel playback. *While speaker set B...

Instruction Manual
Page 11
...TX-SR505 North American model/TX-SR505E/ TX-SR575 only) These jacks are for connecting speaker set A. J REMOTE CONTROL This Remote Interactive jack can be connected here. K CD IN This analog audio input is for connecting a CD player's analog audio output. O SUBWOOFER PRE OUT A powered subwoofer can be used to connect...another -capable Onkyo com- F MONITOR OUT The S-Video or composite video output should be used to Know the AV Receiver-Continued A DIGITAL IN OPTICAL 1, 2 and COAXIAL 1, 2 These optical and coaxial digital audio inputs are for connecting a recorder ...
...TX-SR505 North American model/TX-SR505E/ TX-SR575 only) These jacks are for connecting speaker set A. J REMOTE CONTROL This Remote Interactive jack can be connected here. K CD IN This analog audio input is for connecting a CD player's analog audio output. O SUBWOOFER PRE OUT A powered subwoofer can be used to connect...another -capable Onkyo com- F MONITOR OUT The S-Video or composite video output should be used to Know the AV Receiver-Continued A DIGITAL IN OPTICAL 1, 2 and COAXIAL 1, 2 These optical and coaxial digital audio inputs are for connecting a recorder ...

Instruction Manual
Page 17
...the best position for the sound image. You can enjoy Dolby Pro Logic IIx and Onkyo's own DSP surround listening modes. For movies it to your TV facing forward at one surround back speaker, connect it 's used for a really powerful and solid bass. ization behind the listener ... them at various positions within the room, and choose the one that you 're using the AV receiver, you can enjoy DVDs featuring DTS and Dolby Digital. Ideally they should connect seven speakers and a powered subwoofer. Their role in a movie theater or concert hall. eral, a good bass sound can be...
...the best position for the sound image. You can enjoy Dolby Pro Logic IIx and Onkyo's own DSP surround listening modes. For movies it to your TV facing forward at one surround back speaker, connect it 's used for a really powerful and solid bass. ization behind the listener ... them at various positions within the room, and choose the one that you 're using the AV receiver, you can enjoy DVDs featuring DTS and Dolby Digital. Ideally they should connect seven speakers and a powered subwoofer. Their role in a movie theater or concert hall. eral, a good bass sound can be...

Instruction Manual
Page 19
... tightly, as shown. 5/8" (15 mm) 2 Unscrew the terminal. Screw the terminal tight. Connecting a Powered Subwoofer Using a suitable cable, connect the AV receiver's SUBWOOFER PRE OUT to the input on , speaker set A is unpowered and you 're using an external amplifier, connect the SUBWOOFER PRE OUT to it to 5.1-channel playback. Note: Make sure the plugs are...
... tightly, as shown. 5/8" (15 mm) 2 Unscrew the terminal. Screw the terminal tight. Connecting a Powered Subwoofer Using a suitable cable, connect the AV receiver's SUBWOOFER PRE OUT to the input on , speaker set A is unpowered and you 're using an external amplifier, connect the SUBWOOFER PRE OUT to it to 5.1-channel playback. Note: Make sure the plugs are...

Instruction Manual
Page 26
...audio formats such as DVD-Audio or SACD, and it has a multichannel analog audio output, you can connect it to the AV receiver's multichannel DVD input. Connecting Your Components-Continued Hooking Up the Multichannel DVD Input If your DVD player has a 5.1-channel analog audio... output, don't connect anything to the AV receiver's SURR BACK L/R jacks. Use a multichannel analog audio cable, or several normal audio cables, to connect the AV receiver's DVD IN FRONT L/R, CENTER, SURROUND L/R, SURR BACK L/R, and SUBWOOFER jacks to the 7.1-channel analog audio output on...
...audio formats such as DVD-Audio or SACD, and it has a multichannel analog audio output, you can connect it to the AV receiver's multichannel DVD input. Connecting Your Components-Continued Hooking Up the Multichannel DVD Input If your DVD player has a 5.1-channel analog audio... output, don't connect anything to the AV receiver's SURR BACK L/R jacks. Use a multichannel analog audio cable, or several normal audio cables, to connect the AV receiver's DVD IN FRONT L/R, CENTER, SURROUND L/R, SURR BACK L/R, and SUBWOOFER jacks to the 7.1-channel analog audio output on...


