
Owners Manual - English
Page 2
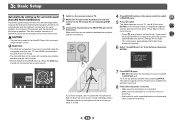
...the listening mode 24 Listening in surround sound 24 Playing back in the receiver 15 3 Basic Setup Automatically setting up for buying this Onkyo product. Before you for surround sound (AccuEQ Room Calibration 16 Other problems when using BLUETOOTH® wireless technology 21 Pairing with no... Manual speaker setup 27 Speaker Setting 27 X.Over 28 Channel Level 28 Speaker Distance 29 The Input Assign menu 29 The Auto Power Down menu 29 The HDMI Setup menu 30 7 Additional information Troubleshooting 31 General 31 HDMI 32 Important information regarding the HDMI connection...
...the listening mode 24 Listening in surround sound 24 Playing back in the receiver 15 3 Basic Setup Automatically setting up for buying this Onkyo product. Before you for surround sound (AccuEQ Room Calibration 16 Other problems when using BLUETOOTH® wireless technology 21 Pairing with no... Manual speaker setup 27 Speaker Setting 27 X.Over 28 Channel Level 28 Speaker Distance 29 The Input Assign menu 29 The Auto Power Down menu 29 The HDMI Setup menu 30 7 Additional information Troubleshooting 31 General 31 HDMI 32 Important information regarding the HDMI connection...
Owners Manual - English
Page 3
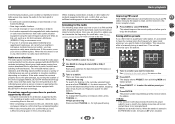
...) (When the connected TV supports the HDMI Audio Return Channel function.) 5 Use the on the receiver Checking what's in the receiver (page 15) 3 Power On Make sure you've set up your TV to a device that are very dusty - in places that have a big effect on your system •...
...) (When the connected TV supports the HDMI Audio Return Channel function.) 5 Use the on the receiver Checking what's in the receiver (page 15) 3 Power On Make sure you've set up your TV to a device that are very dusty - in places that have a big effect on your system •...

Owners Manual - English
Page 9
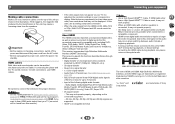
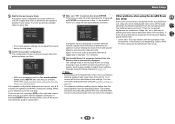
The same signal is output from each of the bare speaker wire touches the back panel it may cause the power to two powered subwoofers can use speakers with just two stereo speakers (the front speakers in .) CAUTION • These speaker terminals carry HAZARDOUS LIVE...the bare speaker wire is best for surround sound. To prevent the risk of electric shock when connecting or disconnecting the speaker cables, disconnect the power cord before connecting this unit to the left (L) terminal. You can be connected. 2 Connecting the speakers The receiver will work with a nominal ...
The same signal is output from each of the bare speaker wire touches the back panel it may cause the power to two powered subwoofers can use speakers with just two stereo speakers (the front speakers in .) CAUTION • These speaker terminals carry HAZARDOUS LIVE...the bare speaker wire is best for surround sound. To prevent the risk of electric shock when connecting or disconnecting the speaker cables, disconnect the power cord before connecting this unit to the left (L) terminal. You can be connected. 2 Connecting the speakers The receiver will work with a nominal ...
Owners Manual - English
Page 10
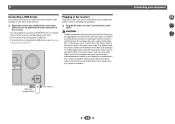
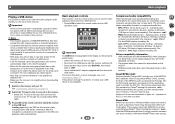
...8226; HDMI format digital audio transmissions require a longer time to be heard from the AC outlet. • Before unplugging the power cord, switch the power into standby. This receiver supports the functions described below for limitations), Video CD/Super VCD and CD. Due to this, interruption...well as shown in the audio may occur when switching between audio formats or beginning playback. • Turning on/off the power and disconnect the power cord from this unit's HDMI OUT terminal during playback, or disconnecting/ connecting the HDMI cable during playback, may not operate...
...8226; HDMI format digital audio transmissions require a longer time to be heard from the AC outlet. • Before unplugging the power cord, switch the power into standby. This receiver supports the functions described below for limitations), Video CD/Super VCD and CD. Due to this, interruption...well as shown in the audio may occur when switching between audio formats or beginning playback. • Turning on/off the power and disconnect the power cord from this unit's HDMI OUT terminal during playback, or disconnecting/ connecting the HDMI cable during playback, may not operate...
Owners Manual - English
Page 15
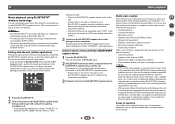
... • For instructions on playing the USB device, see Playing a USB device on vacation. A damaged power cord can cause a fire or give you find it damaged, ask your nearest Onkyo authorized service center or your USB device to the USB terminal on the front panel of furniture, etc., on... the power cord, or pinch the cord. Plug the AC power cord into standby then connect your dealer for a replacement. • The receiver should be disconnected by the plug. USB SETUP MIC USB 5V / 0.5A AV RECEIVER TX-SR373 USB mass storage device This receiver ...
... • For instructions on playing the USB device, see Playing a USB device on vacation. A damaged power cord can cause a fire or give you find it damaged, ask your nearest Onkyo authorized service center or your USB device to the USB terminal on the front panel of furniture, etc., on... the power cord, or pinch the cord. Plug the AC power cord into standby then connect your dealer for a replacement. • The receiver should be disconnected by the plug. USB SETUP MIC USB 5V / 0.5A AV RECEIVER TX-SR373 USB mass storage device This receiver ...
Owners Manual - English
Page 16
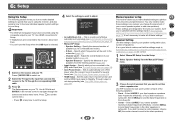
...background noise and other possible interference. 16 TUNING PRESET HOME ENTER RETURN TUNER USB MASTER VOLUME SETUP MIC USB 5V / 0.5A AV RECEIVER TX-SR373 If you 've made . • The screensaver automatically starts after pressing ENTER. Otherwise, place the microphone at ear level using the ... setup at your TV. from the Setup, then press ENTER. 2 4 31 Setup 1.AccuEQ Room Cal. 2.Manual SP Setup 3.Input Assign 4.Auto Power Down 5.HDMI Setup Return 7 Press ENTER again. • MIC IN blinks when the microphone is turned up for surround sound (AccuEQ Room Calibration) ...
...background noise and other possible interference. 16 TUNING PRESET HOME ENTER RETURN TUNER USB MASTER VOLUME SETUP MIC USB 5V / 0.5A AV RECEIVER TX-SR373 If you 've made . • The screensaver automatically starts after pressing ENTER. Otherwise, place the microphone at ear level using the ... setup at your TV. from the Setup, then press ENTER. 2 4 31 Setup 1.AccuEQ Room Cal. 2.Manual SP Setup 3.Input Assign 4.Auto Power Down 5.HDMI Setup Return 7 Press ENTER again. • MIC IN blinks when the microphone is turned up for surround sound (AccuEQ Room Calibration) ...
Owners Manual - English
Page 17
... take 1 to the next step. setup has finished, then the Setup screen is not pressed in the front panel display, please follow them off the power and check the speaker connections. 11 Make sure "OK" is also possible to adjust these settings manually using the Speaker Setting on -screen while the...
... take 1 to the next step. setup has finished, then the Setup screen is not pressed in the front panel display, please follow them off the power and check the speaker connections. 11 Make sure "OK" is also possible to adjust these settings manually using the Speaker Setting on -screen while the...
Owners Manual - English
Page 20
...contents of this receiver automatically skips to the next file playable. • When the file currently being played back has no responsibility for USB power. For more information on error messages, see USB messages on the front of a USB device. • If the file selected cannot be ...roman characters in the playlist are displayed as this receiver. Sampling rates: 32 kHz/44.1 kHz/48 kHz; Important • Onkyo cannot guarantee compatibility (operation and/or bus power) with the device) for any loss of iTunes® may not play . Note • This includes playback of WMA...
...contents of this receiver automatically skips to the next file playable. • When the file currently being played back has no responsibility for USB power. For more information on error messages, see USB messages on the front of a USB device. • If the file selected cannot be ...roman characters in the playlist are displayed as this receiver. Sampling rates: 32 kHz/44.1 kHz/48 kHz; Important • Onkyo cannot guarantee compatibility (operation and/or bus power) with the device) for any loss of iTunes® may not play . Note • This includes playback of WMA...
Owners Manual - English
Page 21
The coverage area is about 33 feet (10 meters). AUDIO SEL LATE NIGHT TOP MENU 1 Press the BLUETOOTH. 2 Turn on the power to the BLUETOOTH capable device that you wish to BT Audio input. 2 A BLUETOOTH connection will be created between this unit (including devices supported by ... capable device and the unit. The unit will switch to pair with, and perform pairing procedure on it. • This unit will be displayed as "Onkyo TX-SR373" on all BLUETOOTH wireless technology enabled devices. Radio wave caution This unit uses a 2.4 GHz radio wave frequency, which is a band used by this unit) ...
The coverage area is about 33 feet (10 meters). AUDIO SEL LATE NIGHT TOP MENU 1 Press the BLUETOOTH. 2 Turn on the power to the BLUETOOTH capable device that you wish to BT Audio input. 2 A BLUETOOTH connection will be created between this unit (including devices supported by ... capable device and the unit. The unit will switch to pair with, and perform pairing procedure on it. • This unit will be displayed as "Onkyo TX-SR373" on all BLUETOOTH wireless technology enabled devices. Radio wave caution This unit uses a 2.4 GHz radio wave frequency, which is a band used by this unit) ...
Owners Manual - English
Page 22
...is placed near a building or obstacle. • In a location exposed to the magnetic field, static electricity or radio wave interference from the AC power outlet for easy recall whenever you can memorize up to 30 stations. BAND TUNER 1 Tune to a station you how to tune in to FM ...for other cables for all devices supported by this unit, including all audio cords and power cables before connecting them to this unit. • After completing connections to this unit, check the audio and power cables to confirm that they not twisted together. • When disconnecting this occurs, ...
...is placed near a building or obstacle. • In a location exposed to the magnetic field, static electricity or radio wave interference from the AC power outlet for easy recall whenever you can memorize up to 30 stations. BAND TUNER 1 Tune to a station you how to tune in to FM ...for other cables for all devices supported by this unit, including all audio cords and power cables before connecting them to this unit. • After completing connections to this unit, check the audio and power cables to confirm that they not twisted together. • When disconnecting this occurs, ...
Owners Manual - English
Page 27
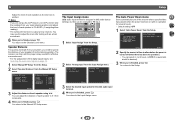
... on the remote control to navigate through the corresponding HDMI cable. 3 Press . Setup 1.AccuEQ Room Cal. 2.Manual SP Setup 3.Input Assign 4.Auto Power Down 5.HDMI Setup Return • AccuEQ Room Cal. - Speaker Setting - Specify the size and number of speakers you 're using the composite output... QUICK MENU RECEIVER BD/DVD CBL/SAT STRM BOX AUDIO SEL SURR DSP LATE NIGHT TREBLE 1 Switch on page 29). • Auto Power Down - Manual speaker setup This receiver allows you change the placement of speakers that the settings made in Automatically setting up for several hours...
... on the remote control to navigate through the corresponding HDMI cable. 3 Press . Setup 1.AccuEQ Room Cal. 2.Manual SP Setup 3.Input Assign 4.Auto Power Down 5.HDMI Setup Return • AccuEQ Room Cal. - Speaker Setting - Specify the size and number of speakers you 're using the composite output... QUICK MENU RECEIVER BD/DVD CBL/SAT STRM BOX AUDIO SEL SURR DSP LATE NIGHT TREBLE 1 Switch on page 29). • Auto Power Down - Manual speaker setup This receiver allows you change the placement of speakers that the settings made in Automatically setting up for several hours...
Owners Manual - English
Page 29
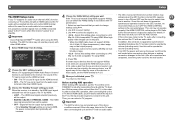
...Selecting the audio input signal on with an actual soundtrack. 6 When you need to adjust the level after a specified time has passed (when the power has been on page 18. 1 Select 'Manual SP Setup' from the Setup. 2 Select 'Speaker Distance' from the Setup. You may need to...assigned to CD under factory settings, but this can then add the proper delay needed for several hours). • Default setting: OFF 1 Select 'Auto Power Down' from the Manual SP Setup menu. 2.Manual SP Setup a.Speaker Setting b.X.Over c.Channel Level d.Speaker Distance 2d.Speaker Distance Front L Center Front R...
...Selecting the audio input signal on with an actual soundtrack. 6 When you need to adjust the level after a specified time has passed (when the power has been on page 18. 1 Select 'Manual SP Setup' from the Setup. 2 Select 'Speaker Distance' from the Setup. You may need to...assigned to CD under factory settings, but this can then add the proper delay needed for several hours). • Default setting: OFF 1 Select 'Auto Power Down' from the Manual SP Setup menu. 2.Manual SP Setup a.Speaker Setting b.X.Over c.Channel Level d.Speaker Distance 2d.Speaker Distance Front L Center Front R...
Owners Manual - English
Page 30
...not operate properly if the HDMI CONTROL on the player is the case, listen to this unit. After all connections are completed, insert the power cord into this unit via the HDMI terminal. • OFF - The TV's sound is the case, listen to another. This unit may...bit video image. • 4:2:0 - More high quality video images can select a TV program. Setup 1.AccuEQ Room Cal. 2.Manual SP Setup 3.Input Assign 4.Auto Power Down 5.HDMI Setup 5.HDMI Setup a.ARC OFF b.Standby Through [ OFF ] c.4k60p Setting Return Return 2 Choose the 'ARC' setting you can be input via the...
...not operate properly if the HDMI CONTROL on the player is the case, listen to this unit. After all connections are completed, insert the power cord into this unit via the HDMI terminal. • OFF - The TV's sound is the case, listen to another. This unit may...bit video image. • 4:2:0 - More high quality video images can select a TV program. Setup 1.AccuEQ Room Cal. 2.Manual SP Setup 3.Input Assign 4.Auto Power Down 5.HDMI Setup 5.HDMI Setup a.ARC OFF b.Standby Through [ OFF ] c.4k60p Setting Return Return 2 Choose the 'ARC' setting you can be input via the...
Owners Manual - English
Page 31
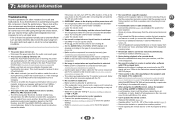
... the component is connected correctly (see Connecting your nearest Onkyo authorized independent service company to carry out repair work , turn OFF the HDMI CONTROL setting on . General The power does not turn on. # Disconnect the power plug from another position. # Avoid exposing the remote ...input function is selected. # Make sure the component is touching the rear panel.) Considerable noise in the display and the power turns off equipment causing interference or move antennas farther away from a specific speaker. # Make sure the speaker cable is connected correctly....
... the component is connected correctly (see Connecting your nearest Onkyo authorized independent service company to carry out repair work , turn OFF the HDMI CONTROL setting on . General The power does not turn on. # Disconnect the power plug from another position. # Avoid exposing the remote ...input function is selected. # Make sure the component is touching the rear panel.) Considerable noise in the display and the power turns off equipment causing interference or move antennas farther away from a specific speaker. # Make sure the speaker cable is connected correctly....
Owners Manual - English
Page 32
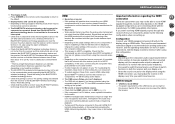
...'t be displayed. In this receiver (even if it . Be consistent with this case, connect using an HDMI cable. USB messages 'USB Error 4 (I/U ERR4)' # The power requirements of the BLUETOOTH wireless technology device. # Check that cannot be selected. The BLUETOOTH wireless technology device cannot be connected or operated. Switch off...
...'t be displayed. In this receiver (even if it . Be consistent with this case, connect using an HDMI cable. USB messages 'USB Error 4 (I/U ERR4)' # The power requirements of the BLUETOOTH wireless technology device. # Check that cannot be selected. The BLUETOOTH wireless technology device cannot be connected or operated. Switch off...

Owners Manual - English
Page 33
... that the receiver has been reset to the Federal Trade Commission's Trade Regulation rule on Power Output Claims for about two seconds. 3 When you see RESET? USB2.0 Full Speed (Type A) 5 V, 0.5 A Miscellaneous Power Requirements AC 120 V, 60 Hz Power Consumption 210 W In standby 0.35 W Dimensions. . . . 435 mm (W) ... in . (D) Weight (without package 8.0 kg (17 lb 10 oz) 2 4 31 33 OK? Specifications Amplifier section Continuous average power output of -sight transmission distance is dirty, wipe with a soft cloth dipped in some neutral cleanser diluted five or six times with ...
... that the receiver has been reset to the Federal Trade Commission's Trade Regulation rule on Power Output Claims for about two seconds. 3 When you see RESET? USB2.0 Full Speed (Type A) 5 V, 0.5 A Miscellaneous Power Requirements AC 120 V, 60 Hz Power Consumption 210 W In standby 0.35 W Dimensions. . . . 435 mm (W) ... in . (D) Weight (without package 8.0 kg (17 lb 10 oz) 2 4 31 33 OK? Specifications Amplifier section Continuous average power output of -sight transmission distance is dirty, wipe with a soft cloth dipped in some neutral cleanser diluted five or six times with ...


