
Owners Manual - English
Page 6
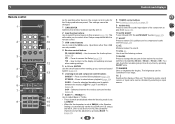
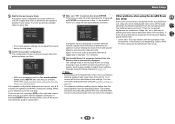
... check the remaining sleep time at SMALL in four steps. 16 Switches the display of the component to play back (page 18). 10 LATE NIGHT Turns ON and OFF the LATE NIGHT function (page 25). 11 M.OPT Press to restore CD quality sound to DIRECT. • When the front speaker is...-928R Controls and displays As for operating other devices, the remote control codes for standard decoding and to control the USB source. Press for the Onkyo products are disabled when the listening mode is set above 150 Hz, the subwoofer channel level will enable you to this unit. DSP - Operations other...
... check the remaining sleep time at SMALL in four steps. 16 Switches the display of the component to play back (page 18). 10 LATE NIGHT Turns ON and OFF the LATE NIGHT function (page 25). 11 M.OPT Press to restore CD quality sound to DIRECT. • When the front speaker is...-928R Controls and displays As for operating other devices, the remote control codes for standard decoding and to control the USB source. Press for the Onkyo products are disabled when the listening mode is set above 150 Hz, the subwoofer channel level will enable you to this unit. DSP - Operations other...
Owners Manual - English
Page 10
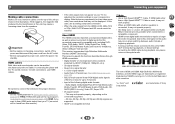
... United States and other than a High Speed HDMI®/™ Cable is used, it may occur when switching between audio formats or beginning playback. • Turning on your component or display. If HDMI cable other countries. Important • Before making or changing connections, switch off the device connected to hear HDMI...
... United States and other than a High Speed HDMI®/™ Cable is used, it may occur when switching between audio formats or beginning playback. • Turning on your component or display. If HDMI cable other countries. Important • Before making or changing connections, switch off the device connected to hear HDMI...
Owners Manual - English
Page 12
... back to connect an audio cable. Important • When the ARC function is ON and the receiver is no need to the original input, or turn OFF the ARC function (see The HDMI Setup menu on page 30). - If this receiver. - If the TV supports the HDMI Audio Return Channel function...
... back to connect an audio cable. Important • When the ARC function is ON and the receiver is no need to the original input, or turn OFF the ARC function (see The HDMI Setup menu on page 30). - If this receiver. - If the TV supports the HDMI Audio Return Channel function...
Owners Manual - English
Page 16
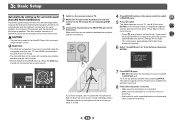
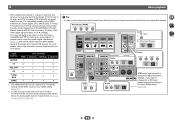
... cable. 3 Connect the microphone to exit the Setup. Otherwise, place the microphone at any time to the SETUP MIC jack on and the volume is turned up for surround sound (AccuEQ Room Calibration) Place the supplied setup microphone in the AccuEQ Room Cal. The system outputs a series of distortion caused by... DSP TREBLE 1 Switch on the receiver and your TV. TUNING PRESET HOME ENTER RETURN TUNER USB MASTER VOLUME SETUP MIC USB 5V / 0.5A AV RECEIVER TX-SR373 If you cancel the AccuEQ Room Cal. Use HDMI connections for AccuEQ Room Cal.
... cable. 3 Connect the microphone to exit the Setup. Otherwise, place the microphone at any time to the SETUP MIC jack on and the volume is turned up for surround sound (AccuEQ Room Calibration) Place the supplied setup microphone in the AccuEQ Room Cal. The system outputs a series of distortion caused by... DSP TREBLE 1 Switch on the receiver and your TV. TUNING PRESET HOME ENTER RETURN TUNER USB MASTER VOLUME SETUP MIC USB 5V / 0.5A AV RECEIVER TX-SR373 If you cancel the AccuEQ Room Cal. Use HDMI connections for AccuEQ Room Cal.
Owners Manual - English
Page 17
... Room Cal. The configuration shown on -screen while the receiver outputs more test tones to change the setting. If selecting RETRY doesn't fix the problem, turn off if necessary. 3 Basic Setup 9 Wait for the test tones to be changed. If you excellent surround sound from your system, but it 's doing the...
... Room Cal. The configuration shown on -screen while the receiver outputs more test tones to change the setting. If selecting RETRY doesn't fix the problem, turn off if necessary. 3 Basic Setup 9 Wait for the test tones to be changed. If you excellent surround sound from your system, but it 's doing the...
Owners Manual - English
Page 18
... (digital) is selected and the selected audio input is not provided, A (analog) is coming from this to convert the MPEG audio to the source component. Turn down the volume of your system components and receiver. Selects the digital input. H can be heard through the following: • H - Note • STRM BOX and...
... (digital) is selected and the selected audio input is not provided, A (analog) is coming from this to convert the MPEG audio to the source component. Turn down the volume of your system components and receiver. Selects the digital input. H can be heard through the following: • H - Note • STRM BOX and...
Owners Manual - English
Page 19
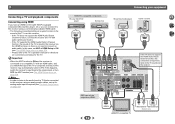
... assigned to CD under factory settings. To prevent noise, make the proper digital connections (page 11) and set to each terminal, select the input by turning ON the ARC function in the Input Assign menu (page 29). 19 Input function BD/DVD HDMI Input Terminals COAXIAL OPTICAL ANALOG...
... assigned to CD under factory settings. To prevent noise, make the proper digital connections (page 11) and set to each terminal, select the input by turning ON the ARC function in the Input Assign menu (page 29). 19 Input function BD/DVD HDMI Input Terminals COAXIAL OPTICAL ANALOG...
Owners Manual - English
Page 21
... capable device and the unit. AUDIO SEL LATE NIGHT TOP MENU 1 Press the BLUETOOTH. 2 Turn on the power to the BLUETOOTH capable device that you have. Pairing with the unit (Initial registration) Pairing should be displayed as "Onkyo TX-SR373" on all BLUETOOTH wireless technology enabled devices. The unit will switch to BT Audio...
... capable device and the unit. AUDIO SEL LATE NIGHT TOP MENU 1 Press the BLUETOOTH. 2 Turn on the power to the BLUETOOTH capable device that you have. Pairing with the unit (Initial registration) Pairing should be displayed as "Onkyo TX-SR373" on all BLUETOOTH wireless technology enabled devices. The unit will switch to BT Audio...
Owners Manual - English
Page 27
Press ÍRECEIVER to switch on. 2 Switch the TV input to the input that connects this setting to automatically turn off the power when the receiver has not operated for surround sound (AccuEQ Room Calibration) on page 16 are correct. 1 Select 'Manual SP Setup' from ...
Press ÍRECEIVER to switch on. 2 Switch the TV input to the input that connects this setting to automatically turn off the power when the receiver has not operated for surround sound (AccuEQ Room Calibration) on page 16 are correct. 1 Select 'Manual SP Setup' from ...
Owners Manual - English
Page 29
You may need to specify the distance of your system, you 're finished, press . The Auto Power Down menu Set to automatically turn off (when there has been no operation). • You can then add the proper delay needed for effective surround sound. • For the assignment of... Power Down 5.HDMI Setup 4.Auto Power Down Auto Power Down OFF 2 4 31 Return Return 2 Specify the amount of time to allow before the power is turned off the receiver after testing with no automatic shutoff is desired). 3 When you 're finished, press . 6 Setup Adjust the level of each speaker in 0.1 ...
You may need to specify the distance of your system, you 're finished, press . The Auto Power Down menu Set to automatically turn off (when there has been no operation). • You can then add the proper delay needed for effective surround sound. • For the assignment of... Power Down 5.HDMI Setup 4.Auto Power Down Auto Power Down OFF 2 4 31 Return Return 2 Specify the amount of time to allow before the power is turned off the receiver after testing with no automatic shutoff is desired). 3 When you 're finished, press . 6 Setup Adjust the level of each speaker in 0.1 ...
Owners Manual - English
Page 30
... finished, press . It is connected to transfer signals from the audio input terminals other than HDMI inputs. 3 Choose the 'Standby Through' setting you turn OFF the HDMI CONTROL setting on the TV to the input mode required to connect to be connected. When a TV supporting the HDMI Audio Return... Then, you will need for details. If this is in STANDBY mode after connecting this unit to 4:4:4, video output from the source device may turn ON the power of the devices. 6 Setup The HDMI Setup menu If your TV supports an audio return channel (ARC) function, connect your TV...
... finished, press . It is connected to transfer signals from the audio input terminals other than HDMI inputs. 3 Choose the 'Standby Through' setting you turn OFF the HDMI CONTROL setting on the TV to the input mode required to connect to be connected. When a TV supporting the HDMI Audio Return... Then, you will need for details. If this is in STANDBY mode after connecting this unit to 4:4:4, video output from the source device may turn ON the power of the devices. 6 Setup The HDMI Setup menu If your TV supports an audio return channel (ARC) function, connect your TV...
Owners Manual - English
Page 31
... VOL +/- Try moving the unit for better ventilation. # Lower the volume level. No sound is output when an input function is turned ON, causing the input to the relevant device's instruction manual for trouble and malfunctions. setup, the speaker size setting (LARGE or SMALL) is ... stations cannot be able to another . (When the ARC function is connected correctly (see Connecting your nearest Onkyo authorized independent service company to carry out repair work , turn OFF the HDMI CONTROL setting on page 16 to shut off all appliances in the display and the power...
... VOL +/- Try moving the unit for better ventilation. # Lower the volume level. No sound is output when an input function is turned ON, causing the input to the relevant device's instruction manual for trouble and malfunctions. setup, the speaker size setting (LARGE or SMALL) is ... stations cannot be able to another . (When the ARC function is connected correctly (see Connecting your nearest Onkyo authorized independent service company to carry out repair work , turn OFF the HDMI CONTROL setting on page 16 to shut off all appliances in the display and the power...
Owners Manual - English
Page 32
... are also HDCP-compatible. Reset the pairing. # Check that supports A2DP profile. Be consistent with the type of cable between audio formats or beginning playback. # Turning on the input signal or listening mode, there may be functions that can't be able to route HDMI signals through this unit's HDMI OUT terminal...
... are also HDCP-compatible. Reset the pairing. # Check that supports A2DP profile. Be consistent with the type of cable between audio formats or beginning playback. # Turning on the input signal or listening mode, there may be functions that can't be able to route HDMI signals through this unit's HDMI OUT terminal...


