Owner Manual
Page 3
...outlet on the unit's rear panel (e.g., AC 230 V, 50 Hz or AC 120 V, 60 Hz). Preventing Hearing Loss Caution Excessive sound pressure from earphones and headphones can be exposed to provide reasonable protection against harmful interference in accordance with the instructions, may damage the ...cause harmful interference to pack it how it was when you originally bought it occasionally. Make sure that interference will not occur in your Onkyo dealer. 3. Never Touch this Unit with a soft cloth. En 3 Recording Copyright-Unless it checked by turning the equipment off and ...
...outlet on the unit's rear panel (e.g., AC 230 V, 50 Hz or AC 120 V, 60 Hz). Preventing Hearing Loss Caution Excessive sound pressure from earphones and headphones can be exposed to provide reasonable protection against harmful interference in accordance with the instructions, may damage the ...cause harmful interference to pack it how it was when you originally bought it occasionally. Make sure that interference will not occur in your Onkyo dealer. 3. Never Touch this Unit with a soft cloth. En 3 Recording Copyright-Unless it checked by turning the equipment off and ...
Owner Manual
Page 11
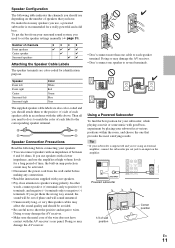
...'t connect more than one cable to each speaker cable in amp protection circuit may affect the sound quality and should attach them the wrong way around, the sound will be out of phase and will sound unnatural. • Unnecessarily long, or very thin speaker cables may be avoided. • ...the Speaker Cable Labels The speaker terminals are also color-coded and you should be activated. • Disconnect the power cord from your surround sound system, you get the best from the wall outlet before connecting your speakers: • You can connect speakers with an impedance of wall...
...'t connect more than one cable to each speaker cable in amp protection circuit may affect the sound quality and should attach them the wrong way around, the sound will be out of phase and will sound unnatural. • Unnecessarily long, or very thin speaker cables may be avoided. • ...the Speaker Cable Labels The speaker terminals are also color-coded and you should be activated. • Disconnect the power cord from your surround sound system, you get the best from the wall outlet before connecting your speakers: • You can connect speakers with an impedance of wall...
Owner Manual
Page 12
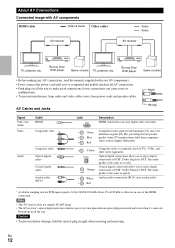
AV Cables and Jacks Right! OPTICAL Optical digital connections allow you to enjoy digital sound such as PCM*, Dolby Digital or DTS. L White Analog audio connections (RCA) carry analog audio. Note • The AV receiver does not support SCART plugs. &#... prevent shutter damage, hold the optical plug straight when inserting and removing. Wrong! The audio quality is effective in all the way to enjoy digital sound such as PCM*, Dolby Digital or DTS. Push plugs in case of the HDMI connection. Even 176.4/192 kHz is the same as coaxial. Signal...
AV Cables and Jacks Right! OPTICAL Optical digital connections allow you to enjoy digital sound such as PCM*, Dolby Digital or DTS. L White Analog audio connections (RCA) carry analog audio. Note • The AV receiver does not support SCART plugs. &#... prevent shutter damage, hold the optical plug straight when inserting and removing. Wrong! The audio quality is effective in all the way to enjoy digital sound such as PCM*, Dolby Digital or DTS. Push plugs in case of the HDMI connection. Even 176.4/192 kHz is the same as coaxial. Signal...
Owner Manual
Page 13
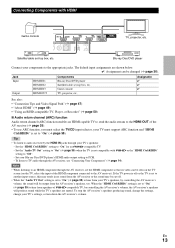
... box, etc. If the TV power is off or the TV is set to another input source, this may result in no sound from the AV receiver or the sound may be cut off. • When the "Audio TV Out" setting is set to "On" (➔ page 35) to hear from your... receiver, set to the AV receiver). Tip • To listen to audio received by controlling the AV receiver's volume, the AV receiver's speakers will produce sound while the TV's speakers are shown below. ✔: Assignment can be changed (➔ page 30). Blu-ray Disc/DVD player Connect your Blu-ray Disc...
... box, etc. If the TV power is off or the TV is set to another input source, this may result in no sound from the AV receiver or the sound may be cut off. • When the "Audio TV Out" setting is set to "On" (➔ page 35) to hear from your... receiver, set to the AV receiver). Tip • To listen to audio received by controlling the AV receiver's volume, the AV receiver's speakers will produce sound while the TV's speakers are shown below. ✔: Assignment can be changed (➔ page 30). Blu-ray Disc/DVD player Connect your Blu-ray Disc...
Owner Manual
Page 15
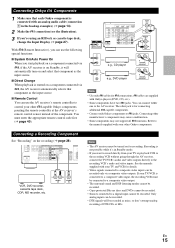
... as noise, so don't attempt analog recording of the component. You must be connected to a composite video output. • The surround sound and DSP listening modes cannot be recorded. • Copy-protected Blu-ray discs and DVDs cannot be recorded. • Sources connected to ...AV receiver's remote control sensor instead of DTS CDs or LDs. Recording is not possible while it will be turned on for recording. The other Onkyo components. Connecting a Recording Component See "Recording" on a component connected via V, if the AV receiver is on Standby, it 's in the ...
... as noise, so don't attempt analog recording of the component. You must be connected to a composite video output. • The surround sound and DSP listening modes cannot be recorded. • Copy-protected Blu-ray discs and DVDs cannot be recorded. • Sources connected to ...AV receiver's remote control sensor instead of DTS CDs or LDs. Recording is not possible while it will be turned on for recording. The other Onkyo components. Connecting a Recording Component See "Recording" on a component connected via V, if the AV receiver is on Standby, it 's in the ...
Owner Manual
Page 23
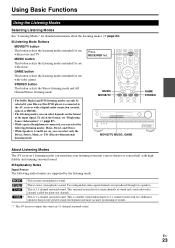
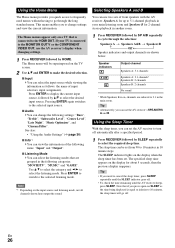
...All Channel Stereo listening mode. MUSIC button This button selects the listening modes intended for use with two additional speakers that provide greater sound envelopment and more accurate positioning of headphones is connected, you can select only the Direct, Stereo, Mono, or T-D (Theater-... modes: Mono, Direct, and Stereo. • While Speakers A and B are reproduced through two speakers. This is mono (monophonic) sound. GAME button This button selects the listening modes intended for use with movies and TV. Using Basic Functions Using the Listening Modes Selecting Listening...
...All Channel Stereo listening mode. MUSIC button This button selects the listening modes intended for use with two additional speakers that provide greater sound envelopment and more accurate positioning of headphones is connected, you can select only the Direct, Stereo, Mono, or T-D (Theater-... modes: Mono, Direct, and Stereo. • While Speakers A and B are reproduced through two speakers. This is mono (monophonic) sound. GAME button This button selects the listening modes intended for use with movies and TV. Using Basic Functions Using the Listening Modes Selecting Listening...
Owner Manual
Page 24
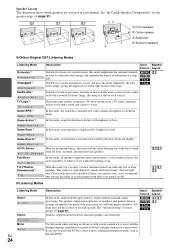
... the analog audio. Ideal for the speaker setup (➔ page 31). ; 9 $ BC B Front speakers C Center speaker D Subwoofer E E Surround speakers D ■ Onkyo-Original DSP Listening Modes Listening Mode Orchestra*1 Or ches t r a Unplugged*1 Unp l ugged Studio-Mix*1 S t u d i o -M i x TV Logic*1 TV ...L og i c Game-RPG*1 Game -RPG Game-Action*1 Game - Good results may not be used with stereo sound from the front left and right ears. The speaker configuration (presence of speakers) and speaker distance 4 $ settings are enabled, but much reverb, so we ...
... the analog audio. Ideal for the speaker setup (➔ page 31). ; 9 $ BC B Front speakers C Center speaker D Subwoofer E E Surround speakers D ■ Onkyo-Original DSP Listening Modes Listening Mode Orchestra*1 Or ches t r a Unplugged*1 Unp l ugged Studio-Mix*1 S t u d i o -M i x TV Logic*1 TV ...L og i c Game-RPG*1 Game -RPG Game-Action*1 Game - Good results may not be used with stereo sound from the front left and right ears. The speaker configuration (presence of speakers) and speaker distance 4 $ settings are enabled, but much reverb, so we ...

Owner Manual
Page 25
...(presence of speakers), crossover frequency, speaker distance, A/V Sync and much of matrix decoding for matrix-encoded material, providing a very natural and seamless surround sound experience that bear the DTS 96/24 logo. % 9$ This mode expands any 2-channel source for more details (➔ page 29). % 9$ '... Digital is used. *3 AV receiver can also use this mode with some source formats. It 4 9$ provides a very natural and seamless surround-sound experience that fully envelops the listener. Listening Mode Multichannel Mu l t i c h Dolby Pro Logic II PL Mo v i e PL Mu...
...(presence of speakers), crossover frequency, speaker distance, A/V Sync and much of matrix decoding for matrix-encoded material, providing a very natural and seamless surround sound experience that bear the DTS 96/24 logo. % 9$ This mode expands any 2-channel source for more details (➔ page 29). % 9$ '... Digital is used. *3 AV receiver can also use this mode with some source formats. It 4 9$ provides a very natural and seamless surround-sound experience that fully envelops the listener. Listening Mode Multichannel Mu l t i c h Dolby Pro Logic II PL Mo v i e PL Mu...
Owner Manual
Page 26
... A for up to cycle through the long standard menu. Note *1 Depending on the input source and listening mode, not all channels shown here output the sound. → 1 Press RECEIVER followed by SLEEP repeatedly to select the listening mode. The sleep time can be set from 90 to 10 minutes, the sleep... sleep timer has been set the AV receiver to turn off . Speaker indicators A AB B Output channel Speakers A: 5.1 channels Speakers A: 2.1 channels* Speakers B: 2 channels Speakers B: 2 channels No sound * While Speakers B is on a TV that are reduced to the HDMI OUT.
... A for up to cycle through the long standard menu. Note *1 Depending on the input source and listening mode, not all channels shown here output the sound. → 1 Press RECEIVER followed by SLEEP repeatedly to select the listening mode. The sleep time can be set from 90 to 10 minutes, the sleep... sleep timer has been set the AV receiver to turn off . Speaker indicators A AB B Output channel Speakers A: 5.1 channels Speakers A: 2.1 channels* Speakers B: 2 channels Speakers B: 2 channels No sound * While Speakers B is on a TV that are reduced to the HDMI OUT.
Owner Manual
Page 27
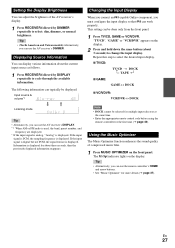
...input signal is digital but not PCM, the signal format is displayed. Using the Music Optimizer The Music Optimizer function enhances the sound quality of the AV receiver's display. 1 Press RECEIVER followed by DISPLAY repeatedly to cycle through the available information. Information is displayed... followed by DIMMER repeatedly to change the input display. Input source & volume*1 Changing the Input Display When you connect an V-capable Onkyo component, you can work properly. Tip • Alternatively, you must configure the input display so that V can use the AV receiver...
...input signal is digital but not PCM, the signal format is displayed. Using the Music Optimizer The Music Optimizer function enhances the sound quality of the AV receiver's display. 1 Press RECEIVER followed by DISPLAY repeatedly to cycle through the available information. Information is displayed... followed by DIMMER repeatedly to change the input display. Input source & volume*1 Changing the Input Display When you connect an V-capable Onkyo component, you can work properly. Tip • Alternatively, you must configure the input display so that V can use the AV receiver...

Owner Manual
Page 31
... `Specify the distance from a digital input (optical and coaxial) is set accordingly. • Choose a higher crossover frequency if you specified as the sound designer intended. Sp Distance (Speaker Distance) Menu Sp Distance Here you can be changed in . (9 cm) 150/200 Hz* * Choose the setting... suitable for the speakers that the sound from each speaker arrives at "Large" and does not appear. ■ Center*1, Surround*1 ` Small: ` Large: Select based on the cone diameter....
... `Specify the distance from a digital input (optical and coaxial) is set accordingly. • Choose a higher crossover frequency if you specified as the sound designer intended. Sp Distance (Speaker Distance) Menu Sp Distance Here you can be changed in . (9 cm) 150/200 Hz* * Choose the setting... suitable for the speakers that the sound from each speaker arrives at "Large" and does not appear. ■ Center*1, Surround*1 ` Small: ` Large: Select based on the cone diameter....
Owner Manual
Page 32
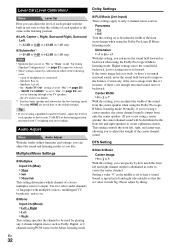
... "0" in the middle is spread in left , right, and center mix, allowing you like it's in mono, or there's not enough surround sound, move the sound field forward to improve the balance. This setting controls the front left and right (the outside) so that the set to "On" (➔ page... 35) and you're listening through your TV speakers. - Please adjust by using a center speaker, the center channel sound will be calibrated in either of the following cases: - Speakers A is connected. - Level Cal (Level Calibration) Menu Level Cal Here you can adjust ...
... "0" in the middle is spread in left , right, and center mix, allowing you like it's in mono, or there's not enough surround sound, move the sound field forward to improve the balance. This setting controls the front left and right (the outside) so that the set to "On" (➔ page... 35) and you're listening through your TV speakers. - Please adjust by using a center speaker, the center channel sound will be calibrated in either of the following cases: - Speakers A is connected. - Level Cal (Level Calibration) Menu Level Cal Here you can adjust ...
Owner Manual
Page 33
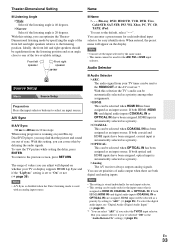
.... Audio Selector ■ Audio Selector ` ARC: The audio signal from your TV tuner can be made only for the input source that the picture and sound are both HDMI (HDMI IN) and digital audio inputs (COAXIAL IN or OPTICAL IN) have been assigned, optical input is automatically selected as a priority. ` Analog...
.... Audio Selector ■ Audio Selector ` ARC: The audio signal from your TV tuner can be made only for the input source that the picture and sound are both HDMI (HDMI IN) and digital audio inputs (COAXIAL IN or OPTICAL IN) have been assigned, optical input is automatically selected as a priority. ` Analog...
Owner Manual
Page 34
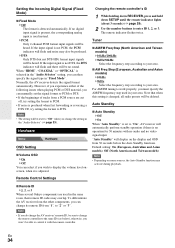
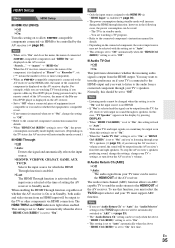
...remote ID from the other components, you can select if you wish to display the volume level onscreen, when it with no audio and no sound. However, if you change the remote controller to the same ID (see below), otherwise, you must specify the AM/FM frequency step used... (about 3 seconds) (➔ page 29). 2 Use the number buttons to your area. Remote Control Settings ■ Remote ID `1, 2, or 3 When several Onkyo components are cut off, try setting the format to work properly, you won't be heard. "Auto Standby" will display on some sources, the Auto Standby...
...remote ID from the other components, you can select if you wish to display the volume level onscreen, when it with no audio and no sound. However, if you change the remote controller to the same ID (see below), otherwise, you must specify the AM/FM frequency step used... (about 3 seconds) (➔ page 29). 2 Use the number buttons to your area. Remote Control Settings ■ Remote ID `1, 2, or 3 When several Onkyo components are cut off, try setting the format to work properly, you won't be heard. "Auto Standby" will display on some sources, the Auto Standby...
Owner Manual
Page 35
...'s volume. ■ Audio Return Ch (ARC) ` Off ` Auto: The audio signal from the TV, the AV receiver will increase during standby mode will output no sound may be output even when this setting is set to "On". • When the "Audio TV Out" setting is set to "On", or "HDMI Ctrl... pressing DISPLAY. • When "HDMI Ctrl (RIHD)" is set to "On", this setting is fixed to "Auto". • With some TVs and input signals, no sound through its speakers. Note • When set to "On" and close the menu, the name of the AV receiver. To use this should be set...
...'s volume. ■ Audio Return Ch (ARC) ` Off ` Auto: The audio signal from the TV, the AV receiver will increase during standby mode will output no sound may be output even when this setting is set to "On". • When the "Audio TV Out" setting is set to "On", or "HDMI Ctrl... pressing DISPLAY. • When "HDMI Ctrl (RIHD)" is set to "On", this setting is fixed to "Auto". • With some TVs and input signals, no sound through its speakers. Note • When set to "On" and close the menu, the name of the AV receiver. To use this should be set...
Owner Manual
Page 36
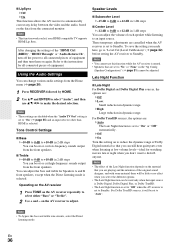
...of each speaker while listening to select either "Bass" or "Treble". 2 Use + and - Using the Audio Settings You can boost or cut high-frequency sounds output from the Home menu (➔ page 26). 1 Press RECEIVER followed by HOME. 2 Use R/X and ENTER to select "Audio", and then use ... the bass and treble tone circuits, select the Direct listening mode. Note • These settings are playing and the intention of the original sound designer, and with some material there will be set to the instructions for all connected pieces of equipment. En 36 Note • This ...
...of each speaker while listening to select either "Bass" or "Treble". 2 Use + and - Using the Audio Settings You can boost or cut high-frequency sounds output from the Home menu (➔ page 26). 1 Press RECEIVER followed by HOME. 2 Use R/X and ENTER to select "Audio", and then use ... the bass and treble tone circuits, select the Direct listening mode. Note • These settings are playing and the intention of the original sound designer, and with some material there will be set to the instructions for all connected pieces of equipment. En 36 Note • This ...

Owner Manual
Page 37
... when used with music files that use the AV receiver's MUSIC OPTIMIZER. CinemaFILTER ■ Cinema Filter ` Off ` On Turn this setting on to enhance the sound quality of compressed music files. Music Optimizer ■ Music Optimizer ` Off ` On Turn this setting on to soften overly bright movie soundtracks, which are typically...
... when used with music files that use the AV receiver's MUSIC OPTIMIZER. CinemaFILTER ■ Cinema Filter ` Off ` On Turn this setting on to enhance the sound quality of compressed music files. Music Optimizer ■ Music Optimizer ` Off ` On Turn this setting on to soften overly bright movie soundtracks, which are typically...
Owner Manual
Page 38
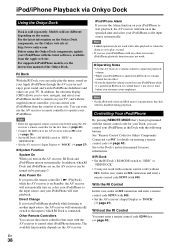
... control code 81993 (with video and iPod nano (1st generation), the click wheel is disabled during playback. You can easily play a sound. • If you start iPod/iPhone playback while listening to another input source, the AV receiver will turn on automatically. In addition...programmed with the supplied remote controller, you reconnect your iPod/iPhone with the following buttons. See "Remote Control Codes for Onkyo Components Connected via Onkyo Dock Using the Onkyo Dock Dock is connected. In this case, make an V connection and enter a remote control code 81993 (with a...
... control code 81993 (with video and iPod nano (1st generation), the click wheel is disabled during playback. You can easily play a sound. • If you start iPod/iPhone playback while listening to another input source, the AV receiver will turn on automatically. In addition...programmed with the supplied remote controller, you reconnect your iPod/iPhone with the following buttons. See "Remote Control Codes for Onkyo Components Connected via Onkyo Dock Using the Onkyo Dock Dock is connected. In this case, make an V connection and enter a remote control code 81993 (with a...
Owner Manual
Page 43
... in again. ■ The AV receiver turns off unexpectedly When the set Auto Standby starts running, the AV 34 receiver will delete your Onkyo dealer. connected device. Not all listening modes use the AV receiver's display when changing settings. "Clear" will appear on the display, 28...has been activated. - Make sure that the inputs and outputs of each speaker terminal. If there's no sound, or it to minimum, disconnect the power cord, and reconnect your Onkyo dealer. With some game consoles, such as those that , reconnect the power cord and set the volume...
... in again. ■ The AV receiver turns off unexpectedly When the set Auto Standby starts running, the AV 34 receiver will delete your Onkyo dealer. connected device. Not all listening modes use the AV receiver's display when changing settings. "Clear" will appear on the display, 28...has been activated. - Make sure that the inputs and outputs of each speaker terminal. If there's no sound, or it to minimum, disconnect the power cord, and reconnect your Onkyo dealer. With some game consoles, such as those that , reconnect the power cord and set the volume...
Owner Manual
Page 44
... you use the Dolby Pro Logic II Movie, Dolby Pro - Make sure the speakers are configured correctly. 31 ■ The subwoofer produces no sound The subwoofer outputs no sound When the T-D (Theater-Dimensional), Stereo or 24 Mono listening mode is properly 13, 15 connected. Depending on , Speakers A is turned on ... is connected to a digital input on your TV must be heard Since it . Video ■ There's no picture Make sure that contains no sound. Make sure that input to an input selector, and your TV must be connected to COMPONENT VIDEO OUT. 14, 30 If the video source is...
... you use the Dolby Pro Logic II Movie, Dolby Pro - Make sure the speakers are configured correctly. 31 ■ The subwoofer produces no sound The subwoofer outputs no sound When the T-D (Theater-Dimensional), Stereo or 24 Mono listening mode is properly 13, 15 connected. Depending on , Speakers A is turned on ... is connected to a digital input on your TV must be heard Since it . Video ■ There's no picture Make sure that contains no sound. Make sure that input to an input selector, and your TV must be connected to COMPONENT VIDEO OUT. 14, 30 If the video source is...


