Owner Manual
Page 2
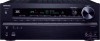
.... Important Safety Instructions 1. Install in performance this unit. 17. Do not defeat the safety purpose of batteries. 18. When the power-supply cord or plug is used, use caution when moving the cart/apparatus combination to avoid injury from the wall outlet and refer...consider the environmental issues and follow local regulations when disposing of the polarized or grounding-type plug. Keep these instructions. 2. Protect the power cord from being walked on or pinched particularly at the rear. Only use this apparatus during lightning storms or when unused for warm...
.... Important Safety Instructions 1. Install in performance this unit. 17. Do not defeat the safety purpose of batteries. 18. When the power-supply cord or plug is used, use caution when moving the cart/apparatus combination to avoid injury from the wall outlet and refer...consider the environmental issues and follow local regulations when disposing of the polarized or grounding-type plug. Keep these instructions. 2. Protect the power cord from being walked on or pinched particularly at the rear. Only use this apparatus during lightning storms or when unused for warm...
Owner Manual
Page 3
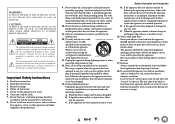
... sound pressure from the AC outlet. Handling Notes • If you do not use this unit, have it 's for an extended period, remove the power cord from earphones and headphones can cause hearing loss. 6. However, there is readily operable (easily accessible) at all over with a soft cloth. Dry... bought it. • Do not leave rubber or plastic items on , so be sure to radio communications. If this unit or its power cord while your Onkyo dealer. 3. Precautions 1. If you should dust the unit all times. Care-Occasionally you do not intend to Part 15 of mild detergent ...
... sound pressure from the AC outlet. Handling Notes • If you do not use this unit, have it 's for an extended period, remove the power cord from earphones and headphones can cause hearing loss. 6. However, there is readily operable (easily accessible) at all over with a soft cloth. Dry... bought it. • Do not leave rubber or plastic items on , so be sure to radio communications. If this unit or its power cord while your Onkyo dealer. 3. Precautions 1. If you should dust the unit all times. Care-Occasionally you do not intend to Part 15 of mild detergent ...
Owner Manual
Page 4
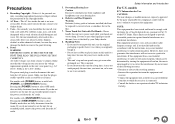
... PREVENT ELECTRIC SHOCK, MATCH WIDE BLADE OF PLUG TO WIDE SLOT, FULLY INSERT. If the power cord's plug is marked with the letter N or coloured black. MIYAGI ONKYO EUROPE ELECTRONICS GmbH En-4 Safety Information and Introduction Sur les modèles dont la fiche ... for your plug, proceed as EN60065, EN55013, EN55020 and EN61000-3-2, -3-3. GROEBENZELL, GERMANY K. For European Models Declaration of Conformity We, ONKYO EUROPE ELECTRONICS GmbH LIEGNITZERSTRASSE 6, 82194 GROEBENZELL, GERMANY declare in own responsibility, that indicated on the body of this apparatus may not correspond ...
... PREVENT ELECTRIC SHOCK, MATCH WIDE BLADE OF PLUG TO WIDE SLOT, FULLY INSERT. If the power cord's plug is marked with the letter N or coloured black. MIYAGI ONKYO EUROPE ELECTRONICS GmbH En-4 Safety Information and Introduction Sur les modèles dont la fiche ... for your plug, proceed as EN60065, EN55013, EN55020 and EN61000-3-2, -3-3. GROEBENZELL, GERMANY K. For European Models Declaration of Conformity We, ONKYO EUROPE ELECTRONICS GmbH LIEGNITZERSTRASSE 6, 82194 GROEBENZELL, GERMANY declare in own responsibility, that indicated on the body of this apparatus may not correspond ...
Owner Manual
Page 5
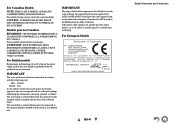
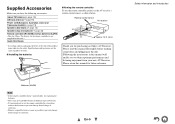
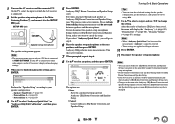
...the batteries ■ Aiming the remote controller To use the remote controller for future reference. Supplied Accessories Make sure you for purchasing an Onkyo AV Receiver. Remote control sensor AV receiver Approx. 16 ft. (5 m) Thank you have the following accessories: Indoor FM antenna (➔... page 19) AM loop antenna (➔ page 19) Power cord (European, Australian, Asian and Taiwanese models) (➔ page 19) Speaker cable labels (➔ page 13) Speaker setup microphone (➔ page...
...the batteries ■ Aiming the remote controller To use the remote controller for future reference. Supplied Accessories Make sure you for purchasing an Onkyo AV Receiver. Remote control sensor AV receiver Approx. 16 ft. (5 m) Thank you have the following accessories: Indoor FM antenna (➔... page 19) AM loop antenna (➔ page 19) Power cord (European, Australian, Asian and Taiwanese models) (➔ page 19) Speaker cable labels (➔ page 13) Speaker setup microphone (➔ page...
Owner Manual
Page 6
...Connecting Your Speakers 12 About AV Connections 15 Connecting Components with HDMI 16 Connecting Your Components 17 Connecting Onkyo RI Components 18 Connecting the Antennas 19 Connecting the Power Cord 19 Turning On & Basic Operations Turning On/Off the AV Receiver 20 Turning On 20 Turning...Codes 75 Looking up for Remote Control Codes 75 Entering Remote Control Codes 76 Remapping Colored Buttons 76 Remote Control Codes for Onkyo Components Connected via RI 77 Resetting the REMOTE MODE Buttons 77 Resetting the Remote Controller 77 Controlling Other Components 77 Appendix ...
...Connecting Your Speakers 12 About AV Connections 15 Connecting Components with HDMI 16 Connecting Your Components 17 Connecting Onkyo RI Components 18 Connecting the Antennas 19 Connecting the Power Cord 19 Turning On & Basic Operations Turning On/Off the AV Receiver 20 Turning On 20 Turning...Codes 75 Looking up for Remote Control Codes 75 Entering Remote Control Codes 76 Remapping Colored Buttons 76 Remote Control Codes for Onkyo Components Connected via RI 77 Resetting the REMOTE MODE Buttons 77 Resetting the Remote Controller 77 Controlling Other Components 77 Appendix ...
Owner Manual
Page 7
...Wide Range Amplifier Technology (5 Hz to 100 kHz bandwidth) • Linear Optimum Gain Volume Circuitry • H.C.P.S. (High Current Power Supply) Massive High Power Transformer • 3 Stage Inverted Darlington Amplifier Design Processing • THX Select2 Plus Certified • Incorporates Qdeo™ technology for...bit Processing DSP • Jitter Cleaning Circuit Technology Connections • 8 HDMI Inputs (1 on front panel) and 2 Outputs • Onkyo Q for System Control • 5 Digital Inputs (2 Optical/3 Coaxial) • Component Video Switching (2 Inputs/1 Output) •...
...Wide Range Amplifier Technology (5 Hz to 100 kHz bandwidth) • Linear Optimum Gain Volume Circuitry • H.C.P.S. (High Current Power Supply) Massive High Power Transformer • 3 Stage Inverted Darlington Amplifier Design Processing • THX Select2 Plus Certified • Incorporates Qdeo™ technology for...bit Processing DSP • Jitter Cleaning Circuit Technology Connections • 8 HDMI Inputs (1 on front panel) and 2 Outputs • Onkyo Q for System Control • 5 Digital Inputs (2 Optical/3 Coaxial) • Component Video Switching (2 Inputs/1 Output) •...
Owner Manual
Page 10
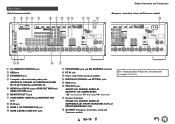
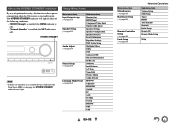
... OUT jacks I IR IN jack J ZONE 2 12V TRIGGER OUT jack K ZONE 2/ZONE 3 LINE OUT jacks L FM ANTENNA jack and AM ANTENNA terminal M PC IN jack N Power cord (North American models) O DIGITAL IN COAXIAL and OPTICAL jacks P GND screw Q PRE OUT jacks (FRONT L/R, CENTER, SURR L/R, SB/FH/FW* L/R, SUBWOOFER) * SB··...
... OUT jacks I IR IN jack J ZONE 2 12V TRIGGER OUT jack K ZONE 2/ZONE 3 LINE OUT jacks L FM ANTENNA jack and AM ANTENNA terminal M PC IN jack N Power cord (North American models) O DIGITAL IN COAXIAL and OPTICAL jacks P GND screw Q PRE OUT jacks (FRONT L/R, CENTER, SURR L/R, SB/FH/FW* L/R, SUBWOOFER) * SB··...
Owner Manual
Page 12
... back speaker, connect it to set the speaker settings automatically (➔ page 35) or manually (➔ page 55). If you should use , a powered subwoofer is recommended for a really powerful and solid bass. Number of the speaker terminal. Surround back left Surround left Connections Center Connecting Your Speakers Speaker Configuration The following illustration...
... back speaker, connect it to set the speaker settings automatically (➔ page 35) or manually (➔ page 55). If you should use , a powered subwoofer is recommended for a really powerful and solid bass. Number of the speaker terminal. Surround back left Surround left Connections Center Connecting Your Speakers Speaker Configuration The following illustration...
Owner Manual
Page 13
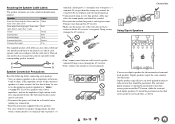
... Tan The supplied speaker cable labels are color-coded for a long period of time, the built-in protection circuit may be activated. • Disconnect the power cord from the wall outlet before connecting your speakers. • Pay close attention to speaker wiring polarity. Attaching the Speaker Cable Labels The speaker terminals...
... Tan The supplied speaker cable labels are color-coded for a long period of time, the built-in protection circuit may be activated. • Disconnect the power cord from the wall outlet before connecting your speakers. • Pay close attention to speaker wiring polarity. Attaching the Speaker Cable Labels The speaker terminals...
Owner Manual
Page 14
...sure to remove the jumper bars that link the speakers' tweeter (high) and woofer (low) terminals. • Bi-amping can connect the powered subwoofer with two SUBWOOFER PRE OUT jacks respectively. Once you can use the AV receiver as shown and turned on the amplifier. See the manuals... in the main room. Connect all speaker outputs to enable bi-amping (➔ page 55). Tweeter (high) Woofer (low) Front right Front left Power amplifier En-14 Refer to your amplifier for your subwoofer, while playing a movie or some music with speakers that support biamping. When bi-amping is...
...sure to remove the jumper bars that link the speakers' tweeter (high) and woofer (low) terminals. • Bi-amping can connect the powered subwoofer with two SUBWOOFER PRE OUT jacks respectively. Once you can use the AV receiver as shown and turned on the amplifier. See the manuals... in the main room. Connect all speaker outputs to enable bi-amping (➔ page 55). Tweeter (high) Woofer (low) Front right Front left Power amplifier En-14 Refer to your amplifier for your subwoofer, while playing a movie or some music with speakers that support biamping. When bi-amping is...
Owner Manual
Page 15
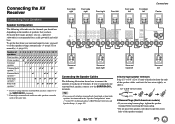
Wrong! ■ HDMI HDMI connections can cause noise or malfunctions). • To prevent interference, keep audio and video cables away from power cords and speaker cables. The audio quality is commonly used on TVs, DVDs, and other video equipment. Caution • To prevent shutter damage...cable to the AV receiver. • Before making any AV connections, read the manuals supplied with your AV components. • Don't connect the power cord until you've completed and double-checked all AV connections. • Push plugs in all the way to make good connections (loose connections ...
Wrong! ■ HDMI HDMI connections can cause noise or malfunctions). • To prevent interference, keep audio and video cables away from power cords and speaker cables. The audio quality is commonly used on TVs, DVDs, and other video equipment. Caution • To prevent shutter damage...cable to the AV receiver. • Before making any AV connections, read the manuals supplied with your AV components. • Don't connect the power cord until you've completed and double-checked all AV connections. • Push plugs in all the way to make good connections (loose connections ...
Owner Manual
Page 16
.... Your TV is set to another input source, this may be cut off or the TV is ARC capable, and - En-16 If the TV power is off . The default input assignments are shown below. ✔: Assignment can be used when: - "Audio Return Channel" is output despite following the above-mentioned...
.... Your TV is set to another input source, this may be cut off or the TV is ARC capable, and - En-16 If the TV power is off . The default input assignments are shown below. ✔: Assignment can be used when: - "Audio Return Channel" is output despite following the above-mentioned...
Owner Manual
Page 18
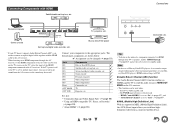
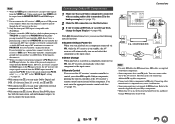
... L ANALOG AUDIO OUT RI Dock R L ANALOG AUDIO OUT Note • Use only V cables for connecting additional V-capable components. • Connect only Onkyo components to V jacks. Note *1 When the USB input is selected, you start playback on a component connected via V, while the AV receiver is on standby...component connected via V, the AV receiver automatically selects that component as well, use the following special functions: ■ System On/Auto Power On When you can input video signals from the VIDEO jack. Music on your computer cannot be played through the AV receiver in ...
... L ANALOG AUDIO OUT RI Dock R L ANALOG AUDIO OUT Note • Use only V cables for connecting additional V-capable components. • Connect only Onkyo components to V jacks. Note *1 When the USB input is selected, you start playback on a component connected via V, while the AV receiver is on standby...component connected via V, the AV receiver automatically selects that component as well, use the following special functions: ■ System On/Auto Power On When you can input video signals from the VIDEO jack. Music on your computer cannot be played through the AV receiver in ...
Owner Manual
Page 19
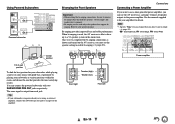
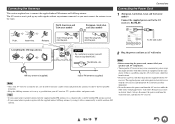
...receiver may cause an electric shock. The AV receiver won't pick up any radio signals without any other equipment. • Never disconnect the power cord from the AV receiver while the other end is still plugged into the jack. If this is ready for use with the AV ...loop antenna. Release. AM loop antenna (supplied) Indoor FM antenna (supplied) Note • Once your AV receiver, TV, speaker cables, and power cords. The supplied power cord is designed exclusively for use, you must connect the antenna to achieve the best possible reception. • Keep the AM loop antenna as...
...receiver may cause an electric shock. The AV receiver won't pick up any radio signals without any other equipment. • Never disconnect the power cord from the AV receiver while the other end is still plugged into the jack. If this is ready for use with the AV ...loop antenna. Release. AM loop antenna (supplied) Indoor FM antenna (supplied) Note • Once your AV receiver, TV, speaker cables, and power cords. The supplied power cord is designed exclusively for use, you must connect the antenna to achieve the best possible reception. • Keep the AM loop antenna as...
Owner Manual
Page 20
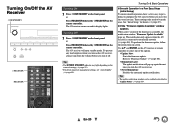
... appears when the AV receiver is available, the notification window "Firmware Update Available" pops up again the next time you turn the AV receiver on power management settings, see "Auto Standby" (➔ page 68). When a new version of the firmware is connected to select one of settings (➔ page 52). •...
... appears when the AV receiver is available, the notification window "Firmware Update Available" pops up again the next time you turn the AV receiver on power management settings, see "Auto Standby" (➔ page 68). When a new version of the firmware is connected to select one of settings (➔ page 52). •...
Owner Manual
Page 36
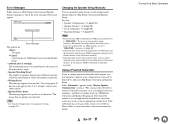
... Audyssey 2EQ Room Correction and Speaker Setup requires you 've finished making the settings, press ENTER. 2EQ: Auto Setup Speakers Type(Front) Powered Zone 2 Powered Zone 3 AUDYSSEY Normal No No Perform the "Speaker Setup" according to your TV is connected to cancel the setup... are : ` Save: Save the calculated settings and exit Audyssey 2EQ Room Correction and Speaker Setup. ` Cancel: Cancel Audyssey 2EQ Room Correction and Speaker Setup. Powered Zone 2 (➔ page 55) - On the TV, select the input to which the AV receiver is muted, it to select "Audyssey Quick Start" or...
... Audyssey 2EQ Room Correction and Speaker Setup requires you 've finished making the settings, press ENTER. 2EQ: Auto Setup Speakers Type(Front) Powered Zone 2 Powered Zone 3 AUDYSSEY Normal No No Perform the "Speaker Setup" according to your TV is connected to cancel the setup... are : ` Save: Save the calculated settings and exit Audyssey 2EQ Room Correction and Speaker Setup. ` Cancel: Cancel Audyssey 2EQ Room Correction and Speaker Setup. Powered Zone 2 (➔ page 55) - On the TV, select the input to which the AV receiver is muted, it to select "Audyssey Quick Start" or...
Owner Manual
Page 37
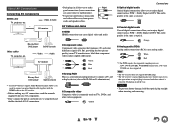
... recommends setting them manually. Changing the Speaker Setup Manually You can manually make sure manually that of the first measurement. Using a Powered Subwoofer If you're using Audyssey 2EQ Room Correction and Speaker Setup, please make changes to interaction with the room, THX recommends ...Ambient noise is too high. If this message appears after 2 or 3 attempts, contact your Onkyo dealer. • Speaker Detect Error This message appears if a speaker is set it to your speakers using a powered subwoofer and it outputs very low-frequency sound at a low volume level, it to "80Hz...
... recommends setting them manually. Changing the Speaker Setup Manually You can manually make sure manually that of the first measurement. Using a Powered Subwoofer If you're using Audyssey 2EQ Room Correction and Speaker Setup, please make changes to interaction with the room, THX recommends ...Ambient noise is too high. If this message appears after 2 or 3 attempts, contact your Onkyo dealer. • Speaker Detect Error This message appears if a speaker is set it to your speakers using a powered subwoofer and it outputs very low-frequency sound at a low volume level, it to "80Hz...

Owner Manual
Page 40
...recommend that you use this mode in mono, so the sound you hear is emphasized to music in this mode, reverberation is distinct with a powerful acoustic image, like being right in order to widen the stereo image, and simulates the natural reverberation of the stage. " 4 % ' (... entire listening area with a similar atmosphere to voices. In this mode, sound pressure is the same regardless of being at a club or rock concert. ■ Onkyo-Original DSP Listening Modes Listening Mode Orchestra Or ches t r a Unplugged Unp l ugged Studio-Mix S t u d i o -M i x TV Logic TV L og i...
...recommend that you use this mode in mono, so the sound you hear is emphasized to music in this mode, reverberation is distinct with a powerful acoustic image, like being right in order to widen the stereo image, and simulates the natural reverberation of the stage. " 4 % ' (... entire listening area with a similar atmosphere to voices. In this mode, sound pressure is the same regardless of being at a club or rock concert. ■ Onkyo-Original DSP Listening Modes Listening Mode Orchestra Or ches t r a Unplugged Unp l ugged Studio-Mix S t u d i o -M i x TV Logic TV L og i...
Owner Manual
Page 47
... holding down the volume before connecting your headphones. • While the headphones plug is inserted in the PHONES jack, the speakers are turned off. (The Powered Zone 2/3 speakers are not turned off.) • When you connect a pair of the following cases: - Note • The Whole House Mode only...The "Audio TV Out" setting is set to standby. Note • Always turn down ZONE 2, press ZONE 3 on the AV receiver's display. The "Powered Zone 2/3" setting is set to "Yes" and Zone 2/3 is turned on. • Playback conditions may be limited depending on the AV receiver, no sound ...
... holding down the volume before connecting your headphones. • While the headphones plug is inserted in the PHONES jack, the speakers are turned off. (The Powered Zone 2/3 speakers are not turned off.) • When you connect a pair of the following cases: - Note • The Whole House Mode only...The "Audio TV Out" setting is set to standby. Note • Always turn down ZONE 2, press ZONE 3 on the AV receiver's display. The "Powered Zone 2/3" setting is set to "Yes" and Zone 2/3 is turned on. • Playback conditions may be limited depending on the AV receiver, no sound ...
Owner Manual
Page 52
... HDMI Auto Standby Network Initial Setup Remote ID Remote Mode Setup Setup About the HYBRID STANDBY Indicator By way of optimized circuitry, this function reduces power consumption when the AV receiver is in either of the following conditions: - The HYBRID STANDBY indicator will light in standby mode. HYBRID STANDBY Note •...
... HDMI Auto Standby Network Initial Setup Remote ID Remote Mode Setup Setup About the HYBRID STANDBY Indicator By way of optimized circuitry, this function reduces power consumption when the AV receiver is in either of the following conditions: - The HYBRID STANDBY indicator will light in standby mode. HYBRID STANDBY Note •...


