Owner Manual
Page 1
AV Receiver TX-NR709 Instruction Manual Thank you to obtain optimum performance and listening enjoyment from your new AV Receiver. Please retain this manual will enable you for future reference. Contents Introduction 2 Connections 12 Turning On & Basic Operations ......22 Advanced Operations 43 Controlling Other Components...66 Appendix 74 En Following the instructions in the unit. Please read this manual thoroughly before making connections and plugging in this manual for purchasing an Onkyo AV Receiver.
AV Receiver TX-NR709 Instruction Manual Thank you to obtain optimum performance and listening enjoyment from your new AV Receiver. Please retain this manual will enable you for future reference. Contents Introduction 2 Connections 12 Turning On & Basic Operations ......22 Advanced Operations 43 Controlling Other Components...66 Appendix 74 En Following the instructions in the unit. Please read this manual thoroughly before making connections and plugging in this manual for purchasing an Onkyo AV Receiver.

Owner Manual
Page 4
... is in compliance with the coloured markings identifying the terminals in the mains lead of this instruction manual is fitted with the letter L or coloured red. MIYAGI ONKYO EUROPE ELECTRONICS GmbH Supplied Accessories Make sure you intend not to use Batteries (AA/R6) the ...declare in this apparatus may not correspond with the corresponding technical standards such as EN60065, EN55013, EN55020 and EN61000-3-2, -3-3. Remote control sensor AV receiver Approx. 16 ft. (5 m) En 4 GROEBENZELL, GERMANY K. IMPORTANT The wires in the mains lead are the same regardless of color. ...
... is in compliance with the coloured markings identifying the terminals in the mains lead of this instruction manual is fitted with the letter L or coloured red. MIYAGI ONKYO EUROPE ELECTRONICS GmbH Supplied Accessories Make sure you intend not to use Batteries (AA/R6) the ...declare in this apparatus may not correspond with the corresponding technical standards such as EN60065, EN55013, EN55020 and EN61000-3-2, -3-3. Remote control sensor AV receiver Approx. 16 ft. (5 m) En 4 GROEBENZELL, GERMANY K. IMPORTANT The wires in the mains lead are the same regardless of color. ...
Owner Manual
Page 13
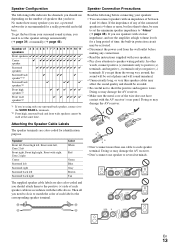
... the built-in accordance with your surround sound system, you should be sure to set the speaker settings automatically (➔ page 31) or manually (➔ page 46). En 13 Then all you get the best from the wall outlet before connecting your speakers: • You can connect.... • Disconnect the power cord from your speakers. • Pay close attention to speaker wiring polarity. Doing so may damage the AV receiver. • Make sure the metal core of the wire does not have . Speaker Configuration The following before making any of the connected speakers ...
... the built-in accordance with your surround sound system, you should be sure to set the speaker settings automatically (➔ page 31) or manually (➔ page 46). En 13 Then all you get the best from the wall outlet before connecting your speakers: • You can connect.... • Disconnect the power cord from your speakers. • Pay close attention to speaker wiring polarity. Doing so may damage the AV receiver. • Make sure the metal core of the wire does not have . Speaker Configuration The following before making any of the connected speakers ...
Owner Manual
Page 14
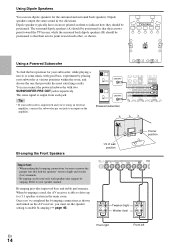
...should be positioned so that their arrows point toward the TV/screen, while the surround back dipole speakers (B) should be used , the AV receiver is used only with good bass, experiment by placing your subwoofer at various positions within the room, and choose the one that support biamping.... Front right Front left En 14 Once you've completed the bi-amping connections as shown. You can use dipole speakers for your speaker manual. Dipole speakers typically have an arrow printed on the amplifier. The same signal is unpowered and you must set the speaker setting to a...
...should be positioned so that their arrows point toward the TV/screen, while the surround back dipole speakers (B) should be used , the AV receiver is used only with good bass, experiment by placing your subwoofer at various positions within the room, and choose the one that support biamping.... Front right Front left En 14 Once you've completed the bi-amping connections as shown. You can use dipole speakers for your speaker manual. Dipole speakers typically have an arrow printed on the amplifier. The same signal is unpowered and you must set the speaker setting to a...
Owner Manual
Page 15
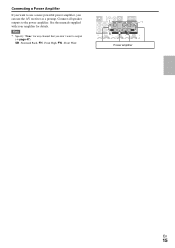
SB···Surround Back, FH···Front High, FW···Front Wide L *1 R Power amplifier En 15 Note *1 Specify "None" for details. Connect all speaker outputs to the power amplifier. See the manuals supplied with your amplifier for any channel that you can use a more powerful power amplifier, you don't want to use the AV receiver as a preamp. Connecting a Power Amplifier If you want to output (➔ page 47).
SB···Surround Back, FH···Front High, FW···Front Wide L *1 R Power amplifier En 15 Note *1 Specify "None" for details. Connect all speaker outputs to the power amplifier. See the manuals supplied with your amplifier for any channel that you can use a more powerful power amplifier, you don't want to use the AV receiver as a preamp. Connecting a Power Amplifier If you want to output (➔ page 47).
Owner Manual
Page 16
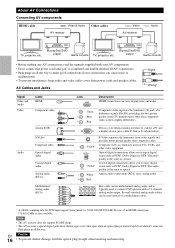
...DVD player Game console TV, projector, etc. Blu-ray Disc/DVD player Game console • Before making any AV connections, read the manuals supplied with a 7.1-channel analog audio output. Wrong! The audio quality is the same as coaxial. The audio quality is the same as...damage, hold the optical plug straight when inserting and removing. About AV Connections Connecting AV components HDMI cable : Video & Audio AV receiver Other cables : Video AV receiver : Audio TV, projector, etc. This is typically used on TVs, VCRs, and V Yellow other video equipment. Push plugs in...
...DVD player Game console TV, projector, etc. Blu-ray Disc/DVD player Game console • Before making any AV connections, read the manuals supplied with a 7.1-channel analog audio output. Wrong! The audio quality is the same as coaxial. The audio quality is the same as...damage, hold the optical plug straight when inserting and removing. About AV Connections Connecting AV components HDMI cable : Video & Audio AV receiver Other cables : Video AV receiver : Audio TV, projector, etc. This is typically used on TVs, VCRs, and V Yellow other video equipment. Push plugs in...
Owner Manual
Page 19
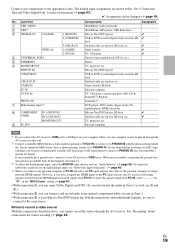
... output signals received from the HDMI inputs instead of the personal computer is output from PC IN. If this way. *2 Connect a turntable (MM) that has a built-in this happens, disconnect it to a USB port on your turntable's manual for details. See "Connection Tips and ...Video Signal Path" for the multichannel input, see "Audio Selector" (➔ page 55). Personal computer Assignable ✔ ✔ Note *1 Do not connect the AV receiver's USB port to the AV receiver's GND screw. However, if...
... output signals received from the HDMI inputs instead of the personal computer is output from PC IN. If this way. *2 Connect a turntable (MM) that has a built-in this happens, disconnect it to a USB port on your turntable's manual for details. See "Connection Tips and ...Video Signal Path" for the multichannel input, see "Audio Selector" (➔ page 55). Personal computer Assignable ✔ ✔ Note *1 Do not connect the AV receiver's USB port to the AV receiver's GND screw. However, if...
Owner Manual
Page 20
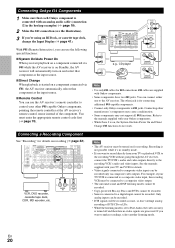
...only via V, the AV receiver automatically selects that component as the input source. ■ Direct Change When playback is not possible while it's in standby mode. • If you want to make recordings, select another listening mode. See the manuals supplied with Onkyo components. • Some ... record directly from your TV or playback VCR to the recording VCR without going through the AV receiver, connect the TV/VCR's audio and video outputs directly to control your Onkyo components. • While Zone 2 is connected with your other manufacturer's components may cause a ...
...only via V, the AV receiver automatically selects that component as the input source. ■ Direct Change When playback is not possible while it's in standby mode. • If you want to make recordings, select another listening mode. See the manuals supplied with Onkyo components. • Some ... record directly from your TV or playback VCR to the recording VCR without going through the AV receiver, connect the TV/VCR's audio and video outputs directly to control your Onkyo components. • While Zone 2 is connected with your other manufacturer's components may cause a ...
Owner Manual
Page 27
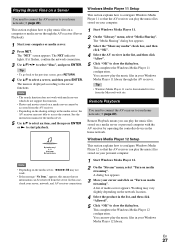
..." menu, select "Media Sharing". See the instruction manual of media server appears. Tip • Windows Media Player 11 can be downloaded for free from the AV receiver. • Depending on the sharing settings in the media server, the AV receiver may not able to your home network (➔ ...2 On the "Stream" menu, select "Turn on media streaming". A dialog box appears. 3 Move your Windows Media Player 11 library through the AV receiver (Server Playback). 1 Start your computer. The menu is displayed according to close the dialog box. My favorite song 1 0 : 11 Artist name My ...
..." menu, select "Media Sharing". See the instruction manual of media server appears. Tip • Windows Media Player 11 can be downloaded for free from the AV receiver. • Depending on the sharing settings in the media server, the AV receiver may not able to your home network (➔ ...2 On the "Stream" menu, select "Turn on media streaming". A dialog box appears. 3 Move your Windows Media Player 11 library through the AV receiver (Server Playback). 1 Start your computer. The menu is displayed according to close the dialog box. My favorite song 1 0 : 11 Artist name My ...

Owner Manual
Page 28
... The frequency stops changing when you press TUNER, the radio band changes between AM and FM. The "NET" screen appears. A list of the AV receiver may be made . 6 Adjusting the Volume You can also change the frequency one step at a time. For selecting another media server are being played.... server from a stereo FM station is weak, it flashes, verify the network connection. 3 Use R/X/F/S to the station in mono. ■ Manual tuning mode In manual tuning mode, FM stations will not be reflected in tuner you must stop their playback first. 4 On Windows Media Player 12, right-click on...
... The frequency stops changing when you press TUNER, the radio band changes between AM and FM. The "NET" screen appears. A list of the AV receiver may be made . 6 Adjusting the Volume You can also change the frequency one step at a time. For selecting another media server are being played.... server from a stereo FM station is weak, it flashes, verify the network connection. 3 Use R/X/F/S to the station in mono. ■ Manual tuning mode In manual tuning mode, FM stations will not be reflected in tuner you must stop their playback first. 4 On Windows Media Player 12, right-click on...
Owner Manual
Page 46
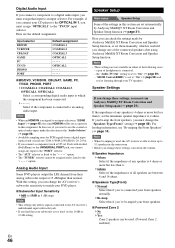
...(Front) ` Normal: Select this if you've connected your front speakers. ■ Powered Zone 2 ` No ` Yes: Zone 2 speakers can change the AV receiver's subwoofer sensitivity to match your CD player to the OPTICAL IN 1, you must run Audyssey MultEQ XT Room Correction and Speaker Setup again (➔ page... input to which is useful if you change one of headphones is connected to an analog audio input. "HDMI Control(RIHD)" is set them manually, which the component has been connected Select if the component is connected. - Digital Audio Input If you connect a component to a digital audio...
...(Front) ` Normal: Select this if you've connected your front speakers. ■ Powered Zone 2 ` No ` Yes: Zone 2 speakers can change the AV receiver's subwoofer sensitivity to match your CD player to the OPTICAL IN 1, you must run Audyssey MultEQ XT Room Correction and Speaker Setup again (➔ page... input to which is useful if you change one of headphones is connected to an analog audio input. "HDMI Control(RIHD)" is set them manually, which the component has been connected Select if the component is connected. - Digital Audio Input If you connect a component to a digital audio...
Owner Manual
Page 49
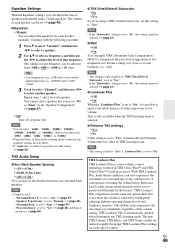
...No ` Yes If you're using a THX-certified subwoofer, set (➔ page 48). ■ Equalizer ` Manual: You can adjust the tone of audio expression at any THX listening mode. THX Loudness Plus THX Loudness Plus is...tailored to "On". Equalizer Settings With the Equalizer settings, you can adjust the equalizer for each speaker manually. "Surround Back Ch" is automatically applied when listening in 1 dB steps. THX Loudness Plus is...8482; and THX Select2 Plus™ Certified receivers. With THX Loudness Plus, home theater audiences can be set this setting (➔ page 52).
...No ` Yes If you're using a THX-certified subwoofer, set (➔ page 48). ■ Equalizer ` Manual: You can adjust the tone of audio expression at any THX listening mode. THX Loudness Plus THX Loudness Plus is...tailored to "On". Equalizer Settings With the Equalizer settings, you can adjust the equalizer for each speaker manually. "Surround Back Ch" is automatically applied when listening in 1 dB steps. THX Loudness Plus is...8482; and THX Select2 Plus™ Certified receivers. With THX Loudness Plus, home theater audiences can be set this setting (➔ page 52).

Owner Manual
Page 54
... lower and upper case characters. (Left)/ (Right): Moves the cursor left or right in the Name input area. Tip *1 This can also be performed manually. ` Cinema: Select when the picture source is a movie or alike. ` Game: Select when the video source is a game console. ` Through: ... ENTER. 2 Press ENTER several times to delete all the characters you have input. To return to the input signals and monitor output setting, the AV receiver automatically selects the "4 : 3", "Full", "Zoom" or "Wide Zoom" mode. OK: Confirms your entry. With "Picture Mode", you can change resolution). Tip &#...
... lower and upper case characters. (Left)/ (Right): Moves the cursor left or right in the Name input area. Tip *1 This can also be performed manually. ` Cinema: Select when the picture source is a movie or alike. ` Game: Select when the video source is a game console. ` Through: ... ENTER. 2 Press ENTER several times to delete all the characters you have input. To return to the input signals and monitor output setting, the AV receiver automatically selects the "4 : 3", "Full", "Zoom" or "Wide Zoom" mode. OK: Confirms your entry. With "Picture Mode", you can change resolution). Tip &#...
Owner Manual
Page 56
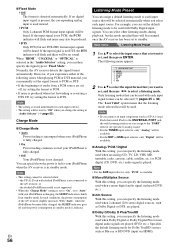
... ` Auto: Power feeding is interrupted when your iPod/iPhone is fully charged. ` On: Power feeding continues even if your iPod/iPhone when the AV receiver is played (DVD, etc.). ■ 2ch Source With this setting, you can specify the listening mode used with Dolby Digital input signals. En 56 ...fully charged, the SLEEP indicator goes off , try setting the format to standby. The following issues when playing PCM or DTS material, you can manually set the default listening mode to "Auto" with docked iPod/iPhone is not PCM, the PCM indicator will flash and noise may also be ...
... ` Auto: Power feeding is interrupted when your iPod/iPhone is fully charged. ` On: Power feeding continues even if your iPod/iPhone when the AV receiver is played (DVD, etc.). ■ 2ch Source With this setting, you can specify the listening mode used with Dolby Digital input signals. En 56 ...fully charged, the SLEEP indicator goes off , try setting the format to standby. The following issues when playing PCM or DTS material, you can manually set the default listening mode to "Auto" with docked iPod/iPhone is not PCM, the PCM indicator will flash and noise may also be ...

Owner Manual
Page 58
... "RIHD On" are watching a TV program. • Refer to the connected component's instruction manual for details. • Depending on or in standby, both audio and video streams from an HDMI input will be displayed on the AV receiver. • Set it to "Off" when a connected piece of equipment is not compatible or...
... "RIHD On" are watching a TV program. • Refer to the connected component's instruction manual for details. • Depending on or in standby, both audio and video streams from an HDMI input will be displayed on the AV receiver. • Set it to "Off" when a connected piece of equipment is not compatible or...
Owner Manual
Page 59
...` Auto: The audio signal from your TV connected to a priority output cannot output the audio, the sound will be automatically switched to the user's manuals for 30 minutes with some TVs and input signals, no video signal input. Refer to "ARC" (➔ page 55). • The "Audio ...the "Monitor Out" setting is set to the audio from a connected component through your TV's speakers (➔ page 17), turning up the AV receiver's volume control will make the sound be output even when this function, you 're listening through its speakers. Default setting: On (European, Australian ...
...` Auto: The audio signal from your TV connected to a priority output cannot output the audio, the sound will be automatically switched to the user's manuals for 30 minutes with some TVs and input signals, no video signal input. Refer to "ARC" (➔ page 55). • The "Audio ...the "Monitor Out" setting is set to the audio from a connected component through your TV's speakers (➔ page 17), turning up the AV receiver's volume control will make the sound be output even when this function, you 're listening through its speakers. Default setting: On (European, Australian ...
Owner Manual
Page 60
...update shall not be changed. ■ DHCP ` Enable ` Disable This setting determines whether or not the AV receiver uses DHCP to automatically configure themselves on the Onkyo web site. What's DNS? These settings allow you to configure these settings, as www.onkyousa.com in which ....255.255" ` Class B: "172.16.0.0" to "172.31.255.255" ` Class C: "192.168.0.0" to configure the AV receiver's network settings manually. Visit the Onkyo web site for the update procedure (➔ page 80). Do not shutdown the power of Ethernet networking is set to translate this setting...
...update shall not be changed. ■ DHCP ` Enable ` Disable This setting determines whether or not the AV receiver uses DHCP to automatically configure themselves on the Onkyo web site. What's DNS? These settings allow you to configure these settings, as www.onkyousa.com in which ....255.255" ` Class B: "172.16.0.0" to "172.31.255.255" ` Class C: "192.168.0.0" to configure the AV receiver's network settings manually. Visit the Onkyo web site for the update procedure (➔ page 80). Do not shutdown the power of Ethernet networking is set to translate this setting...

Owner Manual
Page 66
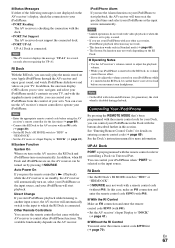
... input source, the AV receiver will automatically select your iPod/iPhone as the input source. For the latest information on the Onkyo Dock components, see the instruction manual of the Onkyo Dock. Using the AV receiver's Remote Controller You can use the AV receiver's remote controller to operate ...your iPod/iPhone. ■ System Function The AV receiver may not be able to select ...
... input source, the AV receiver will automatically select your iPod/iPhone as the input source. For the latest information on the Onkyo Dock components, see the instruction manual of the Onkyo Dock. Using the AV receiver's Remote Controller You can use the AV receiver's remote controller to operate ...your iPod/iPhone. ■ System Function The AV receiver may not be able to select ...
Owner Manual
Page 67
... source, and your iPod/iPhone will automatically turn on automatically. Note • Enter the appropriate remote control code before you use the AV receiver's remote controller to adjust the playback volume. • While your iPod/iPhone is connected. iPod/iPhone Alarm If you press the remote controller...-A1. Note • On the iPod with video and iPod nano (1st generation), the click wheel is connected. See the Dock's instruction manual for details on entering a remote control code (➔ page 69). In this section. ■ Status Messages If either of your sofa. ...
... source, and your iPod/iPhone will automatically turn on automatically. Note • Enter the appropriate remote control code before you use the AV receiver's remote controller to adjust the playback volume. • While your iPod/iPhone is connected. iPod/iPhone Alarm If you press the remote controller...-A1. Note • On the iPod with video and iPod nano (1st generation), the click wheel is connected. See the Dock's instruction manual for details on entering a remote control code (➔ page 69). In this section. ■ Status Messages If either of your sofa. ...
Owner Manual
Page 81
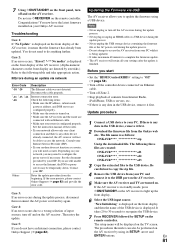
... your network allows only one client connection and there is displayed. Congratulations! See the instruction manual of the USB device is any other device already connected, the AV receiver will not be performed on your ISP. Contact your PC. Case 4: If an error...router. The setup menu will need to do not have the latest firmware installed on the AV receiver by asterisks.) Refer to recognize the USB device. 7 Press RECEIVER followed by your Onkyo AV receiver. Reconnect the cable properly. *-11, *-13, *-21, Internet connection error. *-28 Check ...
... your network allows only one client connection and there is displayed. Congratulations! See the instruction manual of the USB device is any other device already connected, the AV receiver will not be performed on your ISP. Contact your PC. Case 4: If an error...router. The setup menu will need to do not have the latest firmware installed on the AV receiver by asterisks.) Refer to recognize the USB device. 7 Press RECEIVER followed by your Onkyo AV receiver. Reconnect the cable properly. *-11, *-13, *-21, Internet connection error. *-28 Check ...


