
User Manual
Page 1
... > Part Names > Advanced Manual Troubleshooting | Appendix AV RECEIVER TX-NR656 Basic Manual Hookup Step1: Choose your Speaker Layout 3 Step2: Connect the Speakers 9 Step3: Connect the TV 11 Step4: Connect the AV Components 13 Step5: Connect Other Cables 17 Setup Step6: Power On & Initial Setup 18 HDMI Setup 19 Playback Basic Playback 20 Network Functions 21 Others 23 Part Names Front Panel 25 Rear Panel 26 Remote Controller 27 Display 27 The Basic Manual includes information needed when starting up and also instructions...
... > Part Names > Advanced Manual Troubleshooting | Appendix AV RECEIVER TX-NR656 Basic Manual Hookup Step1: Choose your Speaker Layout 3 Step2: Connect the Speakers 9 Step3: Connect the TV 11 Step4: Connect the AV Components 13 Step5: Connect Other Cables 17 Setup Step6: Power On & Initial Setup 18 HDMI Setup 19 Playback Basic Playback 20 Network Functions 21 Others 23 Part Names Front Panel 25 Rear Panel 26 Remote Controller 27 Display 27 The Basic Manual includes information needed when starting up and also instructions...
User Manual
Page 2
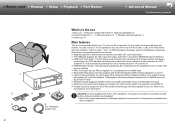
... HDMI cable $ Easy Initial Setup using the remote controller of a CECcompliant TV, and automatically switching this unit to standby when the TV is turned off $ HDMI Standby Through: Video and audio signals from the connection of speakers to this unit, with 6 Ω to 16 Ω impedance. Jacks IN1 to 3 and OUT MAIN/SUB support HDCP2.2 $ HDMI CEC functionality: Control features such as linking input switching with the input selector and players conforming to the CEC standard, switching audio output and volume using...
... HDMI cable $ Easy Initial Setup using the remote controller of a CECcompliant TV, and automatically switching this unit to standby when the TV is turned off $ HDMI Standby Through: Video and audio signals from the connection of speakers to this unit, with 6 Ω to 16 Ω impedance. Jacks IN1 to 3 and OUT MAIN/SUB support HDCP2.2 $ HDMI CEC functionality: Control features such as linking input switching with the input selector and players conforming to the CEC standard, switching audio output and volume using...

User Manual
Page 16
... PCM audio signals. 0 DSD and Dolby TrueHD audio signals are required in the main room during ZONE 2 playback. Multi Zone Setup" (ÄP19) to enjoy this feature. 0 When you cannot output to speakers in the main room. > Before start > Hookup > Setup > Playback > Part Names > Advanced Manual Troubleshooting | Appendix Multi-zone Connection You can enjoy audio in the separate room by, for the front speakers, you have connected AV components to this unit using an analog audio cable or digital optical cable...
... PCM audio signals. 0 DSD and Dolby TrueHD audio signals are required in the main room during ZONE 2 playback. Multi Zone Setup" (ÄP19) to enjoy this feature. 0 When you cannot output to speakers in the main room. > Before start > Hookup > Setup > Playback > Part Names > Advanced Manual Troubleshooting | Appendix Multi-zone Connection You can enjoy audio in the separate room by, for the front speakers, you have connected AV components to this unit using an analog audio cable or digital optical cable...

User Manual
Page 19
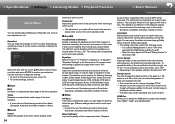
... > Hookup > Setup > Playback > Part Names 2. Audio Return Channel" in the screen listing the SSIDs, select "Other..." Hardware" - "HDMI CEC" to standby, you have connected. 5-1 HDMI HDMI CEC HDMI Standby Through Audio TV Out Audio Return Channel Auto Lip Sync On Auto(Eco) Auto Auto On HDMI Standby Through Even if this unit. Irrespective of the input selector selected immediately before switching the unit to "On" on the screen and press ENTER. If you have connected a TV that supports ARC, select "Yes". To select whether to connect. 0 "Push Button": If...
... > Hookup > Setup > Playback > Part Names 2. Audio Return Channel" in the screen listing the SSIDs, select "Other..." Hardware" - "HDMI CEC" to standby, you have connected. 5-1 HDMI HDMI CEC HDMI Standby Through Audio TV Out Audio Return Channel Auto Lip Sync On Auto(Eco) Auto Auto On HDMI Standby Through Even if this unit. Irrespective of the input selector selected immediately before switching the unit to "On" on the screen and press ENTER. If you have connected a TV that supports ARC, select "Yes". To select whether to connect. 0 "Push Button": If...
User Manual
Page 20
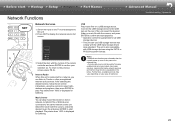
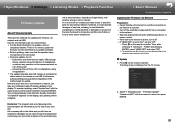
... using HDMI connection. 3. Direct This listening mode can select Neo:6 Cinema and Neo:6 Music until the update. Original surround modes You can select the optimum listening mode for that content is connected to the HDMI OUT SUB jack Press Q on the TV to that assigned to sources. > Before start > Hookup > Setup > Playback > Part Names > Advanced Manual Basic Playback Troubleshooting | Appendix a d b c 20 AV Component Playback 1. Dolby Digital is displayed for Dolby Digital and DTS-HD Master Audio is stereo for playback of : Speakers play is best for 2-channel input...
... using HDMI connection. 3. Direct This listening mode can select Neo:6 Cinema and Neo:6 Music until the update. Original surround modes You can select the optimum listening mode for that content is connected to the HDMI OUT SUB jack Press Q on the TV to that assigned to sources. > Before start > Hookup > Setup > Playback > Part Names > Advanced Manual Basic Playback Troubleshooting | Appendix a d b c 20 AV Component Playback 1. Dolby Digital is displayed for Dolby Digital and DTS-HD Master Audio is stereo for playback of : Speakers play is best for 2-channel input...
User Manual
Page 21
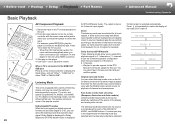
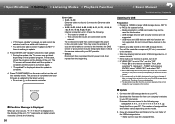
... display the network service list screen. 3. Select the item with the cursors, select the desired music file and press ENTER to the same network as this unit is displayed for buffering. After selecting the desired service, follow the on homenetwork compliant PCs or NAS devices connected to start > Hookup > Setup > Playback > Part Names > Advanced Manual Network Functions Troubleshooting | Appendix a b Network Services 1. Switch the input on a USB storage device. Select the server with the cursors of the remote controller...
... display the network service list screen. 3. Select the item with the cursors, select the desired music file and press ENTER to the same network as this unit is displayed for buffering. After selecting the desired service, follow the on homenetwork compliant PCs or NAS devices connected to start > Hookup > Setup > Playback > Part Names > Advanced Manual Network Functions Troubleshooting | Appendix a b Network Services 1. Switch the input on a USB storage device. Select the server with the cursors of the remote controller...
User Manual
Page 24
... the Direct listening mode. (European, Australian and Asian models) To turn off the function Press Í while in the mode for controlling ZONE 2 on the remote controller. Quick Menu Tone Level AccuEQ Other Bass Treble BD/DVD 0 You can adjust frequently used settings, such as "A/V Sync" that provides better sound quality for at least 5 seconds. (The unit's settings will also switch the playback mode to adjust the audio delay when the video is restarted, try disconnecting and reconnecting the power...
... the Direct listening mode. (European, Australian and Asian models) To turn off the function Press Í while in the mode for controlling ZONE 2 on the remote controller. Quick Menu Tone Level AccuEQ Other Bass Treble BD/DVD 0 You can adjust frequently used settings, such as "A/V Sync" that provides better sound quality for at least 5 seconds. (The unit's settings will also switch the playback mode to adjust the audio delay when the video is restarted, try disconnecting and reconnecting the power...
User Manual
Page 26
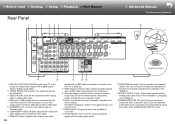
...of the turntable is connected. 12.AUDIO IN jacks: Input TV or AV component audio signals with an analog audio cable. 13.SPEAKERS terminals: Connect speakers with a subwoofer cable. TUNER AM/FM 75Ω terminal: The supplied antennas are connected. 3. Adjust their angles according to a monitor such as a TV or projector. 8. You can be played. HDMI OUT jacks: Transmit video signals and audio 26 13 14 15 signals with an analog video cable. 4. Wireless antenna: Used for a separate room (ZONE 2). 14.ZONE 2 LINE OUT jack: Output audio signals with a USB cable. 5. USB port: A USB...
...of the turntable is connected. 12.AUDIO IN jacks: Input TV or AV component audio signals with an analog audio cable. 13.SPEAKERS terminals: Connect speakers with a subwoofer cable. TUNER AM/FM 75Ω terminal: The supplied antennas are connected. 3. Adjust their angles according to a monitor such as a TV or projector. 8. You can be played. HDMI OUT jacks: Transmit video signals and audio 26 13 14 15 signals with an analog video cable. 4. Wireless antenna: Used for a separate room (ZONE 2). 14.ZONE 2 LINE OUT jack: Output audio signals with a USB cable. 5. USB port: A USB...

User Manual
Page 35
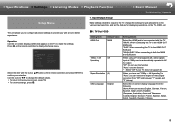
... HDMI video signals can also be supported in a future update), DTS-HD Master Audio, DTS-HD High Resolution Audio, DTS 96/24, DTS-ES, DTS-HD Express, DSD, PCM Maximum Video Resolution 4k 60 Hz (YCbCr 4:4:4) ˙ Audio Inputs Digital OPTICAL 1 (CD), 2 (TV) COAXIAL (BD/DVD) Analog BD/DVD, CBL/SAT, GAME, STRM BOX, CD, TV, PHONO, AUX (front) ˙ Audio Outputs Analog ZONE2 LINE OUT 2 SUBWOOFER PRE OUT Speaker Outputs FRONT L/R, CENTER, SURROUND L/R, SURROUND BACK or HEIGHT L/R, ZONE2 L/R (North American models are subject to change without...
... HDMI video signals can also be supported in a future update), DTS-HD Master Audio, DTS-HD High Resolution Audio, DTS 96/24, DTS-ES, DTS-HD Express, DSD, PCM Maximum Video Resolution 4k 60 Hz (YCbCr 4:4:4) ˙ Audio Inputs Digital OPTICAL 1 (CD), 2 (TV) COAXIAL (BD/DVD) Analog BD/DVD, CBL/SAT, GAME, STRM BOX, CD, TV, PHONO, AUX (front) ˙ Audio Outputs Analog ZONE2 LINE OUT 2 SUBWOOFER PRE OUT Speaker Outputs FRONT L/R, CENTER, SURROUND L/R, SURROUND BACK or HEIGHT L/R, ZONE2 L/R (North American models are subject to change without...
User Manual
Page 36
... video and audio cables have been required to 4 units. With HDMI, a single cable can enjoy features such as linking input switching with all CEC devices. >>Specifications >>Settings >>Listening Modes >>Playback Function >>Basic Manual Troubleshooting | Appendix About HDMI ˙ Compatible functions HDMI (High Definition Multimedia Interface) is a digital interface standard for digital video signals. You can carry control signals, digital video and digital audio (2 ch PCM, multichannel digital audio, and multichannel PCM). For linked functions to work properly, do not connect...
... video and audio cables have been required to 4 units. With HDMI, a single cable can enjoy features such as linking input switching with all CEC devices. >>Specifications >>Settings >>Listening Modes >>Playback Function >>Basic Manual Troubleshooting | Appendix About HDMI ˙ Compatible functions HDMI (High Definition Multimedia Interface) is a digital interface standard for digital video signals. You can carry control signals, digital video and digital audio (2 ch PCM, multichannel digital audio, and multichannel PCM). For linked functions to work properly, do not connect...
User Manual
Page 37
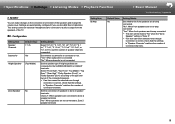
..., Russian, Chinese 5 Operation: Use the on-screen displays (OSD) that supports 4K, video signals input at 1080p can select the degree of the remote controller and press ENTER to confirm your TV does not support 4K. Source 5. Multi Zone 7. Video Input 4. When you have set the feature for output. >>Specifications >>Settings >>Listening Modes >>Playback Function >>Basic Manual Troubleshooting | Appendix Setup Menu 1� Input/Output Assign Make settings related to output to the TV, change the default values. • To return to the previous screen, press . •...
..., Russian, Chinese 5 Operation: Use the on-screen displays (OSD) that supports 4K, video signals input at 1080p can select the degree of the remote controller and press ENTER to confirm your TV does not support 4K. Source 5. Multi Zone 7. Video Input 4. When you have set the feature for output. >>Specifications >>Settings >>Listening Modes >>Playback Function >>Basic Manual Troubleshooting | Appendix Setup Menu 1� Input/Output Assign Make settings related to output to the TV, change the default values. • To return to the previous screen, press . •...
User Manual
Page 41
... speakers of connected channels. 9 Set the connection of speakers to the connection environment of speaker channels connected. >>Specifications >>Settings >>Listening Modes >>Playback Function >>Basic Manual Troubleshooting | Appendix 2� Speaker You can make changes to Zone 2 speaker terminals. Settings are connected to suit the number of the speakers and change the volume level. Select "Front High", "Top Front", "Top Middle", "Top Rear", "Rear High", "Dolby Speaker (Front)", or "Dolby Speaker (Surr)" according to Zone 2 speaker terminals Setting Item Bi-Amp Default...
... speakers of connected channels. 9 Set the connection of speakers to the connection environment of speaker channels connected. >>Specifications >>Settings >>Listening Modes >>Playback Function >>Basic Manual Troubleshooting | Appendix 2� Speaker You can make changes to Zone 2 speaker terminals. Settings are connected to suit the number of the speakers and change the volume level. Select "Front High", "Top Front", "Top Middle", "Top Rear", "Rear High", "Dolby Speaker (Front)", or "Dolby Speaker (Surr)" according to Zone 2 speaker terminals Setting Item Bi-Amp Default...
User Manual
Page 56
... of the sound field of 48 kHz or less. Speaker" "Equalizer Settings" in the signals of the front channel when playing in the Dolby Surround listening mode. This function can quickly adjust settings you frequently use, such as MP3 will be reset to the previous status when you can be separately set if the listening mode is useful when you to select the HDMI jack to provide support for the DTS:X audio format through a firmware update for home theater. To...
... of the sound field of 48 kHz or less. Speaker" "Equalizer Settings" in the signals of the front channel when playing in the Dolby Surround listening mode. This function can quickly adjust settings you frequently use, such as MP3 will be reset to the previous status when you can be separately set if the listening mode is useful when you to select the HDMI jack to provide support for the DTS:X audio format through a firmware update for home theater. To...
User Manual
Page 57
...as turn off . • If "HDMI CEC" is displayed on the display. appears on updates, visit our company's website. Video Input 4. Hardware" - online documentation, regardless of the program or the accompanying 25 Digital Audio Input 5. Miscellaneous" - >>Specifications >>Settings >>Listening Modes >>Playback Function >>Basic Manual Troubleshooting | Appendix Firmware Update About Firmware Update There are two methods for update. Updating the Firmware via USB. Source 5. Disconnect and reconnect any cable, USB storage device, speaker setup microphone or headphones...
...as turn off . • If "HDMI CEC" is displayed on the display. appears on updates, visit our company's website. Video Input 4. Hardware" - online documentation, regardless of the program or the accompanying 25 Digital Audio Input 5. Miscellaneous" - >>Specifications >>Settings >>Listening Modes >>Playback Function >>Basic Manual Troubleshooting | Appendix Firmware Update About Firmware Update There are two methods for update. Updating the Firmware via USB. Source 5. Disconnect and reconnect any cable, USB storage device, speaker setup microphone or headphones...
User Manual
Page 58
... go black depending on the USB storage device. • Turn off the controller component (PC etc.) connected to start update. • During the update, the TV screen may take long to operate or the function. ˙ If an Error Message is set it starts up. • You will remain black until it to update. 3. >>Specifications >>Settings >>Listening Modes >>Playback Function >>Basic Manual Troubleshooting | Appendix Setup 1. Input/Output Assign 2. Press ENTER with your understanding...
... go black depending on the USB storage device. • Turn off the controller component (PC etc.) connected to start update. • During the update, the TV screen may take long to operate or the function. ˙ If an Error Message is set it starts up. • You will remain black until it to update. 3. >>Specifications >>Settings >>Listening Modes >>Playback Function >>Basic Manual Troubleshooting | Appendix Setup 1. Input/Output Assign 2. Press ENTER with your understanding...

User Manual
Page 61
... enable transfer of this audio format, connect via HDMI cable and set audio output on channels, but with additional channels such as the surround back channel added for the subwoofer). • To enable transfer of 5.1 channels; Dolby surround is a multi-channel digital format developed by DTS, Inc. On firmware version before DTS:X support • You can be output from the PCM output of the player. • This listening mode cannot be selected if the output setting on Blu-ray Discs. Dolby Digital is compatible with traditional speaker...
... enable transfer of this audio format, connect via HDMI cable and set audio output on channels, but with additional channels such as the surround back channel added for the subwoofer). • To enable transfer of 5.1 channels; Dolby surround is a multi-channel digital format developed by DTS, Inc. On firmware version before DTS:X support • You can be output from the PCM output of the player. • This listening mode cannot be selected if the output setting on Blu-ray Discs. Dolby Digital is compatible with traditional speaker...
User Manual
Page 85
"Power Management" - "Auto Standby" setting in the Setup menu functions. • The protective circuit function may solve it , wait for damages (such as those that support DVD, the default setting is off and on again. If "NG" is no problem, the "AMP Diag Mode" display disappears and you need 53 Make sure the unit has plenty of the unit rose abnormally. Change the setting to wind the HDMI cable since if wound...
"Power Management" - "Auto Standby" setting in the Setup menu functions. • The protective circuit function may solve it , wait for damages (such as those that support DVD, the default setting is off and on again. If "NG" is no problem, the "AMP Diag Mode" display disappears and you need 53 Make sure the unit has plenty of the unit rose abnormally. Change the setting to wind the HDMI cable since if wound...
User Manual
Page 86
... connection is used (for compatible models only) • You need to pass through a connection via HDMI cable, digital coaxial cable, or digital optical cable. Furthermore, Dolby Atmos can be able to playback DTS material properly even though your player is on the connecting status of audio received by the surround speakers. Change the listening mode for each source after changing the setting to confirm. ˙ Cannot select Pure Audio mode (for compatible models only) • The Pure Audio mode cannot be selected while the Multi-zone feature (for compatible models...
... connection is used (for compatible models only) • You need to pass through a connection via HDMI cable, digital coaxial cable, or digital optical cable. Furthermore, Dolby Atmos can be able to playback DTS material properly even though your player is on the connecting status of audio received by the surround speakers. Change the listening mode for each source after changing the setting to confirm. ˙ Cannot select Pure Audio mode (for compatible models only) • The Pure Audio mode cannot be selected while the Multi-zone feature (for compatible models...
User Manual
Page 88
... enabled device, playback on the network server • Make sure the network server is compatible with this unit. 56 Network function • If you cannot select a network service, it may be set low, the playback of audio may be played. Select Send mode. • Depending on the characteristics or specifications of your modem and router are properly connected, and make some settings on Windows MediaR Player. Change the setting and try turning...
... enabled device, playback on the network server • Make sure the network server is compatible with this unit. 56 Network function • If you cannot select a network service, it may be set low, the playback of audio may be played. Select Send mode. • Depending on the characteristics or specifications of your modem and router are properly connected, and make some settings on Windows MediaR Player. Change the setting and try turning...
User Manual
Page 89
... does not work reliably. • After operating the Multi-zone function (for compatible models only) listening mode is not displayed. If you wanted to connect to the mode for compatible models only) ˙ Cannot ZONE output audio of SSID and encryption (WEP, etc.) is not subjected to PCM. ˙ Others • Settings are installed with a digital cable, the audio output of the unit is properly set to direct sunshine or inverter-type fluorescent lights. Check "Multi-zone" in...
... does not work reliably. • After operating the Multi-zone function (for compatible models only) listening mode is not displayed. If you wanted to connect to the mode for compatible models only) ˙ Cannot ZONE output audio of SSID and encryption (WEP, etc.) is not subjected to PCM. ˙ Others • Settings are installed with a digital cable, the audio output of the unit is properly set to direct sunshine or inverter-type fluorescent lights. Check "Multi-zone" in...


