Instruction Manual - English
Page 5
Multi Zone 7. Hardware 6. Source 5. Audio Adjust 4. Miscellaneous Web Setup Menu operations Initial Setup with Auto Start-up Wizard Operations Onkyo Controller Main features Initial Setup Troubleshooting When the unit is operating erratically 101 Troubleshooting 140 101 Appendix 101 101 Speaker Layouts and Selectable Listening Modes 151 LISTENING MODE buttons and ... 118 120 130 131 133 133 134 134 137 137 137 139 5 Speaker 3. Input/Output Assign 2. Connecting a transmitter for playback Connections Setting Up Playing Back Setup Setup Menu Menu list 1.
Multi Zone 7. Hardware 6. Source 5. Audio Adjust 4. Miscellaneous Web Setup Menu operations Initial Setup with Auto Start-up Wizard Operations Onkyo Controller Main features Initial Setup Troubleshooting When the unit is operating erratically 101 Troubleshooting 140 101 Appendix 101 101 Speaker Layouts and Selectable Listening Modes 151 LISTENING MODE buttons and ... 118 120 130 131 133 133 134 134 137 137 137 139 5 Speaker 3. Input/Output Assign 2. Connecting a transmitter for playback Connections Setting Up Playing Back Setup Setup Menu Menu list 1.

Instruction Manual - English
Page 6
..., available services may no longer be posted on our website and through other means at a later date. • The illustrations in the box • Initial Setup Guide (1) * This is not supplied with the product. „„Note • Connect speakers with an impedance of North American models unless otherwise mentioned. •.... • Details on the firmware update will be available if new functions are added by updating firmware or the service providers terminate their services. Speaker setup microphone (1) • Used during Initial...
..., available services may no longer be posted on our website and through other means at a later date. • The illustrations in the box • Initial Setup Guide (1) * This is not supplied with the product. „„Note • Connect speakers with an impedance of North American models unless otherwise mentioned. •.... • Details on the firmware update will be available if new functions are added by updating firmware or the service providers terminate their services. Speaker setup microphone (1) • Used during Initial...

Instruction Manual - English
Page 7
... network or USB port when the firmware update is Displayed If an error occurs Error!" Disconnecting and reconnecting cables, USB storage device, speaker setup microphone or headphones, or performing operations on the display of firmware updates may take approx. 20 minutes to the network. • Stop...storage device, or server content being played. • If the multi-zone function is active, turn the unit into standby mode. Press . The Setup menu is completed. Select "7. "Update via NET" with a function to update the firmware. In such a case, check the progress on the ...
... network or USB port when the firmware update is Displayed If an error occurs Error!" Disconnecting and reconnecting cables, USB storage device, speaker setup microphone or headphones, or performing operations on the display of firmware updates may take approx. 20 minutes to the network. • Stop...storage device, or server content being played. • If the multi-zone function is active, turn the unit into standby mode. Press . The Setup menu is completed. Select "7. "Update via NET" with a function to update the firmware. In such a case, check the progress on the ...
Instruction Manual - English
Page 8
Whether this unit and the router are not supported. -- Disconnecting and reconnecting cables, USB storage device, speaker setup microphone or headphones, or performing operations on the unit such as below. Do not connect these devices to the network. • Stop an Internet radio, ...
Whether this unit and the router are not supported. -- Disconnecting and reconnecting cables, USB storage device, speaker setup microphone or headphones, or performing operations on the unit such as below. Do not connect these devices to the network. • Stop an Internet radio, ...

Instruction Manual - English
Page 9
... "Completed!" Retry from the unit. 9. Select "7. Error Code • -01, -10: The USB storage device cannot be selected, wait for another model. The Setup menu is complete. 8. Press ENTER with a household outlet. • If the USB storage device has been partitioned, each section will remain black until it with...
... "Completed!" Retry from the unit. 9. Select "7. Error Code • -01, -10: The USB storage device cannot be selected, wait for another model. The Setup menu is complete. 8. Press ENTER with a household outlet. • If the USB storage device has been partitioned, each section will remain black until it with...

Instruction Manual - English
Page 10
... while setting. 12. HYBRID STANDBY indicator: Lights up when any of this unit. ( →p103) 10. ZONE 2 button: Controls the multi-zone function. ( →p89) 6. SETUP button: You can make settings such as "HDMI" and "Audio" quickly on the TV and the display to have a more enjoyable experience with the cursors...
... while setting. 12. HYBRID STANDBY indicator: Lights up when any of this unit. ( →p103) 10. ZONE 2 button: Controls the multi-zone function. ( →p89) 6. SETUP button: You can make settings such as "HDMI" and "Audio" quickly on the TV and the display to have a more enjoyable experience with the cursors...

Instruction Manual - English
Page 11
Input selector buttons: Switches the input to play music files. ( →p93) 11 Press / of "TREBLE", "VOCAL" or "BASS" respectively. 17. USB port: Connect a USB storage device to be played. 16. PHONES jack: Connect headphones with a standard plug (ø1/4″/6.3 mm). 14. Front Panel 13. TONE CONTROL buttons: Adjusts the sound quality. SETUP MIC jack: Connect the supplied speaker setup microphone. ( →p136) 18. LISTENING MODE buttons: Switches the listening mode ( →p71) by pressing "MOVIE/ TV", "MUSIC" and "GAME" repeatedly. 15.
Input selector buttons: Switches the input to play music files. ( →p93) 11 Press / of "TREBLE", "VOCAL" or "BASS" respectively. 17. USB port: Connect a USB storage device to be played. 16. PHONES jack: Connect headphones with a standard plug (ø1/4″/6.3 mm). 14. Front Panel 13. TONE CONTROL buttons: Adjusts the sound quality. SETUP MIC jack: Connect the supplied speaker setup microphone. ( →p136) 18. LISTENING MODE buttons: Switches the listening mode ( →p71) by pressing "MOVIE/ TV", "MUSIC" and "GAME" repeatedly. 15.

Instruction Manual - English
Page 15
... AV component. (Some devices may not be played. 3. Select the time from "MAIN", "SUB", and "MAIN+SUB". 9. "Power Management" - button: Switches the information on the Setup menu. 8. SLEEP button: You can also set this button during playback allows you to the pairing mode. 10. Input selector buttons: Switches the input to...
... AV component. (Some devices may not be played. 3. Select the time from "MAIN", "SUB", and "MAIN+SUB". 9. "Power Management" - button: Switches the information on the Setup menu. 8. SLEEP button: You can also set this button during playback allows you to the pairing mode. 10. Input selector buttons: Switches the input to...

Instruction Manual - English
Page 17
... 2 SHIFT MODE 17 To delete all the input characters, press the CLEAR button on the TV screen such as when inputting a password for Wi-Fi Setup ( →p122) or naming a preset radio station ( →p118). 1.
... 2 SHIFT MODE 17 To delete all the input characters, press the CLEAR button on the TV screen such as when inputting a password for Wi-Fi Setup ( →p122) or naming a preset radio station ( →p118). 1.

Instruction Manual - English
Page 31
Twist the wires exposed from the Setup menu, press on the remote controller, and set "Speaker Impedance" to 16 Ω. When setting "Speaker Impedance" from the tip of the speaker cable so ... Cables 1/2˝ (12 mm) Make correct connection between the unit's jacks and speaker's jacks (+ side to - side to + side, and - side) for "Speaker Setup" in the Initial Setup section ( →p134). side wires touch each channel. If the exposed wires touch the rear panel, or the + side and - If any of the...
Twist the wires exposed from the Setup menu, press on the remote controller, and set "Speaker Impedance" to 16 Ω. When setting "Speaker Impedance" from the tip of the speaker cable so ... Cables 1/2˝ (12 mm) Make correct connection between the unit's jacks and speaker's jacks (+ side to - side to + side, and - side) for "Speaker Setup" in the Initial Setup section ( →p134). side wires touch each channel. If the exposed wires touch the rear panel, or the + side and - If any of the...

Instruction Manual - English
Page 49
... as a pre-amplifier in order to produce a large volume that cannot be output with the unit only. "Zone 2 Lineout" ( →p110) to the power amplifier. a Setup • Set "2. Speaker" - Speaker" - "Speaker Channels" according to the number of channels of the connected speakers. • Settings are required to output audio to "Front...
... as a pre-amplifier in order to produce a large volume that cannot be output with the unit only. "Zone 2 Lineout" ( →p110) to the power amplifier. a Setup • Set "2. Speaker" - Speaker" - "Speaker Channels" according to the number of channels of the connected speakers. • Settings are required to output audio to "Front...

Instruction Manual - English
Page 51
...; Settings are required when 4K or 8K high-quality video is to insert the HDMI cable all the way in tuner), connection with the TV. Setup • When not using a TV's built-in . Also, use only the HDMI cable to the instruction manual of the TV on the settings. Connections Connecting...
...; Settings are required when 4K or 8K high-quality video is to insert the HDMI cable all the way in tuner), connection with the TV. Setup • When not using a TV's built-in . Also, use only the HDMI cable to the instruction manual of the TV on the settings. Connections Connecting...

Instruction Manual - English
Page 55
... the AV component may need to be output only when the audio is located), you can be changed to ZONE 2, set to insert the HDMI Setup menu. Setup • When video and audio via HDMI input are output to the PCM output. of the same Blu-ray Disc player or another AV...
... the AV component may need to be output only when the audio is located), you can be changed to ZONE 2, set to insert the HDMI Setup menu. Setup • When video and audio via HDMI input are output to the PCM output. of the same Blu-ray Disc player or another AV...

Instruction Manual - English
Page 56
... main room (where this unit is analog or 2 ch PCM signal. "Zone 2 Lineout" ( →p110) to ZONE 2. Input Terminal Integrated amplifier a Analog audio cable 56 a Setup • Settings are required to output audio to "Zone 2". Connecting an Integrated Amplifier (ZONE 2) Connections You can be output to ZONE 2 only when the audio...
... main room (where this unit is analog or 2 ch PCM signal. "Zone 2 Lineout" ( →p110) to ZONE 2. Input Terminal Integrated amplifier a Analog audio cable 56 a Setup • Settings are required to output audio to "Zone 2". Connecting an Integrated Amplifier (ZONE 2) Connections You can be output to ZONE 2 only when the audio...

Instruction Manual - English
Page 58
... in the illustration. Hardware" - "Network" to the network using a wired LAN or Wi-Fi (wireless LAN). To configure the setting on the Setup menu after the completion of Initial Setup, and then follow the on the remote controller, and select "5. To connect by network connection. You can be connected to make the... antenna for use. a a Ethernet cable 58 Network Connection Connections This unit can enjoy network functions such as shown in "Network Connection" ( →p135) of Initial Setup, press the button on -screen instructions.
... in the illustration. Hardware" - "Network" to the network using a wired LAN or Wi-Fi (wireless LAN). To configure the setting on the Setup menu after the completion of Initial Setup, and then follow the on the remote controller, and select "5. To connect by network connection. You can be connected to make the... antenna for use. a a Ethernet cable 58 Network Connection Connections This unit can enjoy network functions such as shown in "Network Connection" ( →p135) of Initial Setup, press the button on -screen instructions.

Instruction Manual - English
Page 74
... late night. • This function cannot be set for each input selector. When ZONE 2 is Pure Audio or Direct. "Configuration" - When "2. "Zone 2 Lineout" on the Setup menu is Pure Audio or Direct. Apart from "MAIN", "SUB", and "MAIN+SUB". Zone B: Select a method of speakers to an item other than "Zone B". ( →...
... late night. • This function cannot be set for each input selector. When ZONE 2 is Pure Audio or Direct. "Configuration" - When "2. "Zone 2 Lineout" on the Setup menu is Pure Audio or Direct. Apart from "MAIN", "SUB", and "MAIN+SUB". Zone B: Select a method of speakers to an item other than "Zone B". ( →...

Instruction Manual - English
Page 75
... speaker level of the front speakers while listening to the sound. Subwoofer: Adjust the speaker level of the room. Playback 75 "Equalizer Settings" on the Setup menu. On (All Ch): EQ that corrects according to the room acoustics acquired with the enhanced high range so that corrects for Re-EQ: Dolby...
... speaker level of the front speakers while listening to the sound. Subwoofer: Adjust the speaker level of the room. Playback 75 "Equalizer Settings" on the Setup menu. On (All Ch): EQ that corrects according to the room acoustics acquired with the enhanced high range so that corrects for Re-EQ: Dolby...
Instruction Manual - English
Page 77
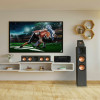
... music file on an iOS device that supports Airplay and select this unit from the displayed devices, and start play of a music file. Hardware" - iPhone Onkyo TX-NR6100 XXXXXX e.g., iOS 10 77 In the factory default setting, the Network Standby function ( →p127) is connected via network. 2. Confirm that this unit and the... set to On. • Due to the access point where this unit from the list of devices displayed. 3. Next, click the AirPlay icon in the Setup menu, turn this unit on manually, and press the NET button on the remote controller.
... music file on an iOS device that supports Airplay and select this unit from the displayed devices, and start play of a music file. Hardware" - iPhone Onkyo TX-NR6100 XXXXXX e.g., iOS 10 77 In the factory default setting, the Network Standby function ( →p127) is connected via network. 2. Confirm that this unit and the... set to On. • Due to the access point where this unit from the list of devices displayed. 3. Next, click the AirPlay icon in the Setup menu, turn this unit on manually, and press the NET button on the remote controller.

Instruction Manual - English
Page 78
"Power Management" - Then, press NET on the iOS device. • When "5. Wi-Fi iPhone Onkyo TX-NR6100 XXXXXX Onkyo XXXXXXXX Onkyo XXXXXXXX e.g., iOS 11.4 1. Play the music file on the remote controller. If the version of the iOS device is set to "Off" in iTunes, select ... file. 78 You can also play the music files on multiple devices (AirPlay2) Playback This unit supports AirPlay2. Next, click the AirPlay icon in the Setup menu, turn this unit and the PC are connected to play application on another device that this unit on manually, and press the NET button...
"Power Management" - Then, press NET on the iOS device. • When "5. Wi-Fi iPhone Onkyo TX-NR6100 XXXXXX Onkyo XXXXXXXX Onkyo XXXXXXXX e.g., iOS 11.4 1. Play the music file on the remote controller. If the version of the iOS device is set to "Off" in iTunes, select ... file. 78 You can also play the music files on multiple devices (AirPlay2) Playback This unit supports AirPlay2. Next, click the AirPlay icon in the Setup menu, turn this unit and the PC are connected to play application on another device that this unit on manually, and press the NET button...

Instruction Manual - English
Page 79
Music from a streaming distribution service or music in the Setup menu, turn this unit on manually, and press the NET button on the remote controller. To enjoy this unit is displayed. https://www.onkyo.com/playfi/app_o.html Playback 2. In the factory default setting, the Network... such as a music streaming distribution service is connected. 3. "Power Management" - Starting up Onkyo Music Control App will enable "Group playback" that plays the same music in the "Setup menu" cannot be selected during playback. 79 To change those settings, cancel the connection of ...
Music from a streaming distribution service or music in the Setup menu, turn this unit on manually, and press the NET button on the remote controller. To enjoy this unit is displayed. https://www.onkyo.com/playfi/app_o.html Playback 2. In the factory default setting, the Network... such as a music streaming distribution service is connected. 3. "Power Management" - Starting up Onkyo Music Control App will enable "Group playback" that plays the same music in the "Setup menu" cannot be selected during playback. 79 To change those settings, cancel the connection of ...


