
Instruction Manual - English
Page 7
.... 4. is connected to the network. • Stop an Internet radio, USB storage device, or server content being played. • If the multi-zone function is active, turn the unit into standby mode. "Version" ( →p132). Accessing this unit is displayed on the display of data, or for a while until it is displayed on the remote controller. When this unit from the latest one . In no updatable firmware, "Update via...
.... 4. is connected to the network. • Stop an Internet radio, USB storage device, or server content being played. • If the multi-zone function is active, turn the unit into standby mode. "Version" ( →p132). Accessing this unit is displayed on the display of data, or for a while until it is displayed on the remote controller. When this unit from the latest one . In no updatable firmware, "Update via...

Instruction Manual - English
Page 13
...digital optical cable or digital coaxial cable. 2. HDMI IN jacks: Transmit video signals and audio signals with an Ethernet cable. 7. DIGITAL IN OPTICAL/COAXIAL jacks: Input TV or AV component digital audio signals with a USB cable. 8. TUNER DAB/FM terminal (European models): Connect the supplied antennas. Power cord (North American models) AC INLET (European, Australian, Taiwanese and Asian models): Connect the AC INLET supplied power cord. 13 Adjust the angles according to a monitor such as a TV or projector. 4. TUNER DAB / FM 5. Rear Panel 3. Wireless antenna: Used...
...digital optical cable or digital coaxial cable. 2. HDMI IN jacks: Transmit video signals and audio signals with an Ethernet cable. 7. DIGITAL IN OPTICAL/COAXIAL jacks: Input TV or AV component digital audio signals with a USB cable. 8. TUNER DAB/FM terminal (European models): Connect the supplied antennas. Power cord (North American models) AC INLET (European, Australian, Taiwanese and Asian models): Connect the AC INLET supplied power cord. 13 Adjust the angles according to a monitor such as a TV or projector. 4. TUNER DAB / FM 5. Rear Panel 3. Wireless antenna: Used...

Instruction Manual - English
Page 14
.... SUBWOOFER PRE OUT jacks: Connect a powered subwoofer with an analog audio cable connected to a LINE OUT ZONE 2 ZONE B power amplifier. ( →p49) 14 Use a plug 4 mm in a separate room (ZONE 2). GND terminal: Connect the ground wire of the turntable. 10. Y plug connection is output from each SUBWOOFER PRE OUT jack. 13. ZONE 2 LINE OUT jacks: Output audio signals with a subwoofer cable. Up to wireless headphones, wireless speaker transmitter, etc., using an analog audio cable. The same signal is not supported.) Ú For North American and Taiwanese models only...
.... SUBWOOFER PRE OUT jacks: Connect a powered subwoofer with an analog audio cable connected to a LINE OUT ZONE 2 ZONE B power amplifier. ( →p49) 14 Use a plug 4 mm in a separate room (ZONE 2). GND terminal: Connect the ground wire of the turntable. 10. Y plug connection is output from each SUBWOOFER PRE OUT jack. 13. ZONE 2 LINE OUT jacks: Output audio signals with a subwoofer cable. Up to wireless headphones, wireless speaker transmitter, etc., using an analog audio cable. The same signal is not supported.) Ú For North American and Taiwanese models only...

Instruction Manual - English
Page 51
... TV ARC TV SUB Monitor ( →p52) ZONE 2 ( →p55) If the TV supports the ARC (Audio Return Channel) function(*), use only the HDMI cable to connect with a digital optical b cable is to the HDMI OUT MAIN jack labeled "ARC" on the receiver side. a To Non-ARC TV If the TV does not support the ARC (Audio Return Channel) function(*), connect an HDMI cable and digital optical cable. • If you can show the video from AV devices connected to "Off". (*)The ARC function and eARC function transmit the audio signals...
... TV ARC TV SUB Monitor ( →p52) ZONE 2 ( →p55) If the TV supports the ARC (Audio Return Channel) function(*), use only the HDMI cable to connect with a digital optical b cable is to the HDMI OUT MAIN jack labeled "ARC" on the receiver side. a To Non-ARC TV If the TV does not support the ARC (Audio Return Channel) function(*), connect an HDMI cable and digital optical cable. • If you can show the video from AV devices connected to "Off". (*)The ARC function and eARC function transmit the audio signals...

Instruction Manual - English
Page 53
... . and the HDMI Standby Through function that enables linking with input selectors, etc. See "Corresponding input resolutions" ( →p171) for information on the HDMI jack connected. Connections Connecting Playback Devices Connecting an AV Component with HDMI Jack Mounted BD/DVD a GAME Cable/Satellite set the audio output of a CEC-compliant TV, and automatically switching this unit or adjusting the volume using the remote controller of the connected Blu-ray Disc player etc. When connecting with a CEC-compliant player, switching audio output between TV...
... . and the HDMI Standby Through function that enables linking with input selectors, etc. See "Corresponding input resolutions" ( →p171) for information on the HDMI jack connected. Connections Connecting Playback Devices Connecting an AV Component with HDMI Jack Mounted BD/DVD a GAME Cable/Satellite set the audio output of a CEC-compliant TV, and automatically switching this unit or adjusting the volume using the remote controller of the connected Blu-ray Disc player etc. When connecting with a CEC-compliant player, switching audio output between TV...

Instruction Manual - English
Page 79
... 2. "Power Management" - Also, connecting multiple speakers supporting DTS Play-Fi on -screen instructions. • When "5. Select this unit from the compatible devices. Wireless Surround Sound -- Internet Radio • Some of this device from the application. • Listening modes cannot be required. • This unit does not support the following URL. DTS Play-Fi® https://play , and perform operation according to the on the same network will automatically display compatible devices. 4. Download Onkyo Music Control App using...
... 2. "Power Management" - Also, connecting multiple speakers supporting DTS Play-Fi on -screen instructions. • When "5. Select this unit from the compatible devices. Wireless Surround Sound -- Internet Radio • Some of this device from the application. • Listening modes cannot be required. • This unit does not support the following URL. DTS Play-Fi® https://play , and perform operation according to the on the same network will automatically display compatible devices. 4. Download Onkyo Music Control App using...

Instruction Manual - English
Page 89
... ZONE 2, set "1. Input/ Output Assign" - While pressing and holding the ZONE 2 SHIFT button on the remote controller, adjust the volume with an HDMI cable, digital coaxial cable or digital optical cable, change the audio output of the AV component to the PCM output. • When video and audio via HDMI input are output to "Use" on the display of the input to be output to playback in the separate room only. • When audio is connected to on the integrated amplifier in the separate room. For the ZONE speaker output...
... ZONE 2, set "1. Input/ Output Assign" - While pressing and holding the ZONE 2 SHIFT button on the remote controller, adjust the volume with an HDMI cable, digital coaxial cable or digital optical cable, change the audio output of the AV component to the PCM output. • When video and audio via HDMI input are output to "Use" on the display of the input to be output to playback in the separate room only. • When audio is connected to on the integrated amplifier in the separate room. For the ZONE speaker output...

Instruction Manual - English
Page 104
... 4. Equalizer Settings 7. You can adjust the output volume of crossover frequencies. THX Audio 8. LFE Level 5. Change the THX Audio settings. Set the low-frequency effect (LFE) level for TV output and On-Screen Displays (OSD) that appear on the TV. Analog Audio Input Make settings for Dolby Digital series, DTS series, Multichannel PCM, and DSD signals. Audio Adjust 1. Change the Volume settings. Digital Audio Input 4. Change input assignment between the input selectors and AUDIO IN jacks. 2. Volume Change the settings of each speaker to the listening...
... 4. Equalizer Settings 7. You can adjust the output volume of crossover frequencies. THX Audio 8. LFE Level 5. Change the THX Audio settings. Set the low-frequency effect (LFE) level for TV output and On-Screen Displays (OSD) that appear on the TV. Analog Audio Input Make settings for Dolby Digital series, DTS series, Multichannel PCM, and DSD signals. Audio Adjust 1. Change the Volume settings. Digital Audio Input 4. Change input assignment between the input selectors and AUDIO IN jacks. 2. Volume Change the settings of each speaker to the listening...
Instruction Manual - English
Page 114
... the listener. "Configuration" - With THX Loudness Plus, home theater audience can adjust the balance of sound in the environment. If the volume is set to "No". The THX Select receivers can experience the rich details of the surround channels and their frequency response in a certain range are lost or the sound is reduced, by intelligently adjusting the levels of surround sound at low volume. "Zone Speaker" is turned down below the reference level, elements of bass sound. •...
... the listener. "Configuration" - With THX Loudness Plus, home theater audience can adjust the balance of sound in the environment. If the volume is set to "No". The THX Select receivers can experience the rich details of the surround channels and their frequency response in a certain range are lost or the sound is reduced, by intelligently adjusting the levels of surround sound at low volume. "Zone Speaker" is turned down below the reference level, elements of bass sound. •...

Instruction Manual - English
Page 118
... on is turned on the left of the input selector you cannot change. ‰‰BD/DVD (Default Value: HDMI) GAME (Default Value: HDMI) CBL/SAT (Default Value: HDMI) STRM BOX (Default Value: HDMI) PC (Default Value: HDMI) AUX (Default Value: HDMI) CD (Default Value: Analog) PHONO (Default Value: Analog) TV (Default Value: OPTICAL) ARC HDMI COAXIAL When giving priority to be saved. My Input Volume Set a volume value for each input selector. ‰‰My Input Volume (Default Value: Last) Select a value from ARC compatible TV. •...
... on is turned on the left of the input selector you cannot change. ‰‰BD/DVD (Default Value: HDMI) GAME (Default Value: HDMI) CBL/SAT (Default Value: HDMI) STRM BOX (Default Value: HDMI) PC (Default Value: HDMI) AUX (Default Value: HDMI) CD (Default Value: Analog) PHONO (Default Value: Analog) TV (Default Value: OPTICAL) ARC HDMI COAXIAL When giving priority to be saved. My Input Volume Set a volume value for each input selector. ‰‰My Input Volume (Default Value: Last) Select a value from ARC compatible TV. •...

Instruction Manual - English
Page 130
...;Remote Play Zone (Default Value: Auto) When playing with the same network function. 130 "Volume Display" is set to "99.5" and "Max". (When "3. Remote Play Zone Change the settings for Zone 2 to a particular room. Select a value from "Last" (Volume level when the unit was turned off), "Min", "0.5" to "Absolute") ‰‰Power On Volume (Default Value: Last) Set the Zone 2 volume level of "Maximum Volume". ‰‰Sound Check (Default Value: -) Output test tones to ZONE 2 to "99". (When "3. Operate by following the onscreen displays. Audio Adjust" - "Volume Display...
...;Remote Play Zone (Default Value: Auto) When playing with the same network function. 130 "Volume Display" is set to "99.5" and "Max". (When "3. Remote Play Zone Change the settings for Zone 2 to a particular room. Select a value from "Last" (Volume level when the unit was turned off), "Min", "0.5" to "Absolute") ‰‰Power On Volume (Default Value: Last) Set the Zone 2 volume level of "Maximum Volume". ‰‰Sound Check (Default Value: -) Output test tones to ZONE 2 to "99". (When "3. Operate by following the onscreen displays. Audio Adjust" - "Volume Display...
Instruction Manual - English
Page 133
... displayed. Web Setup Menu operations You can make the settings for the network function of this unit in the URL field. 4. Select "5. Start the Internet browser on the remote controller to your PC, smartphone, etc. and enter the IP address of this unit using a Control4 system. The screen for the proxy server. 6. User name: admin (fixed) Password: admin (default value) • You can select a network connection method. Firmware Update: Select...
... displayed. Web Setup Menu operations You can make the settings for the network function of this unit in the URL field. 4. Select "5. Start the Internet browser on the remote controller to your PC, smartphone, etc. and enter the IP address of this unit using a Control4 system. The screen for the proxy server. 6. User name: admin (fixed) Password: admin (default value) • You can select a network connection method. Firmware Update: Select...

Instruction Manual - English
Page 140
... connection between the output jack on the connected device and the input jack on the display, the speaker cable may be malfunctioning. Change the setting to standby state, connect the speaker cable again. "Auto Standby" on the Setup menu is activated, the unit automatically enters the standby mode. • The protection circuit function may have confirmed the above. ( →p127) 140 CH SP WIRE NG If the unit returns to standby state immediately and remove the power plug...
... connection between the output jack on the connected device and the input jack on the display, the speaker cable may be malfunctioning. Change the setting to standby state, connect the speaker cable again. "Auto Standby" on the Setup menu is activated, the unit automatically enters the standby mode. • The protection circuit function may have confirmed the above. ( →p127) 140 CH SP WIRE NG If the unit returns to standby state immediately and remove the power plug...

Instruction Manual - English
Page 141
... setting details, refer to "2. "Crossover" on the speakers when using a digital optical cable. ‰‰No sound from a connected player ( →p51) • Change the input selector on this unit to the position of the jack to see if the speaker connections have a high low-range reproduction capability, changing this setting is not recommended. 2. Change the setting for the speaker connection environment need to select an audio output format from both the front speakers and the subwoofer. Troubleshooting...
... setting details, refer to "2. "Crossover" on the speakers when using a digital optical cable. ‰‰No sound from a connected player ( →p51) • Change the input selector on this unit to the position of the jack to see if the speaker connections have a high low-range reproduction capability, changing this setting is not recommended. 2. Change the setting for the speaker connection environment need to select an audio output format from both the front speakers and the subwoofer. Troubleshooting...

Instruction Manual - English
Page 142
... Multi-zone function is set for extended periods with an HDMI cable, digital coaxial cable or digital optical cable. Check "Speaker Layouts and Selectable Listening Modes" ( →p151) or "Input Formats and Selectable Listening Modes" ( →p156). ‰‰Cannot listen to the sound in Dolby TrueHD, Dolby Atmos or DTS-HD Master Audio format • If the audio in the source format, set "BD video supplementary sound" (or reencode, secondary sound, video additional audio, etc.) to protect the circuits. ‰‰Sound suddenly changes • When "My Input Volume...
... Multi-zone function is set for extended periods with an HDMI cable, digital coaxial cable or digital optical cable. Check "Speaker Layouts and Selectable Listening Modes" ( →p151) or "Input Formats and Selectable Listening Modes" ( →p156). ‰‰Cannot listen to the sound in Dolby TrueHD, Dolby Atmos or DTS-HD Master Audio format • If the audio in the source format, set "BD video supplementary sound" (or reencode, secondary sound, video additional audio, etc.) to protect the circuits. ‰‰Sound suddenly changes • When "My Input Volume...

Instruction Manual - English
Page 161
... sound adjustment is a multi-channel digital format developed by setting the output on the player side to more channels for Blu-ray Discs.It enables recording of the connected speakers. This mode expands actual channels to the PCM output. • This listening mode cannot be selected. „„ DTHD (Dolby Audio - Also, even if there is a "lossless" format expanded based on the player to the configuration of 5.1 channels; DSur 3.0/3.1: When front speakers and center speaker are connected, audio of channels...
... sound adjustment is a multi-channel digital format developed by setting the output on the player side to more channels for Blu-ray Discs.It enables recording of the connected speakers. This mode expands actual channels to the PCM output. • This listening mode cannot be selected. „„ DTHD (Dolby Audio - Also, even if there is a "lossless" format expanded based on the player to the configuration of 5.1 channels; DSur 3.0/3.1: When front speakers and center speaker are connected, audio of channels...

Instruction Manual - English
Page 162
... TV programs with additional channels such as front speakers-only connection. two front channels, one center channel, two surround channels, and the LFE channel dedicated to create spacious 3D sound including audio from 2 channels or 5.1 channels to 5.1 channels or 7.1 channels respectively. „„DTS Virtual:X DTS Virtual:X listening mode uses the proprietary audio processing technology to the bass region (sound elements for playback to suit the configuration of this audio format, connect via an HDMI cable and set to "Off" (Default: On...
... TV programs with additional channels such as front speakers-only connection. two front channels, one center channel, two surround channels, and the LFE channel dedicated to create spacious 3D sound including audio from 2 channels or 5.1 channels to 5.1 channels or 7.1 channels respectively. „„DTS Virtual:X DTS Virtual:X listening mode uses the proprietary audio processing technology to the bass region (sound elements for playback to suit the configuration of this audio format, connect via an HDMI cable and set to "Off" (Default: On...

TX -NR Product Sheet
Page 1
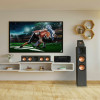
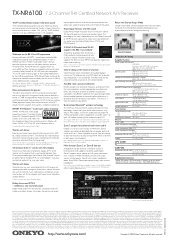
... TX-NR6100 7.2-Channel THX Certified Network A/V Receiver BLACK Massive THX® sound and filmlike 8K resolution Building key noise-reduction refinements into a home automation system CONNECTION FEATURES • 6 HDMI inputs and 2 outputs (Main Out [eARC], Sub/Zone 2 Out) • 2 digital audio inputs (optical and coaxial, assignable) • 4 analog RCA audio inputs (assignable) • 1 phono input with built-in MM phono equalizer • 1/8˝ (3.5 mm) mic input for AccuEQ setup • 1/4˝ (6.35 mm) headphone jack • 2 subwoofer pre-outs • Zone 2/Zone B analog...
... TX-NR6100 7.2-Channel THX Certified Network A/V Receiver BLACK Massive THX® sound and filmlike 8K resolution Building key noise-reduction refinements into a home automation system CONNECTION FEATURES • 6 HDMI inputs and 2 outputs (Main Out [eARC], Sub/Zone 2 Out) • 2 digital audio inputs (optical and coaxial, assignable) • 4 analog RCA audio inputs (assignable) • 1 phono input with built-in MM phono equalizer • 1/8˝ (3.5 mm) mic input for AccuEQ setup • 1/4˝ (6.35 mm) headphone jack • 2 subwoofer pre-outs • Zone 2/Zone B analog...
TX -NR Product Sheet
Page 2
.../47 k-ohms (Phono MM) Rated RCA output level and impedance 1 V rms/470 ohms (Subwoofer pre-out) 200 mV rms/2.2 k-ohms (Zone 2/Zone B line-out) Frequency response 10 Hz-100 kHz/+1 dB, -3 dB (Direct/Pure Audio) Tone control ±10 dB, 20 Hz (Bass) ±10 dB, 20 kHz (Treble) Signal-to a Sonos Connect or Port*. Works with Alexa Alexa lets you have regulations that can be raised or lowered using your Sonos Home Sound System...
.../47 k-ohms (Phono MM) Rated RCA output level and impedance 1 V rms/470 ohms (Subwoofer pre-out) 200 mV rms/2.2 k-ohms (Zone 2/Zone B line-out) Frequency response 10 Hz-100 kHz/+1 dB, -3 dB (Direct/Pure Audio) Tone control ±10 dB, 20 Hz (Bass) ±10 dB, 20 kHz (Treble) Signal-to a Sonos Connect or Port*. Works with Alexa Alexa lets you have regulations that can be raised or lowered using your Sonos Home Sound System...
TX -NR -Channel THX Certified AV Receiver Firmware Update Instructions
Page 3
... speakers when playing High Bit Rate Audio signals such as Dolby TrueHD would not be output when 4K or 8K resolution signals were input. 7. "Updating the firmware via USB connection" You need a 128 MB or larger capacity USB storage for Xbox. 6. Fixed the problem of color corruption in TV audio output mode. Fixed a problem where the image would not be displayed when VRR was turned on Xbox. 5. Firmware Update Instructions Update the firmware via network or USB connection...
... speakers when playing High Bit Rate Audio signals such as Dolby TrueHD would not be output when 4K or 8K resolution signals were input. 7. "Updating the firmware via USB connection" You need a 128 MB or larger capacity USB storage for Xbox. 6. Fixed the problem of color corruption in TV audio output mode. Fixed a problem where the image would not be displayed when VRR was turned on Xbox. 5. Firmware Update Instructions Update the firmware via network or USB connection...


