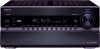
Owner Manual
Page 5
... Remote Control Codes 93 Remote Control Codes for Onkyo Components Connected via V 93 Resetting REMOTE MODE Buttons 94 Resetting the Remote Controller 94 Controlling Other Components 94 Activities Setup 96 Learning Commands 97 Using Normal Macros 98 Others Troubleshooting 99 Specifications (TX-NR5008 105 Specifications (TX-NR3008 107 About HDMI 109 Using an RIHD-compatible TV, Player, or Recorder ... 110 Firmware Update 112 Updating the Firmware via Network 112 Updating the Firmware via USB 113 Video Resolution Chart 115 To reset the AV receiver to its factory defaults, turn...
... Remote Control Codes 93 Remote Control Codes for Onkyo Components Connected via V 93 Resetting REMOTE MODE Buttons 94 Resetting the Remote Controller 94 Controlling Other Components 94 Activities Setup 96 Learning Commands 97 Using Normal Macros 98 Others Troubleshooting 99 Specifications (TX-NR5008 105 Specifications (TX-NR3008 107 About HDMI 109 Using an RIHD-compatible TV, Player, or Recorder ... 110 Firmware Update 112 Updating the Firmware via Network 112 Updating the Firmware via USB 113 Video Resolution Chart 115 To reset the AV receiver to its factory defaults, turn...

Owner Manual
Page 6
... Direct for Super Audio CD Connections • 8 HDMI*8 Inputs (1 on front panel) and 2 Outputs • Onkyo Q for System Control • (TX-NR5008) 7 Digital Inputs (4 Optical/3 Coaxial) • (TX-NR3008) 6 Digital Inputs (3 Optical/3 Coaxial) • Component Video Switching (3 Inputs/1 Output) • Universal Port for the Optional Dock for iPod*9/HD Radio™*10 tuner module (North American models)/ DAB+ tuner module (European and Asian models) • 2 Independent Subwoofer Pre Outs • Banana Plug-Compatible Speaker Posts*11 • Powered Zone 2/3 • Internet Radio...
... Direct for Super Audio CD Connections • 8 HDMI*8 Inputs (1 on front panel) and 2 Outputs • Onkyo Q for System Control • (TX-NR5008) 7 Digital Inputs (4 Optical/3 Coaxial) • (TX-NR3008) 6 Digital Inputs (3 Optical/3 Coaxial) • Component Video Switching (3 Inputs/1 Output) • Universal Port for the Optional Dock for iPod*9/HD Radio™*10 tuner module (North American models)/ DAB+ tuner module (European and Asian models) • 2 Independent Subwoofer Pre Outs • Banana Plug-Compatible Speaker Posts*11 • Powered Zone 2/3 • Internet Radio...

Owner Manual
Page 13
.... The speakers are bi-amped, front speakers A can be wired normally. Similarly, if front speakers B are configured by using the "Speaker Setup" (➔ 50). Speaker Configuration Subwoofer Front Center Surround Surround Back Not Use Use Not Use Not Use Not Use Speakers B 2-1. Speaker Configuration Subwoofer Front Center Surround Surround Back Use Use Use Use Not Use Speakers A 2-2. You could, for example, use Speakers A when watching a DVD movie with 7.2-channels surround sound and use Speakers B for serious music listening with a pair of high-power stereo speakers, the...
.... The speakers are bi-amped, front speakers A can be wired normally. Similarly, if front speakers B are configured by using the "Speaker Setup" (➔ 50). Speaker Configuration Subwoofer Front Center Surround Surround Back Not Use Use Not Use Not Use Not Use Speakers B 2-1. Speaker Configuration Subwoofer Front Center Surround Surround Back Use Use Use Use Not Use Speakers A 2-2. You could, for example, use Speakers A when watching a DVD movie with 7.2-channels surround sound and use Speakers B for serious music listening with a pair of high-power stereo speakers, the...

Owner Manual
Page 23
... appropriate remote control code first (➔ 93). You must assign it to an input selector. If your turntable's manual for the multichannel input, see "Subwoofer Input Sensitivity" (➔ 50). • The AV receiver can output audio and video signals from the AUX INPUT jacks to the VCR/DVR OUT jacks. • With connection %, you can use the following special functions: ■ Auto Power On When you start playback on a component connected via V, the AV receiver automatically selects that component...
... appropriate remote control code first (➔ 93). You must assign it to an input selector. If your turntable's manual for the multichannel input, see "Subwoofer Input Sensitivity" (➔ 50). • The AV receiver can output audio and video signals from the AUX INPUT jacks to the VCR/DVR OUT jacks. • With connection %, you can use the following special functions: ■ Auto Power On When you start playback on a component connected via V, the AV receiver automatically selects that component...

Owner Manual
Page 28
... volume, use the MASTER VOLUME control. 4 Select a listening mode and enjoy! If the input signal is PCM, the sampling frequency is displayed. See also: • "Controlling Other Components" (➔ 91) • "Controlling iPod" (➔ 86) • "Listening to cycle through the available information. The following information can adjust the brightness of the AV receiver's display. Tip • Alternatively, you can determine the language used for about the current input source as follows. (Components connected to the UNIVERSAL PORT jack...
... volume, use the MASTER VOLUME control. 4 Select a listening mode and enjoy! If the input signal is PCM, the sampling frequency is displayed. See also: • "Controlling Other Components" (➔ 91) • "Controlling iPod" (➔ 86) • "Listening to cycle through the available information. The following information can adjust the brightness of the AV receiver's display. Tip • Alternatively, you can determine the language used for about the current input source as follows. (Components connected to the UNIVERSAL PORT jack...

Owner Manual
Page 33
...: Auto Setup - - Close windows, televisions, radios, air conditioners, fluorescent lights, home appliances, light dimmers, or other devices. On the TV, select the input to which played through each speaker as possible. SETUP MIC jack Speaker setup microphone The speaker setting menu appears. 3 When you set "Subwoofer" to the next step. 5 Press ENTER. Use the volume control on the AV receiver and the connected TV. When the "Subwoofer" setting is lower than 75 dB, leave the subwoofer's volume control at the Main Listening...
...: Auto Setup - - Close windows, televisions, radios, air conditioners, fluorescent lights, home appliances, light dimmers, or other devices. On the TV, select the input to which played through each speaker as possible. SETUP MIC jack Speaker setup microphone The speaker setting menu appears. 3 When you set "Subwoofer" to the next step. 5 Press ENTER. Use the volume control on the AV receiver and the connected TV. When the "Subwoofer" setting is lower than 75 dB, leave the subwoofer's volume control at the Main Listening...
Owner Manual
Page 50
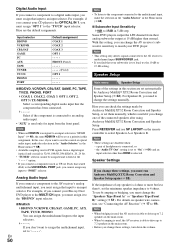
... bi-amping is used only for input from a digital input (optical and coaxial) is 32/44.1/48/88.2/96 kHz/16, 20, 24 bit. • "TUNER" selector cannot be set as UP-A1 Dock that seated iPod) to the UNIVERSAL PORT jack, you want to assign the multichannel input, set the minimum speaker impedance to 4 ohms. To use the coaxial or optical audio input, make the selection in the "Audio Selector" in the Home menu (➔ 68). ■ Subwoofer Input Sensitivity...
... bi-amping is used only for input from a digital input (optical and coaxial) is 32/44.1/48/88.2/96 kHz/16, 20, 24 bit. • "TUNER" selector cannot be set as UP-A1 Dock that seated iPod) to the UNIVERSAL PORT jack, you want to assign the multichannel input, set the minimum speaker impedance to 4 ohms. To use the coaxial or optical audio input, make the selection in the "Audio Selector" in the Home menu (➔ 68). ■ Subwoofer Input Sensitivity...

Owner Manual
Page 54
... can adjust the sound and listening modes as Dolby Digital, or 2-channel analog/PCM source in the Mono listening mode. Note • This setting is fixed at "Yes" if "Loudness Plus" is output. ` Main/Sub: Both the main and sub channels are tailored to apply the proper THX Loudness Plus settings for playing any THX listening mode. Input Channel ` Main: The main channel is output. ` Sub: The sub channel is set to "Yes". ■ Loudness Plus ` Off: Select this to turn on BGC. woofer...
... can adjust the sound and listening modes as Dolby Digital, or 2-channel analog/PCM source in the Mono listening mode. Note • This setting is fixed at "Yes" if "Loudness Plus" is output. ` Main/Sub: Both the main and sub channels are tailored to apply the proper THX Loudness Plus settings for playing any THX listening mode. Input Channel ` Main: The main channel is output. ` Sub: The sub channel is set to "Yes". ■ Loudness Plus ` Off: Select this to turn on BGC. woofer...

Owner Manual
Page 55
... different content or source components, freeing the user from the center speaker when using the Dolby Pro Logic IIx Music listening mode. This setting controls the front left channel is output. ` Right: Only the right channel is set to "Off" and "Equalizer" setting will be selected. ■ Dolby EX This setting determines how Dolby EX encoded signals are handled. Also, by only the center speaker. (If you're not using a center speaker, the center channel sound is output by adjusting the frequency balance according to...
... different content or source components, freeing the user from the center speaker when using the Dolby Pro Logic IIx Music listening mode. This setting controls the front left channel is output. ` Right: Only the right channel is set to "Off" and "Equalizer" setting will be selected. ■ Dolby EX This setting determines how Dolby EX encoded signals are handled. Also, by only the center speaker. (If you're not using a center speaker, the center channel sound is output by adjusting the frequency balance according to...

Owner Manual
Page 57
... "Subwoofer" setting is selected. ■ Dynamic EQ ` Off: Audyssey Dynamic EQ® off. ` On: Audyssey Dynamic EQ on the display. It does so by selecting the correct frequency response and surround volume levels moment-by Audyssey MultEQ XT32 will light (➔ 9). This setting determines whether or not analog audio signals (bass signals) are output. The Dynamic EQ indicator will play at low volume levels. A home theater system automatically calibrated by -moment so that level you have selected "Yes", only DAC Direct will be adjusted while Speakers...
... "Subwoofer" setting is selected. ■ Dynamic EQ ` Off: Audyssey Dynamic EQ® off. ` On: Audyssey Dynamic EQ on the display. It does so by selecting the correct frequency response and surround volume levels moment-by Audyssey MultEQ XT32 will light (➔ 9). This setting determines whether or not analog audio signals (bass signals) are output. The Dynamic EQ indicator will play at low volume levels. A home theater system automatically calibrated by -moment so that level you have selected "Yes", only DAC Direct will be adjusted while Speakers...

Owner Manual
Page 58
... gradual adjustments to surround sound content. Dynamic EQ selects the correct frequency response and surround levels moment-by-moment at the preferred volume setting by taking into Dynamic Volume so that as volume is bass response, tonal balance, and surround impression that remain constant despite changes in real time to provide well-balanced sound for every listener at any userselected volume setting. The result is decreased by the user and then monitors...
... gradual adjustments to surround sound content. Dynamic EQ selects the correct frequency response and surround levels moment-by-moment at the preferred volume setting by taking into Dynamic Volume so that as volume is bass response, tonal balance, and surround impression that remain constant despite changes in real time to provide well-balanced sound for every listener at any userselected volume setting. The result is decreased by the user and then monitors...

Owner Manual
Page 62
... Dolby Digital or DTS. ■ Dolby D/Dolby D Plus/TrueHD With this setting, you can be available. Specifies the default listening mode for multichannel PCM sources from HDMI IN such as DVD-Audio, and DSD multichannel sources such as UP-A1 series Dock that seated iPod) to the UNIVERSAL PORT jack, you want to reset to the default value. Listening Mode Preset 1. CBL/SAT 4. For "NET/USB" input source only "Digital" will be selected automatically when you can assign only listening modes for the analog sound...
... Dolby Digital or DTS. ■ Dolby D/Dolby D Plus/TrueHD With this setting, you can be available. Specifies the default listening mode for multichannel PCM sources from HDMI IN such as DVD-Audio, and DSD multichannel sources such as UP-A1 series Dock that seated iPod) to the UNIVERSAL PORT jack, you want to reset to the default value. Listening Mode Preset 1. CBL/SAT 4. For "NET/USB" input source only "Digital" will be selected automatically when you can assign only listening modes for the analog sound...

Owner Manual
Page 64
...'re listening through your TV's speakers (➔ 21), if you turn up the AV receiver's volume control, the sound will be output by the HDMI Lip Sync function on the A/V Sync screen. • If the "Monitor Out" setting is output from the HDMI output. Changing the Remote Controller's ID 1 While holding down RECEIVER, press and hold down the AV receiver's volume. • If the "Monitor Out" setting is set to HDMI OUT SUB. It's not available if "SAT Radio Mode" is set to...
...'re listening through your TV's speakers (➔ 21), if you turn up the AV receiver's volume control, the sound will be output by the HDMI Lip Sync function on the A/V Sync screen. • If the "Monitor Out" setting is output from the HDMI output. Changing the Remote Controller's ID 1 While holding down RECEIVER, press and hold down the AV receiver's volume. • If the "Monitor Out" setting is set to HDMI OUT SUB. It's not available if "SAT Radio Mode" is set to...
Owner Manual
Page 65
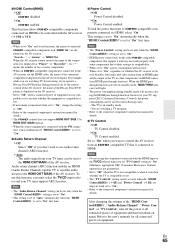
... Control", turn off the power to the TV or other components via the HDMI cable, the name of two or more component). • When an Q-compatible component is connected to the AV receiver via HDMI connection (HDMI pass through function; Audio return channel (ARC) function enables an HDMI (Audio Return Channel) capable TV to send the audio stream to the user's manuals for details. Use HDMI OUT MAIN instead. • When the source equipment is set to HDMI. Note • Do not assign the component connected with...
... Control", turn off the power to the TV or other components via the HDMI cable, the name of two or more component). • When an Q-compatible component is connected to the AV receiver via HDMI connection (HDMI pass through function; Audio return channel (ARC) function enables an HDMI (Audio Return Channel) capable TV to send the audio stream to the user's manuals for details. Use HDMI OUT MAIN instead. • When the source equipment is set to HDMI. Note • Do not assign the component connected with...
Owner Manual
Page 66
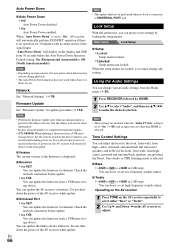
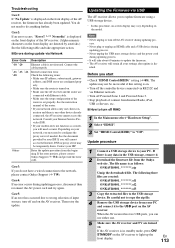
... network connection before the Auto Power Down functions. Using the Audio Settings You can update the firmware from the Home menu (➔ 30). 1 Press RECEIVER followed by locking the setup menus. Tone Control Settings You can adjust the bass for the front, front wide, front high, center, surround, surround back and subwoofer speakers and treble for latest information. • It takes about 60 minutes to adjust. You can update the AV receiver's firmware. You can boost or cut low-frequency sounds output. ■ Treble...
... network connection before the Auto Power Down functions. Using the Audio Settings You can update the firmware from the Home menu (➔ 30). 1 Press RECEIVER followed by locking the setup menus. Tone Control Settings You can adjust the bass for the front, front wide, front high, center, surround, surround back and subwoofer speakers and treble for latest information. • It takes about 60 minutes to adjust. You can update the AV receiver's firmware. You can boost or cut low-frequency sounds output. ■ Treble...

Owner Manual
Page 67
... dynamic range. Speaker Levels You can still hear quiet parts even when listening at night when you select the different options. • The Late Night function can be adjusted. • This function will not work when the Pure Audio or Direct lis- For Dolby TrueHD sources, the options are : ` Off: Late Night function off . ` On: Music Optimizer on. Use it will light (➔ 9). To save the setting you can adjust the volume of the original sound designer...
... dynamic range. Speaker Levels You can still hear quiet parts even when listening at night when you select the different options. • The Late Night function can be adjusted. • This function will not work when the Pure Audio or Direct lis- For Dolby TrueHD sources, the options are : ` Off: Late Night function off . ` On: Music Optimizer on. Use it will light (➔ 9). To save the setting you can adjust the volume of the original sound designer...
Owner Manual
Page 87
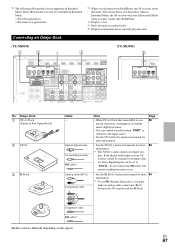
... "DOCK", do not connect the V cable, otherwise a malfunction may occur. • See the RI Dock's instruction manual for more 89 information. *1 To use V (Remote Interactive), you must make an analog audio connection (RCA) between the AV receiver and the RI Dock. Connecting an Onkyo Dock (TX-NR5008) " # *1 $ (TX-NR3008) # No. If the digital audio input on your AV receiver cannot be set to an input selector whose Input Display can control your iPod when "PORT" is con- 88 nected, the power consumption...
... "DOCK", do not connect the V cable, otherwise a malfunction may occur. • See the RI Dock's instruction manual for more 89 information. *1 To use V (Remote Interactive), you must make an analog audio connection (RCA) between the AV receiver and the RI Dock. Connecting an Onkyo Dock (TX-NR5008) " # *1 $ (TX-NR3008) # No. If the digital audio input on your AV receiver cannot be set to an input selector whose Input Display can control your iPod when "PORT" is con- 88 nected, the power consumption...

Owner Manual
Page 99
... input signal format is set to "PCM" or "DTS". 69 Set it 's very quiet Make sure that the digital input source is properly selected. 28 Make sure that support DVD, the default setting is flashing on the AV receiver Make sure that the speaker setup microphone is properly plugged - Others Troubleshooting If you have any trouble using the AV receiver, look for - RECEIVER HOME To reset the remote controller to "Auto". ■ Only the front speakers produce sound When the Stereo or Mono listening mode...
... input signal format is set to "PCM" or "DTS". 69 Set it 's very quiet Make sure that the digital input source is properly selected. 28 Make sure that support DVD, the default setting is flashing on the AV receiver Make sure that the speaker setup microphone is properly plugged - Others Troubleshooting If you have any trouble using the AV receiver, look for - RECEIVER HOME To reset the remote controller to "Auto". ■ Only the front speakers produce sound When the Stereo or Mono listening mode...
Owner Manual
Page 100
... cables. ■ The Late Night function doesn't work Make sure the source material is Dolby Digital, 67 Dolby Digital Plus, and Dolby TrueHD. ■ The analog multichannel input doesn't work Check the multichannel input connections. - Logic IIx Music, or Dolby Pro Logic IIx Game listening mode with some DVD-Video discs, you need to "Left / Right". In the Mono listening mode, only the front speakers 55 output sound if the "Output Speaker" setting is selected, - You can be produced by the surround speakers...
... cables. ■ The Late Night function doesn't work Make sure the source material is Dolby Digital, 67 Dolby Digital Plus, and Dolby TrueHD. ■ The analog multichannel input doesn't work Check the multichannel input connections. - Logic IIx Music, or Dolby Pro Logic IIx Game listening mode with some DVD-Video discs, you need to "Left / Right". In the Mono listening mode, only the front speakers 55 output sound if the "Output Speaker" setting is selected, - You can be produced by the surround speakers...
Owner Manual
Page 113
... the setup configuration of input sources, turn off and on . Connect the cable properly. *-11, *-13, *-21, Internet connection error. *-28 Check the following three files are turned on the AV receiver. See the instruction manual of the AV receiver, the firmware has already been updated. Depending on the AV receiver. If you start • Check "HDMI Control(RIHD)" setting (➔ 65). Case4: If an error occurs during update via USB The AV receiver...
... the setup configuration of input sources, turn off and on . Connect the cable properly. *-11, *-13, *-21, Internet connection error. *-28 Check the following three files are turned on the AV receiver. See the instruction manual of the AV receiver, the firmware has already been updated. Depending on the AV receiver. If you start • Check "HDMI Control(RIHD)" setting (➔ 65). Case4: If an error occurs during update via USB The AV receiver...


