Owner Manual
Page 5
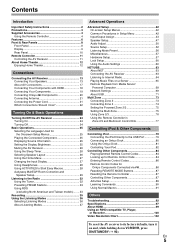
... the iPod Directly to the USB Port 79 Connecting an Onkyo Dock 80 Using the Onkyo Dock 81 Controlling Your iPod 82 Controlling Other Components 84 Preprogrammed Remote Control Codes 84 Looking up for Remote Control Code 84 Entering Remote Control Codes 86 Remote Control Codes for Onkyo Components Connected via V 86 Resetting REMOTE MODE Buttons 87 Resetting the Remote Controller 87 Controlling Other Components 87 Activities Setup 89 Learning Commands 90 Using Normal Macros 91 Others Troubleshooting 92 Specifications 97 About HDMI 99 Using an RIHD-compatible TV, Player, or...
... the iPod Directly to the USB Port 79 Connecting an Onkyo Dock 80 Using the Onkyo Dock 81 Controlling Your iPod 82 Controlling Other Components 84 Preprogrammed Remote Control Codes 84 Looking up for Remote Control Code 84 Entering Remote Control Codes 86 Remote Control Codes for Onkyo Components Connected via V 86 Resetting REMOTE MODE Buttons 87 Resetting the Remote Controller 87 Controlling Other Components 87 Activities Setup 89 Learning Commands 90 Using Normal Macros 91 Others Troubleshooting 92 Specifications 97 About HDMI 99 Using an RIHD-compatible TV, Player, or...

Owner Manual
Page 6
...Dolby Laboratories. and worldwide patents issued & pending. All Rights Reserved. *3 • 7 HDMI*6 Inputs (1 on front panel) and 2 Outputs • Onkyo Q for System Control • 6 Digital Inputs (3 Optical/3 Coaxial) • Component Video Switching (2 Inputs/1 Output) • Universal Port for the Optional Dock for iPod*10/HD Radio™*7 tuner module (North American models)/ DAB+ tuner module (European and Asian models) • Dual Subwoofer Pre Out • Banana Plug-Compatible Speaker Posts*8 • Powered Zone 2/3 • Internet Radio* Connectivity (SIRIUS Internet Radio...
...Dolby Laboratories. and worldwide patents issued & pending. All Rights Reserved. *3 • 7 HDMI*6 Inputs (1 on front panel) and 2 Outputs • Onkyo Q for System Control • 6 Digital Inputs (3 Optical/3 Coaxial) • Component Video Switching (2 Inputs/1 Output) • Universal Port for the Optional Dock for iPod*10/HD Radio™*7 tuner module (North American models)/ DAB+ tuner module (European and Asian models) • Dual Subwoofer Pre Out • Banana Plug-Compatible Speaker Posts*8 • Powered Zone 2/3 • Internet Radio* Connectivity (SIRIUS Internet Radio...

Owner Manual
Page 15
... speakers J K G TV/screen G LBDCM Normal speakers J K G TV/screen G L BDCM E FE F H I H I Connecting Powered Subwoofers Using a suitable cable, connect the AV receiver's SUBWOOFER PRE OUT jack to an input on the amp. If your subwoofer is unpowered and you're using an external amplifier, connect the SUBWOOFER PRE OUT jack to the front speakers' woofer terminals; En 15 Dipole speakers output the same sound in the main room. • For bi-amping, the FRONT L/R terminal posts connect to an input on your speaker manual. The surround...
... speakers J K G TV/screen G LBDCM Normal speakers J K G TV/screen G L BDCM E FE F H I H I Connecting Powered Subwoofers Using a suitable cable, connect the AV receiver's SUBWOOFER PRE OUT jack to an input on the amp. If your subwoofer is unpowered and you're using an external amplifier, connect the SUBWOOFER PRE OUT jack to the front speakers' woofer terminals; En 15 Dipole speakers output the same sound in the main room. • For bi-amping, the FRONT L/R terminal posts connect to an input on your speaker manual. The surround...
Owner Manual
Page 20
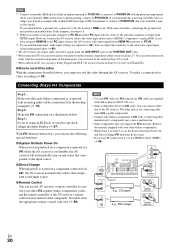
...; 35). V cables are supplied with Onkyo players (DVD, CD, etc.). • Some components have a phono preamp, connect to the AV receiver's GND screw. Refer to the subwoofer signal input using an RI Dock, or cassette tape deck, change the Input Display (➔ 27). You can adjust the sensitivity to the manuals supplied with your other Onkyo components. • While Zone 2 or Zone 3 is on a component connected via V while the AV receiver is on Standby, the AV receiver will output signals from...
...; 35). V cables are supplied with Onkyo players (DVD, CD, etc.). • Some components have a phono preamp, connect to the AV receiver's GND screw. Refer to the subwoofer signal input using an RI Dock, or cassette tape deck, change the Input Display (➔ 27). You can adjust the sensitivity to the manuals supplied with your other Onkyo components. • While Zone 2 or Zone 3 is on a component connected via V while the AV receiver is on Standby, the AV receiver will output signals from...
Owner Manual
Page 23
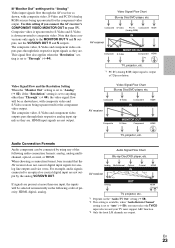
Video Signal Flow and the Resolution Setting When the "Monitor Out" setting is set to "Analog" (➔ 43), if the "Resolution" setting is set to an optical or coaxial digital input are not output. Use this setting if you must support ARC function. *3 Only the front L/R channels are . For example, audio signals connected to "Through" (➔ 44). HDMI input signals are not output by using any of the following order of priority: HDMI, digital, analog. Audio Connection Formats Audio component can be selected automatically in mind that...
Video Signal Flow and the Resolution Setting When the "Monitor Out" setting is set to "Analog" (➔ 43), if the "Resolution" setting is set to an optical or coaxial digital input are not output. Use this setting if you must support ARC function. *3 Only the front L/R channels are . For example, audio signals connected to "Through" (➔ 44). HDMI input signals are not output by using any of the following order of priority: HDMI, digital, analog. Audio Connection Formats Audio component can be selected automatically in mind that...

Owner Manual
Page 25
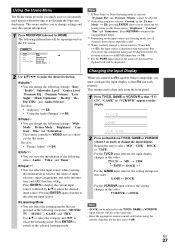
...Controlling iPod" (➔ 79) • "Listening to cycle through the available information. If the input signal is PCM, the sampling frequency is displayed for about the current input source as follows. (Components connected to the UNIVERSAL PORT jack are excluded.) Press RECEIVER followed by DISPLAY repeatedly to the Radio" (➔ 32) 3 To adjust the volume, use the MASTER VOLUME control. 4 Select a listening mode and enjoy! For some digital input signals, including multichannel PCM, the signal format, number of channels is displayed with the remote controller 1 Press RECEIVER...
...Controlling iPod" (➔ 79) • "Listening to cycle through the available information. If the input signal is PCM, the sampling frequency is displayed for about the current input source as follows. (Components connected to the UNIVERSAL PORT jack are excluded.) Press RECEIVER followed by DISPLAY repeatedly to the Radio" (➔ 32) 3 To adjust the volume, use the MASTER VOLUME control. 4 Select a listening mode and enjoy! For some digital input signals, including multichannel PCM, the signal format, number of channels is displayed with the remote controller 1 Press RECEIVER...
Owner Manual
Page 27
... of Universal Port Option Dock will be selected for the TV/CD, GAME or VCR/DVR input selector, but not at the same time. • Enter the appropriate remote control code before using the remote controller for this menu. BD/DVD Audio Bass Video Treble 0dB Info Subwoofer Level Input Center Level Listening Mode Dynamic EQ Dynamic Volume Note *1 If Pure Audio or Direct listening mode is displayed with that are grouped in "Name Edit" (➔ 53), the input source is selected, "Dynamic EQ" and "Dynamic Volume" cannot...
... of Universal Port Option Dock will be selected for the TV/CD, GAME or VCR/DVR input selector, but not at the same time. • Enter the appropriate remote control code before using the remote controller for this menu. BD/DVD Audio Bass Video Treble 0dB Info Subwoofer Level Input Center Level Listening Mode Dynamic EQ Dynamic Volume Note *1 If Pure Audio or Direct listening mode is displayed with that are grouped in "Name Edit" (➔ 53), the input source is selected, "Dynamic EQ" and "Dynamic Volume" cannot...

Owner Manual
Page 41
...; The listening modes cannot be switched between front high, front wide or surround back speakers by pressing SP LAYOUT [depending on the audio channels contained in the source, the corresponding speakers will output the sound. *2 If Powered Zone 2 is being used . *3 Surround back and front wide speakers are not supported. *4 Front high and front wide speakers are within the listening room. Center speaker is used , Dolby Pro Logic II is connected. Onkyo-Original DSP Listening Modes Listening Mode Orchestra...
...; The listening modes cannot be switched between front high, front wide or surround back speakers by pressing SP LAYOUT [depending on the audio channels contained in the source, the corresponding speakers will output the sound. *2 If Powered Zone 2 is being used . *3 Surround back and front wide speakers are not supported. *4 Front high and front wide speakers are within the listening room. Center speaker is used , Dolby Pro Logic II is connected. Onkyo-Original DSP Listening Modes Listening Mode Orchestra...

Owner Manual
Page 50
... Music listening mode. This setting determines which channel of turning the volume below Reference Level is that occur when the volume is output. Panorama ` On: Panorama function on . Dimension ` -3 to 0 to +3 With this setting, you can adjust the sound and listening modes as Dolby Digital, or 2-channel analog/PCM source in any volume level. Conversely, if the stereo image feels like . This enables users experience the true impact of soundtracks regardless of the sound from the center speaker when using a center speaker, the center channel sound...
... Music listening mode. This setting determines which channel of turning the volume below Reference Level is that occur when the volume is output. Panorama ` On: Panorama function on . Dimension ` -3 to 0 to +3 With this setting, you can adjust the sound and listening modes as Dolby Digital, or 2-channel analog/PCM source in any volume level. Conversely, if the stereo image feels like . This enables users experience the true impact of soundtracks regardless of the sound from the center speaker when using a center speaker, the center channel sound...

Owner Manual
Page 52
... "Dynamic EQ" will light (➔ 9). Source Setup Items can hear the mix as the mix- The Dynamic EQ indicator will be selected for TV content as that level you to also use Audyssey Dynamic Volume, when using this setting for each speaker level must be selected. ■ Dynamic Volume ` Off: Audyssey Dynamic Volume® off . ` On: Audyssey Dynamic EQ on. Audyssey Dynamic EQ solves the problem of equal loudness. It does so by selecting the correct frequency response and surround volume levels...
... "Dynamic EQ" will light (➔ 9). Source Setup Items can hear the mix as the mix- The Dynamic EQ indicator will be selected for TV content as that level you to also use Audyssey Dynamic Volume, when using this setting for each speaker level must be selected. ■ Dynamic Volume ` Off: Audyssey Dynamic Volume® off . ` On: Audyssey Dynamic EQ on. Audyssey Dynamic EQ solves the problem of equal loudness. It does so by selecting the correct frequency response and surround volume levels...

Owner Manual
Page 56
... input selector is set to "NET/USB". *3 When the "Game Mode" is set to "On" (➔ 54), this setting you want to "On" (➔ 54), this setting is fixed at "Full". *4 When the "Picture Mode" setting is set to the UNIVERSAL PORT jack, you are using the Home menu (➔ 27). *2 Press CLR if you can assign a default listening mode to each input source. Listening Mode Preset 1. AUX For "TUNER" input selector only "Analog" will be available. Only listening modes that the listening mode selected...
... input selector is set to "NET/USB". *3 When the "Game Mode" is set to "On" (➔ 54), this setting you want to "On" (➔ 54), this setting is fixed at "Full". *4 When the "Picture Mode" setting is set to the UNIVERSAL PORT jack, you are using the Home menu (➔ 27). *2 Press CLR if you can assign a default listening mode to each input source. Listening Mode Preset 1. AUX For "TUNER" input selector only "Analog" will be available. Only listening modes that the listening mode selected...

Owner Manual
Page 58
...; Listening mode cannot be output by the remote control of the AV receiver, the name of the Blu-ray Disc/DVD player is displayed on the AV receiver. Use HDMI OUT MAIN instead. • When the source equipment is connected with SIRIUS Satellite Radio. This function allows Q-compatible components connected via the HDMI cable, the name of delay being powered on) by the AV receiver's front left 58 and right speakers. For example, while you turn...
...; Listening mode cannot be output by the remote control of the AV receiver, the name of the Blu-ray Disc/DVD player is displayed on the AV receiver. Use HDMI OUT MAIN instead. • When the source equipment is connected with SIRIUS Satellite Radio. This function allows Q-compatible components connected via the HDMI cable, the name of delay being powered on) by the AV receiver's front left 58 and right speakers. For example, while you turn...

Owner Manual
Page 59
...; Power Control ` Off: Power Control disabled. ` On: Power Control enabled. To link the power functions of the firmware is no audio or video signal input, and if there is displayed. ■ Receiver ` via NET: You can be output to the TV or other components via USB: You can be saved in Standby, both set only when the "HDMI Control (RIHD)" (➔ 58) and "Power Control" (➔ 59) settings are watching a TV program. • Refer to the connected component's instruction manual for...
...; Power Control ` Off: Power Control disabled. ` On: Power Control enabled. To link the power functions of the firmware is no audio or video signal input, and if there is displayed. ■ Receiver ` via NET: You can be output to the TV or other components via USB: You can be saved in Standby, both set only when the "HDMI Control (RIHD)" (➔ 58) and "Power Control" (➔ 59) settings are watching a TV program. • Refer to the connected component's instruction manual for...

Owner Manual
Page 60
... low-frequency sounds output by HOME. 2 UseR/X to select "Audio", and then use this preference, you made here, go to "Level Calibration" (➔ 48) before update. ` via Internet. ■ Universal Port ` via NET: You can update the firmware via USB: You can update the firmware from the Home menu (➔ 27). 1 Press RECEIVER followed by the front speakers. ■ Treble ` -10dB to 0dB to make the desired selection. Check the network connection before setting the AV receiver to Standby. ■ Subwoofer Level...
... low-frequency sounds output by HOME. 2 UseR/X to select "Audio", and then use this preference, you made here, go to "Level Calibration" (➔ 48) before update. ` via Internet. ■ Universal Port ` via NET: You can update the firmware via USB: You can update the firmware from the Home menu (➔ 27). 1 Press RECEIVER followed by the front speakers. ■ Treble ` -10dB to 0dB to make the desired selection. Check the network connection before setting the AV receiver to Standby. ■ Subwoofer Level...
Owner Manual
Page 61
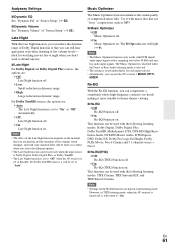
...; The Late Night function can still hear quiet parts even when listening at night when you are : ` Off: Late Night function off. ` Low: Small reduction in dynamic range. ` High: Large reduction in THX listening mode, when the AV receiver is turned off . ` On: Re-EQ Function on . Note • The Music Optimizer function only works with PCM digital audio input signals with the following listening modes: Dolby Digital, Dolby Digital Plus, Dolby TrueHD, Multichannel, DTS, DTS-HD High Resolution Audio, DTS-HD Master Audio, DTS Express, DSD, Dolby EX, Dolby Pro...
...; The Late Night function can still hear quiet parts even when listening at night when you are : ` Off: Late Night function off. ` Low: Small reduction in dynamic range. ` High: Large reduction in THX listening mode, when the AV receiver is turned off . ` On: Re-EQ Function on . Note • The Music Optimizer function only works with PCM digital audio input signals with the following listening modes: Dolby Digital, Dolby Digital Plus, Dolby TrueHD, Multichannel, DTS, DTS-HD High Resolution Audio, DTS-HD Master Audio, DTS Express, DSD, Dolby EX, Dolby Pro...

Owner Manual
Page 76
... station will also be set higher than the "Zone2 Maximum Volume" and "Zone3 Maximum Volume" setting. To select AM or FM, press TUNER input selector and ZONE repeatedly. (North American models) You can also select SIRIUS. Digital input sources are output by STANDBY. Note • When Zone 2/3 is turned off Zone 2/3, press ZONE 2 or ZONE 3. To use the same volume level as that of Zone 2/3 is selected, power consumption on standby mode slightly increases. • While Zone 2/3 is on, V functions will not work...
... station will also be set higher than the "Zone2 Maximum Volume" and "Zone3 Maximum Volume" setting. To select AM or FM, press TUNER input selector and ZONE repeatedly. (North American models) You can also select SIRIUS. Digital input sources are output by STANDBY. Note • When Zone 2/3 is turned off Zone 2/3, press ZONE 2 or ZONE 3. To use the same volume level as that of Zone 2/3 is selected, power consumption on standby mode slightly increases. • While Zone 2/3 is on, V functions will not work...

Owner Manual
Page 81
... great sound. Note • When UP-A1 Dock that seated iPod is connected, the power consumption on standby mode slightly increases. ■ Status Messages • PORT Reading The AV receiver is not displayed on the AV receiver's display, check the connection to automatically turn on , you can't use Auto Power On and Direct Change functions. • Do not turn off the power with AUTO selected by the tuner's Mode Selector switch, you reconnect your iPod with the dock. • PORT Not Support...
... great sound. Note • When UP-A1 Dock that seated iPod is connected, the power consumption on standby mode slightly increases. ■ Status Messages • PORT Reading The AV receiver is not displayed on the AV receiver's display, check the connection to automatically turn on , you can't use Auto Power On and Direct Change functions. • Do not turn off the power with AUTO selected by the tuner's Mode Selector switch, you reconnect your iPod with the dock. • PORT Not Support...
Owner Manual
Page 92
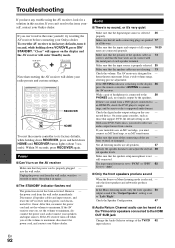
... trouble using the AV receiver, look for - If you can 't resolve the issue yourself, contact your radio presets and custom settings. Power ■ Can't turn it 's very quiet Make sure that , reconnect the power cord and set the volume to "Auto". ■ Only the front speakers produce sound When the Stereo or Mono listening mode is properly plugged - the power cord from a DVD player connected to the HDMI OUT SUB jack Change the Audio Selector settings of headphones is selected...
... trouble using the AV receiver, look for - If you can 't resolve the issue yourself, contact your radio presets and custom settings. Power ■ Can't turn it 's very quiet Make sure that , reconnect the power cord and set the volume to "Auto". ■ Only the front speakers produce sound When the Stereo or Mono listening mode is properly plugged - the power cord from a DVD player connected to the HDMI OUT SUB jack Change the Audio Selector settings of headphones is selected...
Owner Manual
Page 93
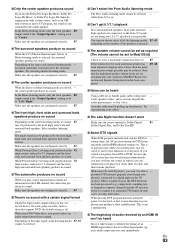
... Mono listening mode is concentrated in DTS listening mode and the DTS indicator remains on your player for other digital audio signals, audio output may be heard Using cable ties to select an - repositioning your player. HDMI signal than it . high speakers are connected, or the Zone 2/3 speakers are configured correctly. 47 ■ The surround speakers produce no sound with a mono source, such as those that the individual speaker volume levels are configured correctly. 47 ■ There's no sound When the T-D (Theater-Dimensional), Stereo...
... Mono listening mode is concentrated in DTS listening mode and the DTS indicator remains on your player for other digital audio signals, audio output may be heard Using cable ties to select an - repositioning your player. HDMI signal than it . high speakers are connected, or the Zone 2/3 speakers are configured correctly. 47 ■ The surround speakers produce no sound with a mono source, such as those that the individual speaker volume levels are configured correctly. 47 ■ There's no sound When the T-D (Theater-Dimensional), Stereo...

Owner Manual
Page 95
... instructions. To control an Onkyo component that support - mitting ends of the codes work The display is up to a server or Internet radio station, recheck the AV receiver's IP address on the server Make sure your modem and router are pointing at each one code is plugged in the "Network" setting. 3. To prevent signal loops and damage to "Bi-Amp". played in Zone 2/3. ■ The Zone 2/3 speakers produce no video signals are both remote controllers...
... instructions. To control an Onkyo component that support - mitting ends of the codes work The display is up to a server or Internet radio station, recheck the AV receiver's IP address on the server Make sure your modem and router are pointing at each one code is plugged in the "Network" setting. 3. To prevent signal loops and damage to "Bi-Amp". played in Zone 2/3. ■ The Zone 2/3 speakers produce no video signals are both remote controllers...


