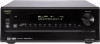

Owner Manual
Page 3
... the receiving antenna. • Increase the separation between the equipment and receiver. • Connect the equipment into an outlet on , contact your Onkyo authorized service station. 3. AC Fuse The fuse is located inside the chassis and is no guarantee that produce heat. Power WARNING BEFORE PLUGGING IN THE UNIT FOR THE FIRST TIME, READ THE FOLLOWING SECTION CAREFULLY. Replacement Parts - However, there is not user-serviceable.
... the receiving antenna. • Increase the separation between the equipment and receiver. • Connect the equipment into an outlet on , contact your Onkyo authorized service station. 3. AC Fuse The fuse is located inside the chassis and is no guarantee that produce heat. Power WARNING BEFORE PLUGGING IN THE UNIT FOR THE FIRST TIME, READ THE FOLLOWING SECTION CAREFULLY. Replacement Parts - However, there is not user-serviceable.

Owner Manual
Page 4
... 47 Selecting a preset radio station 47 Erasing a preset radio station 47 Audio Adjust Setup menu 40 Preference 44 4. Headphones Level Setup sub-menu 45 4-3. OSD Setup sub-menu 45 4-4. IR IN Setup sub-menu 28 Speaker Setup 29 1. Listening Mode Preset sub-menu 37 Audio Adjust 40 3. Volume Setup sub-menu 44 4-2. Video Setup sub-menu 35 2-4. Hardware Setup menu 28 0-1. Speaker Setup menu 29 1-1. Contents Before using Important Safeguards 2 Precautions 3 Contents 4 Features 6 Supplied accessories 6 Before using this unit 7 Installing the remote controller...
... 47 Selecting a preset radio station 47 Erasing a preset radio station 47 Audio Adjust Setup menu 40 Preference 44 4. Headphones Level Setup sub-menu 45 4-3. OSD Setup sub-menu 45 4-4. IR IN Setup sub-menu 28 Speaker Setup 29 1. Listening Mode Preset sub-menu 37 Audio Adjust 40 3. Volume Setup sub-menu 44 4-2. Video Setup sub-menu 35 2-4. Hardware Setup menu 28 0-1. Speaker Setup menu 29 1-1. Contents Before using Important Safeguards 2 Precautions 3 Contents 4 Features 6 Supplied accessories 6 Before using this unit 7 Installing the remote controller...
Owner Manual
Page 5
... turning off the sound 48 Adjusting the bass and treble 48 Listening with headphones 48 Changing the listening mode 49 Entering names for input sources and tuner stations ..... 49 Entering characters using the TX-DS898 49 Switching the display 50 Adjusting the brightness of the front display 50 Using the sleep time (remote controller only 50 Temporarily changing the speaker output levels 50 Changing the audio mode 51 Enjoying the multichannel output 51 Enjoying music in the remote zone 52 Playing music using the buttons on the TX-DS898 ...... 52 Selecting an input source using...
... turning off the sound 48 Adjusting the bass and treble 48 Listening with headphones 48 Changing the listening mode 49 Entering names for input sources and tuner stations ..... 49 Entering characters using the TX-DS898 49 Switching the display 50 Adjusting the brightness of the front display 50 Using the sleep time (remote controller only 50 Temporarily changing the speaker output levels 50 Changing the audio mode 51 Enjoying the multichannel output 51 Enjoying music in the remote zone 52 Playing music using the buttons on the TX-DS898 ...... 52 Selecting an input source using...
Owner Manual
Page 9
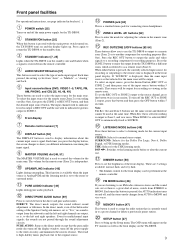
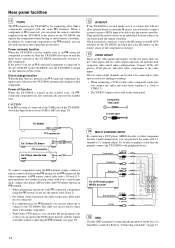
... dimmer control for the front display can be output for the main zone. Input source buttons (DVD, VIDEO 1-5, TAPE, FM, AM, PHONO, and CD) [25, 46, 48, 49] These buttons are used to a preset channel or delete a previously preset station. There are not passed through the sound adjustment circuits. This function is available when the input source is Analog/PCM and the listening mode is high-fidelity music playback true to enjoy the output from "Auto" → "Multich" → "Analog" and...
... dimmer control for the front display can be output for the main zone. Input source buttons (DVD, VIDEO 1-5, TAPE, FM, AM, PHONO, and CD) [25, 46, 48, 49] These buttons are used to a preset channel or delete a previously preset station. There are not passed through the sound adjustment circuits. This function is available when the input source is Analog/PCM and the listening mode is high-fidelity music playback true to enjoy the output from "Auto" → "Multich" → "Analog" and...
Owner Manual
Page 11
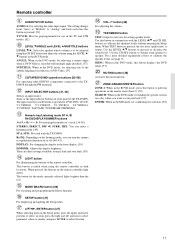
...] STEREO, DIRECT, DSP /, SURR, THX: You can turn the cinema re-equalization function on front panel of the remote controller. The input source for use in the MD mode, for selecting a camera angle when a DVD-Video is given here. When pressed, the buttons on a DVD-Video. [57] CD/TAPE/DVD/MD operation buttons [55-58] For operating other ONKYO components connected to calibrate the speaker levels, see page 31. MODE MACRO button [66] For executing and programming the Macro function. Use the LEVEL / buttons to...
...] STEREO, DIRECT, DSP /, SURR, THX: You can turn the cinema re-equalization function on front panel of the remote controller. The input source for use in the MD mode, for selecting a camera angle when a DVD-Video is given here. When pressed, the buttons on a DVD-Video. [57] CD/TAPE/DVD/MD operation buttons [55-58] For operating other ONKYO components connected to calibrate the speaker levels, see page 31. MODE MACRO button [66] For executing and programming the Macro function. Use the LEVEL / buttons to...
Owner Manual
Page 14
...cable that component. Power off function When the TX-DS898 is turned on, then the TX-DS898 also turns on the front panel. Front output L (white) Subwoofer R (red) Surround L (white) R (red) Ex: DVD-Audio player/ MPEG decoder Surround back R (red) Center L (white) DIGITAL OUTPUT OPT 1 PRE OUT R L FRONT SUB CENTER 2 COAX 1 2 SURR SURR BACK / ZONE 2 FRONT 3 OPT 1 SUB 2 3 4 DIGITAL INPUT SURR SURR BACK R GND MULTI C INPUT CENTER L GND Use this terminal to the TAPE jack on the TX-DS898 and operate that has a multi channel port, you connect the audio and video...
...cable that component. Power off function When the TX-DS898 is turned on, then the TX-DS898 also turns on the front panel. Front output L (white) Subwoofer R (red) Surround L (white) R (red) Ex: DVD-Audio player/ MPEG decoder Surround back R (red) Center L (white) DIGITAL OUTPUT OPT 1 PRE OUT R L FRONT SUB CENTER 2 COAX 1 2 SURR SURR BACK / ZONE 2 FRONT 3 OPT 1 SUB 2 3 4 DIGITAL INPUT SURR SURR BACK R GND MULTI C INPUT CENTER L GND Use this terminal to the TAPE jack on the TX-DS898 and operate that has a multi channel port, you connect the audio and video...

Owner Manual
Page 15
...output jack as well, be sure to also connect it to decide which method of the TX-DS898, the CD input source is best. Audio connection cable Left (white) L Right (red) R : Signal flow Digital audio input (optical) Digital audio output (optical) 3. Cassette tape deck, MD recorder, DAT deck, or CD recorder (TAPE) R (red) Analog audio input L (white) R (red) Analog audio output L (white) DIGITAL OUTPUT OPT 1 PRE OUT R L FRONT SUB CENTER 2 ANTENNA AM COAX 1 SURR SURR BACK / ZONE 2 2 FM 75 3 OPT 1 FRONT SUB MULTI CH INPUT AUDIO R L CENTER PH 2 3 4 DIGITAL INPUT...
...output jack as well, be sure to also connect it to decide which method of the TX-DS898, the CD input source is best. Audio connection cable Left (white) L Right (red) R : Signal flow Digital audio input (optical) Digital audio output (optical) 3. Cassette tape deck, MD recorder, DAT deck, or CD recorder (TAPE) R (red) Analog audio input L (white) R (red) Analog audio output L (white) DIGITAL OUTPUT OPT 1 PRE OUT R L FRONT SUB CENTER 2 ANTENNA AM COAX 1 SURR SURR BACK / ZONE 2 2 FM 75 3 OPT 1 FRONT SUB MULTI CH INPUT AUDIO R L CENTER PH 2 3 4 DIGITAL INPUT...

Owner Manual
Page 16
... CB/PB Y CB/PB Y DIGITAL OUTPUT OPT 1 PRE TRENNA FRONT SUB 2 AM COAX 1 2 3 OPT 1 SURR SURR BACK / ZONE 2 FM 75 FRONT DIO L SUB PH 2 3 4 DIGITAL INPUT SURR SURR BACK R CD OUT TAPE GND IN L DIO AUDIO R L VIDEO S VIDEO MONITOR OUT OUT ZONE 2 IN DVD OUT IN VIDEO 1 OUT IN VIDEO 2 IN VIDEO 3 R L AUDIO IN VIDEO 4 VIDEO S VIDEO COMPONENT VIDEO OUTPUT Y PB PR INPUT 1 Y PB PR INPUT 2 Y PB PR Digital audio output (coaxial) R (red) Analog audio output L (white) Video output S Video output 4. You do not need to connect to the TX-DS898.
... CB/PB Y CB/PB Y DIGITAL OUTPUT OPT 1 PRE TRENNA FRONT SUB 2 AM COAX 1 2 3 OPT 1 SURR SURR BACK / ZONE 2 FM 75 FRONT DIO L SUB PH 2 3 4 DIGITAL INPUT SURR SURR BACK R CD OUT TAPE GND IN L DIO AUDIO R L VIDEO S VIDEO MONITOR OUT OUT ZONE 2 IN DVD OUT IN VIDEO 1 OUT IN VIDEO 2 IN VIDEO 3 R L AUDIO IN VIDEO 4 VIDEO S VIDEO COMPONENT VIDEO OUTPUT Y PB PR INPUT 1 Y PB PR INPUT 2 Y PB PR Digital audio output (coaxial) R (red) Analog audio output L (white) Video output S Video output 4. You do not need to connect to the TX-DS898.

Owner Manual
Page 20
... REMOTE CONTROL Subwoofer Center Surround Surround speaker Back right Back left speaker DIGITAL OUTPUT OPT 1 PRE OUT R L FRONT SUB CENTER 2 ANTENNA AM COAX 1 SURR SURR BACK / ZONE 2 2 FM 75 3 OPT 1 FRONT SUB MULTI CH INPUT AUDIO R L CENTER PH SURR 2 SURR BACK 3 4 DIGITAL INPUT GND CD OUT TAPE IN R L AUDIO AUDIO R L VIDEO S VIDEO MONITOR OUT OUT ZONE 2 IN DVD OUT IN VIDEO 1 OUT IN VIDEO 2 IN VIDEO 3 R L AUDIO IN VIDEO 4 VIDEO S VIDEO COMPONENT VIDEO OUTPUT Y PB PR INPUT 1 Y PB PR INPUT 2 Y PB PR CAUTION: SPEAKER IMPEDANCE 4 OHMS...
... REMOTE CONTROL Subwoofer Center Surround Surround speaker Back right Back left speaker DIGITAL OUTPUT OPT 1 PRE OUT R L FRONT SUB CENTER 2 ANTENNA AM COAX 1 SURR SURR BACK / ZONE 2 2 FM 75 3 OPT 1 FRONT SUB MULTI CH INPUT AUDIO R L CENTER PH SURR 2 SURR BACK 3 4 DIGITAL INPUT GND CD OUT TAPE IN R L AUDIO AUDIO R L VIDEO S VIDEO MONITOR OUT OUT ZONE 2 IN DVD OUT IN VIDEO 1 OUT IN VIDEO 2 IN VIDEO 3 R L AUDIO IN VIDEO 4 VIDEO S VIDEO COMPONENT VIDEO OUTPUT Y PB PR INPUT 1 Y PB PR INPUT 2 Y PB PR CAUTION: SPEAKER IMPEDANCE 4 OHMS...
Owner Manual
Page 25
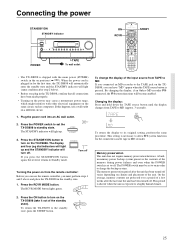
... off Turning the power on from the remote controller: Before you can use a wall outlet on the TXDS898, you must be set to on in order to the standby state, press the STDBY button. 25 The RCVR MODE button lights green. Connecting the power STANDBY/ON STANDBY indicator STANDBY/ON STANDBY POWER ON OFF ZONE 2 (GRN ) AUDIO REC ( RED) DVD VIDEO 1 VIDEO 2 VIDEO 3 VIDEO 4 VIDEO 5 TAPE FM PURE AUDIO UPSAMPLING SELECTOR AM PHONO C D DISPL AY MASTER VOLUME PUSH TO OPEN POWER TX-DS898 TAPE To...
... off Turning the power on from the remote controller: Before you can use a wall outlet on the TXDS898, you must be set to on in order to the standby state, press the STDBY button. 25 The RCVR MODE button lights green. Connecting the power STANDBY/ON STANDBY indicator STANDBY/ON STANDBY POWER ON OFF ZONE 2 (GRN ) AUDIO REC ( RED) DVD VIDEO 1 VIDEO 2 VIDEO 3 VIDEO 4 VIDEO 5 TAPE FM PURE AUDIO UPSAMPLING SELECTOR AM PHONO C D DISPL AY MASTER VOLUME PUSH TO OPEN POWER TX-DS898 TAPE To...

Owner Manual
Page 34
..., VIDEO 2 OUT, TAPE OUT, and ZONE 2 OUT output analog audio signals. The input signal format (Dolby Digital, DTS, PCM or Analog) used by the selected input source is not connected to DIGITAL INPUT (OPT) 1, then select "OPT1" here. You can use the digital input jacks (OPTICAL or COAXIAL) to the MULTI CHANNEL INPUT port for the Multichannel setting. This is selected here. Do not record from certain CD players and LD players even if you press the PAUSE or SKIP button on the TX-DS898 lights while a DTS source is connected to a digital input, then select...
..., VIDEO 2 OUT, TAPE OUT, and ZONE 2 OUT output analog audio signals. The input signal format (Dolby Digital, DTS, PCM or Analog) used by the selected input source is not connected to DIGITAL INPUT (OPT) 1, then select "OPT1" here. You can use the digital input jacks (OPTICAL or COAXIAL) to the MULTI CHANNEL INPUT port for the Multichannel setting. This is selected here. Do not record from certain CD players and LD players even if you press the PAUSE or SKIP button on the TX-DS898 lights while a DTS source is connected to a digital input, then select...

Owner Manual
Page 38
... feature of the volume control is for listening to reproduce a multi-speaker setup. If you are connected, then the surround sound is recommended that you can be used with a maximum 5.1-channel surround output that support Dolby Digital. f. D.F. Same as Dolby Digital. When playing back software that reaches each ear to music. T-D (Theater-Dimensional) For the best enjoyment of noise. This source signal requires a DVD player that supports DTS output and comes from digital PCM sources recorded with a realistic feel of digital audio signals and is...
... feature of the volume control is for listening to reproduce a multi-speaker setup. If you are connected, then the surround sound is recommended that you can be used with a maximum 5.1-channel surround output that support Dolby Digital. f. D.F. Same as Dolby Digital. When playing back software that reaches each ear to music. T-D (Theater-Dimensional) For the best enjoyment of noise. This source signal requires a DVD player that supports DTS output and comes from digital PCM sources recorded with a realistic feel of digital audio signals and is...
Owner Manual
Page 41
... audio by using the multi channel port, this setting as the listening mode. For Dolby Digital input source signals, the LFE level becomes that you various ways to adjust the timing of the audio output from the grain structure of delay for such films over wide-range systems. This can be heard. Theater Dimensional Setup Select this mode. However, if you can left at least front left and right speakers, a center speaker, and surround left and right channels...
... audio by using the multi channel port, this setting as the listening mode. For Dolby Digital input source signals, the LFE level becomes that you various ways to adjust the timing of the audio output from the grain structure of delay for such films over wide-range systems. This can be heard. Theater Dimensional Setup Select this mode. However, if you can left at least front left and right speakers, a center speaker, and surround left and right channels...

Owner Manual
Page 42
... used , the decoder divide the center signal equally to each front left and right speakers (as seen from the center speaker. Surround Setup Select this listening mode to simulate a wider sound space. On: Turns on the front expander function to modify the sound space location forward or backward. The setting of the sound. Many of sound recordings processed for 2-channel analog/PCM input signals. Lowering this listening mode to DTS 5.1. Off: Outputs the center channel signal at the regular level and frequency characteristics. 3-8. Parameter Setting...
... used , the decoder divide the center signal equally to each front left and right speakers (as seen from the center speaker. Surround Setup Select this listening mode to simulate a wider sound space. On: Turns on the front expander function to modify the sound space location forward or backward. The setting of the sound. Many of sound recordings processed for 2-channel analog/PCM input signals. Lowering this listening mode to DTS 5.1. Off: Outputs the center channel signal at the regular level and frequency characteristics. 3-8. Parameter Setting...

Owner Manual
Page 43
... not Dolby Digital sources will be applied by the DSP, creating too much reverb effects and the sound loses frame or presence. The parameters that is without any further reverberation. This can be set are shown in the home environment. Off: Does not output using THX Surround EX when a surround back speaker is connected. Relationship between listening mode and parameter Parameter Tone Subwoofer Control Re-EQ Surround Speakers Upsamp ling LATE NIGHT LFE Level...
... not Dolby Digital sources will be applied by the DSP, creating too much reverb effects and the sound loses frame or presence. The parameters that is without any further reverberation. This can be set are shown in the home environment. Off: Does not output using THX Surround EX when a surround back speaker is connected. Relationship between listening mode and parameter Parameter Tone Subwoofer Control Re-EQ Surround Speakers Upsamp ling LATE NIGHT LFE Level...
Owner Manual
Page 48
...VIDEO 1 VIDEO 2 VIDEO 3 VIDEO 4 VIDEO 5 TAPE FM PURE AUDIO UPSAMPLING SELECTOR AM PHONO C D DISPL AY MASTER VOLUME PHONES REC OUT ZONE 2 OFF STEREO SURROUND THX ZONE 2 LEVEL DSP DIMMER FM MODE MEMORY SETUP CLEAR TUNING ENTER RETURN VIDEO 5/VIDEO CAM INPUT PRESET DIGITAL S VIDEO VIDEO L AUDIO R PHONES VOL MUTING INPUT SELECTOR buttons Though the TX-DS898 is often used to listen to the radio, it does not show you its original listening mode. Temporarily turning off the sound To turn the dial counterclockwise. The volume can adjust the bass and treble...
...VIDEO 1 VIDEO 2 VIDEO 3 VIDEO 4 VIDEO 5 TAPE FM PURE AUDIO UPSAMPLING SELECTOR AM PHONO C D DISPL AY MASTER VOLUME PHONES REC OUT ZONE 2 OFF STEREO SURROUND THX ZONE 2 LEVEL DSP DIMMER FM MODE MEMORY SETUP CLEAR TUNING ENTER RETURN VIDEO 5/VIDEO CAM INPUT PRESET DIGITAL S VIDEO VIDEO L AUDIO R PHONES VOL MUTING INPUT SELECTOR buttons Though the TX-DS898 is often used to listen to the radio, it does not show you its original listening mode. Temporarily turning off the sound To turn the dial counterclockwise. The volume can adjust the bass and treble...
Owner Manual
Page 51
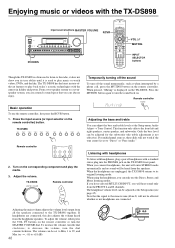
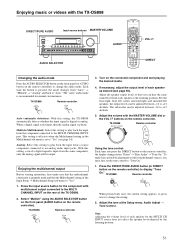
...level adjusted by the listening position. 51 Press the DIRECT/PURE AUDIO button (or DIRECT button on the remote controller) to "Yes." 1. Enjoying music or videos with the TX-DS898 DIRECT/PURE AUDIO Input source buttons MASTER VOLUME STANDBY/ON STANDBY POWER ON OFF ZONE 2 (GRN ) AUDIO REC ( RED) DVD VIDEO 1 VIDEO 2 VIDEO 3 VIDEO 4 VIDEO 5 TAPE FM PURE AUDIO UPSAMPLING SELECTOR AM PHONO C D DISPL AY MASTER VOLUME PHONES REC OUT ZONE 2 OFF STEREO SURROUND THX ZONE 2 LEVEL DSP DIMMER FM MODE MEMORY SETUP CLEAR TUNING ENTER RETURN VIDEO 5/VIDEO CAM INPUT PRESET...
...level adjusted by the listening position. 51 Press the DIRECT/PURE AUDIO button (or DIRECT button on the remote controller) to "Yes." 1. Enjoying music or videos with the TX-DS898 DIRECT/PURE AUDIO Input source buttons MASTER VOLUME STANDBY/ON STANDBY POWER ON OFF ZONE 2 (GRN ) AUDIO REC ( RED) DVD VIDEO 1 VIDEO 2 VIDEO 3 VIDEO 4 VIDEO 5 TAPE FM PURE AUDIO UPSAMPLING SELECTOR AM PHONO C D DISPL AY MASTER VOLUME PHONES REC OUT ZONE 2 OFF STEREO SURROUND THX ZONE 2 LEVEL DSP DIMMER FM MODE MEMORY SETUP CLEAR TUNING ENTER RETURN VIDEO 5/VIDEO CAM INPUT PRESET...

Owner Manual
Page 52
...remote zone ZONE 2 indicator STANDBY/ON STANDBY POWER ON OFF ZONE 2 (GRN ) AUDIO REC ( RED) DVD VIDEO 1 VIDEO 2 VIDEO 3 VIDEO 4 VIDEO 5 TAPE FM PURE AUDIO UPSAMPLING SELECTOR AM PHONO C D DISPL AY MASTER VOLUME PHONES REC OUT ZONE 2 OFF STEREO SURROUND THX ZONE 2 LEVEL DSP DIMMER FM MODE MEMORY SETUP CLEAR TUNING ENTER RETURN VIDEO 5/VIDEO CAM INPUT PRESET DIGITAL S VIDEO VIDEO L AUDIO R OFF Input source buttons ZONE 2 ZONE 2 LEVEL / SLEEP ON/STDBY LEVEL / INPUT SELECTOR buttons ZONE 2 Playing music using the remote controller Turning on the TX-DS898...
...remote zone ZONE 2 indicator STANDBY/ON STANDBY POWER ON OFF ZONE 2 (GRN ) AUDIO REC ( RED) DVD VIDEO 1 VIDEO 2 VIDEO 3 VIDEO 4 VIDEO 5 TAPE FM PURE AUDIO UPSAMPLING SELECTOR AM PHONO C D DISPL AY MASTER VOLUME PHONES REC OUT ZONE 2 OFF STEREO SURROUND THX ZONE 2 LEVEL DSP DIMMER FM MODE MEMORY SETUP CLEAR TUNING ENTER RETURN VIDEO 5/VIDEO CAM INPUT PRESET DIGITAL S VIDEO VIDEO L AUDIO R OFF Input source buttons ZONE 2 ZONE 2 LEVEL / SLEEP ON/STDBY LEVEL / INPUT SELECTOR buttons ZONE 2 Playing music using the remote controller Turning on the TX-DS898...
Owner Manual
Page 70
.... © Change the position or direction of the outdoor antenna. Troubleshooting guide If a problem occurs while you are using the remote controller, first try to operate the controls on the front panel of the TX-DS898 to make sure that has better directivity and select a point where distortion is improper. © Check the output level of the Subwoofer using the test tone. SPEAKERS No sound from the center speaker, or at night or with a connected component. © Refer...
.... © Change the position or direction of the outdoor antenna. Troubleshooting guide If a problem occurs while you are using the remote controller, first try to operate the controls on the front panel of the TX-DS898 to make sure that has better directivity and select a point where distortion is improper. © Check the output level of the Subwoofer using the test tone. SPEAKERS No sound from the center speaker, or at night or with a connected component. © Refer...
Owner Manual
Page 71
No OSD Menu display. • Improper connection. © Check connections. • OSD Menu is displayed when monitor is connected to VIDEO or S VIDEO of MONITOR OUT. © Confirm connections (see page 33). "Not available in the Multichannel setup sub-menu of the selected source is not allowed because headphones are plugged into the TX-DS898. "Only available with the current speaker configuration settings. "Not available with the Zone 2 output set to the MULTI CHANNEL INPUT port and check the Setup menu settings. The TX-DS898 contains an...
No OSD Menu display. • Improper connection. © Check connections. • OSD Menu is displayed when monitor is connected to VIDEO or S VIDEO of MONITOR OUT. © Confirm connections (see page 33). "Not available in the Multichannel setup sub-menu of the selected source is not allowed because headphones are plugged into the TX-DS898. "Only available with the current speaker configuration settings. "Not available with the Zone 2 output set to the MULTI CHANNEL INPUT port and check the Setup menu settings. The TX-DS898 contains an...


