

Owner Manual
Page 1
...connections and turning on the power. Please read this manual for purchasing the Onkyo AV Receiver. Operation Speaker setup 14 Selecting a sound source 17 Using Listening Mode 21 Tuning in this unit 5 Preparation Audio ...equipment connections .......... 6 Video equipment connections .......... 7 Connecting other devices into the RC-392M 34 Using a Macro function 36 Appendix Troubleshooting guide 40 Specifications 41 Control guide Control positions and names .......... 42 AV Receiver TX-DS575X...
...connections and turning on the power. Please read this manual for purchasing the Onkyo AV Receiver. Operation Speaker setup 14 Selecting a sound source 17 Using Listening Mode 21 Tuning in this unit 5 Preparation Audio ...equipment connections .......... 6 Video equipment connections .......... 7 Connecting other devices into the RC-392M 34 Using a Macro function 36 Appendix Troubleshooting guide 40 Specifications 41 Control guide Control positions and names .......... 42 AV Receiver TX-DS575X...
Owner Manual
Page 10
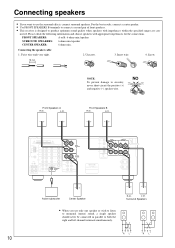
nected. Twist wire ends very tight. 2. TX-DS575X -+ Active subwoofer Center Speaker • When you want to use only one speaker or wish to listen to monaural (mono) sound, a single speaker should never be connected in parallel to both the right and left channel terminals simultaneously. -+ -+ R... speakers with impedances within the specified ranges are con- Screw. 15 mm NOTE: To prevent damage to produce optimum sound quality when speakers with appropriate impedances for the connections. FRONT SPEAKERS: A or B: 6 ohms min./speaker SURROUND SPEAKERS: 6 ...
nected. Twist wire ends very tight. 2. TX-DS575X -+ Active subwoofer Center Speaker • When you want to use only one speaker or wish to listen to monaural (mono) sound, a single speaker should never be connected in parallel to both the right and left channel terminals simultaneously. -+ -+ R... speakers with impedances within the specified ranges are con- Screw. 15 mm NOTE: To prevent damage to produce optimum sound quality when speakers with appropriate impedances for the connections. FRONT SPEAKERS: A or B: 6 ohms min./speaker SURROUND SPEAKERS: 6 ...
Owner Manual
Page 11
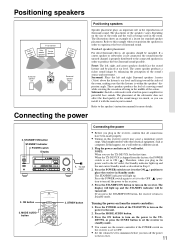
...2 VIDEO 3 TAPE FM AM PHONO C D DOWN MASTER VOLUME UP BASS TREBLE AV RECEIVER TX-DS575X 1. STNBY button Connecting the power • Before you plug in the power cord to produce the best Surround sound possible. Therefore, when you plug in order to the AC outlet, the Standby indicator lights up... . Press the POWER switch again to set it to the ON( ) position to place the receiver in standby mode. • You cannot use the TX-DS575X for standard speaker...
...2 VIDEO 3 TAPE FM AM PHONO C D DOWN MASTER VOLUME UP BASS TREBLE AV RECEIVER TX-DS575X 1. STNBY button Connecting the power • Before you plug in the power cord to produce the best Surround sound possible. Therefore, when you plug in order to the AC outlet, the Standby indicator lights up... . Press the POWER switch again to set it to the ON( ) position to place the receiver in standby mode. • You cannot use the TX-DS575X for standard speaker...
Owner Manual
Page 13
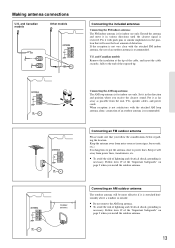
.... Put it well away from power lines, transformers, etc. • To avoid the risk of the "Important Safeguards" on page 2 when you receive the clearest sound. Connecting an FM outdoor antenna Please make sure that will cause the least amount of an outdoor antenna is dangerous to put the antenna close...
.... Put it well away from power lines, transformers, etc. • To avoid the risk of the "Important Safeguards" on page 2 when you receive the clearest sound. Connecting an FM outdoor antenna Please make sure that will cause the least amount of an outdoor antenna is dangerous to put the antenna close...
Owner Manual
Page 16
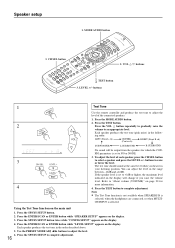
... follow- Press the MODE AUDIO button. 2. ing order: LEFT (Front L ch) CENTER (Center ch) RIGHT (Front R ch) SUBWOOFER L-SURROUND R-SURROUND No sound will change if you hear it in the range between -12dB and +12dB. Refer to NO or NONE. 3. Press the TEST button to an appropriate...2 Press the VOL q button repeatedly to gradually raise the volume to complete adjustment. Press the SP/SYS SETUP button. 2. The test tone should sound at the same level when you raise the volume level. Press the ENTER/SCAN or ENTER button while "LEVEL SETUP" appears on the display. 4. ...
... follow- Press the MODE AUDIO button. 2. ing order: LEFT (Front L ch) CENTER (Center ch) RIGHT (Front R ch) SUBWOOFER L-SURROUND R-SURROUND No sound will change if you hear it in the range between -12dB and +12dB. Refer to NO or NONE. 3. Press the TEST button to an appropriate...2 Press the VOL q button repeatedly to gradually raise the volume to complete adjustment. Press the SP/SYS SETUP button. 2. The test tone should sound at the same level when you raise the volume level. Press the ENTER/SCAN or ENTER button while "LEVEL SETUP" appears on the display. 4. ...
Owner Manual
Page 17
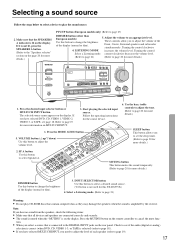
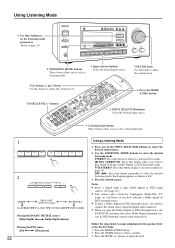
...LEVEL CONTROL MULTI CH INPUT DVD VIDEO 1 VIDEO 2 VIDEO 3 TAPE FM AM PHONO C D DOWN MASTER VOLUME UP BASS TREBLE AV RECEIVER TX-DS575X 1. LISTENING MODE increases the volume level. Press the desired input selector button or MULTI CH INPUT button. VOLUME button (qup/udown) Use ...) (Refer to page 19 for more details.) DIMMER button Use this TX-DS575X.) 4. Refer to page 20 for more details.) 2. Start playing the selected input source. Follow the operating instructions for this button to select a desired sound source. (V4 button is not lit, press the SPEAKERS A button...
...LEVEL CONTROL MULTI CH INPUT DVD VIDEO 1 VIDEO 2 VIDEO 3 TAPE FM AM PHONO C D DOWN MASTER VOLUME UP BASS TREBLE AV RECEIVER TX-DS575X 1. LISTENING MODE increases the volume level. Press the desired input selector button or MULTI CH INPUT button. VOLUME button (qup/udown) Use ...) (Refer to page 19 for more details.) DIMMER button Use this TX-DS575X.) 4. Refer to page 20 for more details.) 2. Start playing the selected input source. Follow the operating instructions for this button to select a desired sound source. (V4 button is not lit, press the SPEAKERS A button...

Owner Manual
Page 18
Selecting a sound source DVD Player 1 DVD TX-DS575X DIGITAL INPUT COAXIAL 2 COAXIAL 1 OPTICAL 2 OPTICAL 1 2 DIGITAL/ ANALOG 3 PRESET/ MODE ADJ DOW N UP 4 ENTER or ENTER / SCAN 5 PRESET/ MODE ADJ DOW N UP 6 ENTER or ENTER /... signals, it automatically detects the signal format (Dolby Digital, DTS, or PCM) and performs the necessary decoding process. DIGITAL (digital signal playback mode) The TX-DS575X plays back digital signals. (Input analog signals will be played.) Selecting the input signal format Normally, select AUTO for playback. ANALOG - You can assign digital...
Selecting a sound source DVD Player 1 DVD TX-DS575X DIGITAL INPUT COAXIAL 2 COAXIAL 1 OPTICAL 2 OPTICAL 1 2 DIGITAL/ ANALOG 3 PRESET/ MODE ADJ DOW N UP 4 ENTER or ENTER / SCAN 5 PRESET/ MODE ADJ DOW N UP 6 ENTER or ENTER /... signals, it automatically detects the signal format (Dolby Digital, DTS, or PCM) and performs the necessary decoding process. DIGITAL (digital signal playback mode) The TX-DS575X plays back digital signals. (Input analog signals will be played.) Selecting the input signal format Normally, select AUTO for playback. ANALOG - You can assign digital...
Owner Manual
Page 19
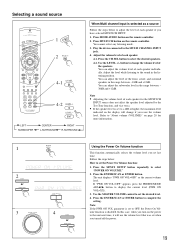
... of the speakers. You can adjust the subwoofer level in the range between -12dB and +12dB. Adjust the level while listening to the sound in the range between - 30dB and +12dB. You can adjust the level of the front, center, and surround speakers in the listening ...volume level that was set when you turn on the remote controller. Press the SP/SYS SETUP button repeatedly to select the desired speakers. 4-2. Selecting a sound source 1 2 4-1 4-2 LEFT SUBWOOFER CENTER L-SURROUND RIGHT R-SURROUND When Multi channel input is selected as a source Follow the steps below : How to...
... of the speakers. You can adjust the subwoofer level in the range between -12dB and +12dB. Adjust the level while listening to the sound in the range between - 30dB and +12dB. You can adjust the level of the front, center, and surround speakers in the listening ...volume level that was set when you turn on the remote controller. Press the SP/SYS SETUP button repeatedly to select the desired speakers. 4-2. Selecting a sound source 1 2 4-1 4-2 LEFT SUBWOOFER CENTER L-SURROUND RIGHT R-SURROUND When Multi channel input is selected as a source Follow the steps below : How to...
Owner Manual
Page 20
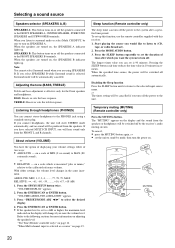
...Press the SLEEP button until it returns to the FRONT SPEAKERS A, CENTER SPEAKER, SURROUND SPEAKERS and SUBWOOFER terminals. or The timer setting will hear sound only from the speakers. Temporary muting (MUTING) (Remote controller only) Press the MUTING button. Adjusting the tone (BASS, TREBLE) Treble and... +1dB or higher, the maximum level indicated on . 20 About volume (VOLUME) You have selected MULTI CH INPUT, you select SPEAKERS B while Surround sound is selected as a source" on or off the power to the system after which is set up . on page 16. "VOLUME DISPLAY" appears. ...
...Press the SLEEP button until it returns to the FRONT SPEAKERS A, CENTER SPEAKER, SURROUND SPEAKERS and SUBWOOFER terminals. or The timer setting will hear sound only from the speakers. Temporary muting (MUTING) (Remote controller only) Press the MUTING button. Adjusting the tone (BASS, TREBLE) Treble and... +1dB or higher, the maximum level indicated on . 20 About volume (VOLUME) You have selected MULTI CH INPUT, you select SPEAKERS B while Surround sound is selected as a source" on or off the power to the system after which is set up . on page 16. "VOLUME DISPLAY" appears. ...
Owner Manual
Page 21
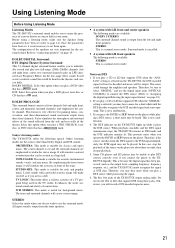
...hall in your room. ter channel. versation, and three-dimensional sound movement output from the side and rear walls of the stage. DOLBY SURROUND PRO LOGIC Onkyo's listening modes The TX-DS575X offers the following special Onkyo listening modes for background music. UNPLUGGED: This mode is a... normal stereo mode. Lively sounds with a powerful acoustic image will make sure the Speaker Setup...
...hall in your room. ter channel. versation, and three-dimensional sound movement output from the side and rear walls of the stage. DOLBY SURROUND PRO LOGIC Onkyo's listening modes The TX-DS575X offers the following special Onkyo listening modes for background music. UNPLUGGED: This mode is a... normal stereo mode. Lively sounds with a powerful acoustic image will make sure the Speaker Setup...
Owner Manual
Page 22
... source. • To play a Dolby digital or DTS Surround source, you need to connect the sound source using the digital input connector. • When you to play the Dolby Digital or DTS Surround source, the TX-DS575X automatically enters Dolby Digital Surround (stereo) or DTS Surround (stereo) mode respectively. Press the CH SEL...
... source. • To play a Dolby digital or DTS Surround source, you need to connect the sound source using the digital input connector. • When you to play the Dolby Digital or DTS Surround source, the TX-DS575X automatically enters Dolby Digital Surround (stereo) or DTS Surround (stereo) mode respectively. Press the CH SEL...

Owner Manual
Page 23
...further reverberation. "0dB" is recommended for your taste, select -∞dB. 23 "+10dB" is recommended. If the low range sounds too loud for cinema sound sources. nal level (the value you set using the test tone). • When you press the TEST button after you ... more information. • When you to the origi- Orchestra, Unplugged, Studio-Mix, TV Logic - If the low range sounds too loud for music sound source. Setting the Listening mode parameters The following parameters are available for the fact that contains necessary Dolby Digital information. Note: The...
...further reverberation. "0dB" is recommended for your taste, select -∞dB. 23 "+10dB" is recommended. If the low range sounds too loud for cinema sound sources. nal level (the value you set using the test tone). • When you press the TEST button after you ... more information. • When you to the origi- Orchestra, Unplugged, Studio-Mix, TV Logic - If the low range sounds too loud for music sound source. Setting the Listening mode parameters The following parameters are available for the fact that contains necessary Dolby Digital information. Note: The...
Owner Manual
Page 30
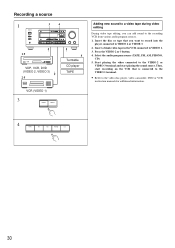
...playing the video connected to the VIDEO 2 or VIDEO 3 terminal and start recording on the VCR that you can add sound to VIDEO 1. 3. Then, start playing the sound source. Insert a blank video tape in the VCR connected to the recording VCR from various audio program sources. 1. Recording...3 TAPE FM AM PHONO C D DOWN MASTER VOLUME UP BASS TREBLE AV RECEIVER TX-DS575X 1·5 VDP, VCR, DVD (VIDEO 2, VIDEO 3) 2·5 5 Turntable CD player TAPE VCR (VIDEO 1) 3 VIDEO 2 VIDEO 3 Adding new sound to a video tape during video editing During video tape editing, you want to ...
...playing the video connected to the VIDEO 2 or VIDEO 3 terminal and start recording on the VCR that you can add sound to VIDEO 1. 3. Then, start playing the sound source. Insert a blank video tape in the VCR connected to the recording VCR from various audio program sources. 1. Recording...3 TAPE FM AM PHONO C D DOWN MASTER VOLUME UP BASS TREBLE AV RECEIVER TX-DS575X 1·5 VDP, VCR, DVD (VIDEO 2, VIDEO 3) 2·5 5 Turntable CD player TAPE VCR (VIDEO 1) 3 VIDEO 2 VIDEO 3 Adding new sound to a video tape during video editing During video tape editing, you want to ...
Owner Manual
Page 32
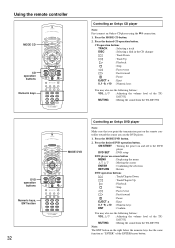
...use the following buttons: VOL q/u : Adjusting the volume level of the TXDS575X MUTING : Muting the sound from the TX-DS575X DVD operation buttons Numeric keys, ENT button 32 MODE DVD Controlling an Onkyo DVD player Note: Make sure that you point the transmission part on the remote controller toward the ...sensor area on the right below the numeric keys has the same function as "ENTER" of the TXDS575X MUTING : Muting the sound from the TX-DS575X Note: The ENT...
...use the following buttons: VOL q/u : Adjusting the volume level of the TXDS575X MUTING : Muting the sound from the TX-DS575X DVD operation buttons Numeric keys, ENT button 32 MODE DVD Controlling an Onkyo DVD player Note: Make sure that you point the transmission part on the remote controller toward the ...sensor area on the right below the numeric keys has the same function as "ENTER" of the TXDS575X MUTING : Muting the sound from the TX-DS575X Note: The ENT...
Owner Manual
Page 33
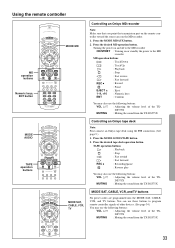
... You may also use the following buttons: VOL q/u : Adjusting the volume level of the TXDS575X MUTING : Muting the sound from the TX-DS575X Controlling an Onkyo tape deck Note: First connect an Onkyo tape deck using the page 9.) connection. (See 1. Press the desired MD operation button. Turning the power on and... devices. (See page 34.) You may use the following buttons: VOL q/u : Adjusting the volume level of the TXDS575X MUTING : Muting the sound from the TX-DS575X MODE SAT, CABLE, VCR, TV MODE SAT, CABLE, VCR, and TV buttons No preset codes are programmed into the MODE SAT, CABLE, ...
... You may also use the following buttons: VOL q/u : Adjusting the volume level of the TXDS575X MUTING : Muting the sound from the TX-DS575X Controlling an Onkyo tape deck Note: First connect an Onkyo tape deck using the page 9.) connection. (See 1. Press the desired MD operation button. Turning the power on and... devices. (See page 34.) You may use the following buttons: VOL q/u : Adjusting the volume level of the TXDS575X MUTING : Muting the sound from the TX-DS575X MODE SAT, CABLE, VCR, TV MODE SAT, CABLE, VCR, and TV buttons No preset codes are programmed into the MODE SAT, CABLE, ...
Owner Manual
Page 40
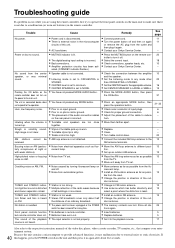
... and STEREO indicators light but sound is distorted and stereo separation is least. • Install an outdoor FM antenna. • Change the position or direction of the out- troller to turn on the unit and then press it again. • Contact your Onkyo Service Center. • Check the ...connection between the amplifier and the speaker. • Set the Listening mode to any MODE button. • Poor or no input ground. • Poor or no sound. • AC fuse blown. • MUTING ...
... and STEREO indicators light but sound is distorted and stereo separation is least. • Install an outdoor FM antenna. • Change the position or direction of the out- troller to turn on the unit and then press it again. • Contact your Onkyo Service Center. • Check the ...connection between the amplifier and the speaker. • Set the Listening mode to any MODE button. • Poor or no input ground. • Poor or no sound. • AC fuse blown. • MUTING ...


