
Owner Manual
Page 1
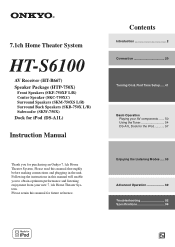
...enable you for purchasing an Onkyo 7.1ch Home Theater System. Please retain this manual for the iPod 57 Enjoying the Listening Modes ..... 59 Advanced Operation 69 Troubleshooting 92 Specifications 96 En Following the instructions in this manual thoroughly before making connections and...1ch Home Theater System HT-S6100 AV Receiver (HT-R667) Speaker Package (HTP-750X) Front Speakers (SKF-750XF L/R) Center Speaker (SKC-750XC) Surround Speakers (SKM-750XS L/R) Surround Back Speakers (SKB-750X L/R) Subwoofer (SKW-750X) Dock for iPod (DS-A1L) Instruction Manual Thank you to obtain...
...enable you for purchasing an Onkyo 7.1ch Home Theater System. Please retain this manual for the iPod 57 Enjoying the Listening Modes ..... 59 Advanced Operation 69 Troubleshooting 92 Specifications 96 En Following the instructions in this manual thoroughly before making connections and...1ch Home Theater System HT-S6100 AV Receiver (HT-R667) Speaker Package (HTP-750X) Front Speakers (SKF-750XF L/R) Center Speaker (SKC-750XC) Surround Speakers (SKM-750XS L/R) Surround Back Speakers (SKB-750X L/R) Subwoofer (SKW-750X) Dock for iPod (DS-A1L) Instruction Manual Thank you to obtain...
Owner Manual
Page 4
...by connecting or discon- Thumps and clicks caused by an oscillator, electronic musical instrument, and so on the body of this instruction manual is in locations subject to the terminal which case you should be connected to direct sunlight or in the mains lead of the ...fuse. IMPORTANT The plug is used for the ASTA mark or the BSI mark on . 4. For European Models Declaration of Conformity We, ONKYO EUROPE ELECTRONICS GmbH LIEGNITZERSTRASSE 6, 82194 GROEBENZELL, GERMANY declare in own responsibility, that are coloured in accordance with the following signals are placed nearby....
...by connecting or discon- Thumps and clicks caused by an oscillator, electronic musical instrument, and so on the body of this instruction manual is in locations subject to the terminal which case you should be connected to direct sunlight or in the mains lead of the ...fuse. IMPORTANT The plug is used for the ASTA mark or the BSI mark on . 4. For European Models Declaration of Conformity We, ONKYO EUROPE ELECTRONICS GmbH LIEGNITZERSTRASSE 6, 82194 GROEBENZELL, GERMANY declare in own responsibility, that are coloured in accordance with the following signals are placed nearby....
Owner Manual
Page 13
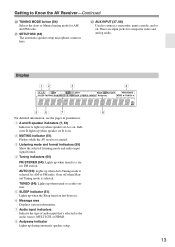
AUTO (54): Lights up when Auto Tuning mode is on. Goes off when Manual Tuning mode is muted. 3 Listening mode and format indicators (59) Show the selected listening mode and audio input signal format. 4 Tuning indicators (54) FM STEREO (... for composite video and analog audio. V AUX INPUT (37, 68) Used to Know the AV Receiver-Continued T TUNING MODE button (54) Selects the Auto or Manual tuning mode for AM and FM radio. Indicator B lights up during automatic speaker setup. 13 U SETUP MIC (42) The automatic speaker setup microphone connects here...
AUTO (54): Lights up when Auto Tuning mode is on. Goes off when Manual Tuning mode is muted. 3 Listening mode and format indicators (59) Show the selected listening mode and audio input signal format. 4 Tuning indicators (54) FM STEREO (... for composite video and analog audio. V AUX INPUT (37, 68) Used to Know the AV Receiver-Continued T TUNING MODE button (54) Selects the Auto or Manual tuning mode for AM and FM radio. Indicator B lights up during automatic speaker setup. 13 U SETUP MIC (42) The automatic speaker setup microphone connects here...
Owner Manual
Page 21
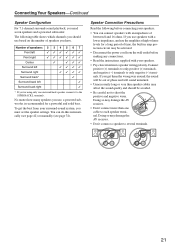
... surround-sound playback, you get the best from the wall outlet before connecting your speakers: • You can do this automatically (see page 42) or manually (see page 74).
... surround-sound playback, you get the best from the wall outlet before connecting your speakers: • You can do this automatically (see page 42) or manually (see page 74).
Owner Manual
Page 26
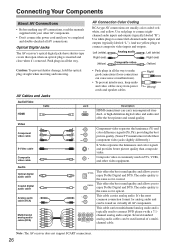
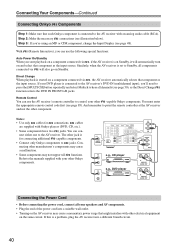
... DTS. Note: The AV receiver does not support SCART connections. 26 Connecting Your Components About AV Connections • Before making any AV connections, read the manuals supplied with a 7.1channel analog audio output. Left (white) Analog audio Left (white) Right (red) Right (red) (Yellow) Composite video (Yellow) Caution: To prevent shutter damage...
... DTS. Note: The AV receiver does not support SCART connections. 26 Connecting Your Components About AV Connections • Before making any AV connections, read the manuals supplied with a 7.1channel analog audio output. Left (white) Analog audio Left (white) Right (red) Right (red) (Yellow) Composite video (Yellow) Caution: To prevent shutter damage...
Owner Manual
Page 33
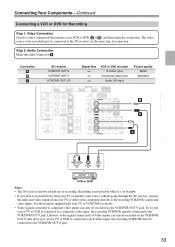
See the manuals supplied with your VCR or DVR ( A or B ), and then make the connection. Connecting Your Components-Continued Connecting a VCR or DVR for Recording Step 1: Video Connection ...
See the manuals supplied with your VCR or DVR ( A or B ), and then make the connection. Connecting Your Components-Continued Connecting a VCR or DVR for Recording Step 1: Video Connection ...
Owner Manual
Page 36
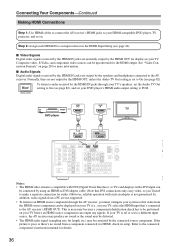
...-Continued Making HDMI Connections Step 1: Use HDMI cables to connect the AV receiver's HDMI jacks to your TV. Hint! Refer to the connected component's instruction manual for DS-A1L) CBL/SAT V VCR/DVR S DVD MONITOR OUT V S AM ANTENNA FM 75 IN IN L OUT OUT IN IN IN FRONT SURR CENTER SURR...
...-Continued Making HDMI Connections Step 1: Use HDMI cables to connect the AV receiver's HDMI jacks to your TV. Hint! Refer to the connected component's instruction manual for DS-A1L) CBL/SAT V VCR/DVR S DVD MONITOR OUT V S AM ANTENNA FM 75 IN IN L OUT OUT IN IN IN FRONT SURR CENTER SURR...
Owner Manual
Page 37
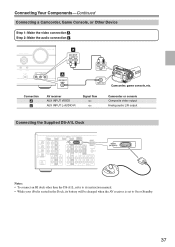
... VCR/DVR R SUB WOOFER DVD DOCK (for DS-A1L) Notes: • To connect an RI dock other than the DS-A1L, refer to its instruction manual. • While your iPod is seated in the Dock, its battery will be charged when the AV receiver is set to On or Standby. 37...
... VCR/DVR R SUB WOOFER DVD DOCK (for DS-A1L) Notes: • To connect an RI dock other than the DS-A1L, refer to its instruction manual. • While your iPod is seated in the Dock, its battery will be charged when the AV receiver is set to On or Standby. 37...
Owner Manual
Page 40
... illustration below). cables are supplied with other manufacturer's components may cause a malfunction. • Some components may cause a momentary power surge that might interfere with Onkyo players (DVD, CD, etc.). • Some components have two jacks. REMOTE CONTROL IN HDMI ASSIGNABLE L IN 4 IN 3 (CBL/SAT) IN 2 ...the same circuit. With (Remote Interactive), you 'll need to press the [MULTI CH] button repeatedly and select Multich to the manuals supplied with your speakers and AV components. • Plug the end of the power cord into a different branch circuit. 40 ...
... illustration below). cables are supplied with other manufacturer's components may cause a malfunction. • Some components may cause a momentary power surge that might interfere with Onkyo players (DVD, CD, etc.). • Some components have two jacks. REMOTE CONTROL IN HDMI ASSIGNABLE L IN 4 IN 3 (CBL/SAT) IN 2 ...the same circuit. With (Remote Interactive), you 'll need to press the [MULTI CH] button repeatedly and select Multich to the manuals supplied with your speakers and AV components. • Plug the end of the power cord into a different branch circuit. 40 ...

Owner Manual
Page 45
...Retry the Automatic Speaker Setup Press the [ENTER] button. Make sure speakers that if the volume is too high. Changing the Speaker Settings Manually If you 're using a powered subwoofer and it outputs very low-frequency sound at a low volume level, it to the halfway point... Result" screen as "No", increase the subwoofer's volume to its highest crossover frequency, and then try running the automatic speaker setup again. Contact your Onkyo dealer. Using a Powered Subwoofer If you wish to make changes to the number detected on the first measurement. Speaker Detect Error - - -...
...Retry the Automatic Speaker Setup Press the [ENTER] button. Make sure speakers that if the volume is too high. Changing the Speaker Settings Manually If you 're using a powered subwoofer and it outputs very low-frequency sound at a low volume level, it to the halfway point... Result" screen as "No", increase the subwoofer's volume to its highest crossover frequency, and then try running the automatic speaker setup again. Contact your Onkyo dealer. Using a Powered Subwoofer If you wish to make changes to the number detected on the first measurement. Speaker Detect Error - - -...

Owner Manual
Page 53
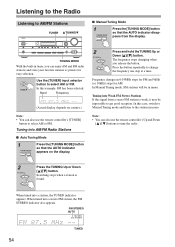
... CD SETUP RETURN MOVIE/TV MUSIC GAME LISTENING MODE DISPLAY DIGITAL INPUT DIMMER MEMORY TUNING MODE CLEAR SETUP MIC AUX INPUT VIDEO L AUDIO R AV RECEIVER HT-R667 DIGITAL INPUT 1 DIGITAL INPUT Press and hold the AV receiver's [DIGITAL INPUT] button for each digital signal format. If the input signal is not DTS... no sound. Common Functions-Continued Specifying the Digital Signal Format The following issues when playing PCM or DTS sources, you can specify the signal format manually. • If the beginnings of digital input signals automatically.
... CD SETUP RETURN MOVIE/TV MUSIC GAME LISTENING MODE DISPLAY DIGITAL INPUT DIMMER MEMORY TUNING MODE CLEAR SETUP MIC AUX INPUT VIDEO L AUDIO R AV RECEIVER HT-R667 DIGITAL INPUT 1 DIGITAL INPUT Press and hold the AV receiver's [DIGITAL INPUT] button for each digital signal format. If the input signal is not DTS... no sound. Common Functions-Continued Specifying the Digital Signal Format The following issues when playing PCM or DTS sources, you can specify the signal format manually. • If the beginnings of digital input signals automatically.
Owner Manual
Page 54
...button. When tuned into a station, the TUNED indicator appears. In this case, switch to Manual Tuning mode and listen to the station in mono. Band Frequency (Actual display depends on the display. ■ Manual Tuning Mode 1 TUNING MODE Press the [TUNING MODE] button so that the AUTO indicator ...MOVIE/TV MUSIC GAME LISTENING MODE DISPLAY DIGITAL INPUT DIMMER MEMORY TUNING MODE CLEAR SETUP MIC AUX INPUT VIDEO L AUDIO R AV RECEIVER HT-R667 TUNING MODE With the built-in 0.05MHz steps for FM and 9kHz (or 10kHz) steps for easy selection. Press the button repeatedly...
...button. When tuned into a station, the TUNED indicator appears. In this case, switch to Manual Tuning mode and listen to the station in mono. Band Frequency (Actual display depends on the display. ■ Manual Tuning Mode 1 TUNING MODE Press the [TUNING MODE] button so that the AUTO indicator ...MOVIE/TV MUSIC GAME LISTENING MODE DISPLAY DIGITAL INPUT DIMMER MEMORY TUNING MODE CLEAR SETUP MIC AUX INPUT VIDEO L AUDIO R AV RECEIVER HT-R667 TUNING MODE With the built-in 0.05MHz steps for FM and 9kHz (or 10kHz) steps for easy selection. Press the button repeatedly...
Owner Manual
Page 70
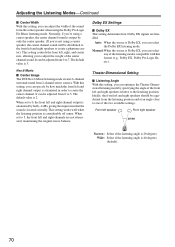
... center channel sound is output by half (-6 dB), giving the impression that the sound is Dolby EX, you can select the Dolby EX listening mode. Manual: When the source is located centrally. Theater-Dimensional Setting ■ Listening Angle With this setting, you can optimize the Theater-Dimensional listening mode by how...
... center channel sound is output by half (-6 dB), giving the impression that the sound is Dolby EX, you can select the Dolby EX listening mode. Manual: When the source is located centrally. Theater-Dimensional Setting ■ Listening Angle With this setting, you can optimize the Theater-Dimensional listening mode by how...

Owner Manual
Page 74
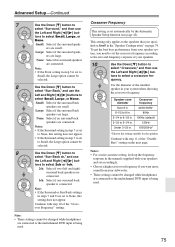
...Setup 3 This section explains how to check the speaker settings and how to set them manually, which speakers are large. For speakers with a smaller diameter, specify Small (default crossover... 100Hz). For those with a cone diameter larger than 6-1/2 inches, specify Large (full band). R667's own display when changing settings. 1 Press the [RECEIVER] button fol- Use the Down [ ] button...buttons to the composite video or S-Video MONITOR OUT, or the COMPONENT VIDEO OUT, use the HT- If your TV is being used. Use the Up and Down [ ]/[ ] buttons to ...
...Setup 3 This section explains how to check the speaker settings and how to set them manually, which speakers are large. For speakers with a smaller diameter, specify Small (default crossover... 100Hz). For those with a cone diameter larger than 6-1/2 inches, specify Large (full band). R667's own display when changing settings. 1 Press the [RECEIVER] button fol- Use the Down [ ] button...buttons to the composite video or S-Video MONITOR OUT, or the COMPONENT VIDEO OUT, use the HT- If your TV is being used. Use the Up and Down [ ]/[ ] buttons to ...
Owner Manual
Page 75
... setting only applies to the speakers that you need to set to None, this setting does not appear. • If the Surround setting in the manuals supplied with your speakers and set automatically by the Automatic Speaker Setup function (see page 42). Use the diameter of the "Double Bass" setting on...
... setting only applies to the speakers that you need to set to None, this setting does not appear. • If the Surround setting in the manuals supplied with your speakers and set automatically by the Automatic Speaker Setup function (see page 42). Use the diameter of the "Double Bass" setting on...
Owner Manual
Page 78
...menu appears onscreen. Notes: • The front, center, surround, and surround back speak- The setup menu closes. Here you selected Manual, continue with this setting after having performed the Automatic Speaker Setup. To set automatically by using its [SETUP], [ENTER], and arrow buttons... the level at that you selected Off or Audyssey, go to select a speaker. 2-5. Tip: Low frequencies (e.g., 63Hz) affect bass sounds; Manual: You can adjust the tone of individual speakers, see page 77. 1 Press the [RECEIVER] REMOTE MODE button, followed by the Automatic Speaker...
...menu appears onscreen. Notes: • The front, center, surround, and surround back speak- The setup menu closes. Here you selected Manual, continue with this setting after having performed the Automatic Speaker Setup. To set automatically by using its [SETUP], [ENTER], and arrow buttons... the level at that you selected Off or Audyssey, go to select a speaker. 2-5. Tip: Low frequencies (e.g., 63Hz) affect bass sounds; Manual: You can adjust the tone of individual speakers, see page 77. 1 Press the [RECEIVER] REMOTE MODE button, followed by the Automatic Speaker...

Owner Manual
Page 83
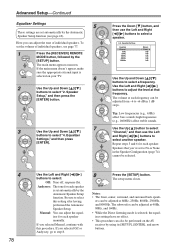
... AV receiver's speakers. Note: • After changing the Control, Power Control, or TV Control setting, be accessed. 4 Press the [SETUP] button. Refer to the instruction manuals for Remote Interactive over HDMI and is part of the HDMI standard. If the main menu doesn't appear, make sure the appropriate external input is... menu appears onscreen. Advanced Setup-Continued Notes: • RIHD, which allows system control over HDMI, is the name of the system control function found on Onkyo components.
... AV receiver's speakers. Note: • After changing the Control, Power Control, or TV Control setting, be accessed. 4 Press the [SETUP] button. Refer to the instruction manuals for Remote Interactive over HDMI and is part of the HDMI standard. If the main menu doesn't appear, make sure the appropriate external input is... menu appears onscreen. Advanced Setup-Continued Notes: • RIHD, which allows system control over HDMI, is the name of the system control function found on Onkyo components.

