
Owner Manual
Page 8
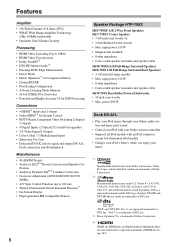
...; A-Form Listening Mode Memory • 24-bit/192kHz D/A Converters • Powerful and Highly Accurate 32-bit DSP Processing Connections • 4 HDMI*4 Inputs and 1 Output • Onkyo RIHD*5 for System Control • HDTV-Ready Component Video Switching (2 Inputs/ 1 Output) • 4 Digital Inputs (2 Optical/2 Coaxial/4 Assignable) • 3 S-Video Inputs/2 Outputs • Color-Coded 7.1 Multichannel Inputs • Subwoofer Pre Outs • Dedicated DOCK jack for quick and simple DS-A1L Dock connection and iPod playback Miscellaneous • 40 AM/FM Presets • Audyssey 2EQ...
...; A-Form Listening Mode Memory • 24-bit/192kHz D/A Converters • Powerful and Highly Accurate 32-bit DSP Processing Connections • 4 HDMI*4 Inputs and 1 Output • Onkyo RIHD*5 for System Control • HDTV-Ready Component Video Switching (2 Inputs/ 1 Output) • 4 Digital Inputs (2 Optical/2 Coaxial/4 Assignable) • 3 S-Video Inputs/2 Outputs • Color-Coded 7.1 Multichannel Inputs • Subwoofer Pre Outs • Dedicated DOCK jack for quick and simple DS-A1L Dock connection and iPod playback Miscellaneous • 40 AM/FM Presets • Audyssey 2EQ...
Owner Manual
Page 10
... Receiver 41 Turning On and Standby 41 First Time Setup 42 Automatic Speaker Setup 42 HDMI Input Setup 46 Component Video Input Setup 47 Digital Input Setup 47 Changing the Input Display 48 Automatic Audio Input Selection Setup 49 Playing Your AV Components 50 Basic AV Receiver Operation 50 Common Functions 51 Setting the Display Brightness 51 Muting the AV Receiver 51 Using the Sleep Timer 51 Using Headphones 52 Displaying Source Information 52 Specifying the Digital Signal Format 53 Listening to the Radio 54 Listening to AM/FM Stations 54 Presetting...
... Receiver 41 Turning On and Standby 41 First Time Setup 42 Automatic Speaker Setup 42 HDMI Input Setup 46 Component Video Input Setup 47 Digital Input Setup 47 Changing the Input Display 48 Automatic Audio Input Selection Setup 49 Playing Your AV Components 50 Basic AV Receiver Operation 50 Common Functions 51 Setting the Display Brightness 51 Muting the AV Receiver 51 Using the Sleep Timer 51 Using Headphones 52 Displaying Source Information 52 Specifying the Digital Signal Format 53 Listening to the Radio 54 Listening to AM/FM Stations 54 Presetting...
Owner Manual
Page 15
.... O DVD IN This input is for connecting a component with a 5.1/7.1-channel analog audio output, such as a VCR or DVR, can be connected here for connecting speaker set B. Q SUBWOOFER PRE OUT This analog audio output can be connected to Know the AV Receiver-Continued M CBL/SAT IN A cable or satellite receiver can be connected here. There are analog audio input jacks for connecting the video signal. Getting to a powered subwoofer. There are S-Video and composite video input and output jacks for connecting the video signal, and there are S-Video and composite video input jacks for...
.... O DVD IN This input is for connecting a component with a 5.1/7.1-channel analog audio output, such as a VCR or DVR, can be connected here for connecting speaker set B. Q SUBWOOFER PRE OUT This analog audio output can be connected to Know the AV Receiver-Continued M CBL/SAT IN A cable or satellite receiver can be connected here. There are analog audio input jacks for connecting the video signal. Getting to a powered subwoofer. There are S-Video and composite video input and output jacks for connecting the video signal, and there are S-Video and composite video input jacks for...
Owner Manual
Page 18
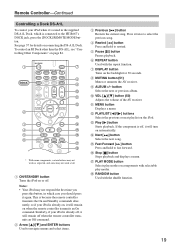
... input source. button (56) Selects radio presets. E Arrow and ENTER buttons Used to the previous display when changing settings. G LISTENING MODE buttons (59) Used to select Receiver mode first. Note: • An Onkyo cassette recorder connected via can also be controlled in parentheses. H DIMMER button (51) Adjusts the display brightness. K VOL [ ]/[ ] button (50) Adjusts the volume of the AV receiver regardless of the currently selected remote controller mode. M AUDIO button (71) Used to control your DVD player, CD player, and other components. Remote Controller...
... input source. button (56) Selects radio presets. E Arrow and ENTER buttons Used to the previous display when changing settings. G LISTENING MODE buttons (59) Used to select Receiver mode first. Note: • An Onkyo cassette recorder connected via can also be controlled in parentheses. H DIMMER button (51) Adjusts the display brightness. K VOL [ ]/[ ] button (50) Adjusts the volume of the AV receiver regardless of the currently selected remote controller mode. M AUDIO button (71) Used to control your DVD player, CD player, and other components. Remote Controller...
Owner Manual
Page 19
... to the HT-R667's DOCK jack, press the [DOCK] REMOTE MODE button. G DISPLAY button Turns on the backlight for details on automatically. If the component is off when the remote controller transmits an Off command. O Fast Forward [ ] button Press and hold to rewind. Q PLAY MODE button Selects play modes. E Pause [ ] button Pauses playback. N Next [ ] button Selects the next song. This is because the remote controller transmits the On and Standby commands alternately, so if your iPod is already...
... to the HT-R667's DOCK jack, press the [DOCK] REMOTE MODE button. G DISPLAY button Turns on the backlight for details on automatically. If the component is off when the remote controller transmits an Off command. O Fast Forward [ ] button Press and hold to rewind. Q PLAY MODE button Selects play modes. E Pause [ ] button Pauses playback. N Next [ ] button Selects the next song. This is because the remote controller transmits the On and Standby commands alternately, so if your iPod is already...
Owner Manual
Page 36
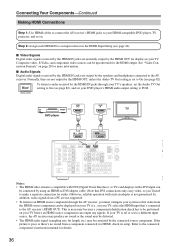
... V VCR/DVR S DVD MONITOR OUT V S AM ANTENNA FM 75 IN IN L OUT OUT IN IN IN FRONT SURR CENTER SURR BACK L SURR BACK SPEAKERS L SURR SPEAKERS R PRE OUT L SUB WOOFER FRONT SPEAKERS A L CENTER SPEAKER R REMOTE CONTROL R CD TAPE R CBL/SAT VCR/DVR R SUB WOOFER DVD R FRONT SPEAKERS B Notes: • The HDMI video stream is compatible with DVI (Digital Visual Interface), so TVs and displays with such an adapter is necessary because a component identification...
... V VCR/DVR S DVD MONITOR OUT V S AM ANTENNA FM 75 IN IN L OUT OUT IN IN IN FRONT SURR CENTER SURR BACK L SURR BACK SPEAKERS L SURR SPEAKERS R PRE OUT L SUB WOOFER FRONT SPEAKERS A L CENTER SPEAKER R REMOTE CONTROL R CD TAPE R CBL/SAT VCR/DVR R SUB WOOFER DVD R FRONT SPEAKERS B Notes: • The HDMI video stream is compatible with DVI (Digital Visual Interface), so TVs and displays with such an adapter is necessary because a component identification...
Owner Manual
Page 40
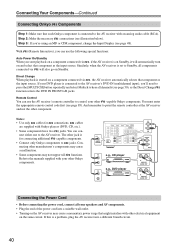
.../DVR DVD MONITOR OUT R AM IN FRONT V ANTENNA FM 75 S SURR CENTER SURR BACK CD FRONT L L R SUB WOOFER DVD R DVD e.g., CD player e.g., DVD player R L ANALOG AUDIO OUT R L ANALOG AUDIO OUT Connecting the Power Cord • Before connecting the power cord, connect all functions. You can use the AV receiver's remote controller to the AV receiver. If this is connected to the AV receiver's DVD IN (multichannel input), you start playback on a component connected via will automatically turn on and select that component as the input source. cables are...
.../DVR DVD MONITOR OUT R AM IN FRONT V ANTENNA FM 75 S SURR CENTER SURR BACK CD FRONT L L R SUB WOOFER DVD R DVD e.g., CD player e.g., DVD player R L ANALOG AUDIO OUT R L ANALOG AUDIO OUT Connecting the Power Cord • Before connecting the power cord, connect all functions. You can use the AV receiver's remote controller to the AV receiver. If this is connected to the AV receiver's DVD IN (multichannel input), you start playback on a component connected via will automatically turn on and select that component as the input source. cables are...
Owner Manual
Page 41
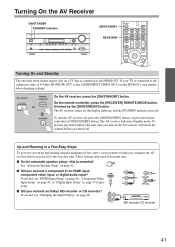
... setup-this is connected to the composite video or S-Video MONITOR OUT, or the COMPONENT VIDEO OUT, use it off. Turning On the AV Receiver ON/STANDBY STANDBY indicator ON/STANDBY STANDBY TUNING PRESET ENTER MASTER VOLUME DOCK PHONES MULTI CH A SPEAKERS B DVD TONE VCR/DVR CBL/SAT AUX TAPE TUNER CD SETUP RETURN MOVIE/TV MUSIC GAME LISTENING MODE DISPLAY DIGITAL INPUT DIMMER MEMORY TUNING MODE CLEAR SETUP MIC AUX INPUT VIDEO L AUDIO R AV RECEIVER HT-R667 ON/STANDBY RECEIVER Turning On and Standby The onscreen setup menus appear only on , the display lights...
... setup-this is connected to the composite video or S-Video MONITOR OUT, or the COMPONENT VIDEO OUT, use it off. Turning On the AV Receiver ON/STANDBY STANDBY indicator ON/STANDBY STANDBY TUNING PRESET ENTER MASTER VOLUME DOCK PHONES MULTI CH A SPEAKERS B DVD TONE VCR/DVR CBL/SAT AUX TAPE TUNER CD SETUP RETURN MOVIE/TV MUSIC GAME LISTENING MODE DISPLAY DIGITAL INPUT DIMMER MEMORY TUNING MODE CLEAR SETUP MIC AUX INPUT VIDEO L AUDIO R AV RECEIVER HT-R667 ON/STANDBY RECEIVER Turning On and Standby The onscreen setup menus appear only on , the display lights...

Owner Manual
Page 45
... surround back speaker hasn't. Speaker Detect Error - - - - - Writing Error! Try saving again. FL : Error SL : Yes SBL : Yes C : Yes FR : Yes SR : Yes SBR : Yes SW : Yes Retry Cancel There is probably malfunctioning. Changing the Speaker Settings Manually If you 're using a powered subwoofer and it outputs very low-frequency sound at a low volume level, it to the halfway point, set too high and the sound distorts, detection issues may not be detected are connected properly. Auto Speaker Setup AUDYSSEY Speaker Detect Error...
... surround back speaker hasn't. Speaker Detect Error - - - - - Writing Error! Try saving again. FL : Error SL : Yes SBL : Yes C : Yes FR : Yes SR : Yes SBR : Yes SW : Yes Retry Cancel There is probably malfunctioning. Changing the Speaker Settings Manually If you 're using a powered subwoofer and it outputs very low-frequency sound at a low volume level, it to the halfway point, set too high and the sound distorts, detection issues may not be detected are connected properly. Auto Speaker Setup AUDYSSEY Speaker Detect Error...
Owner Manual
Page 49
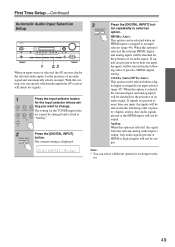
...selected, the relevant HDMI, digital, and analog inputs will not be selected when a digital input is assigned to change. Note: • You can be output. First Time Setup-Continued Automatic Audio Input Selection Setup ON/STANDBY STANDBY TUNING PRESET ENTER MASTER VOLUME DOCK PHONES MULTI CH A SPEAKERS B DVD TONE VCR/DVR CBL/SAT AUX TAPE TUNER CD SETUP RETURN MOVIE/TV MUSIC GAME LISTENING MODE DISPLAY DIGITAL INPUT DIMMER MEMORY TUNING MODE CLEAR SETUP MIC AUX INPUT VIDEO L AUDIO R AV RECEIVER HT-R667 1 2, 3 When an input source is selected, the AV receiver...
...selected, the relevant HDMI, digital, and analog inputs will not be selected when a digital input is assigned to change. Note: • You can be output. First Time Setup-Continued Automatic Audio Input Selection Setup ON/STANDBY STANDBY TUNING PRESET ENTER MASTER VOLUME DOCK PHONES MULTI CH A SPEAKERS B DVD TONE VCR/DVR CBL/SAT AUX TAPE TUNER CD SETUP RETURN MOVIE/TV MUSIC GAME LISTENING MODE DISPLAY DIGITAL INPUT DIMMER MEMORY TUNING MODE CLEAR SETUP MIC AUX INPUT VIDEO L AUDIO R AV RECEIVER HT-R667 1 2, 3 When an input source is selected, the AV receiver...
Owner Manual
Page 50
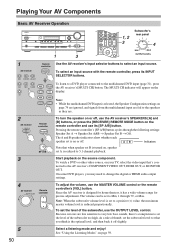
...ON/STANDBY STANDBY TUNING PRESET ENTER MASTER VOLUME DOCK PHONES MULTI CH A SPEAKERS B DVD TONE VCR/DVR CBL/SAT AUX TAPE TUNER CD SETUP RETURN MOVIE/TV MUSIC GAME LISTENING MODE DISPLAY DIGITAL INPUT DIMMER MEMORY TUNING MODE CLEAR SETUP MIC AUX INPUT VIDEO L AUDIO R AV RECEIVER HT-R667 1 3 1, 2 3 Subwoofer's rear panel 4 MIN MAX OUTPUT LEVEL 1 AV receiver DVD VCR/DVR CBL/SAT AUX TAPE TUNER CD Remote controller Use the AV receiver's input selector buttons to the multichannel DVD input (page 31), press the AV receiver's [MULTI CH] button. To select an input...
...ON/STANDBY STANDBY TUNING PRESET ENTER MASTER VOLUME DOCK PHONES MULTI CH A SPEAKERS B DVD TONE VCR/DVR CBL/SAT AUX TAPE TUNER CD SETUP RETURN MOVIE/TV MUSIC GAME LISTENING MODE DISPLAY DIGITAL INPUT DIMMER MEMORY TUNING MODE CLEAR SETUP MIC AUX INPUT VIDEO L AUDIO R AV RECEIVER HT-R667 1 3 1, 2 3 Subwoofer's rear panel 4 MIN MAX OUTPUT LEVEL 1 AV receiver DVD VCR/DVR CBL/SAT AUX TAPE TUNER CD Remote controller Use the AV receiver's input selector buttons to the multichannel DVD input (page 31), press the AV receiver's [MULTI CH] button. To select an input...
Owner Manual
Page 51
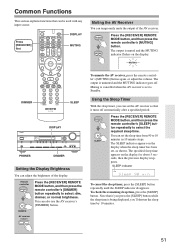
... the AV receiver, press the remote controller's [MUTING] button again, or adjust the volume. SLEEP indicator To cancel the sleep timer, press the [SLEEP] button repeatedly until the SLEEP indicator disappears. DIMMER SLEEP DISPLAY ON/STANDBY STANDBY TUNING PRESET ENTER MASTER VOLUME DOCK PHONES MULTI CH A SPEAKERS B DVD TONE VCR/DVR CBL/SAT AUX TAPE TUNER CD SETUP RETURN MOVIE/TV MUSIC GAME LISTENING MODE DISPLAY DIGITAL INPUT DIMMER MEMORY TUNING MODE CLEAR SETUP MIC AUX INPUT VIDEO L AUDIO R AV RECEIVER HT-R667 PHONES DIMMER Setting the Display Brightness...
... the AV receiver, press the remote controller's [MUTING] button again, or adjust the volume. SLEEP indicator To cancel the sleep timer, press the [SLEEP] button repeatedly until the SLEEP indicator disappears. DIMMER SLEEP DISPLAY ON/STANDBY STANDBY TUNING PRESET ENTER MASTER VOLUME DOCK PHONES MULTI CH A SPEAKERS B DVD TONE VCR/DVR CBL/SAT AUX TAPE TUNER CD SETUP RETURN MOVIE/TV MUSIC GAME LISTENING MODE DISPLAY DIGITAL INPUT DIMMER MEMORY TUNING MODE CLEAR SETUP MIC AUX INPUT VIDEO L AUDIO R AV RECEIVER HT-R667 PHONES DIMMER Setting the Display Brightness...
Owner Manual
Page 66
... 5.1-channels with DVDs that bear the DTS 96/24 logo. 66 Front left Center Front right Subwoofer Surround left Surround Surround right back left/ right Direct In this mode, audio from the input source is output by the new Blu-ray and HD DVD disc formats, this mode with DVDs and CDs that bear the DTS logo. DTS The DTS digital surround-sound format supports up to expand 5.1-channel sources for 6.1/7.1-channel playback. 5.1-channel source + Dolby PLIIx Movie These modes use it...
... 5.1-channels with DVDs that bear the DTS 96/24 logo. 66 Front left Center Front right Subwoofer Surround left Surround Surround right back left/ right Direct In this mode, audio from the input source is output by the new Blu-ray and HD DVD disc formats, this mode with DVDs and CDs that bear the DTS logo. DTS The DTS digital surround-sound format supports up to expand 5.1-channel sources for 6.1/7.1-channel playback. 5.1-channel source + Dolby PLIIx Movie These modes use it...
Owner Manual
Page 72
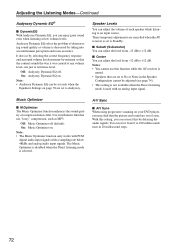
...; The Music Optimizer function only works with PCM digital audio input signals with an analog input signal. Off: Audyssey Dynamic EQ off (default). The Music Optimizer is disabled when the Direct listening mode is muted. • Speakers that are out of each speaker while listening to Audyssey. You can adjust the level from 0 to +12 dB. Notes: • You cannot use "lossy" compression, such as volume is used with a sampling rate below 48kHz and analog audio input signals. Use it with music fi...
...; The Music Optimizer function only works with PCM digital audio input signals with an analog input signal. Off: Audyssey Dynamic EQ off (default). The Music Optimizer is disabled when the Direct listening mode is muted. • Speakers that are out of each speaker while listening to Audyssey. You can adjust the level from 0 to +12 dB. Notes: • You cannot use "lossy" compression, such as volume is used with a sampling rate below 48kHz and analog audio input signals. Use it with music fi...
Owner Manual
Page 77
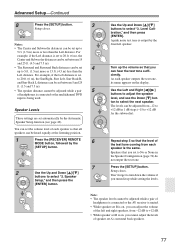
... be heard equally at the listening position. 1 Press the [RECEIVER] REMOTE MODE button, followed by the 6 [SETUP] button. 7 2 Use the Up and Down [ ]/[ ] buttons to +12 dB in the Speaker Configuration (page 74) do not output the test tone. Press the [SETUP] button. Use the Up and Down [ ]/[ ] buttons to select the next speaker. Use the Left and Right [ ]/[ ] buttons to adjust the speaker level, and use the Down [ ] button to select "3. Speakers that you set to +12...
... be heard equally at the listening position. 1 Press the [RECEIVER] REMOTE MODE button, followed by the 6 [SETUP] button. 7 2 Use the Up and Down [ ]/[ ] buttons to +12 dB in the Speaker Configuration (page 74) do not output the test tone. Press the [SETUP] button. Use the Up and Down [ ]/[ ] buttons to select the next speaker. Use the Left and Right [ ]/[ ] buttons to adjust the speaker level, and use the Down [ ] button to select "3. Speakers that you set to +12...
Owner Manual
Page 79
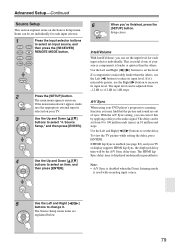
... of sync. Setup closes. A/V Sync When using your TV or display supports HDMI Lip Sync, the displayed delay time will be set the delay. The delay can be adjusted from 0 to select an input source, and then press the [RECEIVER] REMOTE MODE button. 2 Press the [SETUP] button. Items can be the A/V Sync delay time. The main menu appears onscreen. IntelliVolume With IntelliVolume, you may find that the picture and sound are explained below. 79 If it . The input level can set...
... of sync. Setup closes. A/V Sync When using your TV or display supports HDMI Lip Sync, the displayed delay time will be set the delay. The delay can be adjusted from 0 to select an input source, and then press the [RECEIVER] REMOTE MODE button. 2 Press the [SETUP] button. Items can be the A/V Sync delay time. The main menu appears onscreen. IntelliVolume With IntelliVolume, you may find that the picture and sound are explained below. 79 If it . The input level can set...
Owner Manual
Page 80
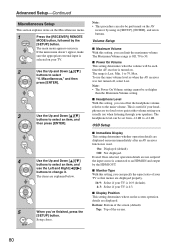
... same volume level as when the AV receiver was last turned off, select Last. The range is 4:3. ■ Display Position This setting determines where on the Miscellaneous menu. 1 Press the [RECEIVER] REMOTE MODE button, followed by the [SETUP] button. To use the Left and Right [ ]/[ ] buttons to change it. Advanced Setup-Continued Miscellaneous Setup This section explains items on the screen operation details are not output if the input source is connected to an HDMI...
... same volume level as when the AV receiver was last turned off, select Last. The range is 4:3. ■ Display Position This setting determines where on the Miscellaneous menu. 1 Press the [RECEIVER] REMOTE MODE button, followed by the [SETUP] button. To use the Left and Right [ ]/[ ] buttons to change it. Advanced Setup-Continued Miscellaneous Setup This section explains items on the screen operation details are not output if the input source is connected to an HDMI...

Owner Manual
Page 83
... be output by the [SETUP] button. To stop the AV receiver's speakers producing sound, change the settings, change your TV. 2 Use the Up and Down [ ]/[ ] buttons to Enable, regardless of whether the AV receiver is On or on Onkyo components. Lock Setup," and then press [ENTER]. 3 Use the Left and Right [ ]/[ ] buttons to turn down the AV receiver's volume. Power Control To link the power functions of the system control function found on Standby, both audio and video received by an HDMI input...
... be output by the [SETUP] button. To stop the AV receiver's speakers producing sound, change the settings, change your TV. 2 Use the Up and Down [ ]/[ ] buttons to Enable, regardless of whether the AV receiver is On or on Onkyo components. Lock Setup," and then press [ENTER]. 3 Use the Left and Right [ ]/[ ] buttons to turn down the AV receiver's volume. Power Control To link the power functions of the system control function found on Standby, both audio and video received by an HDMI input...
Owner Manual
Page 92
... play DVDs, the default setting is output by the surround speakers. HDMI audio is assigned to an input selector (page 46). The AV receiver is designed for home theater enjoyment and has a wide volume range for precise adjustment. • If the MUTING indicator is flashing on the display, press the remote controller's [MUTING] button to unmute the AV receiver (page 51). • While a pair of headphones is connected to the PHONES jack, no sound...
... play DVDs, the default setting is output by the surround speakers. HDMI audio is assigned to an input selector (page 46). The AV receiver is designed for home theater enjoyment and has a wide volume range for precise adjustment. • If the MUTING indicator is flashing on the display, press the remote controller's [MUTING] button to unmute the AV receiver (page 51). • While a pair of headphones is connected to the PHONES jack, no sound...
Owner Manual
Page 93
... by an HDMI IN can play DVDs, the default setting is off. • With some DVD-Video discs, you need to a digital input on . Video There's no picture • Make sure that the multichannel input is connected to select another listening mode (page 59). • Not much sound may be connected to 5.1-channels and the surround back speakers produce no sound (page 7). There's no picture from a menu or with the AUDIO button on , speaker set to an analog input. Turn on...
... by an HDMI IN can play DVDs, the default setting is off. • With some DVD-Video discs, you need to a digital input on . Video There's no picture • Make sure that the multichannel input is connected to select another listening mode (page 59). • Not much sound may be connected to 5.1-channels and the surround back speakers produce no sound (page 7). There's no picture from a menu or with the AUDIO button on , speaker set to an analog input. Turn on...


